2015 MERCEDES-BENZ S-Class child seat
[x] Cancel search: child seatPage 72 of 502
Stop the vehicle immediately, paying atten-
tion to road and traffic conditions. Reactivate the special seat belt retractor and secure the
child restraint system properly.
All seat belts except the driver's seat belt are equipped with a special seat belt retractor.
When activated, the special seat belt retrac-
tor ensures that the seat belt will not slacken
once the child restraint system has been
secured.
Installing a child restraint system:
X Always comply with the child restraint sys-
tem manufacturer's installation instruc-
tions.
X Pull the seat belt smoothly from the belt
outlet.
X Engage the seat belt tongue in the belt
buckle.
Activating the special seat belt retractor:
X Pull the seat belt out fully and let the inertia
reel retract it again.
While the seat belt is retracting, you should
hear a ratcheting sound. The special seat
belt retractor is activated.
X Push the child seat restraint system down
so that the seat belt is tight and does not
loosen.
Removing a child restraint system/deactivat-
ing the special seat belt retractor:
X Always comply with the child restraint sys-
tem manufacturer's installation instruc-
tions.
X Press the release button on the belt buckle,
hold the belt tongue firmly and guide it back
towards the belt outlet.
The special seat belt retractor is deactiva-
ted. Child restraint system
The use of seat belts and child restraint sys-
tems is required by law in:
R all 50 states
R the U.S. territories
R the District of Columbia
R all Canadian provinces
You can obtain further information about the correct child restraint system from any
authorized Mercedes-Benz Center. G
WARNING
If the child restraint system is installed incor- rectly on a suitable seat, it cannot protect as
intended. The child cannot then be restrained in the event of an accident, heavy braking or
sudden changes of direction. There is an
increased risk of injury, possibly even fatal.
Make sure that you observe the child restraint
system manufacturer's installation instruc-
tions and the notes on use. Please ensure,
that the base of the child restraint system is
always resting completely on the seat cush-
ion. Never place objects, e.g. cushions, under or behind the child restraint system. Only use
child restraint systems with the original cover
designed for them. Only replace damaged
covers with genuine covers. G
WARNING
If the child restraint system is installed incor- rectly or is not secured, it can come loose in
the event of an accident, heavy braking or a
sudden change in direction. The child
restraint system could be thrown about, strik- ing vehicle occupants. There is an increased
risk of injury, possibly even fatal.
Always install child restraint systems prop-
erly, even if they are not being used. Make
sure that you observe the child restraint sys-
tem manufacturer's installation instructions.
You will find further information on stowing
objects, luggage or loads under "Loading
guidelines" (Y page 372).70
Children in the vehicleSafety
Page 73 of 502
G
WARNING
Child restraint systems or their securing sys-
tems which have been damaged or subjected to a load in an accident can no longer protect
as intended. The child cannot then be
restrained in the event of an accident, heavy
braking or sudden changes of direction. There is an increased risk of injury, possibly even
fatal.
Replace child restraint systems which have
been damaged or subjected to a load in an
accident as soon as possible. Have the secur-
ing systems on the child restraint system
checked at a qualified specialist workshop,
before you install a child restraint system
again.
The securing systems of child restraint sys-
tems are:
R the seat belt system
R the LATCH-type (ISOFIX) securing rings
R the Top Tether anchorages
If it is absolutely necessary to carry a child on the front-passenger seat, be sure to observe
the information on the "Occupant Classifica-
tion System (OCS)" (Y page 59). There you
will also find information on deactivating the
front-passenger front air bag.
All child restraint systems must meet the fol- lowing standards:
R U.S. Federal Motor Vehicle Safety Stand-
ards 213 and 225
R Canadian Motor Vehicle Safety Standards
213 and 210.2
Confirmation that the child restraint system
corresponds to the standards can be found
on an instruction label on the child restraint
system. This confirmation can also be found
in the installation instructions that are inclu-
ded with the child restraint system.
Observe the warning labels in the vehicle inte-
rior and on the child restraint system. Vehicles with seat belt extenders:
when
securing a child in a child restraint system on
a rear seat, observe the following instruc-
tions:
R make sure that the seat belt on the child
restraint system is fastened according to
the manufacturer's installation instruc-
tions for the child restraint system.
R for child restraint systems with a belt
clamp: engage the belt tongue in the buckle
before you tighten the seat belt using the
belt clamp.
Vehicles with a rear reclining seat: when
installing a child restraint system, move the
rear reclining seat backrest to an almost ver-
tical position. The rear reclining seat backrest
must rest against the child restraint system.
Observe the notes on the cushion air bag
(Y page 59).
Vehicles with belt bags: only use a child
restraint system which has been approved by
Mercedes-Benz. Always observe the instruc-
tions and safety notes on belt bags for the
outer seat belts in the rear (Y page 53). LATCH-type (ISOFIX) child seat secur-
ing system G
WARNING
LATCH-type (ISOFIX) child restraint systems
do not offer sufficient protective effect for
children whose weight is greater than 48 lbs
(22 kg) who are secured using the safety belt integrated in the child restraint system. In the
event of an accident, a child might not be
restrained correctly. This poses an increased
risk of injury or even fatal injury.
If the child weighs more than 48 lbs (22 kg),
only use LATCH-type (ISOFIX) child restraint
systems with which the child is also secured
with the vehicle seat belt. Also secure the
child restraint system with the Top Tether
belt, if available. Children in the vehicle
71Safety Z
Page 74 of 502
Always comply with the manufacturer's
installation and operating instructions for the child restraint system used.
Before every trip, make sure that the LATCH-
type (ISOFIX) child restraint system is
engaged correctly in both LATCH-type (ISO-
FIX) securing rings
! When installing the child restraint system,
make sure that the seat belt for the middle seat does not get trapped. The seat belt
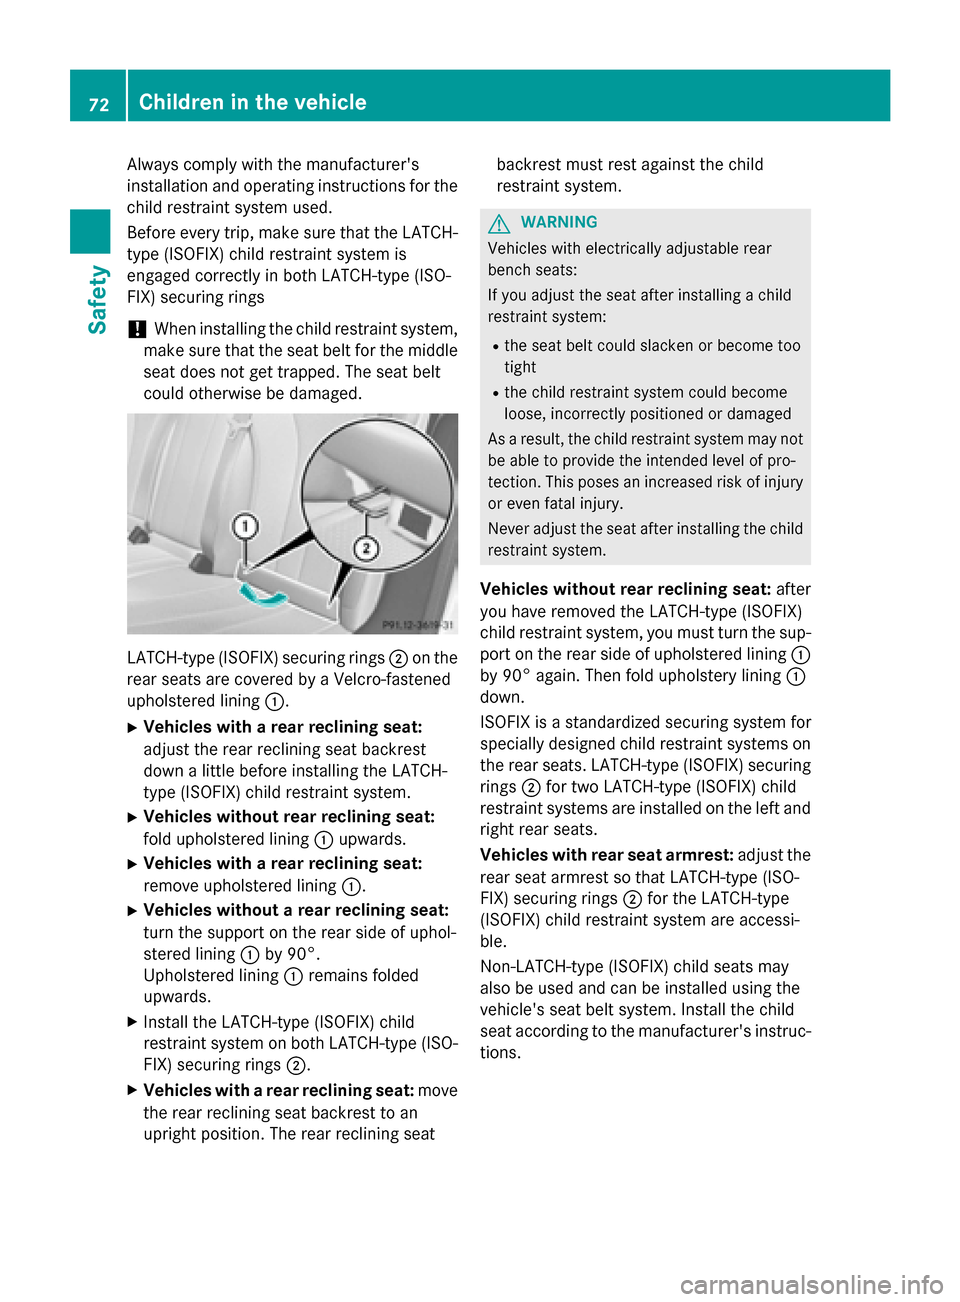
could otherwise be damaged. LATCH-type (ISOFIX) securing rings
;on the
rear seats are covered by a Velcro-fastened
upholstered lining :.
X Vehicles with a rear reclining seat:
adjust the rear reclining seat backrest
down a little before installing the LATCH-
type (ISOFIX) child restraint system.
X Vehicles without rear reclining seat:
fold upholstered lining :upwards.
X Vehicles with a rear reclining seat:
remove upholstered lining :.
X Vehicles without a rear reclining seat:
turn the support on the rear side of uphol-
stered lining :by 90°.
Upholstered lining :remains folded
upwards.
X Install the LATCH-type (ISOFIX) child
restraint system on both LATCH-type (ISO-
FIX) securing rings ;.
X Vehicles with a rear reclining seat: move
the rear reclining seat backrest to an
upright position. The rear reclining seat backrest must rest against the child
restraint system. G
WARNING
Vehicles with electrically adjustable rear
bench seats:
If you adjust the seat after installing a child
restraint system:
R the seat belt could slacken or become too
tight
R the child restraint system could become
loose, incorrectly positioned or damaged
As a result, the child restraint system may not
be able to provide the intended level of pro-
tection. This poses an increased risk of injury or even fatal injury.
Never adjust the seat after installing the child
restraint system.
Vehicles without rear reclining seat: after
you have removed the LATCH-type (ISOFIX)
child restraint system, you must turn the sup-
port on the rear side of upholstered lining :
by 90° again. Then fold upholstery lining :
down.
ISOFIX is a standardized securing system for
specially designed child restraint systems on
the rear seats. LATCH-type (ISOFIX) securing rings ;for two LATCH-type (ISOFIX) child
restraint systems are installed on the left and
right rear seats.
Vehicles with rear seat armrest: adjust the
rear seat armrest so that LATCH-type (ISO-
FIX) securing rings ;for the LATCH-type
(ISOFIX) child restraint system are accessi-
ble.
Non-LATCH-type (ISOFIX) child seats may
also be used and can be installed using the
vehicle's seat belt system. Install the child
seat according to the manufacturer's instruc- tions. 72
Children in the vehicleSafety
Page 75 of 502
Top Tether
Introduction Top Tether provides an additional connection
between the child restraint system secured
with a LATCH-type (ISOFIX) child seat mount
and the vehicle. This helps reduce the risk of
injury even further. If the child restraint sys-
tem is equipped with a Top Tether belt, this
should always be used.
Important safety notes G
WARNING
If the rear seat backrests are not locked, they
could fold forwards in the event of an acci-
dent, heavy braking or sudden changes of
direction. As a result, child restraint systems
cannot perform their intended protective
function. Rear seat backrests that are not
locked can also cause additional injuries, e.g. in the event of an accident. This poses an
increased risk of injury or even fatal injury.
Always lock rear seat backrests after instal-
ling a Top Tether belt. Observe the lock veri-
fication indicator. Adjust the rear seat backr-
ests so that they are in an upright position. G
WARNING
Vehicles with electrically adjustable rear
bench seats:
If you adjust the seat after installing a child
restraint system:
R the seat belt could slacken or become too
tight
R the child restraint system could become
loose, incorrectly positioned or damaged
As a result, the child restraint system may not
be able to provide the intended level of pro-
tection. This poses an increased risk of injury or even fatal injury.
Never adjust the seat after installing the child
restraint system.
If the rear seat backrest is not engaged and
locked, this will be shown in the multifunction display in the instrument cluster. A warning
tone also sounds.
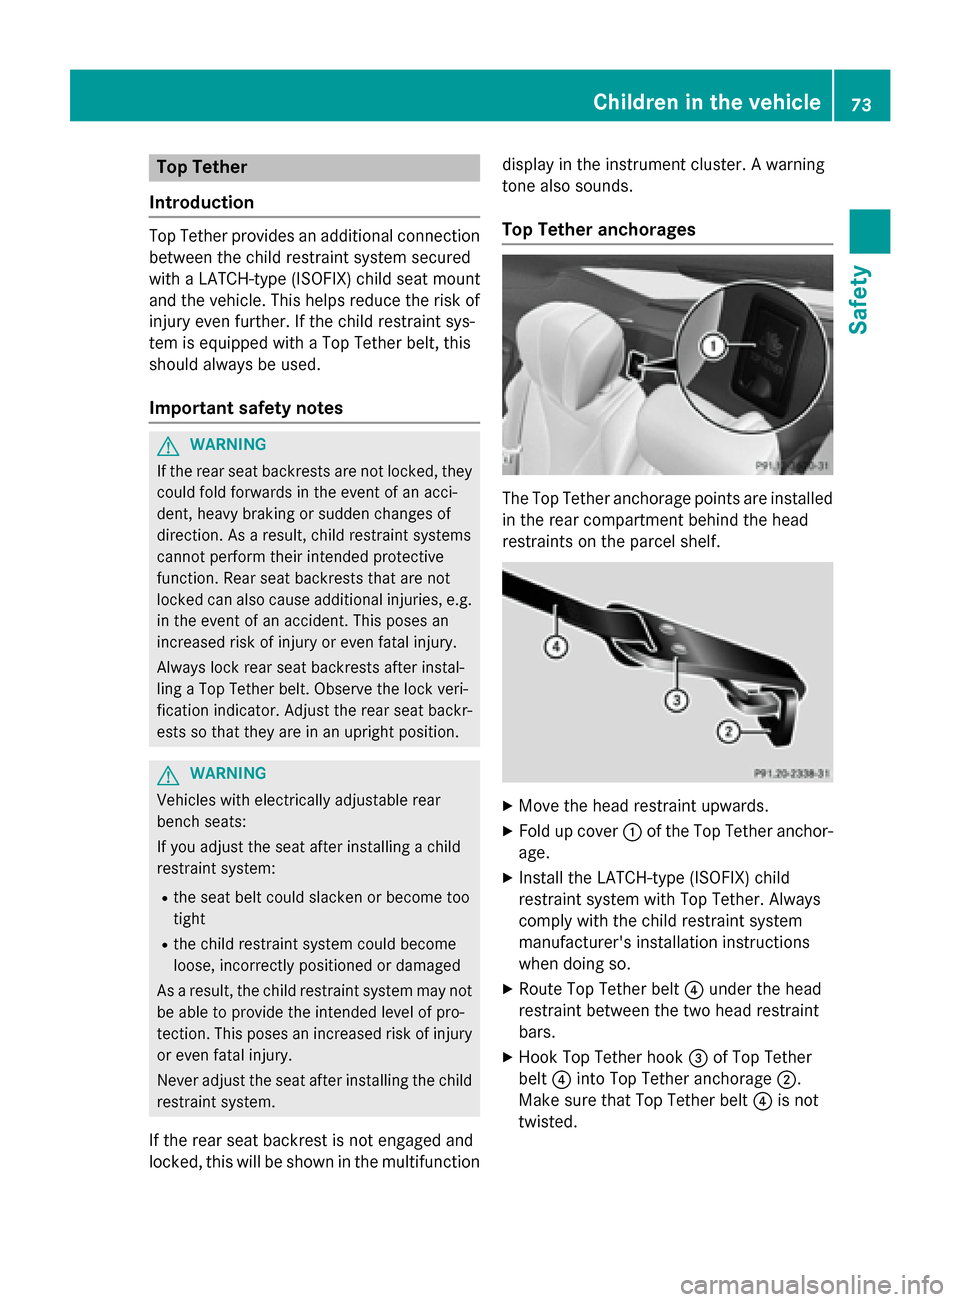
Top Tether anchorages The Top Tether anchorage points are installed
in the rear compartment behind the head
restraints on the parcel shelf. X
Move the head restraint upwards.
X Fold up cover :of the Top Tether anchor-
age.
X Install the LATCH-type (ISOFIX) child
restraint system with Top Tether. Always
comply with the child restraint system
manufacturer's installation instructions
when doing so.
X Route Top Tether belt ?under the head
restraint between the two head restraint
bars.
X Hook Top Tether hook =of Top Tether
belt ?into Top Tether anchorage ;.
Make sure that Top Tether belt ?is not
twisted. Children in the vehicle
73Safety Z
Page 76 of 502
X
Tension Top Tether belt ?. Always comply
with the child restraint system manufactur- er's installation instructions when doing so.
X Fold down cover :of the Top Tether
anchorage.
X If necessary, move the head restraint back
down again slightly (Y page 133). Make
sure that you do not interfere with the cor-
rect routing of Top Tether belt ?.Child restraint system on the front-
passenger seat
General notes Accident statistics show that children
secured in the rear seats are safer than chil-
dren secured in the front-passenger seat. For
this reason, Mercedes-Benz strongly advises
that you install the child restraint system on a
rear seat.
If it is absolutely necessary to install a child
restraint system on the front-passenger seat,
be sure to observe the instructions and safety
notes on the "Occupant Classification System (OCS)" (Y page 59).
You can thus avoid the risks that could arise
as a result of:
R an incorrectly categorized person in the
front-passenger seat
R the unintentional deactivation of the front-
passenger front air bag
R the unsuitable positioning of the child
restraint system, e.g. too close to the dash- board
Rearward-facing child restraint system If it is absolutely necessary to install a rear-
ward-facing child restraint system on the
front-passenger seat, always make sure that
the front-passenger front air bag is deactiva-
ted. Only if the PASSENGER AIR BAG OFF
indicator lamp is permanently lit (Y page 50)
is the front-passenger front air bag deactiva-
ted. Always observe the child restraint system
manufacturer's installation and operating
instructions.
Forward-facing child restraint system If it is absolutely necessary to install a
forward-facing child restraint system on the
front-passenger seat, always move the front-
passenger seat as far back as possible. Fully
retract the seat cushion length. The entire
base of the child restraint system must
always rest on the seat cushion of the front-
passenger seat. The backrest of the child
restraint system must lie as flat as possible
against the backrest of the front-passenger
seat. The child restraint system must not
touch the roof or be subjected to a load by the
head restraint. Adjust the angle of the seat
backrest and the head restraint position
accordingly. Always make sure that the shoul- der belt strap is correctly routed from the
vehicle belt outlet to the shoulder belt guide
on the child restraint system. The shoulder
belt strap must be routed forwards and down-
wards from the vehicle belt outlet. If neces-
sary, adjust the vehicle belt outlet and the
front-passenger seat accordingly.
Always observe the child restraint system
manufacturer's installation and operating
instructions. Child-proof locks
Important safety notes G
WARNING
If children are traveling in the vehicle, they
could:
R open doors, thus endangering other people
or road users
R exit the vehicle and be caught by oncoming
traffic
R operate vehicle equipment and become
trapped
There is a risk of an accident and injury. 74
Children in the vehicleSafety
Page 106 of 502

close. Repeat the leg movement more
quickly if this occurs.
To stop the opening or closing procedure:
R kick with your leg in the sensor detection
range :under the bumper or
R pull the handle on the outside of the trunk
lid or
R press the closing button in the trunk lid or
R press the Fbutton on the SmartKey
If the trunk lid closing procedure has been
stopped:
R move your foot under the bumper again and
the trunk lid will open.
If the trunk lid opening procedure has been
stopped:
R move your foot under the bumper again and
the trunk lid will close. Opening/closing automatically from
inside
Important safety notes G
WARNING
Parts of the body could become trapped dur-
ing automatic closing of the trunk lid. More-
over, people, e.g. children, may be standing in the closing area or may enter the closing area
during the closing process. There is a risk of
injury.
Make sure that nobody is in the vicinity of the closing area during the closing process.
Use one of the following options to stop the
closing process:
R press the Fbutton on the SmartKey.
R pull or press the remote operating switch
on the driver's door.
R press the closing or locking button on the
trunk lid.
R pull the trunk lid handle. G
WARNING
Combustion engines emit poisonous exhaust
gases such as carbon monoxide. Exhaust
gases can enter the vehicle interior if the
trunk lid is open when the engine is running,
especially if the vehicle is in motion. There is a risk of poisoning.
Always switch off the engine before opening
the trunk lid. Never drive with the trunk lid
open.
! The trunk lid swings upwards when
opened. Therefore, make sure that there is
sufficient clearance above the trunk lid.
i The opening dimensions of the trunk lid
can be found in the "Vehicle data" section
(Y page 495).
Opening and closing You can open and close the trunk lid from the
driver's seat when the vehicle is stationary
and unlocked.
X To open: pull remote operating switch for
trunk lid :until the trunk lid opens.
X To close: press remote operating switch
for trunk lid :until the trunk lid is com-
pletely closed. Locking the trunk separately
You can lock the trunk separately. If you then
unlock the vehicle centrally, the trunk
remains locked and cannot be opened. 104
TrunkOpening and closing
Page 123 of 502

X
Before starting off, adjust the rear-view mir-
ror and the exterior mirrors in such a way
that you have a good view of road and traf-
fic conditions (Y page 141).
X Vehicles with a memory function: save
the seat, steering wheel and exterior mirror settings with the memory function
(Y page 144). Seats
Important safety notes
G
WARNING
Children could become trapped if they adjust the seats, particularly when unattended.
There is a risk of injury.
When leaving the vehicle, always take the
SmartKey with you and lock the vehicle. Never leave children unsupervised in the vehicle.
The seats can still be adjusted when there is
no SmartKey in the ignition lock. G
WARNING
You could lose control of your vehicle if you do the following while driving:
R adjust the driver's seat, head restraint,
steering wheel or mirrors
R fasten the seat belt
There is a risk of an accident.
Adjust the driver's seat, head restraint, steer-
ing wheel and mirror and fasten your seat belt before starting the engine. G
WARNING
If you adjust the seat height carelessly, you or other vehicle occupants could be trapped andthereby injured. Children in particular could
accidentally press the electrical seat adjust-
ment buttons and become trapped. There is a
risk of injury.
While moving the seats, make sure that your
hands or other body parts do not get under the
lever assembly of the seat adjustment sys-
tem. G
WARNING
When you adjust a seat, you or other vehicle
occupants could become trapped, e.g. on the seat guide rail. There is a risk of injury.
Make sure when adjusting a seat that no one
has any body parts in the sweep of the seat. G
WARNING
If head restraints are not installed and adjus-
ted correctly, they cannot provide protection
as intended. There is an increased risk of
injury in the head and neck area, e.g. in the
event of an accident or when braking.
Always drive with the head restraints instal-
led. Before driving off, make sure for every
vehicle occupant that the center of the head
restraint supports the back of the head at
about eye level. G
WARNING
The seat belt does not offer the intended level of protection if you have not moved the back-
rest to an almost vertical position. When brak-
ing or in the event of an accident, you could
slide underneath the seat belt and sustain
abdomen or neck injuries, for example. This
poses an increased risk of injury or even fatal injury.
Adjust the seat properly before beginning
your journey. Always ensure that the backrest
is in an almost vertical position and that the
shoulder section of your seat belt is routed
across the center of your shoulder.
! To avoid damage to the seats and the seat
heating, observe the following information:
R keep liquids from spilling on the seats. If
liquid is spilled on the seats, dry them as
soon as possible.
R if the seat covers are damp or wet, do not
switch on the seat heating. The seat
heating should also not be used to dry
the seats.
R clean the seat covers as recommended;
see "Interior care". Seats
121Seats, steering wheel and mirrors Z
Page 124 of 502

R
do not transport heavy loads on the
seats. Do not place sharp objects on the
seat cushions, e.g. knives, nails or tools.
The seats should only be occupied by
passengers, if possible.
R when the seat heating is in operation, do
not cover the seats with insulating mate- rials, e.g. blankets, coats, bags, seat cov-
ers, child seats or booster seats.
! Make sure that there are no objects in the
footwell under or behind the seats when
moving the seats back. There is a risk that
the seats and/or the objects could be dam-
aged. Adjusting the seats
Vehicles with standard head restraints
or luxury head restraints :
Head restraint height
; Head restraint height
= Seat height
? Seat cushion angle
A Seat cushion length
B Seat fore-and-aft adjustment
C Backrest angle
i If PRE-SAFE ®
is triggered, the front-
passenger seat will be moved to a better
position if it was previously in an unfavora- ble position (Y page 67).
i You can store the seat settings using the
memory function (Y page 144). i
To ensure the largest possible range of
seat settings, certain seat adjustment func- tions will automatically activate other seat
adjustment functions.
i The head restraint height is adjusted
automatically when you adjust the seat
height or the seat fore-and-aft position.
Vehicles with an EASY ADJUST luxury
head restraint :
Head restraint height
; Head restraint fore-and-aft position
= Seat height
? Seat cushion angle
A Seat cushion length
B Seat fore-and-aft adjustment
C Backrest angle
i If PRE-SAFE ®
is triggered, the front-
passenger seat will be moved to a better
position if it was previously in an unfavora- ble position (Y page 67).
i You can store the seat settings using the
memory function (Y page 144).
i To ensure the largest possible range of
seat settings, certain seat adjustment func- tions will automatically activate other seat
adjustment functions.
i The head restraint height is adjusted
automatically when you adjust the seat
height or the seat fore-and-aft position. 122
SeatsSeats, steering wheel and mirrors