2015 MERCEDES-BENZ S-CLASS COUPE airbag
[x] Cancel search: airbagPage 66 of 417
restraint system is fitted with a Top Tether
belt, this should always be used.
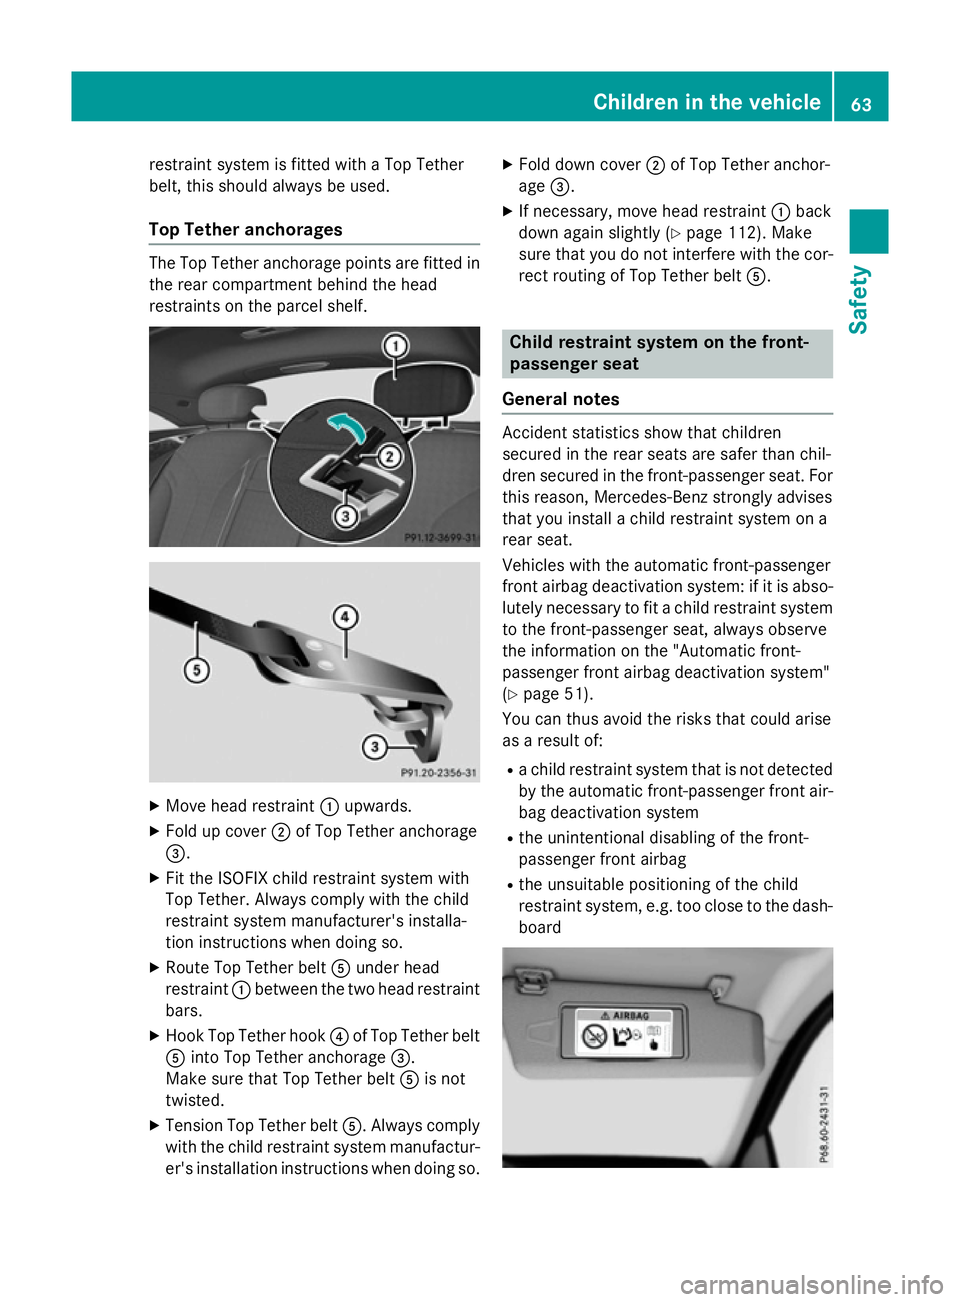
Top Tether anchorages The Top Tether anchorage points are fitted in
the rear compartment behind the head
restraints on the parcel shelf. X
Move head restraint :upwards.
X Fold up cover ;of Top Tether anchorage
=.
X Fit the ISOFIX child restraint system with
Top Tether. Always comply with the child
restraint system manufacturer's installa-
tion instructions when doing so.
X Route Top Tether belt Aunder head
restraint :between the two head restraint
bars.
X Hook Top Tether hook ?of Top Tether belt
A into Top Tether anchorage =.
Make sure that Top Tether belt Ais not
twisted.
X Tension Top Tether belt A. Always comply
with the child restraint system manufactur- er's installation instructions when doing so. X
Fold down cover ;of Top Tether anchor-
age =.
X If necessary, move head restraint :back
down again slightly (Y page 112). Make
sure that you do not interfere with the cor-
rect routing of Top Tether belt A. Child restraint system on the front-
passenger seat
General notes Accident statistics show that children
secured in the rear seats are safer than chil-
dren secured in the front-passenger seat. For
this reason, Mercedes-Benz strongly advises
that you install a child restraint system on a
rear seat.
Vehicles with the automatic front-passenger
front airbag deactivation system: if it is abso- lutely necessary to fit a child restraint system
to the front-passenger seat, always observe
the information on the "Automatic front-
passenger front airbag deactivation system"
(Y page 51).
You can thus avoid the risks that could arise
as a result of:
R a child restraint system that is not detected
by the automatic front-passenger front air- bag deactivation system
R the unintentional disabling of the front-
passenger front airbag
R the unsuitable positioning of the child
restraint system, e.g. too close to the dash-
board Children in the vehicle
63Safety Z
Page 67 of 417
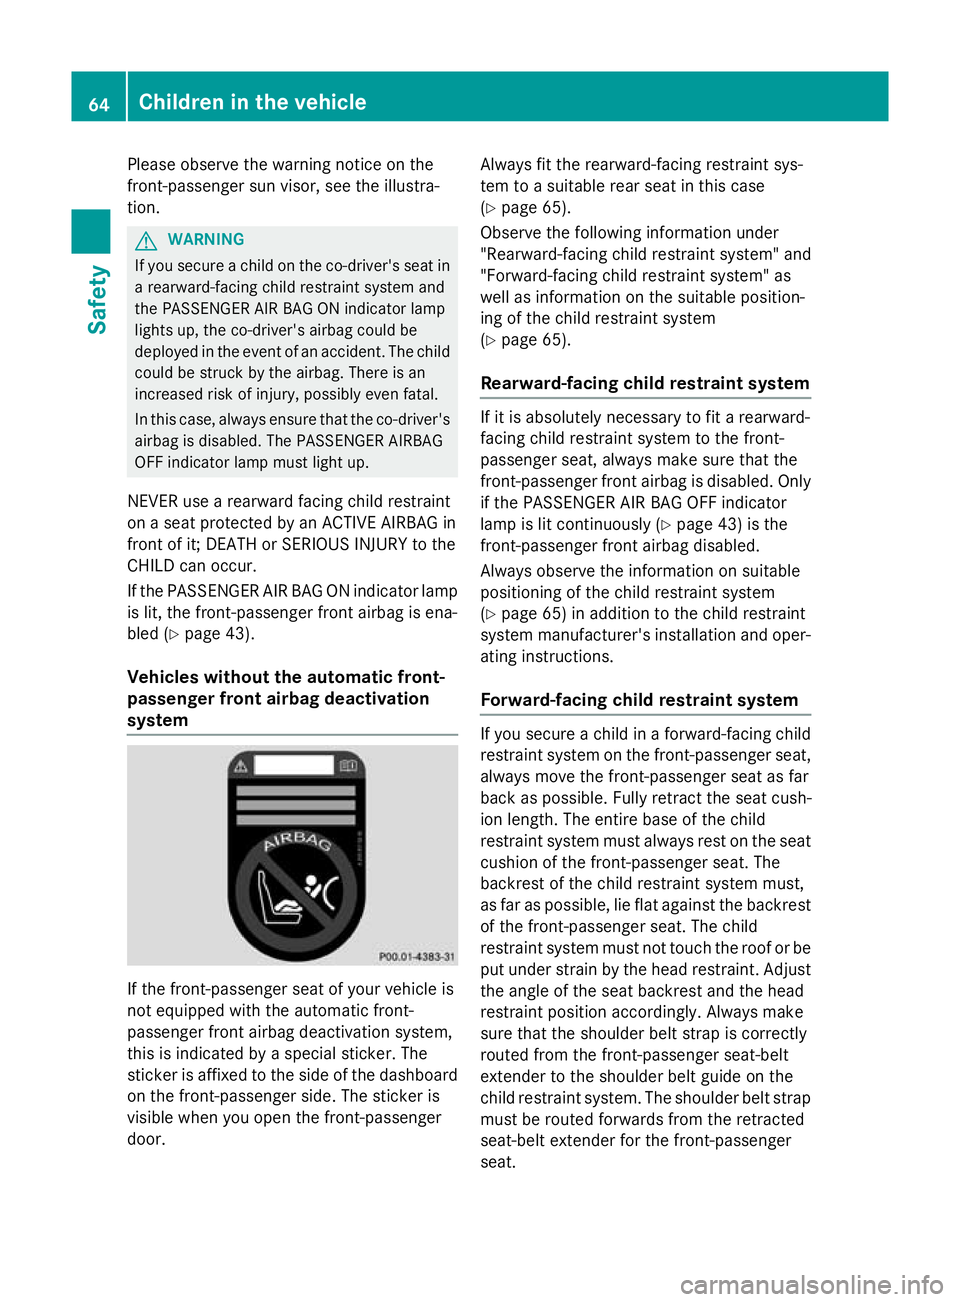
Please observe the warning notice on the
front-passenger sun visor, see the illustra-
tion. G
WARNING
If you secure a child on the co-driver's seat in a rearward-facing child restraint system and
the PASSENGER AIR BAG ON indicator lamp
lights up, the co-driver's airbag could be
deployed in the event of an accident. The childcould be struck by the airbag. There is an
increased risk of injury, possibly even fatal.
In this case, always ensure that the co-driver's
airbag is disabled. The PASSENGER AIRBAG
OFF indicator lamp must light up.
NEVER use a rearward facing child restraint
on a seat protected by an ACTIVE AIRBAG in
front of it; DEATH or SERIOUS INJURY to the
CHILD can occur.
If the PASSENGER AIR BAG ON indicator lamp
is lit, the front-passenger front airbag is ena-
bled (Y page 43).
Vehicles without the automatic front-
passenger front airbag deactivation
system If the front-passenger seat of your vehicle is
not equipped with the automatic front-
passenger front airbag deactivation system,
this is indicated by a special sticker. The
sticker is affixed to the side of the dashboard
on the front-passenger side. The sticker is
visible when you open the front-passenger
door. Always fit the rearward-facing restraint sys-
tem to a suitable rear seat in this case
(Y
page 65).
Observe the following information under
"Rearward-facing child restraint system" and
"Forward-facing child restraint system" as
well as information on the suitable position-
ing of the child restraint system
(Y page 65).
Rearward-facing child restraint system If it is absolutely necessary to fit a rearward-
facing child restraint system to the front-
passenger seat, always make sure that the
front-passenger front airbag is disabled. Only
if the PASSENGER AIR BAG OFF indicator
lamp is lit continuously (Y page 43) is the
front-passenger front airbag disabled.
Always observe the information on suitable
positioning of the child restraint system
(Y page 65) in addition to the child restraint
system manufacturer's installation and oper-
ating instructions.
Forward-facing child restraint system If you secure a child in a forward-facing child
restraint system on the front-passenger seat,
always move the front-passenger seat as far
back as possible. Fully retract the seat cush-
ion length. The entire base of the child
restraint system must always rest on the seat cushion of the front-passenger seat. The
backrest of the child restraint system must,
as far as possible, lie flat against the backrest
of the front-passenger seat. The child
restraint system must not touch the roof or be
put under strain by the head restraint. Adjust the angle of the seat backrest and the head
restraint position accordingly. Always make
sure that the shoulder belt strap is correctly
routed from the front-passenger seat-belt
extender to the shoulder belt guide on the
child restraint system. The shoulder belt strap
must be routed forwards from the retracted
seat-belt extender for the front-passenger
seat. 64
Children in the vehicleSafety
Page 69 of 417
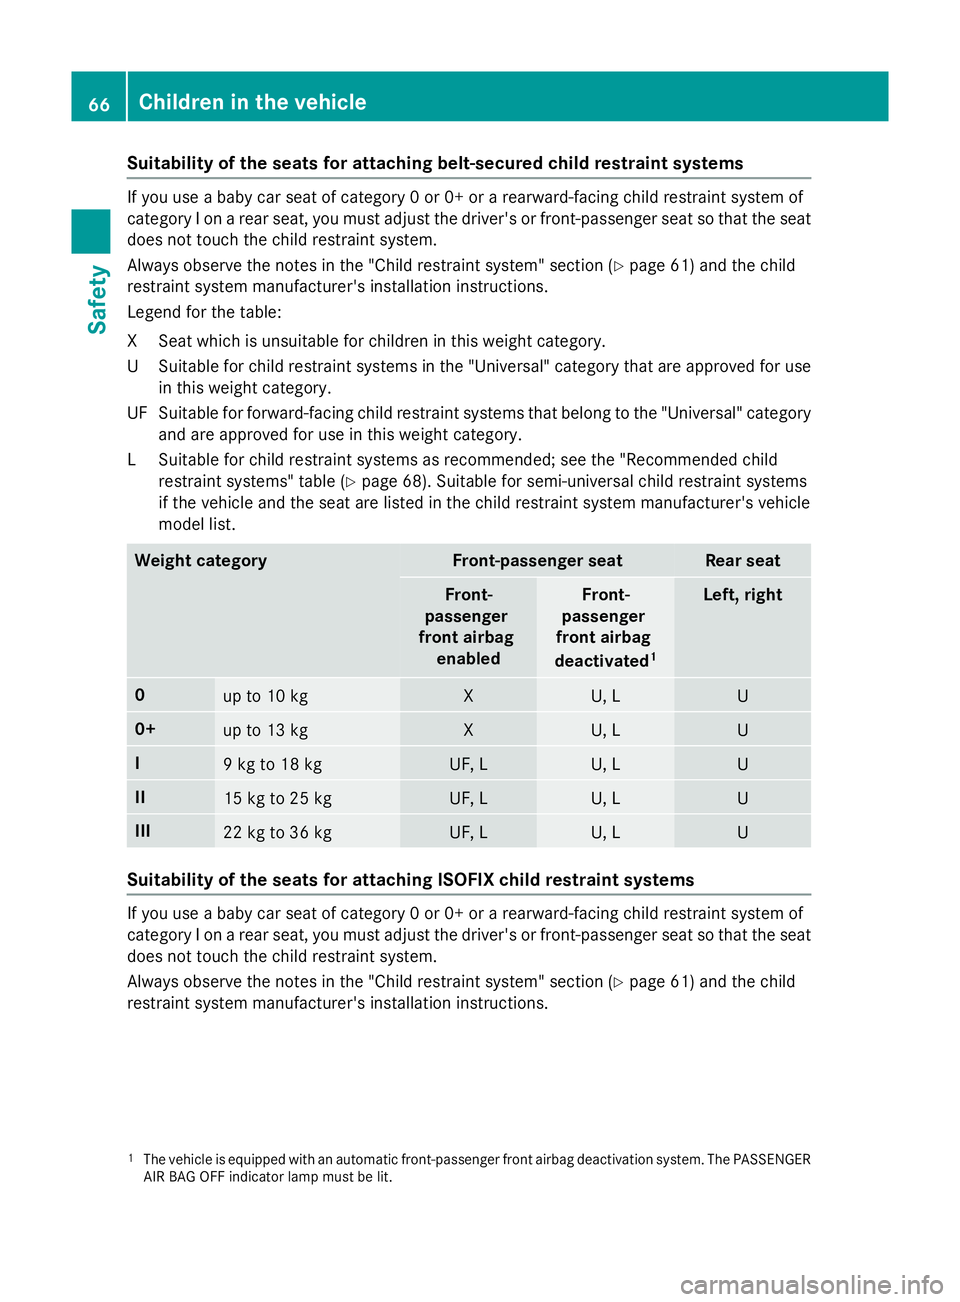
Suitability of the seats for attaching belt-secured child restraint systems
If you use a baby car seat of category 0 or 0+ or a rearward-facing child restraint system of
category I on a rear seat, you must adjust the driver's or front-passenger seat so that the seat
does not touch the child restraint system.
Always observe the notes in the "Child restraint system" section (Y page 61) and the child
restraint system manufacturer's installation instructions.
Legend for the table:
XS eat which is unsuitable for children in this weight category.
US uitable for child restraint systems in the "Universal" category that are approved for use
in this weight category.
UF Suitable for forward-facing child restraint systems that belong to the "Universal" category and are approved for use in this weight category.
LS uitable for child restraint systems as recommended; see the "Recommended child
restraint systems" table (Y page 68). Suitable for semi-universal child restraint systems
if the vehicle and the seat are listed in the child restraint system manufacturer's vehicle
model list. Weight category Front-passenger seat Rear seat
Front-
passenger
front airbag enabled Front-
passenger
front airbag
deactivated 1 Left, right
0
up to 10 kg X U, L U
0+
up to 13 kg X U, L U
I
9 kg to 18 kg UF, L U, L U
II
15 kg to 25 kg UF, L U, L U
III
22 kg to 36 kg UF, L U, L U
Suitability of the seats for attaching ISOFIX child restraint systems
If you use a baby car seat of category 0 or 0+ or a rearward-facing child restraint system of
category I on a rear seat, you must adjust the driver's or front-passenger seat so that the seat
does not touch the child restraint system.
Always observe the notes in the "Child restraint system" section (Y page 61) and the child
restraint system manufacturer's installation instructions.
1 The vehicle is equipped with an automatic front-passenger front airbag deactivation system. The PASSENGER
AIR BAG OFF indicator lamp must be lit. 66
Children in the vehicleSafety
Page 111 of 417
Useful information
i This Owner's Manual describes all mod-
els, series and optional equipment for your
vehicle that were available at the time of
going to press. National variations are pos- sible. Note that your vehicle may not be
equipped with all of the functions descri-
bed. This is also the case for systems and
functions relevant to safety.
i Read the information on qualified special-
ist workshops: (Y page 26). Correct driver's seat position
G
WARNING
You could lose control of the vehicle while
driving if you:
R adjust the driver's seat, steering wheel or
mirrors
R fasten the seat belt
There is a risk of an accident.
Adjust the driver's seat, head restraint, steer-
ing wheel and mirrors and fasten your seat
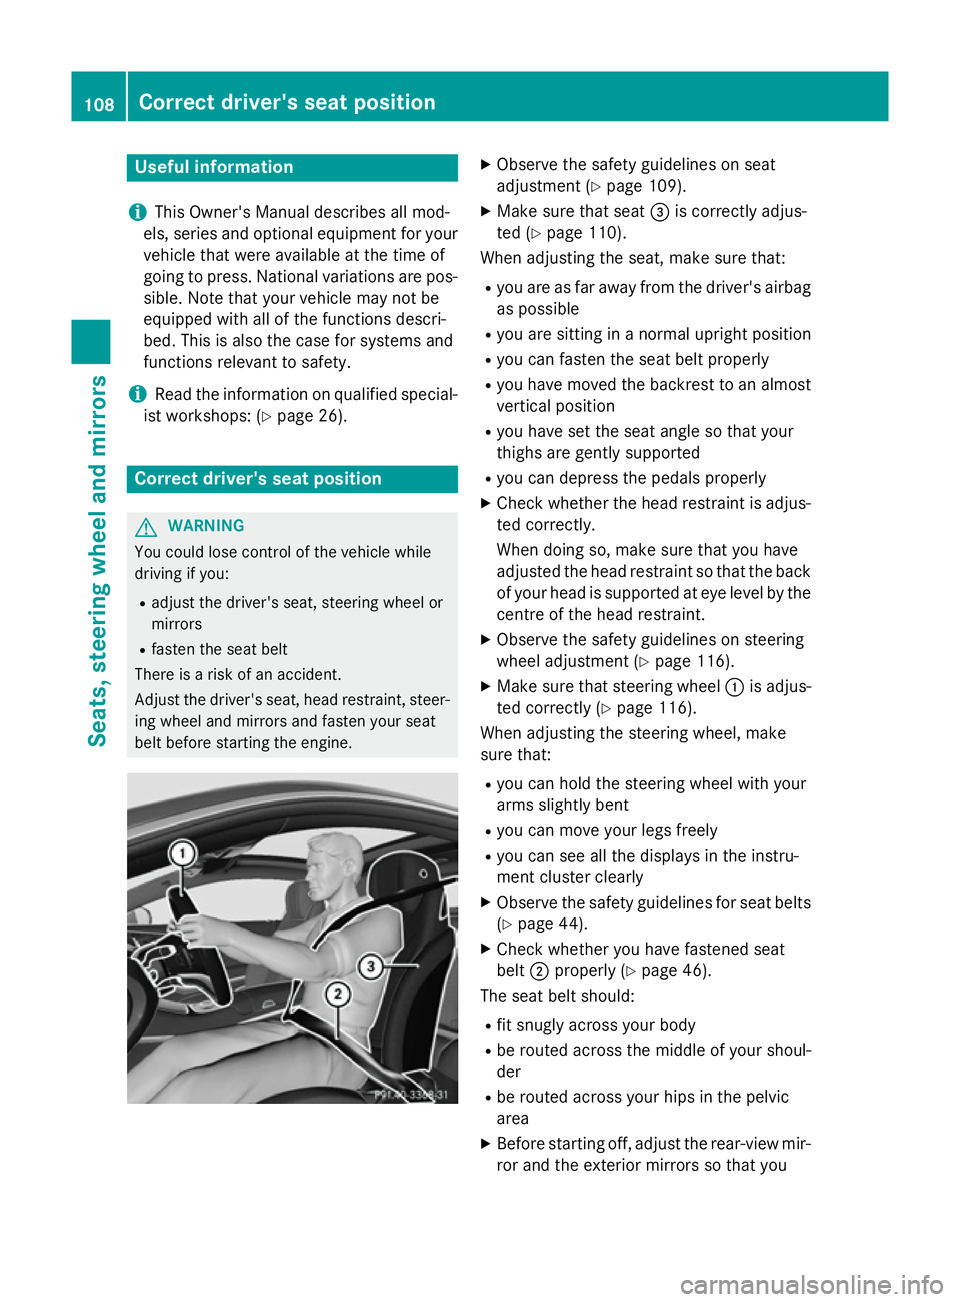
belt before starting the engine. X
Observe the safety guidelines on seat
adjustment (Y page 109).
X Make sure that seat =is correctly adjus-
ted (Y page 110).
When adjusting the seat, make sure that:
R you are as far away from the driver's airbag
as possible
R you are sitting in a normal upright position
R you can fasten the seat belt properly
R you have moved the backrest to an almost
vertical position
R you have set the seat angle so that your
thighs are gently supported
R you can depress the pedals properly
X Check whether the head restraint is adjus-
ted correctly.
When doing so, make sure that you have
adjusted the head restraint so that the back
of your head is supported at eye level by the centre of the head restraint.
X Observe the safety guidelines on steering
wheel adjustment (Y page 116).
X Make sure that steering wheel :is adjus-
ted correctly (Y page 116).
When adjusting the steering wheel, make
sure that:
R you can hold the steering wheel with your
arms slightly bent
R you can move your legs freely
R you can see all the displays in the instru-
ment cluster clearly
X Observe the safety guidelines for seat belts
(Y page 44).
X Check whether you have fastened seat
belt ;properly (Y page 46).
The seat belt should:
R fit snugly across your body
R be routed across the middle of your shoul-
der
R be routed across your hips in the pelvic
area
X Before starting off, adjust the rear-view mir-
ror and the exterior mirrors so that you 108
Correct driver's seat positionSeats, steering wheel and mirrors
Page 112 of 417
have a good view of road and traffic condi-
tions (Y page 120).
X Store the seat, steering wheel and exterior
mirror settings using the memory function
(Y page 123). Seats
Important safety notes
G
WARNING
If children adjust the seats, they could
become trapped, especially if they are unat-
tended. There is a risk of injury.
When leaving the vehicle, always take the key with you and lock the vehicle. Never leave
children unattended in the vehicle.
The seats can still be adjusted when there is
no key in the ignition lock. G
WARNING
When adjusting a seat, you or another vehicle occupant could become trapped by the guiderail of the seat, for instance. There is a risk of
injury.
Make sure that no one has any part of their
body within the sweep of the seat when
adjusting it.
Observe the safety notes on "Airbags"
(Y page 48) and "Children in the Vehicle"
(Y page 60). G
WARNING
You could lose control of the vehicle while
driving if you:
R adjust the driver's seat, steering wheel or
mirrors
R fasten the seat belt
There is a risk of an accident.
Adjust the driver's seat, head restraint, steer-
ing wheel and mirrors and fasten your seat
belt before starting the engine. G
WARNING
If you adjust the seat height carelessly, you or other vehicle occupants could be trapped andthereby injured. Children in particular could
accidentally press the electrical seat adjust-
ment buttons and become trapped. There is a
risk of injury.
While moving the seats, make sure that your
hands or other body parts do not get under the
lever assembly of the seat adjustment sys-
tem. G
WARNING
The head restraints cannot provide the inten-
ded protection unless they are fitted and
adjusted correctly. There is an increased risk of injury to the head and neck in the event of
an accident or sudden braking, for example.
Always drive with the head restraints fitted.
Ensure that the centre of the head restraints
support the back of each vehicle occupant's
head at eye level before driving off. G
WARNING
The seat belt does not offer the intended level of protection if you have not moved the back-
rest to an almost vertical position. When brak-
ing or in the event of an accident, you could
slide underneath the seat belt and sustain
abdomen or neck injuries, for example. This
poses an increased risk of injury or even fatal injury.
Adjust the seat properly before beginning
your journey. Always ensure that the backrest
is in an almost vertical position and that the
shoulder section of your seatbelt is routed
across the centre of your shoulder.
! To avoid damage to the seats and the seat
heating, observe the following information:
R do not spill any liquids on the seats. If
liquid is spilled on the seats, dry them as
soon as possible.
R if the seat covers are damp or wet, do not
switch on the seat heating. The seat Seats
109Seats, steering wheel and mirrors Z
Page 113 of 417
heating should also not be used to dry
the seats.
R clean the seat covers as recommended;
see "Interior care".
R do not transport heavy loads on the
seats. Do not place sharp objects on the seat cushions, e.g. knives, nails or tools. The seats should only be occupied by
passengers, if possible.
R when the seat heating is in operation, do
not cover the seats with insulating mate-
rials, e.g. blankets, coats, bags, seat cov- ers, child seats or booster seats.
! Make sure that there are no objects in the
footwell under or behind the seats when
moving the seats back. There is a risk that
the seats and/or the objects could be dam- aged. Adjusting the seats
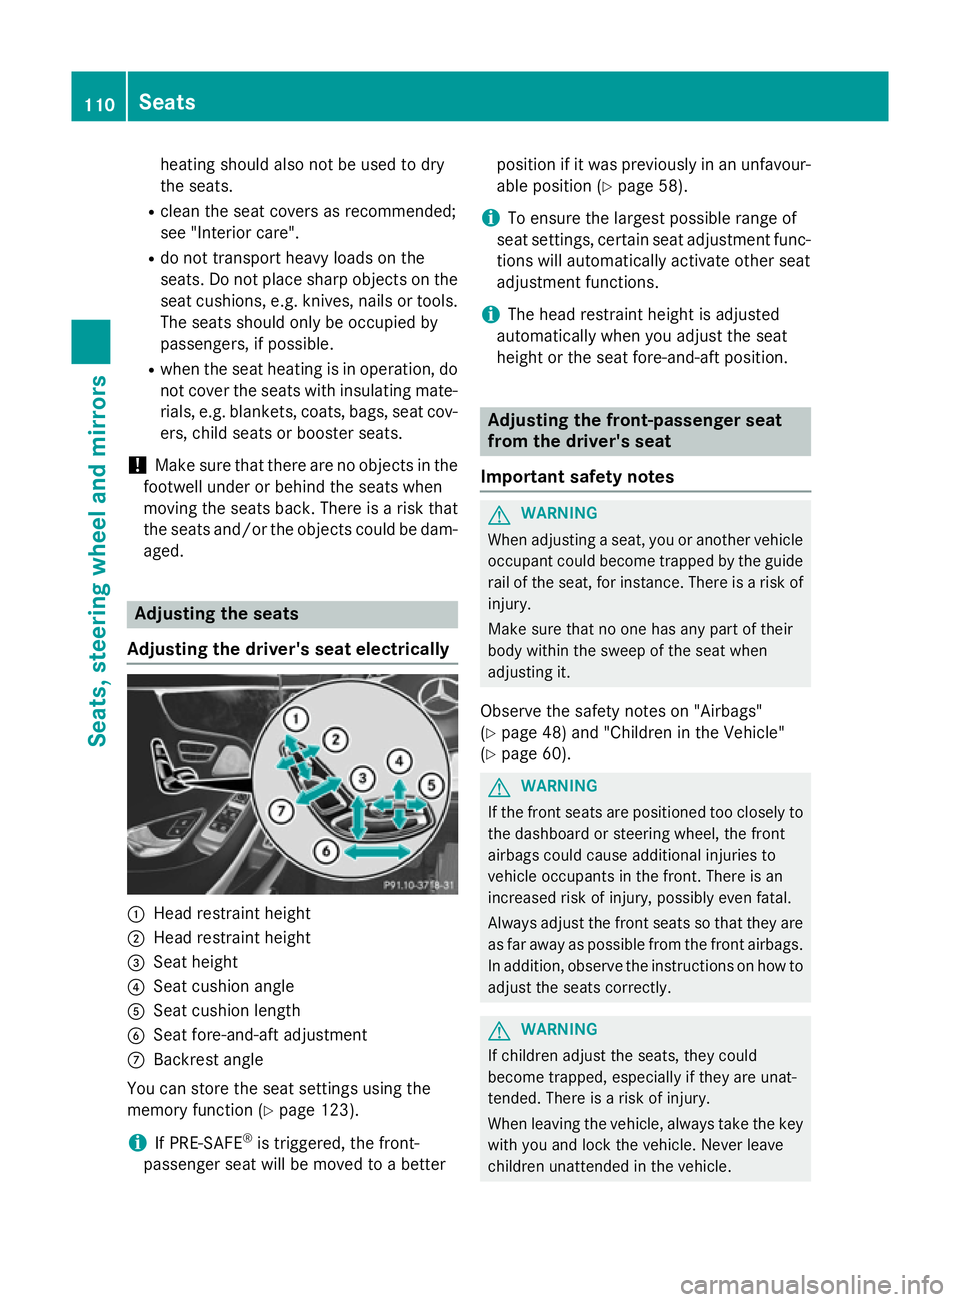
Adjusting the driver's seat electrically :
Head restraint height
; Head restraint height
= Seat height
? Seat cushion angle
A Seat cushion length
B Seat fore-and-aft adjustment
C Backrest angle
You can store the seat settings using the
memory function (Y page 123).
i If PRE-SAFE ®
is triggered, the front-
passenger seat will be moved to a better position if it was previously in an unfavour-
able position (Y page 58).
i To ensure the largest possible range of
seat settings, certain seat adjustment func- tions will automatically activate other seat
adjustment functions.
i The head restraint height is adjusted
automatically when you adjust the seat
height or the seat fore-and-aft position. Adjusting the front-passenger seat
from the driver's seat
Important safety notes G
WARNING
When adjusting a seat, you or another vehicle occupant could become trapped by the guiderail of the seat, for instance. There is a risk of
injury.
Make sure that no one has any part of their
body within the sweep of the seat when
adjusting it.
Observe the safety notes on "Airbags"
(Y page 48) and "Children in the Vehicle"
(Y page 60). G
WARNING
If the front seats are positioned too closely to the dashboard or steering wheel, the front
airbags could cause additional injuries to
vehicle occupants in the front. There is an
increased risk of injury, possibly even fatal.
Always adjust the front seats so that they are
as far away as possible from the front airbags.
In addition, observe the instructions on how to
adjust the seats correctly. G
WARNING
If children adjust the seats, they could
become trapped, especially if they are unat-
tended. There is a risk of injury.
When leaving the vehicle, always take the key with you and lock the vehicle. Never leave
children unattended in the vehicle. 110
SeatsSeats, steering wheel and mirrors
Page 116 of 417
Adjust the seat properly before beginning
your journey. Always ensure that the backrest
is in an almost vertical position and that the
shoulder section of your seatbelt is routed
across the centre of your shoulder. G
WARNING
When adjusting a seat, you or another vehicle occupant could become trapped by the guiderail of the seat, for instance. There is a risk of
injury.
Make sure that no one has any part of their
body within the sweep of the seat when
adjusting it.
Observe the safety notes on "Airbags"
(Y page 48) and "Children in the Vehicle"
(Y page 60).
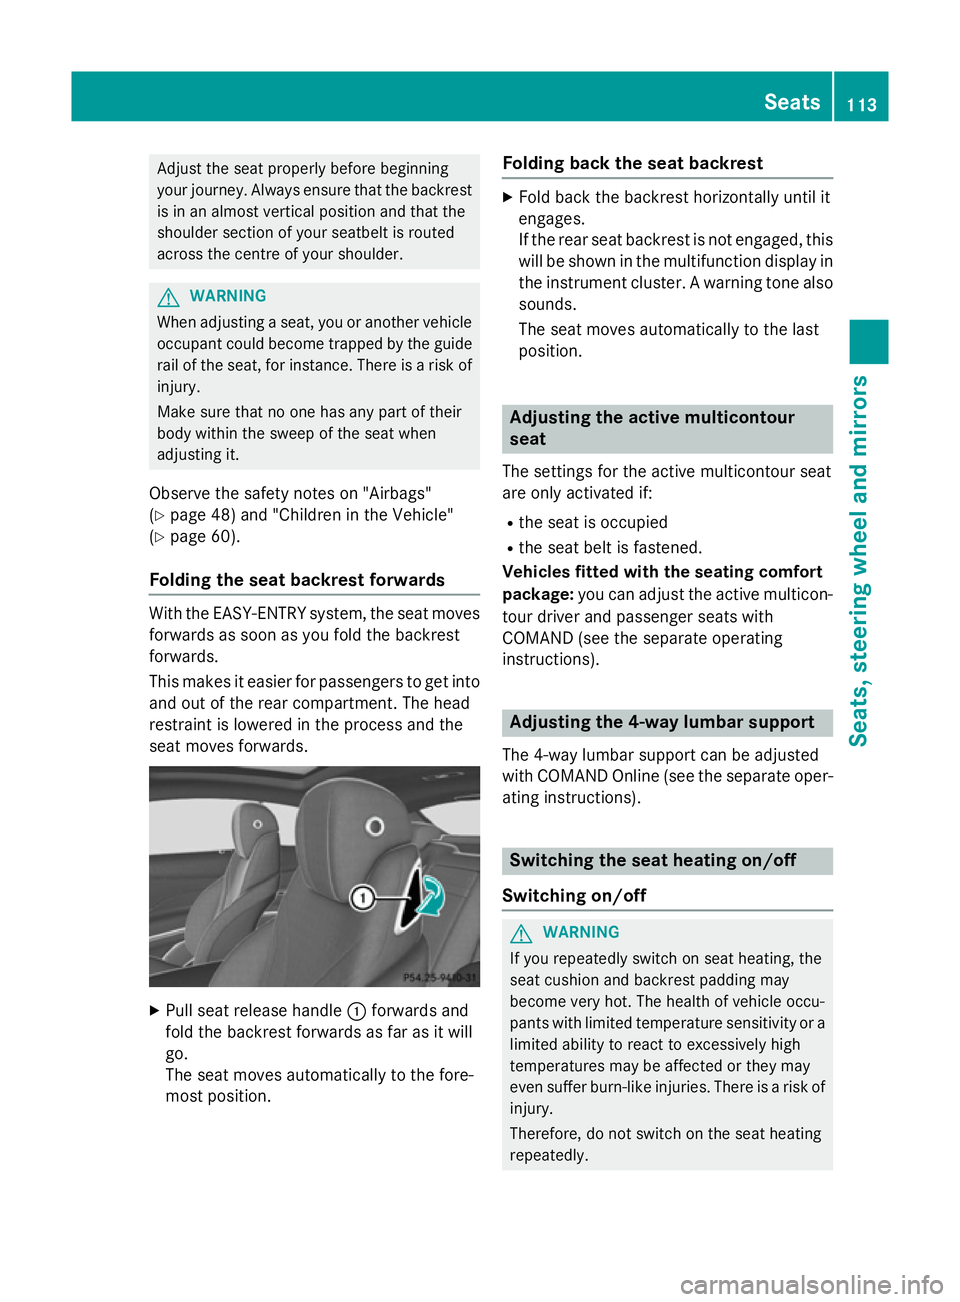
Folding the seat backrest forwards With the EASY-ENTRY system, the seat moves
forwards as soon as you fold the backrest
forwards.
This makes it easier for passengers to get into
and out of the rear compartment. The head
restraint is lowered in the process and the
seat moves forwards. X
Pull seat release handle :forwards and
fold the backrest forwards as far as it will
go.
The seat moves automatically to the fore-
most position. Folding back the seat backrest X
Fold back the backrest horizontally until it
engages.
If the rear seat backrest is not engaged, this
will be shown in the multifunction display inthe instrument cluster. A warning tone also
sounds.
The seat moves automatically to the last
position. Adjusting the active multicontour
seat
The settings for the active multicontour seat
are only activated if:
R the seat is occupied
R the seat belt is fastened.
Vehicles fitted with the seating comfort
package: you can adjust the active multicon-
tour driver and passenger seats with
COMAND (see the separate operating
instructions). Adjusting the 4-way lumbar support
The 4-way lumbar support can be adjusted
with COMAND Online (see the separate oper- ating instructions). Switching the seat heating on/off
Switching on/off G
WARNING
If you repeatedly switch on seat heating, the
seat cushion and backrest padding may
become very hot. The health of vehicle occu-
pants with limited temperature sensitivity or a limited ability to react to excessively high
temperatures may be affected or they may
even suffer burn-like injuries. There is a risk of
injury.
Therefore, do not switch on the seat heating
repeatedly. Seats
113Seats, steering wheel and mirrors Z
Page 132 of 417
only the turn signal lamp on the corre-
sponding side of the vehicle will flash.
X To switch off the hazard warning lamps:
press button :.
The hazard warning lamps switch on auto-
matically if:
R an airbag is deployed or
R the vehicle decelerates rapidly from a
speed of above 70 km/h and comes to a
standstill
The hazard warning lamps switch off auto-
matically if the vehicle reaches a speed of
above 10 km/ha gain after a full brake appli-
cation.
The hazard warning lamps continue to oper-
ate even if the ignition is switched off. Intelligent Light System
General notes The Intelligent Light System is a system that
adjusts the headlamps automatically to suit
the prevailing driving and weather conditions.
It offers advanced functions for improved illu-
mination of the road surface, e.g. depending
on the vehicle speed or weather conditions.
The system includes the active light function, cornering light function, motorway mode and
extended range foglamps. The system is only active when it is dark.
You can activate or deactivate the "Intelligent
Light System" function using the on-board
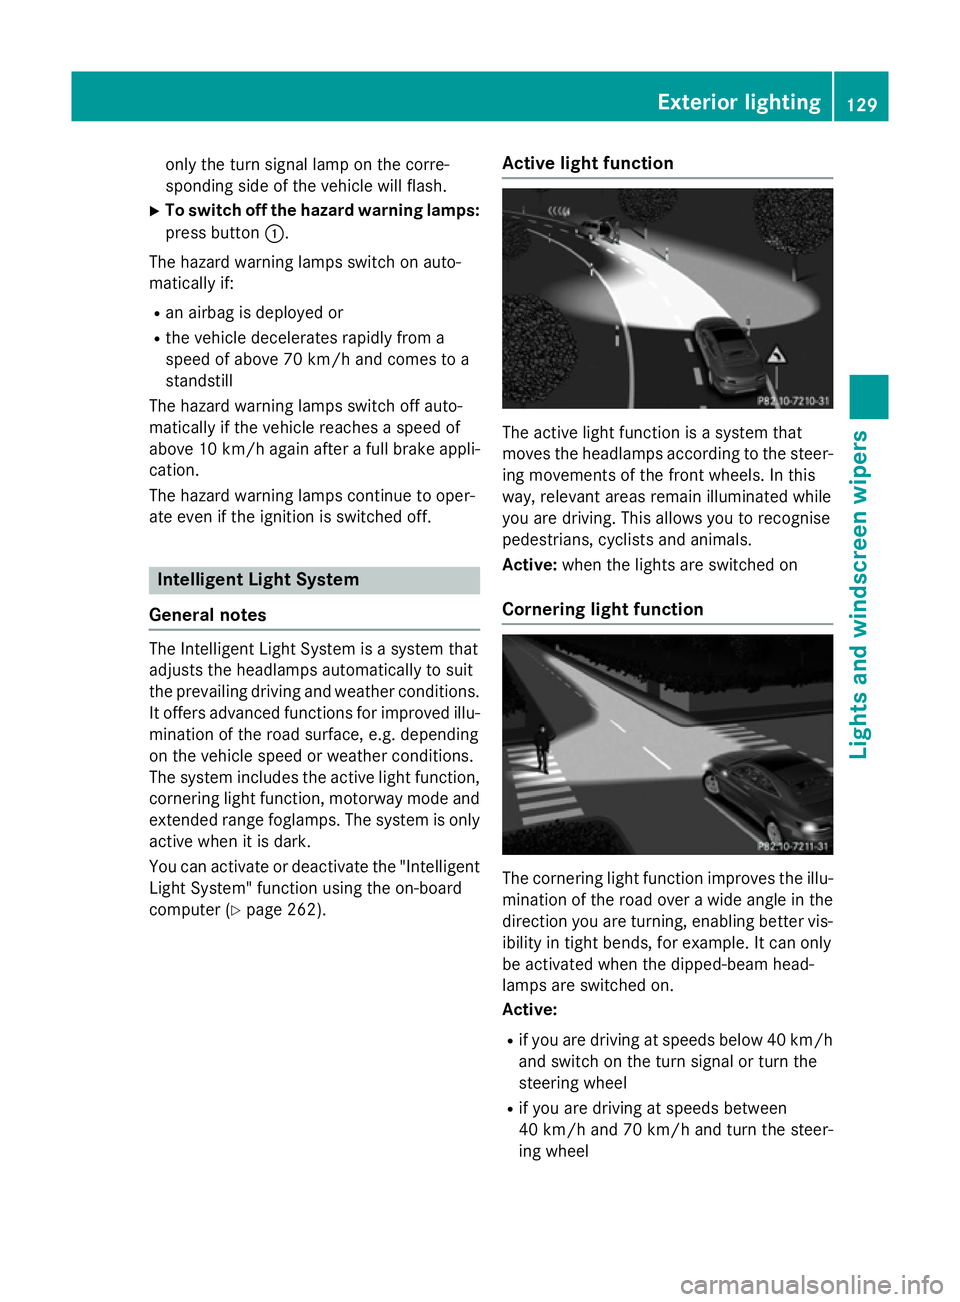
computer (Y page 262). Active light function The active light function is a system that
moves the headlamps according to the steer-
ing movements of the front wheels. In this
way, relevant areas remain illuminated while
you are driving. This allows you to recognise
pedestrians, cyclists and animals.
Active: when the lights are switched on
Cornering light function The cornering light function improves the illu-
mination of the road over a wide angle in the direction you are turning, enabling better vis-
ibility in tight bends, for example. It can only
be activated when the dipped-beam head-
lamps are switched on.
Active:
R if you are driving at speeds below 40 km/h
and switch on the turn signal or turn the
steering wheel
R if you are driving at speeds between
40 km/ha nd 70 km/h and turn the steer-
ing wheel Exterior lighting
129Lights andwindscreen wipers Z