2015 MERCEDES-BENZ S-CLASS COUPE steering
[x] Cancel search: steeringPage 263 of 417

X
Press ato confirm.
The current selection appears.
X To activate/deactivate: press thea
button again.
If the function is activated, traffic signs and
messages appear in the lower area of the
speedometer.
Further information about Traffic Sign Assist
(Y page 230).
Activating/deactivating COLLISION PRE-
VENTION ASSIST PLUS
X Press òon the steering wheel to open
the menu list.
X Press :or9 on the steering wheel
to select the Settings Settingsmenu.
X Confirm by pressing aon the steering
wheel.
X Press :or9 to select the Assis‐
Assis‐
tance
tance submenu.
X Press ato confirm your selection.
X Press the 9or: button to select
Collision Prevention
Collision Prevention.
X Press ato confirm.
The current selection appears.
X To activate/deactivate: pressa
again.
When COLLISION PREVENTION ASSIST PLUS
is deactivated, the æsymbol appears in
the multifunction display in the Assistance
Assistance
graphic
graphic menu.
Further information about COLLISION PRE-
VENTION ASSIST PLUS (Y page 72).
Activating/deactivating PRE-SAFE ®
Brake
PRE‑SAFE ®
Brake is only available for vehi-
cles with the Driving Assistance Plus pack-
age.
X Press òon the steering wheel to open
the menu list.
X Press :or9 on the steering wheel
to select the Settings
Settings menu. X
Confirm by pressing aon the steering
wheel.
X Press :or9 to select the Assis‐ Assis‐
tance tance submenu.
X Press ato confirm your selection.
X Press the :or9 button to select
PRE-SAFE Brake
PRE-SAFE Brake.
X Press ato confirm.
The current selection appears.
X To activate/deactivate: pressa
again.
When PRE-SAFE ®
Brake is deactivated, the
æ symbol appears in the multifunction
display in the Assistance graphic
Assistance graphic menu.
Further information on PRE ‑SAFE®
Brake
(Y page 77).
Activating/deactivating Active Blind Spot
Assist
X Press òon the steering wheel to open
the menu list.
X Press :or9 on the steering wheel
to select the Settings
Settingsmenu.
X Confirm by pressing aon the steering
wheel.
X Press :or9 to select the Assis‐
Assis‐
tance
tance submenu.
X Press ato confirm your selection.
X Press the :or9 button to select
Blind Spot Assist
Blind Spot Assist.
X Press ato confirm.
The current selection appears.
X To activate/deactivate: pressa
again.
When Active Blind Spot Assist is activated,
white radar waves propagating backwards
appear next to the vehicle in the Assis‐ Assis‐
tance graphic
tance graphic.
For further information about Active Blind
Spot Assist, see (Y page 236).260
Menus and submenusOn-board computer and displays
Page 264 of 417
Setting ATTENTION ASSIST
X Press òon the steering wheel to open
the menu list.
X Press :or9 on the steering wheel
to select the Settings
Settings menu.
X Confirm by pressing aon the steering
wheel.
X Use : or9 to select the Assis‐
Assis‐
tance
tance submenu.
X Press ato confirm your selection.
X Press :or9 to select ATTENTION
ATTENTION
ASSIST
ASSIST.
X Press ato confirm your selection.
X Press the :or9 button to select
Deactivated
Deactivated Standard
StandardorSensitive
Sensitive.
X Press ato confirm the selection.
When ATTENTION ASSIST is deactivated, the é symbol appears in the Assistance
Assistance
graphic
graphic menu in the multifunction display.
For further information about ATTENTION
ASSIST, see (Y page 228).
Activating/deactivating Active Lane
Keeping Assist X Press òon the steering wheel to open
the menu list.
X Press :or9 on the steering wheel
to select the Settings Settingsmenu.
X Confirm by pressing aon the steering
wheel.
X Press :or9 to select the Assis‐
Assis‐
tance
tance submenu.
X Press ato confirm your selection.
X Press the :or9 button to select
Lane Keeping Assist
Lane Keeping Assist.
X Press ato confirm.
The current selection, Standard
StandardorAdap‐
Adap‐
tive
tive, appears.
X To change the setting: pressaagain.
Further information about Active Lane Keep-
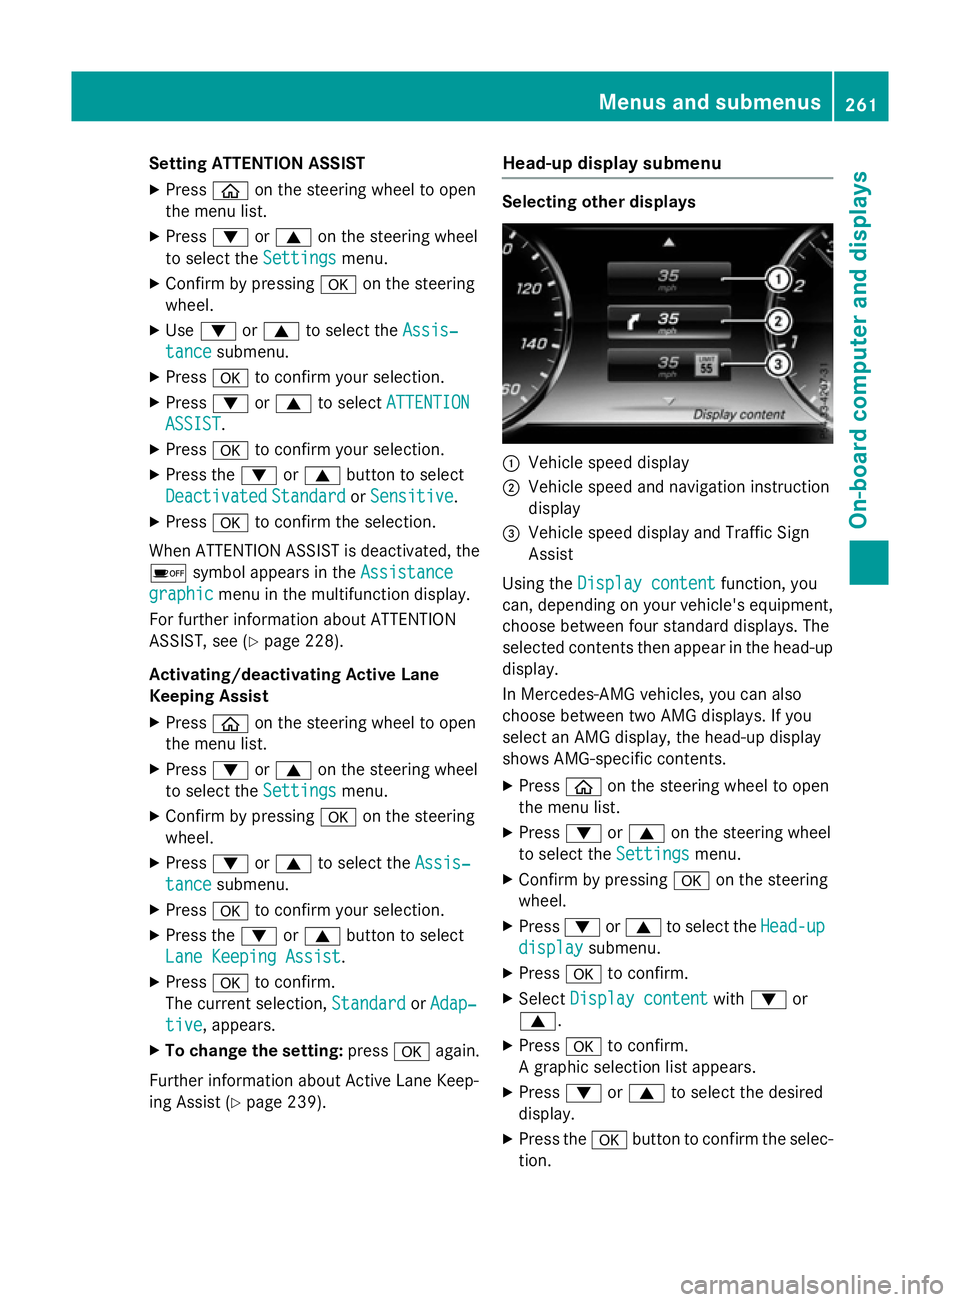
ing Assist (Y page 239). Head-up display submenu Selecting other displays
:
Vehicle speed display
; Vehicle speed and navigation instruction
display
= Vehicle speed display and Traffic Sign
Assist
Using the Display content
Display content function, you
can, depending on your vehicle's equipment,
choose between four standard displays. The
selected contents then appear in the head-up
display.
In Mercedes-AMG vehicles, you can also
choose between two AMG displays. If you
select an AMG display, the head-up display
shows AMG-specific contents.
X Press òon the steering wheel to open
the menu list.
X Press :or9 on the steering wheel
to select the Settings
Settings menu.
X Confirm by pressing aon the steering
wheel.
X Press :or9 to select the Head-up Head-up
display
display submenu.
X Press ato confirm.
X Select Display content
Display content with: or
9.
X Press ato confirm.
A graphic selection list appears.
X Press :or9 to select the desired
display.
X Press the abutton to confirm the selec-
tion. Menus and submenus
261On-board computer and displays Z
Page 265 of 417
Further information on navigation can be
found on COMAND Online (see the separate
operating instructions).
Further information about Traffic Sign Assist
(Y page 230).
Setting the position
You can adjust the position of the head-up
display on the windscreen. You can compen-
sate for height differences if the seat posi-
tions are changed, for example.
X Switch on the head-up display
(Y page 247).
X Press òon the steering wheel to open
the menu list.
X Press the :or9 button on the steer-
ing wheel to select the Settings
Settings menu.
X Confirm by pressing aon the steering
wheel.
X Press :or9 to select the Head-up Head-up
display
display submenu.
X Press ato confirm.
X Press the :or9 button to select the
Position
Position function.
X Press ato save the setting.
X Press :or9 to adjust the position
to a level from Level +5
Level +5 toLevel -5
Level -5.
X Press aor% to save the setting.
Using the Memory function, you can save and
call up the set position of the head-up display as a single memory preset (Y page 122).
Adjusting the brightness
The brightness of the head-up display is auto-
matically adjusted to the surrounding light
conditions. You can also individually adjust
the brightness of the head-up display.
X Switch on the head-up display
(Y page 247).
X Press òon the steering wheel to open
the menu list.
X Press the :or9 button on the steer-
ing wheel to select the Settings
Settings menu.
X Confirm by pressing aon the steering
wheel. X
Use : or9 to select the Head-up
Head-up
display display submenu.
X Press ato confirm.
X Press the :or9 button to select the
Brightness
Brightness function.
X Press the abutton to save the setting.
X Press :or9 to adjust the bright-
ness to a level from Level +5
Level +5 (bright) to
Level -5
Level -5 (dark).
X Press the aor% button to save the
setting.
Light submenu Switching the Intelligent Light System
on/off
X Press òon the steering wheel to open
the menu list.
X Press :or9 on the steering wheel
to select the Settings Settingsmenu.
X Confirm by pressing aon the steering
wheel.
X Use : or9 to select the Lights
Lights
submenu.
X Press ato confirm.
X Press the :or9 button to select the
Intelligent Light System
Intelligent Light System function.
If the Intelligent Light System
Intelligent Light System func-
tion has been switched on, the cone of light and the Lsymbol in the multifunction
display are shown in white.
X Press the abutton to save the setting.
If you switch on the Intelligent Light
Intelligent Light
System
System function, the following functions are
activated:
R Motorway mode
R Active light function
R Cornering light function
R Extended range foglamps
If you set the dipped-beam headlamps for
driving on the right/left, the multifunction
display shows the Inactive for left-
Inactive for left-
side traffic side traffic orInactive for right-
Inactive for right-
side traffic
side traffic display message in the262
Menus and submenusOn-board computer and displays
Page 266 of 417
Lights
Lights
submenu instead of the Intelli‐
Intelli‐
gent Light System
gent Light System function (Ypage 263).
This display message will only appear if the
setting for driving on the left/right is set
opposite to your vehicle's country version.
Further information on the Intelligent Light
System (Y page 129).
Switching the spotlight function on or off
X Press òon the steering wheel to open
the menu list.
X Press :or9 on the steering wheel
to select the Settings
Settings menu.
X Confirm by pressing aon the steering
wheel.
X Press :or9 to select the Lights Lights
submenu.
X Press ato confirm.
X Press the :or9 button to select the
Spotlight
Spotlight function.
X Press the abutton to save the setting.
When the spotlight function is activated,
the assistance graphic shows the pedes-
trian symbol.
Further information on the spotlight function
(Y page 235).
Setting the dipped-beam headlamps for
driving on the left/right
This function is only available on vehicles with
the Intelligent Light System.
You can use this function to switch between
symmetrical and asymmetrical dipped beam
(Y page 126).
X Press òon the steering wheel to open
the menu list.
X Press the :or9 button on the steer-
ing wheel to select the Settings
Settings menu.
X Confirm by pressing aon the steering
wheel.
X Press :or9 to select the Lights Lights
submenu.
X Press ato confirm. X
Press the :or9 button to select the
Dipped beams Setting for
Dipped beams Setting for function.
You will see the selected setting, right-
right-
side traffic
side traffic orleft-side traffic
left-side traffic.
X Press the abutton to save the setting.
If you change the setting, conversion does
not take place until the next time the vehi-
cle is stationary.
If you set the dipped-beam headlamps for
driving on the right/left, then motorway
mode and the extended range foglamps are
unavailable. These are only deactivated if the
setting for driving on the left/right is set
opposite to your vehicle's country version.
A qualified specialist workshop can set the
dipped-beam headlamps for driving on the
left/right.
Instrument cluster submenu Selecting the distance unit
The
Display Display unit
unitSpeed-/odometer
Speed-/odometer func-
tion allows you to choose whether certain
displays appear in kilometres or miles in the
multifunction display.
X Press òon the steering wheel to open
the menu list.
X Press the :or9 button on the steer-
ing wheel to select the Settings Settingsmenu.
X Confirm by pressing aon the steering
wheel.
X Press :or9 to select the Instru‐
Instru‐
ment cluster
ment cluster submenu.
X Press ato confirm.
X Press the :or9 button to select the
Display unit Speed-/odometer
Display unit Speed-/odometer func-
tion.
The current setting km kmorMiles
Miles appears.
X Press the abutton to save the setting.
The selected unit of measurement for dis-
tance applies to the:
R speedometer
R digital speedometer in the Trip
Tripmenu Menus and submenus
263On-board computer and displays Z
Page 267 of 417
R
additional speedometer in the status area
of the multifunction display.
The unit in the additional speedometer is
displayed inversely to the selected dis-
tance unit.
R total distance recorder and trip meter
R trip computer
R current consumption and the range
R navigation instructions in the Navi
Navi menu
R cruise control
R SPEEDTRONIC
R DISTRONIC PLUS
R DISTRONIC PLUS with Steering Assist and
Stop&Go Pilot
R ASSYST PLUS service interval display
Switching the additional speedometer
on/off
The Digital speedo [km/h] Digital speedo [km/h] function
allows you to choose whether the status area
in the multifunction display shows the speed
digitally. The unit in the additional speedom-
eter is always inverse to the speedometer
unit.
X Press òon the steering wheel to open
the menu list.
X Press :or9 on the steering wheel
to select the Settings
Settings menu.
X Confirm by pressing aon the steering
wheel.
X Press :or9 to select the Instru‐
Instru‐
ment cluster ment cluster submenu.
X Press ato confirm your selection.
X Press the :or9 button to select the
Digital speedo [km/h]
Digital speedo [km/h] function.
The current selection appears.
X To activate/deactivate: pressa
again. Vehicle submenu Setting permanent SPEEDTRONIC
X Press òon the steering wheel to open
the menu list.
X Press the :or9 button on the steer-
ing wheel to select the Settings
Settings menu.
X Confirm by pressing aon the steering
wheel.
X Press :or9 to select the Vehicle Vehicle
submenu.
X Press ato confirm.
X Press the :or9 button to select the
Limit speed (winter tyres) Limit speed (winter tyres) function.
The current setting appears.
X Press ato confirm.
X Press :or9 to adjust permanent
SPEEDTRONIC in increments of ten
(240 km/h 240 km/h to160 km/h 160 km/h). The Off
Offsetting
switches permanent SPEEDTRONIC off.
X Press the abutton to store the entry.
For further information on permanent SPEED- TRONIC (Y page 194).
Restoring the factory settings X
Press òon the steering wheel to open
the menu list.
X Press :or9 on the steering wheel
to select the Settings
Settingsmenu.
X Confirm by pressing aon the steering
wheel.
X Press :or9 to select the Factory
Factory
settings
settings submenu.
X Press ato confirm.
The Reset all settings?
Reset all settings? function
appears.
X Press the :or9 button to select No
No
or Yes
Yes .
X Press the abutton to confirm the selec-
tion.
If you have selected Yes Yes, the multifunction
display shows a confirmation message.
For safety reasons, not all functions will be
reset: the Limit speed (winter tyres) Limit speed (winter tyres) 264
Menus and submenusOn-board computer and displays
Page 268 of 417
permanent SPEEDTRONIC function can only
be set in the Vehicle
Vehiclesubmenu. AMG menu (Mercedes-AMG vehicles)
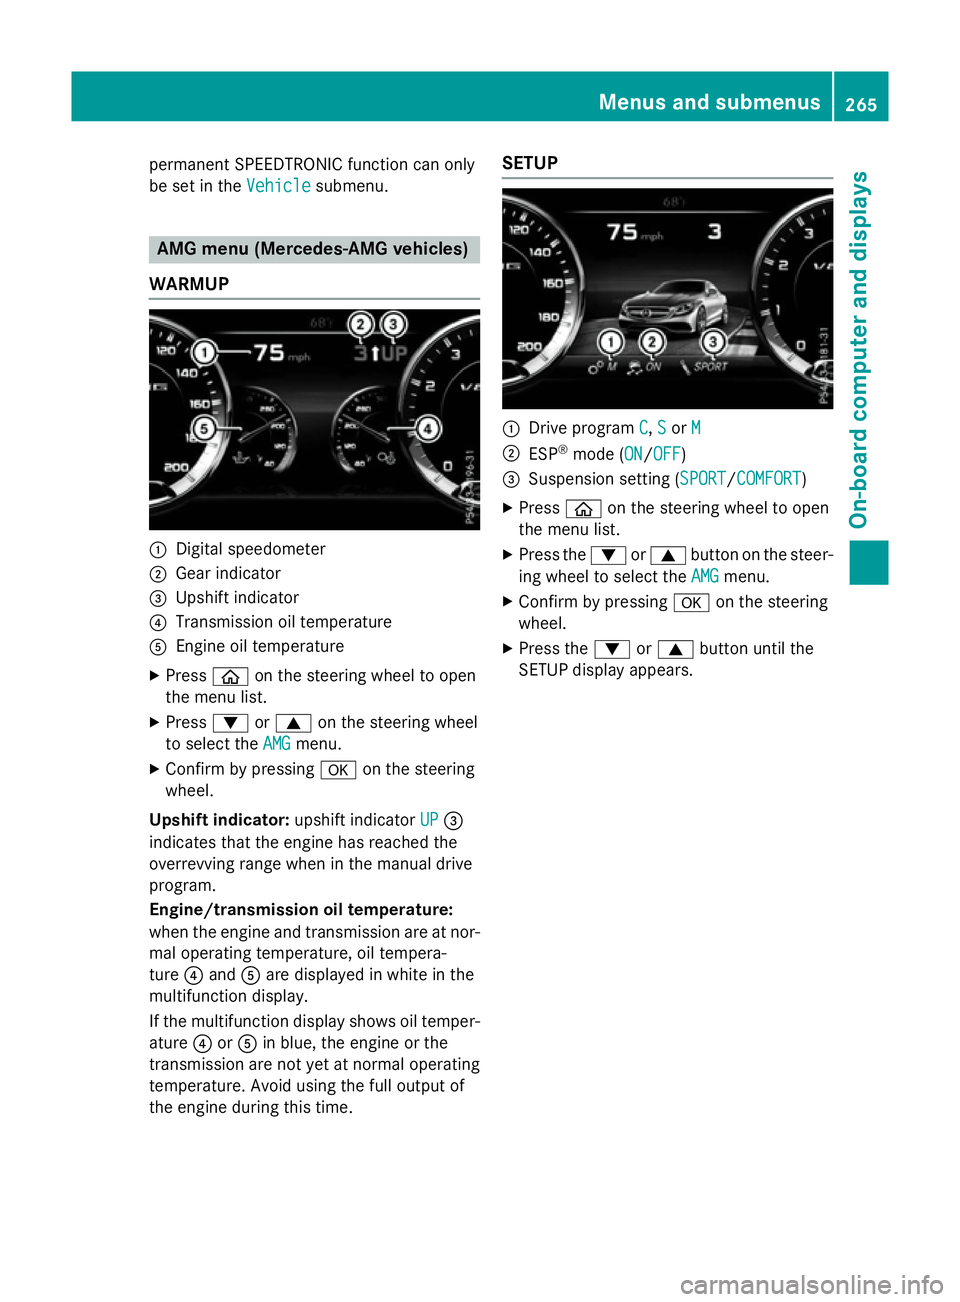
WARMUP :
Digital speedometer
; Gear indicator
= Upshift indicator
? Transmission oil temperature
A Engine oil temperature
X Press òon the steering wheel to open
the menu list.
X Press :or9 on the steering wheel
to select the AMG
AMG menu.
X Confirm by pressing aon the steering
wheel.
Upshift indicator: upshift indicatorUP
UP=
indicates that the engine has reached the
overrevving range when in the manual drive
program.
Engine/transmission oil temperature:
when the engine and transmission are at nor-
mal operating temperature, oil tempera-
ture ?and Aare displayed in white in the
multifunction display.
If the multifunction display shows oil temper-
ature ?orA in blue, the engine or the
transmission are not yet at normal operating
temperature. Avoid using the full output of
the engine during this time. SETUP
:
Drive program C C,S
Sor M
M
; ESP ®
mode (ON ON/OFFOFF)
= Suspension setting ( SPORT
SPORT/COMFORT
COMFORT)
X Press òon the steering wheel to open
the menu list.
X Press the :or9 button on the steer-
ing wheel to select the AMG
AMG menu.
X Confirm by pressing aon the steering
wheel.
X Press the :or9 button until the
SETUP display appears. Menus and submenus
265On-board computer and displays Z
Page 269 of 417
Display messages
Introduction
General notes Display messages appear in the multifunction display.
Display messages with graphic symbols are simplified in the Owner's Manual and may differ
from the symbols in the multifunction display.
Please respond in accordance with the display messages and follow the additional notes in this Owner's Manual.
With certain display messages, you will also hear a warning tone.
You can hide the display messages. The display messages are then stored in the message
memory. Rectify the cause of a display message as soon as possible.
When you stop and park the vehicle, please observe the notes on:
R HOLD function (Y page 205)
R Parking (Y page 181)
Hiding display messages X
Press aor% on the steering wheel.
The multifunction display hides the display message.
The multifunction display shows high-priority display messages in red. Some high-priority dis- play messages cannot be hidden.
The multifunction display shows these messages continuously until the causes for the mes-
sages have been remedied.
Message memory The on-board computer saves certain display messages in the
message memory. You can call
up the display messages:
X Press òon the steering wheel to open the menu list.
X Press :or9 on the steering wheel to select the Service Servicemenu.
X Confirm by pressing aon the steering wheel.
X Press :or9 to select the message memory.
If there are no display messages, the No messages
No messagesdisplay appears in the multifunction
display.
When there are display messages, the number of stored messages appears.
X Press ato confirm.
X Press :or9 to scroll through the display messages. 266
Display
messagesOn-board computer and displays
Page 278 of 417

Display messages
Possible causes/consequences and
M
MSolutions PRE-SAFE
PRE-SAFE
Functions
Functions
limited See Own‐
limited See Own‐
er's Manual er's Manual PRE
‑SAFE ®
PLUS or PRE‑ SAFE®
Brake is unavailable due to a mal-
function. BAS PLUS with Cross-Traffic Assist may also have failed.
X Consult a qualified specialist workshop. Radar sensors
Radar sensors
dirty See Owner's dirty See Owner's
Manual Manual At least one of the following driving systems or driving safety sys-
tems is temporarily restricted or inoperative:
R PRE-SAFE ®
PLUS
R PRE-SAFE ®
Brake
R COLLISION PREVENTION ASSIST PLUS
R Active Lane Keeping Assist
R Active Blind Spot Assist
R DISTRONIC PLUS with Steering Assist and Stop&Go Pilot
If the radar sensor system in front is dirty, Active Blind Spot Assist
will not perform a course-correcting brake application.
Possible causes:
R the sensors in the radiator trim and/or in the bumpers are dirty
R the function of the driving system and/or driving safety system
is impaired due to heavy rain or snow
A warning tone also sounds.
Once the causes listed above no longer apply, the display message
goes out. All driving systems and driving safety systems are opera- tional again.
If the display message does not disappear:
X Pull over and stop the vehicle safely as soon as possible, paying
attention to road and traffic conditions.
X Safeguard the vehicle against rolling away (Y page 181).
X Switch off the engine.
X Clean the sensors (Y page 349) in the following locations:
R in the radiator trim
R in the front bumper
R in the rear bumper, particularly in the middle of the rear
bumper
X Restart the engine.
The display message disappears. ü ü If this symbol appears in the multifunction display, a seat belt
tongue has been inserted into a rear seat belt buckle.
Further information on the status indicator for the rear seat belts
(Y page 48). Display
messages
275On-board computer and displays Z