2015 MERCEDES-BENZ M-Class wheel
[x] Cancel search: wheelPage 132 of 466

Halogen headlamps
0043
Low-beam headlamp: H7 55 W
0044 High-beam headlamp: H7 55 W
0087 Parking lamp/standing lamp: W 5 W BV
0085 Side marker lamp: WY 5 W Tail lamp
0043
Brake lamp: P 21 W-L Changing the front bulbs
Removing and installing the cover in the
front wheel housing You must remove the cover from the front
wheel housing before you can change the
front bulbs. X
To remove: switch off the lights.
X Turn the front wheels inwards.
X Remove securing pin 0044using a suitable
tool.
X Slide cover 0043up and remove it.
X To install: insert cover 0043again and slide it
down until it engages.
X Insert securing pin 0044.
Low-beam headlamps (halogen head-
lamps) X
Remove the cover in the front wheel hous-
ing (Y page 130).
X Turn housing cover 0043counter-clockwise
and pull it out.
X Turn bulb holder 0044counter-clockwise and
pull it out.
X Take the bulb out of bulb holder 0044.
X Insert the new bulb into bulb holder 0044.
X Insert bulb holder 0044into the lamp and turn
it clockwise. 130
Replacing bulbsLights and windshield wipers
Page 133 of 466

X
Align housing cover 0043and turn it clock-
wise until it engages.
X Replace the cover in the front wheel hous-
ing (Y page 130).
High-beam headlamps (halogen head-
lamps) X
Switch off the lights.
X Open the hood.
X Turn housing cover 0043counter-clockwise
and pull it out.
X Pull lever 0087upwards and remove bulb
holder 0044.
X Take the bulb out of bulb holder 0044.
X Insert the new bulb into bulb holder 0044.
X Simultaneously press bulb holder 0044and
pull lever 0087downwards.
X Align housing cover 0043and turn it clock-
wise until it engages.
Parking lamps/standing lamps (halo-
gen headlamps) X
Switch off the lights.
X Open the hood.
X Turn housing cover 0043counter-clockwise
and pull it out.
X Pull out bulb holder 0044.
X Take the bulb out of bulb holder 0044.
X Insert the new bulb into bulb holder 0044.
X Insert bulb holder 0044.
X Align housing cover 0043and turn it clock-
wise until it engages.
Side marker lamps X
Remove the cover in the front wheel hous-
ing (Y page 130).
X Turn cap 0044counter-clockwise and remove
it.
X Pull out bulb holder 0043.
X Take the bulb out of bulb holder 0043.
X Insert the new bulb into bulb holder 0043.
X Insert bulb holder 0043.
X Align cap 0044and turn it clockwise until it
engages.
X Replace the cover in the front wheel hous-
ing (Y page 130). Replacing bulbs
131Lights andwindshield wipers Z
Page 154 of 466

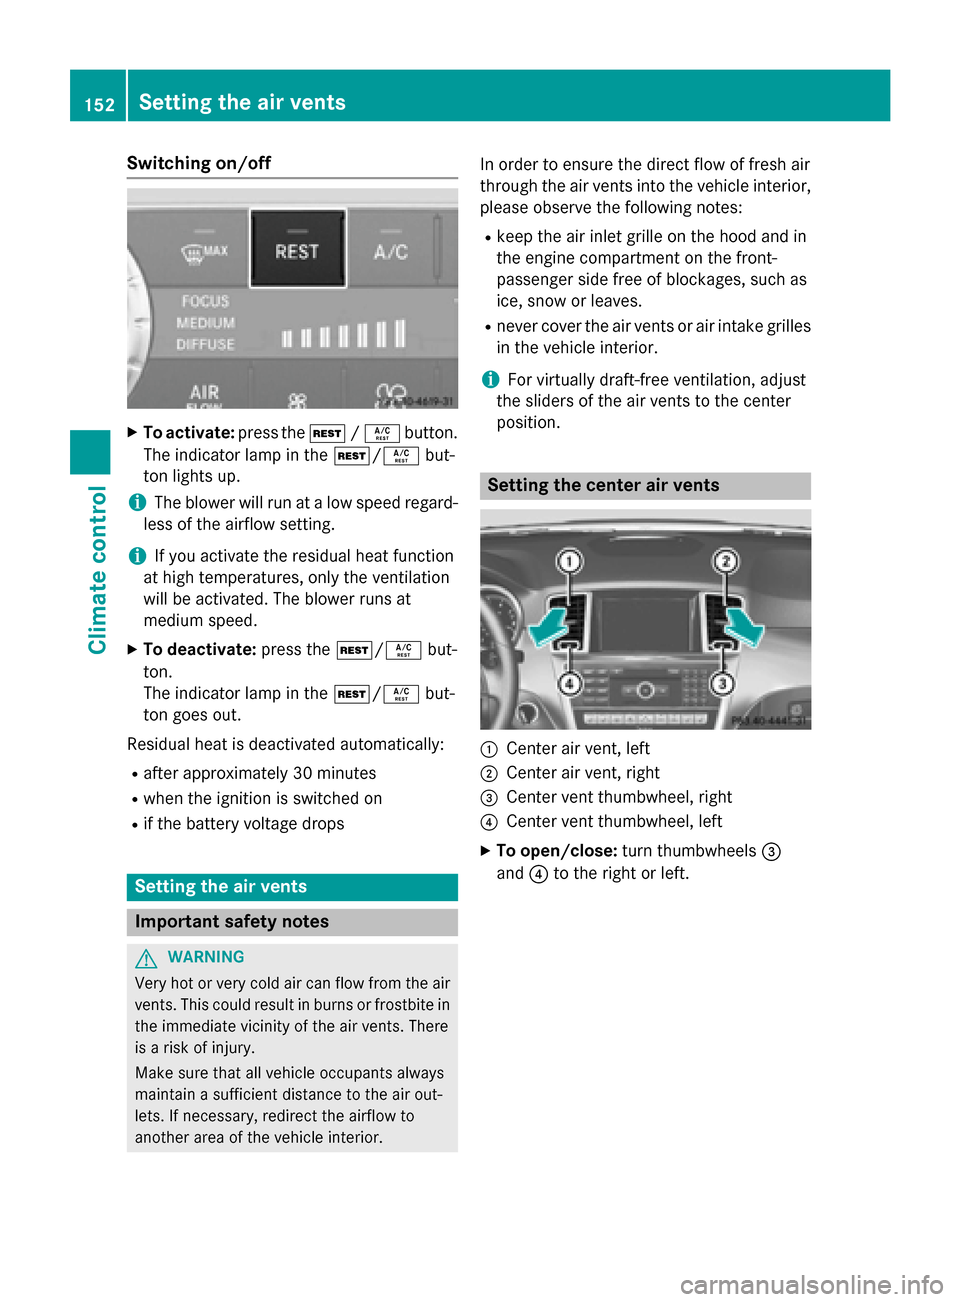
Switching on/off
X
To activate: press the004B/0056 button.
The indicator lamp in the 004B/0056but-
ton lights up.
i The blower will run at a low speed regard-
less of the airflow setting.
i If you activate the residual heat function
at high temperatures, only the ventilation
will be activated. The blower runs at
medium speed.
X To deactivate: press the004B/0056 but-
ton.
The indicator lamp in the 004B/0056but-
ton goes out.
Residual heat is deactivated automatically: R after approximately 30 minutes
R when the ignition is switched on
R if the battery voltage drops Setting the air vents
Important safety notes
G
WARNING
Very hot or very cold air can flow from the air vents. This could result in burns or frostbite in the immediate vicinity of the air vents. There
is a risk of injury.
Make sure that all vehicle occupants always
maintain a sufficient distance to the air out-
lets. If necessary, redirect the airflow to
another area of the vehicle interior. In order to ensure the direct flow of fresh air
through the air vents into the vehicle interior,
please observe the following notes:
R keep the air inlet grille on the hood and in
the engine compartment on the front-
passenger side free of blockages, such as
ice, snow or leaves.
R never cover the air vents or air intake grilles
in the vehicle interior.
i For virtually draft-free ventilation, adjust
the sliders of the air vents to the center
position. Setting the center air vents
0043
Center air vent, left
0044 Center air vent, right
0087 Center vent thumbwheel, right
0085 Center vent thumbwheel, left
X To open/close: turn thumbwheels 0087
and 0085to the right or left. 152
Setting the air ventsClimate control
Page 155 of 466

Setting the side air vents
0043
Side window defroster vent
0044 Side air vent
0087 Control for side air vent
X To open/close: turn thumbwheel 0087up or
down. Setting the glove box air vent
! Close the air vent when heating the vehi-
cle.
At high outside temperatures, open the air
vent and activate the "cooling with air dehu- midification" function. Otherwise, temper-
ature-sensitive items stored in the glove
box could be damaged. 0043
Air vent thumbwheel
0044 Air vent
When automatic climate control is activated,
the glove box can be ventilated, for instance
to cool its contents. The level of airflow
depends on the airflow and air distribution
settings. X
To open/close: turn thumbwheel 0043
clockwise or counter-clockwise. Setting the rear-compartment air
vents
Setting the center vents in the rear com-
partment Example: center vents with rear control panel
0043
Rear-compartment air vent thumbwheel
0044 Rear-compartment air vent, right
0087 Rear control panel
0085 Rear-compartment air vent, left
X To open/close: turn thumbwheel 0043up or
down.
Setting the B-pillar air vent 0043
B-pillar air vent
0044 Thumbwheel for B-pillar air vent
X To open/close: turn thumbwheel 0044to the
left or right. Setting the air vents
153Climate control Z
Page 159 of 466

G
WARNING
Unsuitable footwear can hinder correct usage of the pedals, e.g.:
R shoes with thick soles
R shoes with high heels
R slippers
There is a risk of an accident.
Wear suitable footwear to ensure correct
usage of the pedals. G
WARNING
If you switch off the ignition while driving,
safety-relevant functions are only available
with limitations, or not at all. This could affect, for example, the power steering and the brake
boosting effect. You will require considerably
more effort to steer and brake. There is a risk of an accident.
Do not switch off the ignition while driving. G
WARNING
If the parking brake has not been fully
released when driving, the parking brake can:
R overheat and cause a fire
R lose its hold function.
There is a risk of fire and an accident. Release
the parking brake fully before driving off.
! Warm up the engine quickly. Do not use
the engine's full performance until it has
reached operating temperature.
Only shift the automatic transmission to
the desired drive position when the vehicle
is stationary.
Where possible, avoid spinning the drive
wheels when pulling away on slippery
roads. You could otherwise damage the
drive train.
! AMG vehicles:
at low engine oil temper-
atures below 68 ‡ (+20 †), the maximum
engine speed is restricted in order to pro-
tect the engine. To protect the engine and
maintain smooth engine operation, avoid driving at full throttle when the engine is
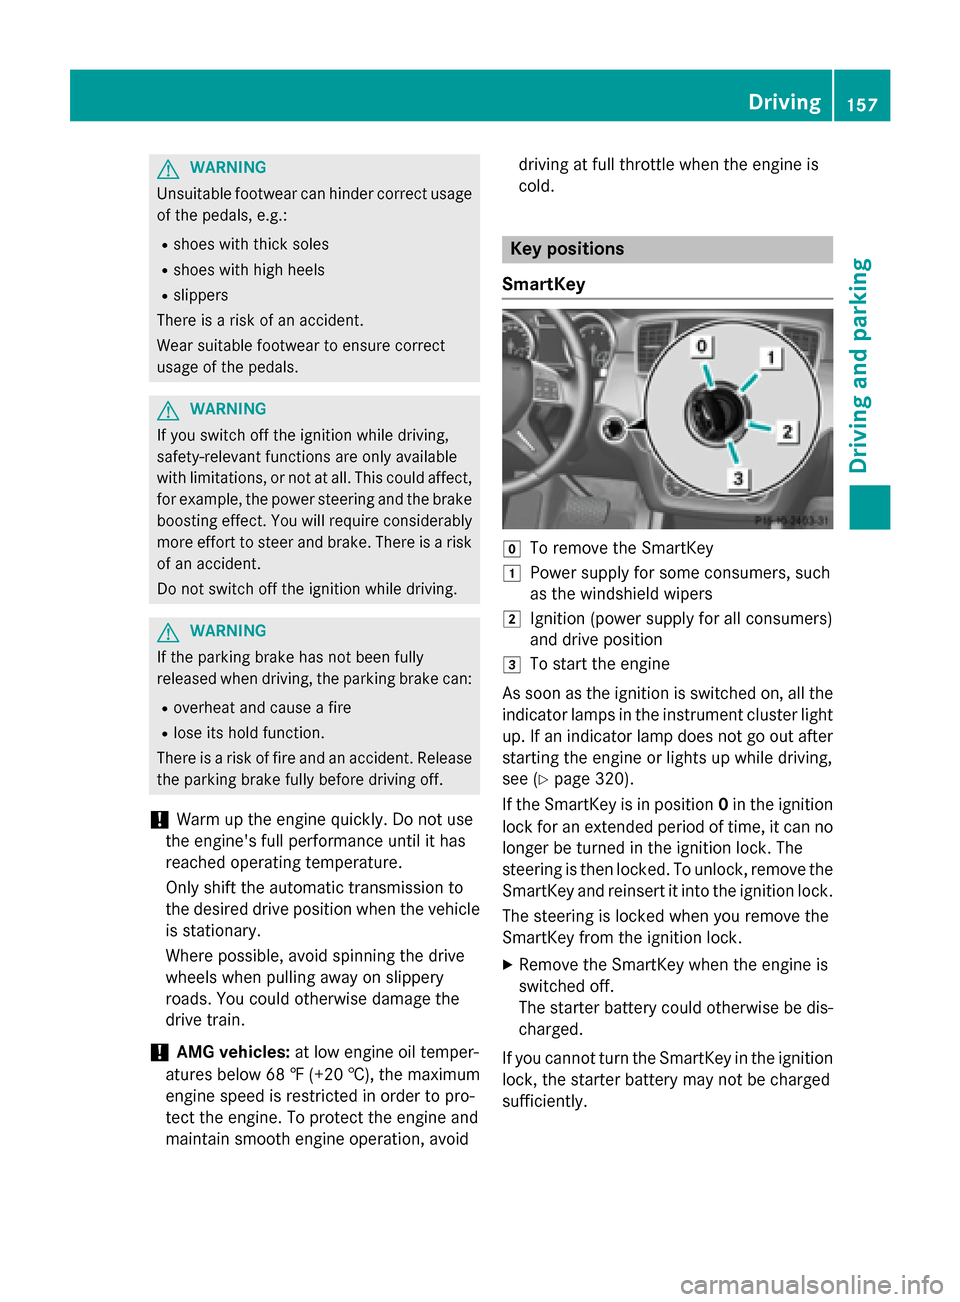
cold. Key positions
SmartKey 005A
To remove the SmartKey
0047 Power supply for some consumers, such
as the windshield wipers
0048 Ignition (power supply for all consumers)
and drive position
0049 To start the engine
As soon as the ignition is switched on, all the
indicator lamps in the instrument cluster light up. If an indicator lamp does not go out after
starting the engine or lights up while driving,
see (Y page 320).
If the SmartKey is in position 0in the ignition
lock for an extended period of time, it can no
longer be turned in the ignition lock. The
steering is then locked. To unlock, remove the SmartKey and reinsert it into the ignition lock.
The steering is locked when you remove the
SmartKey from the ignition lock.
X Remove the SmartKey when the engine is
switched off.
The starter battery could otherwise be dis-
charged.
If you cannot turn the SmartKey in the ignition
lock, the starter battery may not be charged
sufficiently. Driving
157Driving and parking Z
Page 173 of 466

0044 Neutral
Do not shift the transmission to
N
while driving. Otherwise, the auto-
matic transmission could be dam-
aged.
No power is transmitted from the
engine to the drive wheels.
Releasing the brake pedal will allow
you to move the vehicle freely, e.g. to push it or tow it.
If ESP ®
is deactivated or faulty:
only shift the transmission to posi-
tion Nif the vehicle is in danger of
skidding, e.g. on icy roads.
If you switch off the engine using
the SmartKey or the Start/Stop
button, the automatic transmission shifts to neutral Nautomatically.
! Rolling in neutral
Ncan damage
the drive train. 003A Drive
The automatic transmission
changes gear automatically. All
forward gears are available.
Driving tips
Changing gear The automatic transmission shifts to the indi-
vidual gears automatically when it is in trans-
mission position D. This automatic gear shift-
ing behavior is determined by:
R the selected drive program (Y page 172)
R the position of the accelerator pedal
(Y page 171)
R the road speed
Accelerator pedal position Your style of driving influences how the auto-
matic transmission shifts gear:
R little throttle: early upshifts
R more throttle: late upshifts Kickdown Use kickdown for maximum acceleration.
X Depress the accelerator pedal beyond the
pressure point.
The automatic transmission shifts to a
lower gear depending on the engine speed.
X Ease off the accelerator pedal once the
desired speed is reached.
The automatic transmission shifts back up.
Rocking the vehicle free Shifting the transmission repeatedly between
gears Dand Rmay help to free the vehicle if it
has become stuck in slush or snow. The vehi-
cle's engine management system limits the
speed to a maximum of 5 mph (9 km/h) when shifting back and forth. To shift back and forth
between transmission positions Dand R,
move the DIRECT SELECT lever up and down past the point of resistance.
Towing a trailer X
Drive in the middle of the engine speed
range on uphill gradients.
X Depending on the uphill or downhill gradi-
ent, use left-hand steering wheel paddle
shifter (Y page 172) to select a lower gear,
even if cruise control or DISTRONIC PLUS
are activated. Automatic transmission
171Driving and parking Z
Page 174 of 466

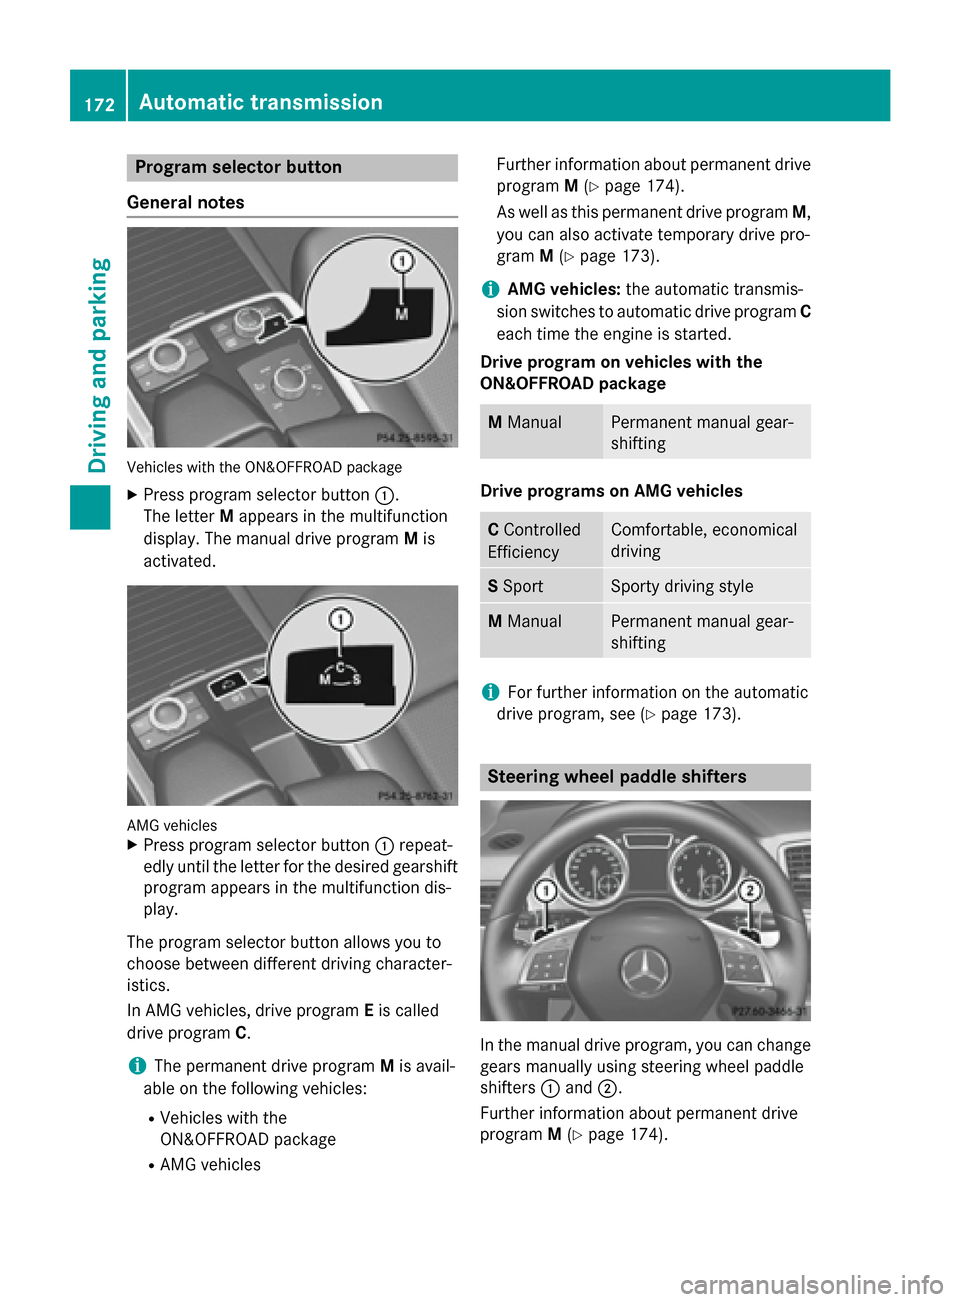
Program selector button
General notes Vehicles with the ON&OFFROAD package
X Press program selector button 0043.
The letter Mappears in the multifunction
display. The manual drive program Mis
activated. AMG vehicles
X
Press program selector button 0043repeat-
edly until the letter for the desired gearshift program appears in the multifunction dis-
play.
The program selector button allows you to
choose between different driving character-
istics.
In AMG vehicles, drive program Eis called
drive program C.
i The permanent drive program Mis avail-
able on the following vehicles:
R Vehicles with the
ON&OFFROAD package
R AMG vehicles Further information about permanent drive
program M(Y page 174).
As well as this permanent drive program M,
you can also activate temporary drive pro-
gram M(Y page 173).
i AMG vehicles:
the automatic transmis-
sion switches to automatic drive program C
each time the engine is started.
Drive program on vehicles with the
ON&OFFROAD package M
Manual Permanent manual gear-
shifting
Drive programs on AMG vehicles
C
Controlled
Efficiency Comfortable, economical
driving
S
Sport Sporty driving style
M
Manual Permanent manual gear-
shifting
i
For further information on the automatic
drive program, see (Y page 173). Steering wheel paddle shifters
In the manual drive program, you can change
gears manually using steering wheel paddle
shifters 0043and 0044.
Further information about permanent drive
program M(Y page 174). 172
Automatic transmissionDriving and parking
Page 175 of 466

Further information about temporary drive
program M(Y page 173).
i You can only change gear with the steer-
ing wheel paddle shifters when the trans-
mission is in position D.Automatic drive program
Automatic drive programs E and S Drive program
E(drive program Con MAG
vehicles) is characterized by the following:
R comfort-oriented engine and transmission
settings
R optimal fuel consumption resulting from
the automatic transmission shifting up
sooner
R the vehicle pulling away more gently in
forward and reverse gears, unless the
accelerator pedal is depressed fully
R increased sensitivity. This improves driving
stability on slippery road surfaces, for
example
R the automatic transmission shifting up
sooner. This results in the vehicle being
driven at lower engine speeds and the
wheels being less likely to spin
Drive program Sis characterized by the fol-
lowing:
R sporty engine and transmission settings
R the automatic transmission shifting up
later
R the fuel consumption possibly being higher
as a result of the later automatic transmis-
sion shift points
Manual drive program M General notes
In this drive program, you can briefly change
gear yourself by using the steering wheel pad- dle shifters. The transmission must be in posi-
tion D. All vehicles (except AMG vehicles):
you
can activate manual drive program Musing
the steering wheel paddle shifters.
AMG vehicles: you can activate manual drive
program Min automatic drive programs Cand
S.
Vehicles with the ON&OFFROAD package:
if manual drive program Mis deactivated
using the program selector button, you can
activate manual drive program Musing the
steering wheel paddle shifters.
i As well as temporary drive program
M,
you can also activate permanent drive pro- gram M(Y page 172).
Further information about permanent drive program M(Y page 174).
Activating
X Shift the transmission to position D.
X Pull the left or right steering wheel paddle
shifter (Y page 172).
Manual drive program Mis temporarily acti-
vated. The selected gear and Mappear in
the multifunction display.
Shifting gears
If you pull on the left or right steering wheel
paddle shifter, the automatic transmission
switches to manual drive program Mfor a
limited amount of time. Depending on which
paddle shifter is pulled, the automatic trans-
mission immediately shifts into the next gear down or up, if permitted.
X To shift up: pull the right-hand steering
wheel paddle shifter (Y page 172).
The automatic transmission shifts up to the
next gear.
i If the maximum engine speed on the cur-
rently engaged gear is reached and you
continue to accelerate, the automatic Automatic transmission
173Driving and parking Z