2015 MERCEDES-BENZ M-Class height
[x] Cancel search: heightPage 110 of 466
Rear seat head restraints
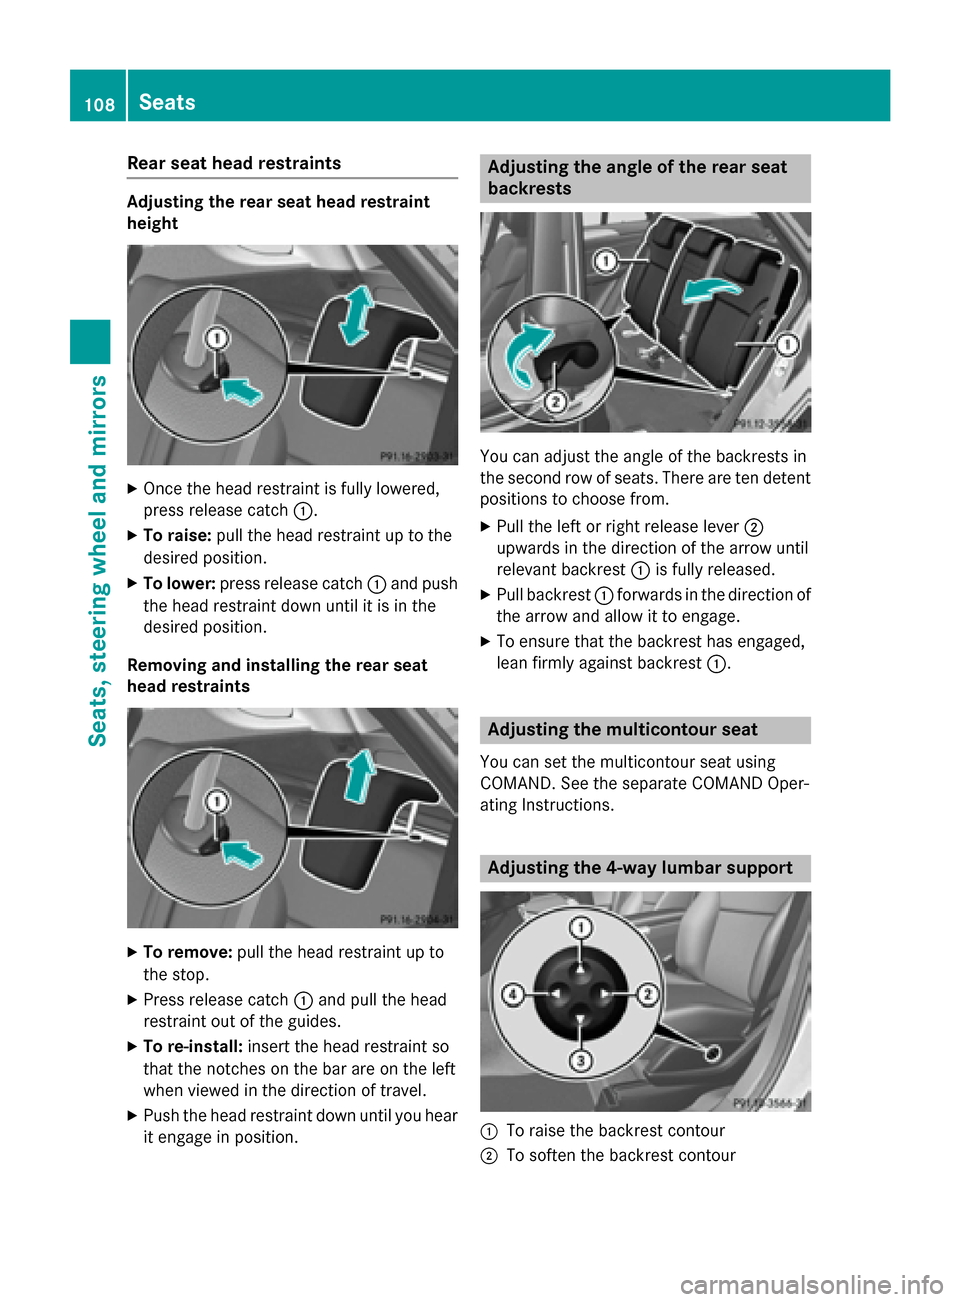
Adjusting the rear seat head restraint
height
X
Once the head restraint is fully lowered,
press release catch 0043.
X To raise: pull the head restraint up to the
desired position.
X To lower: press release catch 0043and push
the head restraint down until it is in the
desired position.
Removing and installing the rear seat
head restraints X
To remove: pull the head restraint up to
the stop.
X Press release catch 0043and pull the head
restraint out of the guides.
X To re-install: insert the head restraint so
that the notches on the bar are on the left
when viewed in the direction of travel.
X Push the head restraint down until you hear
it engage in position. Adjusting the angle of the rear seat
backrests
You can adjust the angle of the backrests in
the second row of seats. There are ten detent
positions to choose from.
X Pull the left or right release lever 0044
upwards in the direction of the arrow until
relevant backrest 0043is fully released.
X Pull backrest 0043forwards in the direction of
the arrow and allow it to engage.
X To ensure that the backrest has engaged,
lean firmly against backrest 0043. Adjusting the multicontour seat
You can set the multicontour seat using
COMAND. See the separate COMAND Oper-
ating Instructions. Adjusting the 4-way lumbar support
0043
To raise the backrest contour
0044 To soften the backrest contour 108
SeatsSeats, steering wheel and mirrors
Page 113 of 466

Problems with the seat ventilation
Problem
Possible causes/consequences and
0050
0050Solutions The seat ventilation has
switched off prema-
turely or cannot be
switched on. The on-board voltage is too low because too many electrical con-
sumers are switched on.
X Switch off electrical consumers that you do not need, such as
the rear window defroster or interior lighting.
Once the battery is sufficiently charged, the seat ventilation will
switch back on automatically. Steering wheel
Important safety notes
G
WARNING
You could lose control of your vehicle if you do the following while driving:
R adjust the driver's seat, head restraint,
steering wheel or mirrors
R fasten the seat belt
There is a risk of an accident.
Adjust the driver's seat, head restraint, steer-
ing wheel and mirror and fasten your seat belt before starting the engine. G
WARNING
Children could injure themselves if they
adjust the steering wheel. There is a risk of
injury.
When leaving the vehicle, always take the
SmartKey with you and lock the vehicle. Never leave children unsupervised in the vehicle. Adjusting the steering wheel man-
ually
G
WARNING
If the steering wheel is unlocked while the
vehicle is in motion, it could change position
unexpectedly. This could cause you to lose
control of the vehicle. There is a risk of an
accident. Before starting off, make sure the steering
wheel is locked. Never unlock the steering
wheel while the vehicle is in motion.
0043
Release lever
0044 To adjust the steering wheel height
0087 To adjust the steering wheel position
(fore-and-aft adjustment)
X Push release lever 0043down completely.
The steering column is unlocked.
X Adjust the steering wheel to the desired
position.
X Push release lever 0043up completely.
The steering column is locked.
X Check if the steering column is locked.
When doing so, try to push the steering
wheel up or down or try to move it in the
fore-and-aft direction. Steering wheel
111Seats, steering wheel and mirrors Z
Page 114 of 466
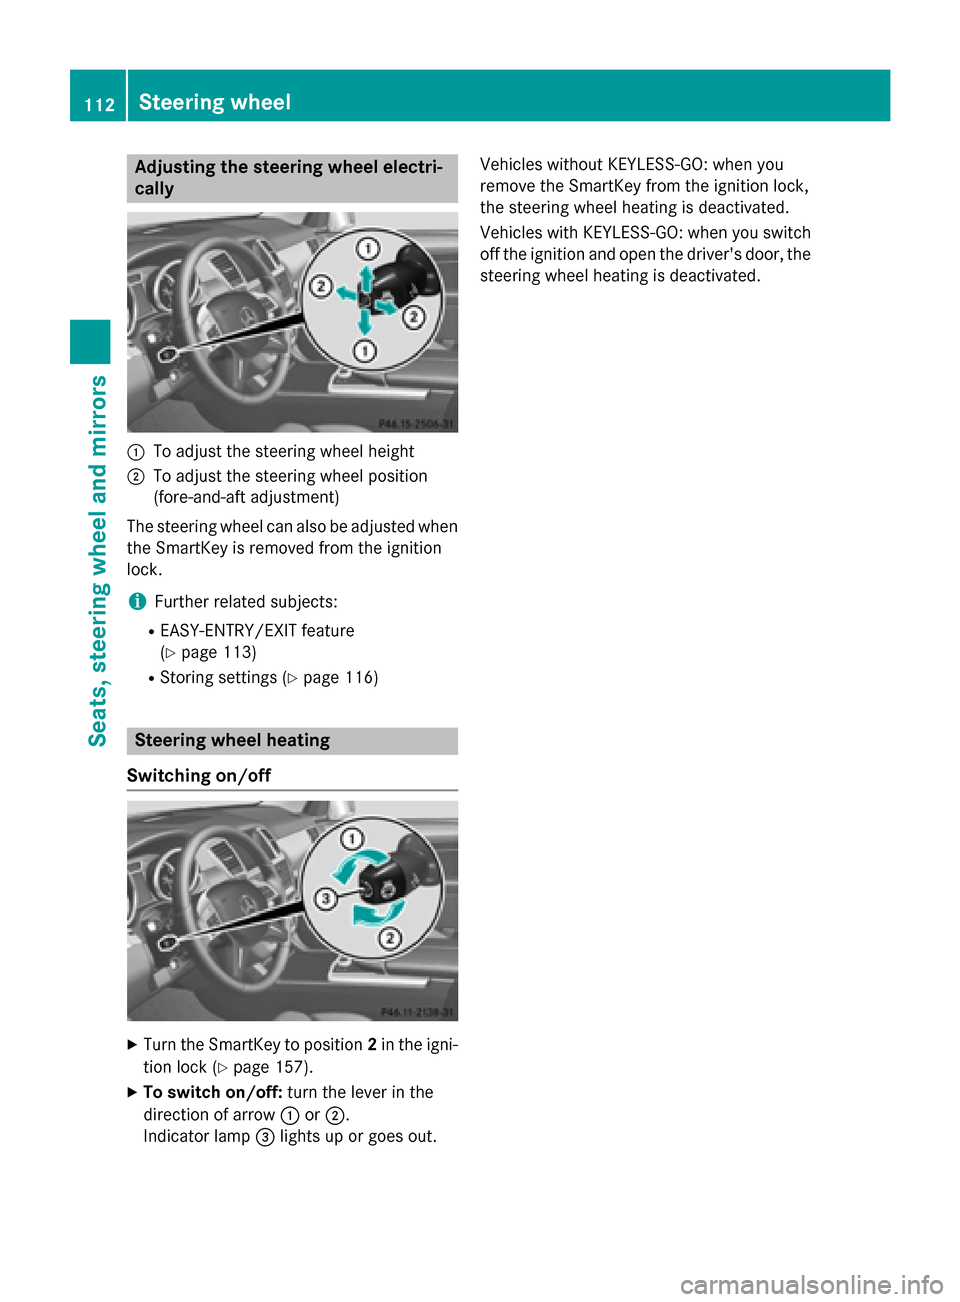
Adjusting the steering wheel electri-
cally 0043
To adjust the steering wheel height
0044 To adjust the steering wheel position
(fore-and-aft adjustment)
The steering wheel can also be adjusted when the SmartKey is removed from the ignition
lock.
i Further related subjects:
R EASY-ENTRY/EXIT feature
(Y page 113)
R Storing settings (Y page 116)Steering wheel heating
Switching on/off X
Turn the SmartKey to position 2in the igni-
tion lock (Y page 157).
X To switch on/off: turn the lever in the
direction of arrow 0043or0044.
Indicator lamp 0087lights up or goes out. Vehicles without KEYLESS-GO: when you
remove the SmartKey from the ignition lock,
the steering wheel heating is deactivated.
Vehicles with KEYLESS-GO: when you switch
off the ignition and open the driver's door, the steering wheel heating is deactivated. 112
Steering wheelSeats
, steering wheel and mirrors
Page 195 of 466

Check the engine oil level. The engine oil
warning lamp warning must not be ignored. Continuing the journey while the symbol is
displayed could lead to engine damage.
X Engine oil level: check the engine oil level
and add oil if necessary.
When driving on steep gradients, the
engine oil level must be sufficiently high to
ensure a correct oil supply in the vehicle.
X DEF tank (BlueTEC vehicles): check the
level and top up if necessary (Y page 180).
X Tire-changing tool kit: check that the jack
is working and make sure you have the lug
wrench, a robust tow cable and a folding
spade in the vehicle.
X Wheels and tires: check the tire tread
depth and tire pressure.
X Check for damage and remove any foreign
objects, e.g. small stones, from the
wheels/tires.
X Replace any missing valve caps.
X Replace dented or damaged wheels.
X Rims: dented or bent rims can result in a
loss of tire pressure and damage the tire
bead. Therefore, check your rims before
driving off-road and replace them as
required.
Checklist after driving off-road !
If you detect damage to the vehicle after
driving off-road, have the vehicle checked
immediately at a qualified specialist work-
shop.
X Vehicles with the ON&OFFROAD pack-
age: activate the on-road program
(Y page 251).
X Deactivate the LOW RANGE off-road gear
(Y page 253).
X Deactivate DSR (Y page 250).
X Vehicles with the AIRMATIC package:
lower the vehicle to a ride height suitable
for the road conditions, e.g. to the high-
way/high-speed level. X
Clean the headlamps and rear lights and
check for damage.
X Clean the front and rear license plates.
X Clean the wheels/tires with a water jet and
remove any foreign objects.
X Clean the wheels, wheel housings and the
vehicle underside with a water jet; check
for any foreign objects and damage.
X Check whether twigs or other parts of
plants have become trapped. These
increase the risk of fire and can damage
fuel pipes, brake hoses or the rubber bel-
lows of the axle joints and propeller shafts.
X After the trip, examine without fail the
entire undercarriage, wheels, tires, brakes,
bodywork structure, steering, chassis and
exhaust system for damage.
X After driving for extended periods across
sand, mud, gravel, water or in similarly dirty
conditions, have the brake discs, wheels,
brake pads/linings and axle joints checked
and cleaned.
X If you detect strong vibrations after off-road
travel, check for foreign objects in the
wheels and drive train and remove them if
necessary. Foreign objects can disturb the
balance and cause vibrations.
Driving over rough terrain places greater
demands on your vehicle than driving on nor-
mal roads. After driving off-road, check the
vehicle. This allows you to detect damage
promptly and reduce the risk of an accident to
yourself and other road users.
Driving on sand Observe the following rules when driving on
sand:
R Vehicles with the ON&OFFROAD pack-
age: select off-road program 1
(Y page 251).
R Vehicles with the AIRMATIC package:
select a raised vehicle level.
R Avoid high engine speeds. Driving tips
193Driving and pa rking Z
Page 209 of 466
Make changes to the vehicle level while the
vehicle is in motion. This enables the vehicle
to adjust to the new level as quickly as pos-
sible.
The vehicle level may change visibly if you
park the vehicle and the outside temperature
changes. If the temperature drops, the vehi-
cle level is lower; with an increase in temper-
ature, the vehicle level rises.
If you unlock the vehicle or open a door, the
vehicle begins to compensate for load dis-
crepancies while still parked. However, for
significant level changes, such as after the
vehicle has been stationary for a long period, the engine must be on. For safety reasons,
the vehicle is only lowered when the doors are
closed. Lowering is interrupted if a door is
opened, and it continues once the door has
been closed.
For information about driving off-road, see
(Y page 191). G
WARNING
When the vehicle is being lowered, people
could become trapped if their limbs are
between the vehicle body and the wheels or
underneath the vehicle. There is a risk of
injury.
Make sure no one is underneath the vehicle or in the immediate vicinity of the wheel arches
when the vehicle is being lowered. G
WARNING
When you drive with the vehicle raised, the
driving characteristics could be impaired by
the vehicle's raised center of gravity. The vehi- cle could rollover more easily, for example on
a bend. There is a risk of an accident.
Always select as low a vehicle level as possi-
ble and adjust your driving style. G
WARNING
When you drive with the chassis lowered or
raised, the vehicle's braking and driving char-
acteristics can be significantly impaired. You
could also exceed the permissible vehicle height if the chassis is raised. There is a risk of
an accident.
Adjust the vehicle level before pulling away. G
WARNING
Due to the high center of gravity, the vehicle
may start to skid and roll over in the event of
an abrupt steering maneuver and/or when
the vehicle's speed is not adapted to the road conditions. There is a risk of an accident.
Always adapt your speed and driving style to
the vehicle's driving characteristics and to the prevailing road and weather conditions.
! When driving on extremely rough terrain,
select a high vehicle level in good time.
Make sure there is always sufficient ground
clearance. You will otherwise damage the
vehicle.
R Utility vehicles have a significantly higher
rollover rate than other types of vehicles.
Failure to operate this vehicle safely may
result in an accident, rollover of the vehicle,
and severe or fatal injury.
R In a rollover crash, an unbelted person is
significantly more likely to die than a per-
son wearing a seat belt.
You and all vehicle occupants should
always wear your seat belts.
Basic settings The extent to which the vehicle is raised or
lowered depends on the basic setting selec-
ted.
Select:
R highway/high-speed level for driving on
normal roads
R off-road level 1 for driving on easily nego-
tiable off-road terrain
R off-road level 2 for driving on normal off-
road terrain
R off-road level 3 for freeing the vehicle in
particularly rough terrain at low speeds
only Driving systems
207Driving and parking Z
Page 215 of 466
Level control
Important safety notes
G
WARNING
When the vehicle is being lowered, people
could become trapped if their limbs are
between the vehicle body and the wheels or
underneath the vehicle. There is a risk of
injury.
Make sure no one is underneath the vehicle or in the immediate vicinity of the wheel arches
when the vehicle is being lowered. G
WARNING
When you drive with the vehicle raised, the
driving characteristics could be impaired by
the vehicle's raised center of gravity. The vehi- cle could rollover more easily, for example on
a bend. There is a risk of an accident.
Always select as low a vehicle level as possi-
ble and adjust your driving style. G
WARNING
When you drive with the chassis lowered or
raised, the vehicle's braking and driving char-
acteristics can be significantly impaired. You
could also exceed the permissible vehicle
height if the chassis is raised. There is a risk of an accident.
Adjust the vehicle level before pulling away. G
WARNING
Due to the high center of gravity, the vehicle
may start to skid and roll over in the event of
an abrupt steering maneuver and/or when
the vehicle's speed is not adapted to the road conditions. There is a risk of an accident.
Always adapt your speed and driving style to
the vehicle's driving characteristics and to the prevailing road and weather conditions.
! When driving on extremely rough terrain,
select a high vehicle level in good time.
Make sure there is always sufficient ground
clearance. You will otherwise damage the
vehicle. !
When you raise the vehicle in such a way
that not all wheels have contact with the
ground, remove the SmartKey from the
ignition lock.
R Utility vehicles have a significantly higher
rollover rate than other types of vehicles.
Failure to operate this vehicle safely may
result in an accident, rollover of the vehicle, and severe or fatal injury.
R In a rollover crash, an unbelted person is
significantly more likely to die than a per-
son wearing a seat belt.
You and all vehicle occupants should
always wear your seat belts.
General notes
Further information about "Driving off-road"
(Y page 191).
Level control adapts the vehicle level auto-
matically to the current operating and driving situation. This results in reduced fuel con-
sumption and improved handling.
If you select ADS comfort mode (Y page 212),
the vehicle is lowered to high-speed level as
the speed increases. As the vehicle speed
decreases, the vehicle is raised back up to
highway level.
If you select ADS sport mode (Y page 212),
the vehicle skips highway level and lowers
directly to high-speed level depending on the
basic setting (Y page 214).
Make changes to the vehicle level while the
vehicle is in motion. This enables the vehicle
to adjust to the new level as quickly as pos-
sible.
The vehicle level may change visibly if you
park the vehicle and the outside temperature
changes. If the temperature drops, the vehi-
cle level is lower; with an increase in temper- ature, the vehicle level rises.
If you unlock the vehicle or open a door, the
vehicle begins to compensate for load dis-
crepancies while still parked. However, for
significant level changes, such as after the
vehicle has been stationary for a long period,
the engine must be on. For safety reasons, Driving systems
213Driving and parking Z
Page 223 of 466

Active Parking Assist may possibly indicate
parking spaces which are not suitable for
parking, for example:
R where parking or stopping is prohibited
R in front of driveways or entrances and exits
R on unsuitable surfaces
Parking tips:
R On narrow roads, drive as close to the park-
ing space as possible.
R Parking spaces that are littered or over-
grown might be identified or measured
incorrectly.
R Parking spaces that are partially occupied
by trailer drawbars might not be identified
as such or be measured incorrectly.
R Snowfall or heavy rain may lead to a parking
space being measured inaccurately.
R Pay attention to the PARKTRONIC
(Y page 218 )warning messages during the
parking procedure.
R At any time, you can intervene in the steer-
ing procedure to correct it. Active Parking
Assist will then be canceled.
R When transporting a load which protrudes
from your vehicle, you should not use
Active Parking Assist.
R Never use Active Parking Assist when snow
chains are installed.
R Make sure that the tire pressures are
always correct. This has a direct influence
on the parking characteristics of the vehi-
cle.
Use Active Parking Assist for parking spaces:
R that are parallel to the direction of travel
R that are on straight roads, not bends
R that are on the same level as the road, e.g.
not on the pavement
Detecting parking spaces Objects located above the height range of
Active Parking Assist will not be detected
when the parking space is measured. These
are not taken into account when the parking procedure is calculated, e.g. overhanging
loads, tail sections or loading ramps of goods
vehicles. G
WARNING
If there are objects above the detection range, Active Parking Assist may turn prematurely.
You may cause a collision as a result. There is
a risk of an accident.
If there are objects above the detection range,
stop and deactivate Active Parking Assist.
For further information on the detection
range (Y page 217).
Active Parking Assist does not support you
with parking spaces parallel to the direction
of travel if:
R the parking space is on a curb
R the system reads the parking space as
being blocked, for example by foliage or
grass paving blocks
R the area is too small for the vehicle to
maneuver into
R the parking space is bordered by an obsta-
cle, e.g. a tree, a post or a trailer 0043
Detected parking space on the left
0044 Parking symbol
0087 Detected parking space on the right
Active Parking Assist is switched on automat-
ically when driving forwards. The system is
operational at speeds of up to approximately 22 mph (35 km/h). While in operation, the
system independently locates and measures
parking spaces on both sides of the vehicle. Driving systems
221Driving and parking Z
Page 230 of 466
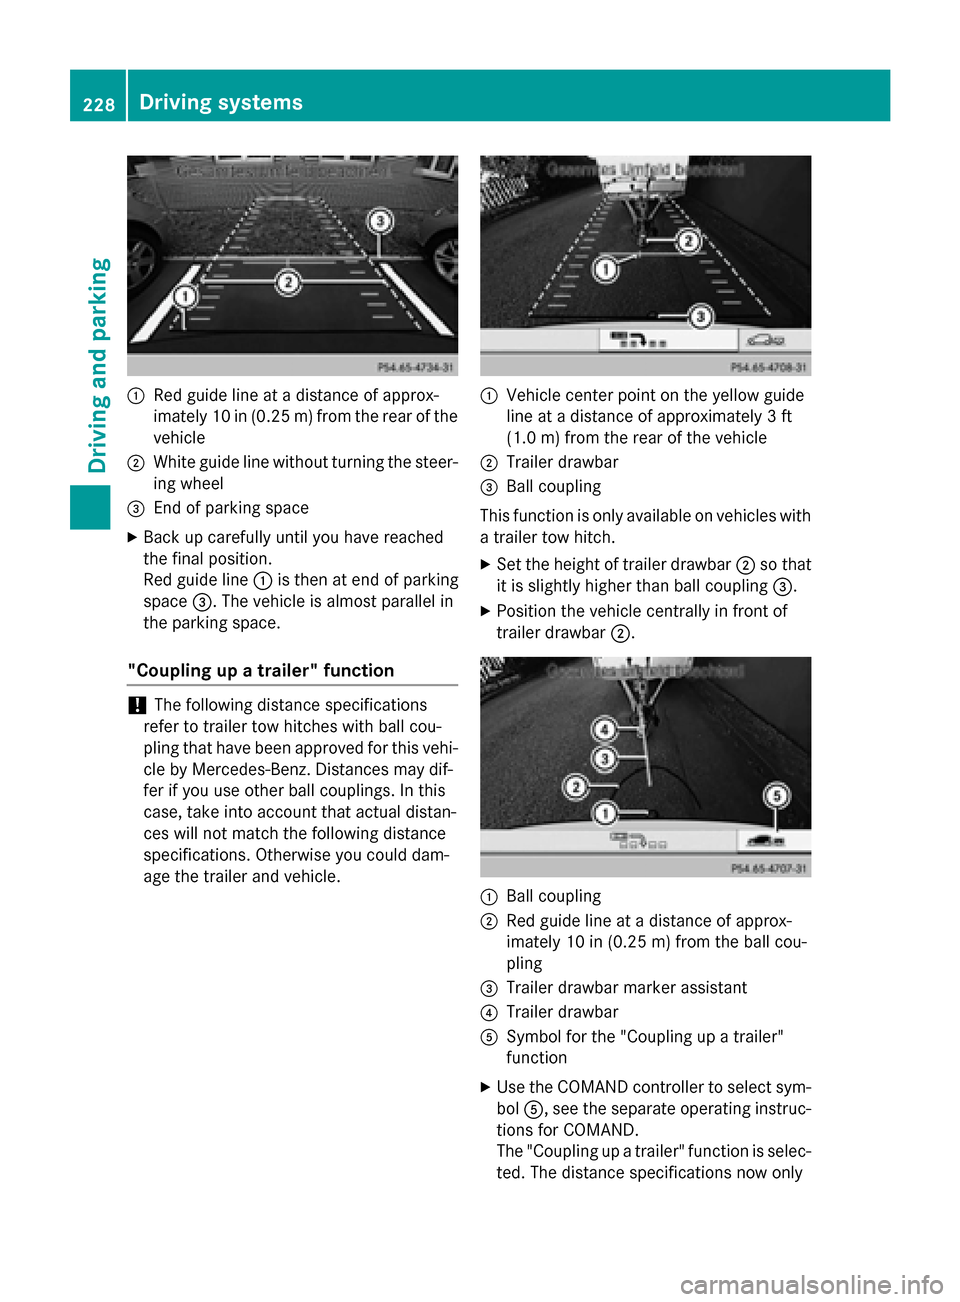
0043
Red guide line at a distance of approx-
imately 10 in (0.25 m) from the rear of the
vehicle
0044 White guide line without turning the steer-
ing wheel
0087 End of parking space
X Back up carefully until you have reached
the final position.
Red guide line 0043is then at end of parking
space 0087. The vehicle is almost parallel in
the parking space.
"Coupling up a trailer" function !
The following distance specifications
refer to trailer tow hitches with ball cou-
pling that have been approved for this vehi-
cle by Mercedes-Benz. Distances may dif-
fer if you use other ball couplings. In this
case, take into account that actual distan-
ces will not match the following distance
specifications. Otherwise you could dam-
age the trailer and vehicle. 0043
Vehicle center point on the yellow guide
line at a distance of approximately 3 ft
(1.0 m) from the rear of the vehicle
0044 Trailer drawbar
0087 Ball coupling
This function is only available on vehicles with
a trailer tow hitch.
X Set the height of trailer drawbar 0044so that
it is slightly higher than ball coupling 0087.
X Position the vehicle centrally in front of
trailer drawbar 0044. 0043
Ball coupling
0044 Red guide line at a distance of approx-
imately 10 in (0.25m)from the ball cou-
pling
0087 Trailer drawbar marker assistant
0085 Trailer drawbar
0083 Symbol for the "Coupling up a trailer"
function
X Use the COMAND controller to select sym-
bol 0083, see the separate operating instruc-
tions for COMAND.
The "Coupling up a trailer" function is selec- ted. The distance specifications now only 228
Driving systemsDriving and parking