2015 MERCEDES-BENZ GLK-CLASS SUV window
[x] Cancel search: windowPage 108 of 386
Problems with the seat heating
ProblemPossible causes/consequences and M Solutions
The seat heating has
switched off prema-
turely or cannot be
switched on.The on-board voltage is too low because too many elect rical con-
sumers are switched on.
X Switch off electrical consumers that you do not need, such as
the rear window defroster or interior lighting.
Steering wheel
Important safety notes
GWARNING
You could lose control of your vehicle if you do
the following while driving:
R adjust the driver's seat, head restraint,
steering wheel or mirrors
R fasten the seat belt
There is a risk of an accident.
Adjust the driver's seat, head restraint, steer-
ing wheel and mirror and fasten your seat belt before starting the engine.
GWARNING
If the steering wheel is unlocked while the
vehicle is in motion, it could change position
unexpectedly. This could cause you to lose
control of the vehicle. There is a risk of an
accident.
Before starting off, make sure the steering
wheel is locked. Never unlock the steering
wheel while the vehicle is in motion.
GWARNING
Children could injure themselves if they
adjust the steering wheel. There is a risk of
injury.
When leaving the vehicle, always take the
SmartKey with you and lock the vehicle. Neverleave children unsupervised in the vehicle.
The electrically adjustable steering wheel can
still be adjusted when there is no SmartKey in
the ignition lock.
Adjusting the steering wheel man-
ually
GWARNING
If the steering wheel is unlocked while the
vehicle is in motion, it could change position
unexpectedly. This could cause you to lose
control of the vehicle. There is a risk of an
accident.
Before starting off, make sure the steering
wheel is locked. Never unlock the steering
wheel while the vehicle is in motion.
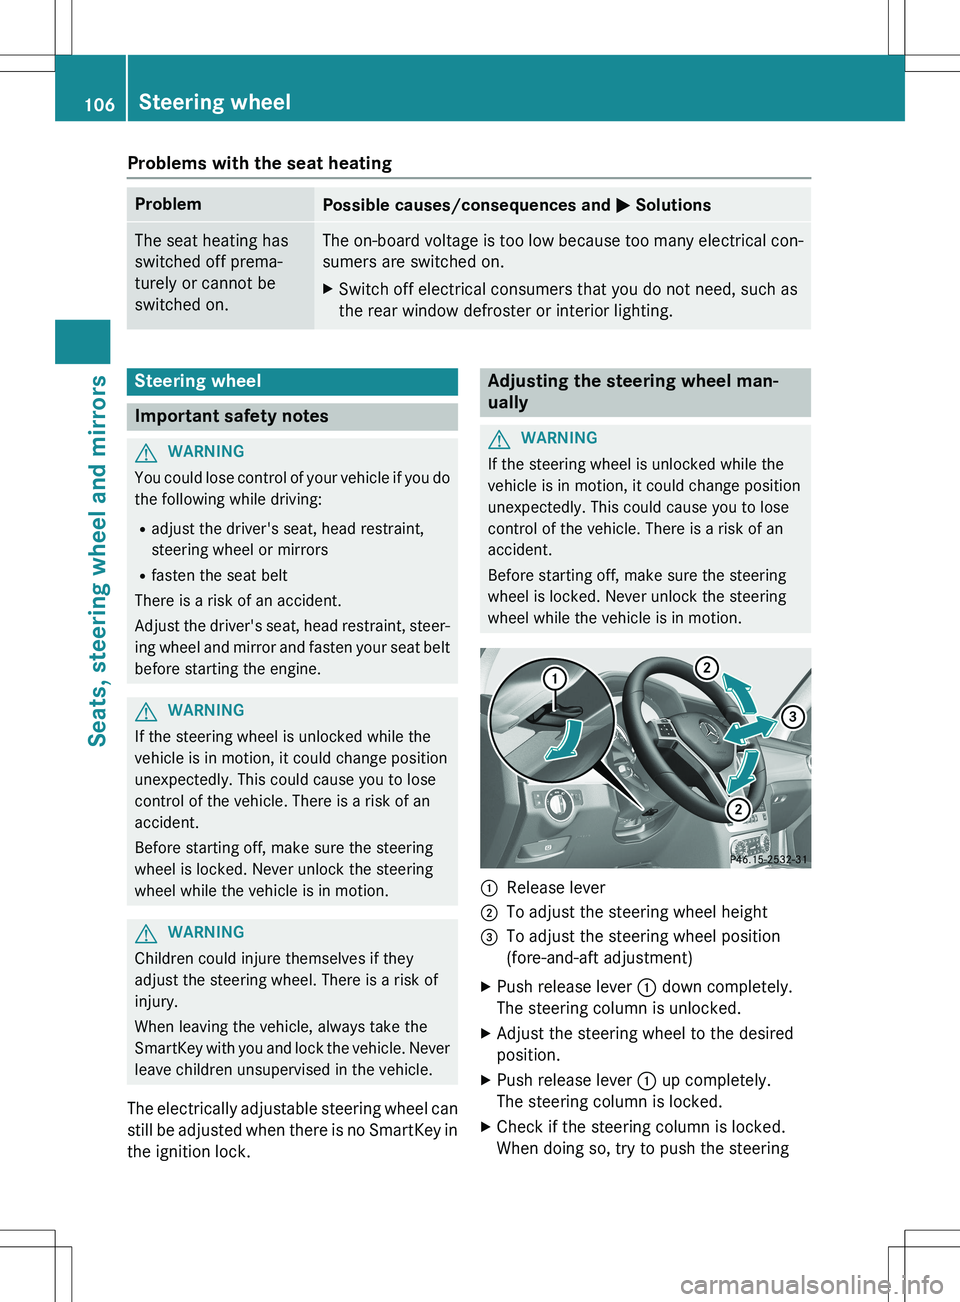
:Release lever
;To adjust the steering wheel height
=To adjust the steering wheel position
(fore-and-aft adjustment)
X Push release lever : down completely.
The steering column is unlocked.
X Adjust the steering wheel to the desired
position.
X Push release lever : up completely.
The steering column is locked.
X Check if the steering column is locked.
When doing so, try to push the steering
106Steering wheel
Seats, steering wheel and mirrors
Page 110 of 386
Problems with the steering wheel heating
ProblemPossible causes/consequences and M Solutions
The steering wheel
heating has switched
off prematurely or can-
not be switched on.The on-board voltage is too low because too many elect rical con-
sumers are switched on.
X Switch off electrical consumers that you do not need, such as
the rear window defroster or interior lighting.
Once the battery is sufficiently charged, the steering wheel
heating will switch back on automatically.
EASY-ENTRY/EXIT feature
Important safety notes
GWARNING
When the EASY-ENTRY/EXIT feature adjusts
the steering wheel, you and other vehicle
occupants – particularly children – could
become trapped. There is a risk of injury.
While the EASY-ENTRY/EXIT feature is mak-
ing adjustments, make sure that no one has
any body parts in the sweep of the steering
wheel.
If somebody becomes trapped: R press one of the memory function position
buttons, or
R move the switch for steering wheel adjust-
ment in the opposite direction to that in
which the steering wheel is moving.
The adjustment process is stopped.
GWARNING
If you drive off while the EASY-ENTRY/EXIT
feature is making adjustments, you could lose
control of the vehicle. There is a risk of an
accident.
Always wait until the adjustment process is
complete before driving off.
The EASY-ENTRY/EXIT feature makes getting in and out of your vehicle easier.
You can activate and deactivate the EASY-
ENTRY/EXIT feature in the on-board com-
puter ( Y page 233).
Position of the steering wheel when the
EASY-ENTRY/EXIT feature is active
The steering wheel swings upwards when
you:
R remove the SmartKey from the ignition lock
R open the driver's door with KEYLESS-GO in
position 1
R open the driver's door and the SmartKey is
in position 0 or 1 in the ignition lock
( Y page 149)
iThe steering wheel only moves upwards if
it has not already reached the upper stop.
Position of the steering wheel for driv-
ing
The steering wheel is moved to the last selec-
ted position when:
R the driver's door is closed
R you insert the SmartKey into the ignition
lock
or
R you press the Start/Stop button once on
vehicles with KEYLESS-GO
When you close the driver's door with the
ignition switched on, the steering wheel is
also automatically moved to the previously
set position.
The last position of the steering wheel is
stored when you switch off the ignition or
when you store the setting with the memory
function ( Y page 112).
108Steering wheel
Seats, steering wheel and mirrors
Page 111 of 386
Crash-responsive EASY-EXIT feature
If the crash-responsive EASY-EXIT feature is
triggered in an accident, the steering columnwill move upwards when the driver's door is
opened. This occurs irrespective of the posi-
tion of the SmartKey in the ignition lock. This
makes it easier to exit the vehicle and rescue
the occupants.
The crash-responsive EASY-EXIT feature is
only operational if the EASY-EXIT/ENTRY fea- ture is activated in the on-board computer.
Mirrors
Rear-view mirror
X Anti-glare mode: flick anti-glare lever :
forwards or back.
Exterior mirrors
Adjusting the exterior mirrors
GWARNING
You could lose control of your vehicle if you do the following while driving:
R adjust the driver's seat, head restraint,
steering wheel or mirrors
R fasten the seat belt
There is a risk of an accident.
Adjust the driver's seat, head restraint, steer-
ing wheel and mirror and fasten your seat belt before starting the engine.
GWARNING
The exterior mirror on the front-passenger
side reduces the size of the image. Visible
objects are actually closer than they appear.
This means that you could misjudge the dis-
tance from road users traveling behind, e.g.
when changing lane. There is a risk of an acci-
dent.
For this reason, always make sure of the
actual distance from the road users traveling
behind by glancing over your shoulder.
The convex exterior mirrors provide a larger
field of vision.
The exterior mirrors are automatically heated
after starting the vehicle if the rear window
defroster is switched on and the outside tem- perature is low. Heating takes a maximum of
10 minutes.
iYou can also heat up the exterior mirrors
manually by switching on the rear window
defroster.
X Make sure that the SmartKey is in position
1 or 2 in the ignition lock ( Y page 149).
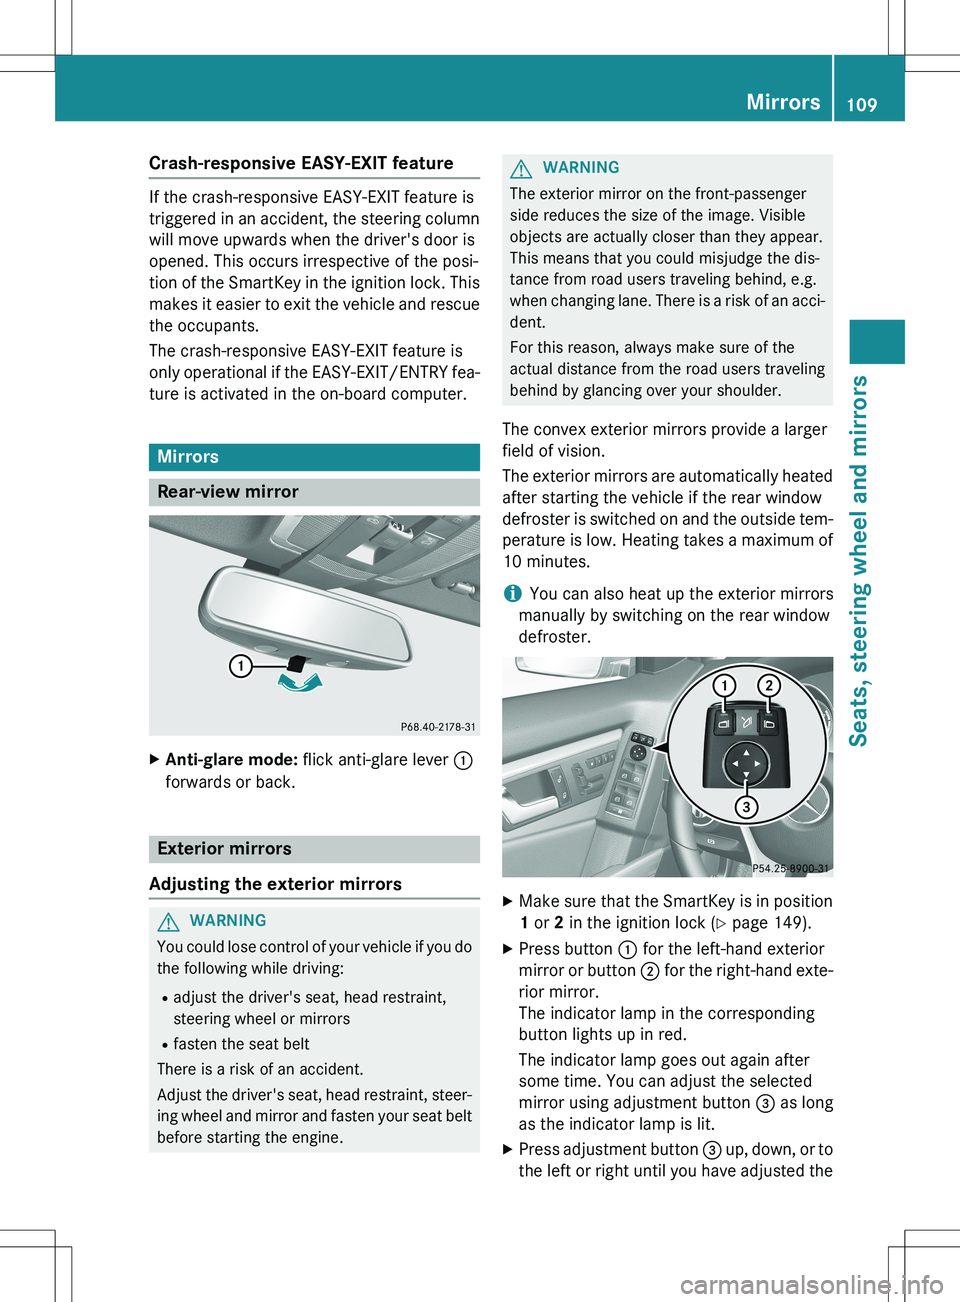
X Press button : for the left-hand exterior
mirror or button ; for the right-hand exte-
rior mirror.
The indicator lamp in the corresponding
button lights up in red.
The indicator lamp goes out again after
some time. You can adjust the selected
mirror using adjustment button = as long
as the indicator lamp is lit.
X Press adjustment button = up, down, or to
the left or right until you have adjusted the
Mirrors109
Seats, steering wheel and mirrors
Z
Page 129 of 386
Switching the rear window wiper on/
off
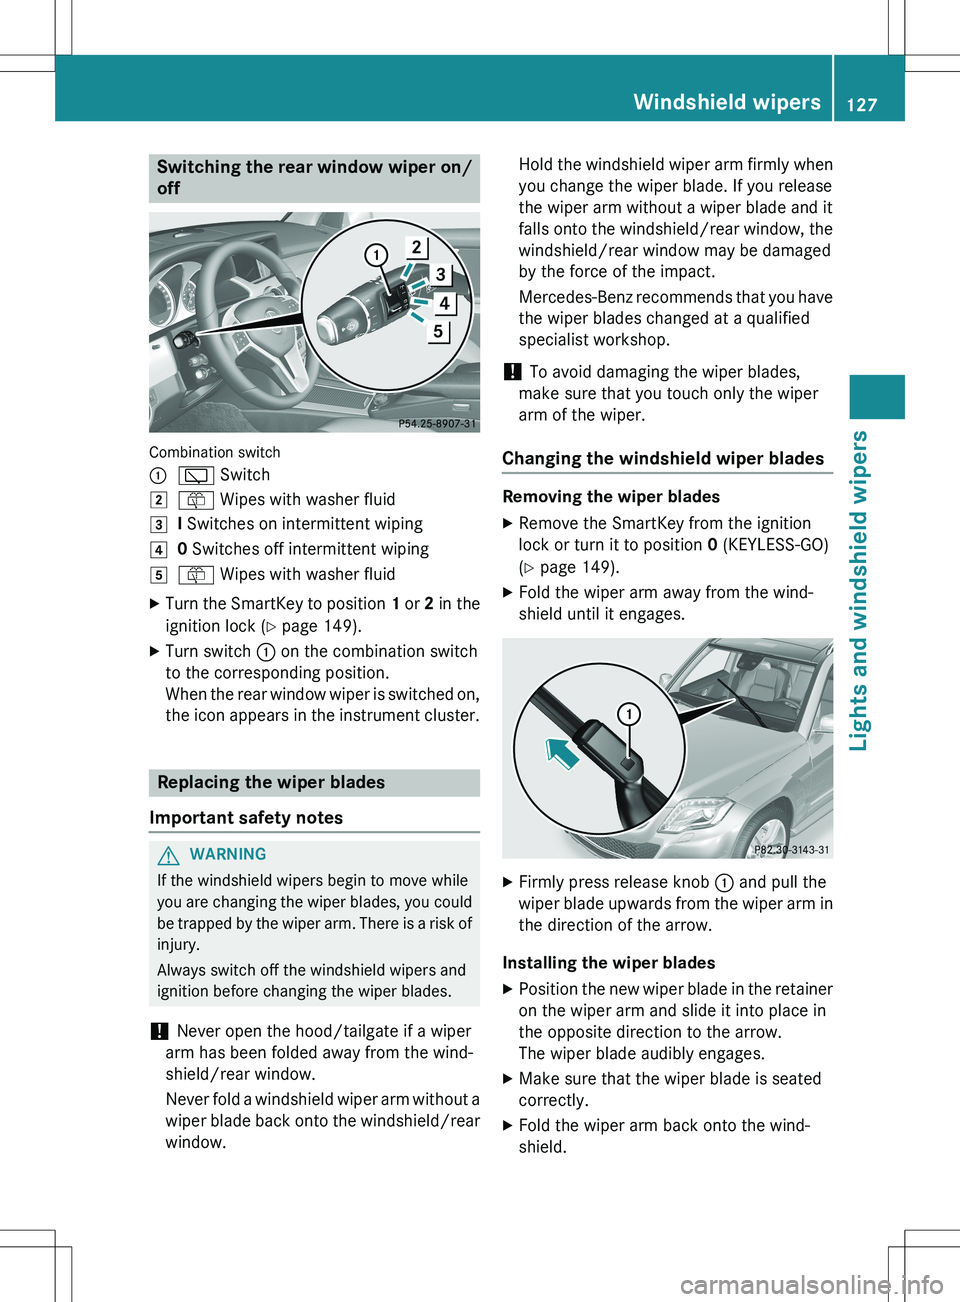
Combination switch :
è Switch
2ô Wipes with washer fluid
3I Switches on intermittent wiping
40 Switches off intermittent wiping
5ô Wipes with washer fluid
X Turn the SmartKey to position 1 or 2 in the
ignition lock ( Y page 149).
X Turn switch : on the combination switch
to the corresponding position.
When the rear window wiper is switched on,
the icon appears in the instrument cluster.
Replacing the wiper blades
Important safety notes
GWARNING
If the windshield wipers begin to move while
you are changing the wiper blades, you could be trapped by the wiper arm. There is a risk of
injury.
Always switch off the windshield wipers and
ignition before changing the wiper blades.
! Never open the hood/tailgate if a wiper
arm has been folded away from the wind-
shield/rear window.
Never fold a windshield wiper arm without a
wiper blade back onto the windshield/rear window. Hold the windshield wiper arm firmly when
you change the wiper blade. If you release
the wiper arm without a wiper blade and it
falls onto the windshield/rear window, the
windshield/rear window may be damaged
by the force of the impact.
Mercedes-Benz recommends that you have the wiper blades changed at a qualified
specialist workshop.
! To avoid damaging the wiper blades,
make sure that you touch only the wiper
arm of the wiper.
Changing the windshield wiper blades
Removing the wiper blades
X Remove the SmartKey from the ignition
lock or turn it to position 0 (KEYLESS-GO)
( Y page 149).
X Fold the wiper arm away from the wind-
shield until it engages.
XFirmly press release knob : and pull the
wiper blade upwards from the wiper arm in the direction of the arrow.
Installing the wiper blades
X Position the new wiper blade in the retainer
on the wiper arm and slide it into place in
the opposite direction to the arrow.
The wiper blade audibly engages.
X Make sure that the wiper blade is seated
correctly.
X Fold the wiper arm back onto the wind-
shield.
Windshield wipers127
Lights and windshield wipers
Z
Page 130 of 386
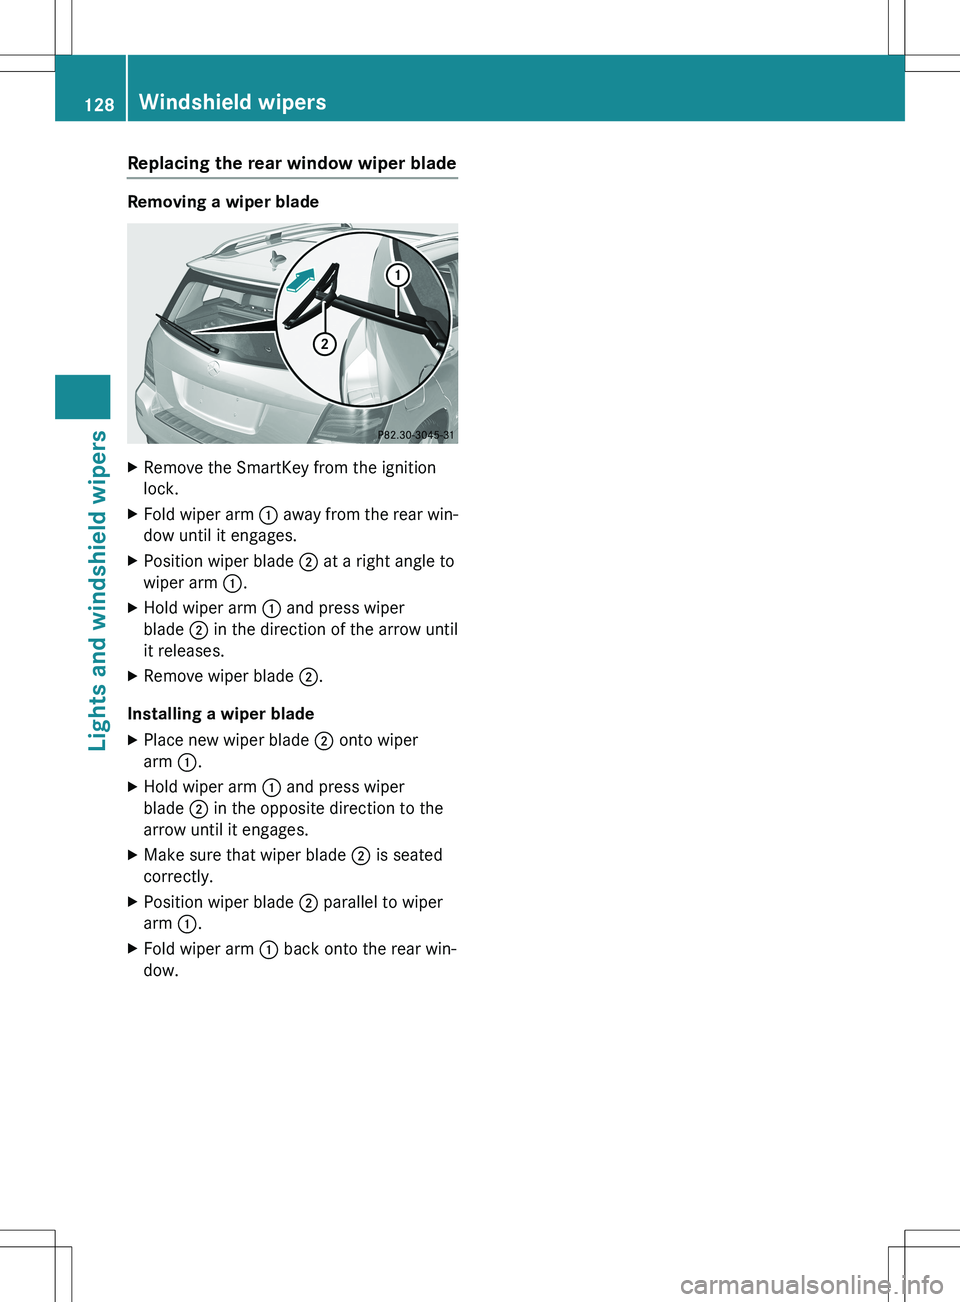
Replacing the rear window wiper blade
Removing a wiper blade
XRemove the SmartKey from the ignition
lock.
X Fold wiper arm : away from the rear win-
dow until it engages.
X Position wiper blade ; at a right angle to
wiper arm :.
X Hold wiper arm : and press wiper
blade ; in the direction of the arrow until
it releases.
X Remove wiper blade ;.
Installing a wiper blade
X Place new wiper blade ; onto wiper
arm :.
X Hold wiper arm : and press wiper
blade ; in the opposite direction to the
arrow until it engages.
X Make sure that wiper blade ; is seated
correctly.
X Position wiper blade ; parallel to wiper
arm :.
X Fold wiper arm : back onto the rear win-
dow.
128Windshield wipers
Lights and windshield wipers
Page 134 of 386

Useful information
iThis Operator's Manual describes all
models and all standard and optional equip- ment of your vehicle available at the time of
publication of the Operator's Manual.
Country-specific differences are possible.
Please note that your vehicle may not be
equipped with all features described. This
also applies to safety-related systems and
functions.
iRead the information on qualified special-
ist workshops ( Y page 27).
Overview of climate control systems
Important safety notes
Observe the settings recommended on the
following pages. The windows could other-
wise fog up.
To prevent the windows from fogging up:
R switch off climate control only briefly
R switch on air-recirculation mode only
briefly
R switch on the cooling with air dehumidifi-
cation function
R switch on the defrost windshield function
briefly, if required
Climate control regulates the temperature
and the humidity in the vehicle interior and
filters undesirable substances out of the air.
Climate control can only be operated when
the engine is running. Optimum operation is
only achieved with the side windows and roof
closed.
The residual heat function can only be acti-
vated or deactivated with the ignition
switched off ( Y page 143).
iVentilate the vehicle for a brief period
during warm weather, e.g. using the con-
venience opening feature ( Y page 93). This
will speed up the cooling process and the
desired interior temperature will be
reached more quickly.
iThe integrated filter filters out most par-
ticles of dust and soot and completely fil-
ters out pollen. It also reduces gaseous pol-
lutants and odors. A clogged filter reduces the amount of air supplied to the vehicle
interior. For this reason, you should alwaysobserve the interval for replacing the filter, which is specified in the Maintenance
Booklet. As it depends on environmental
conditions, e.g. heavy air pollution, the
interval may be shorter than stated in the
Maintenance Booklet.
iIt is possible that the dehumidification
function of the climate control system may
be activated automatically an hour after the
SmartKey has been removed. The vehicle is then ventilated for 30 minutes.
132Overview of climate control systems
Climate control
Page 135 of 386
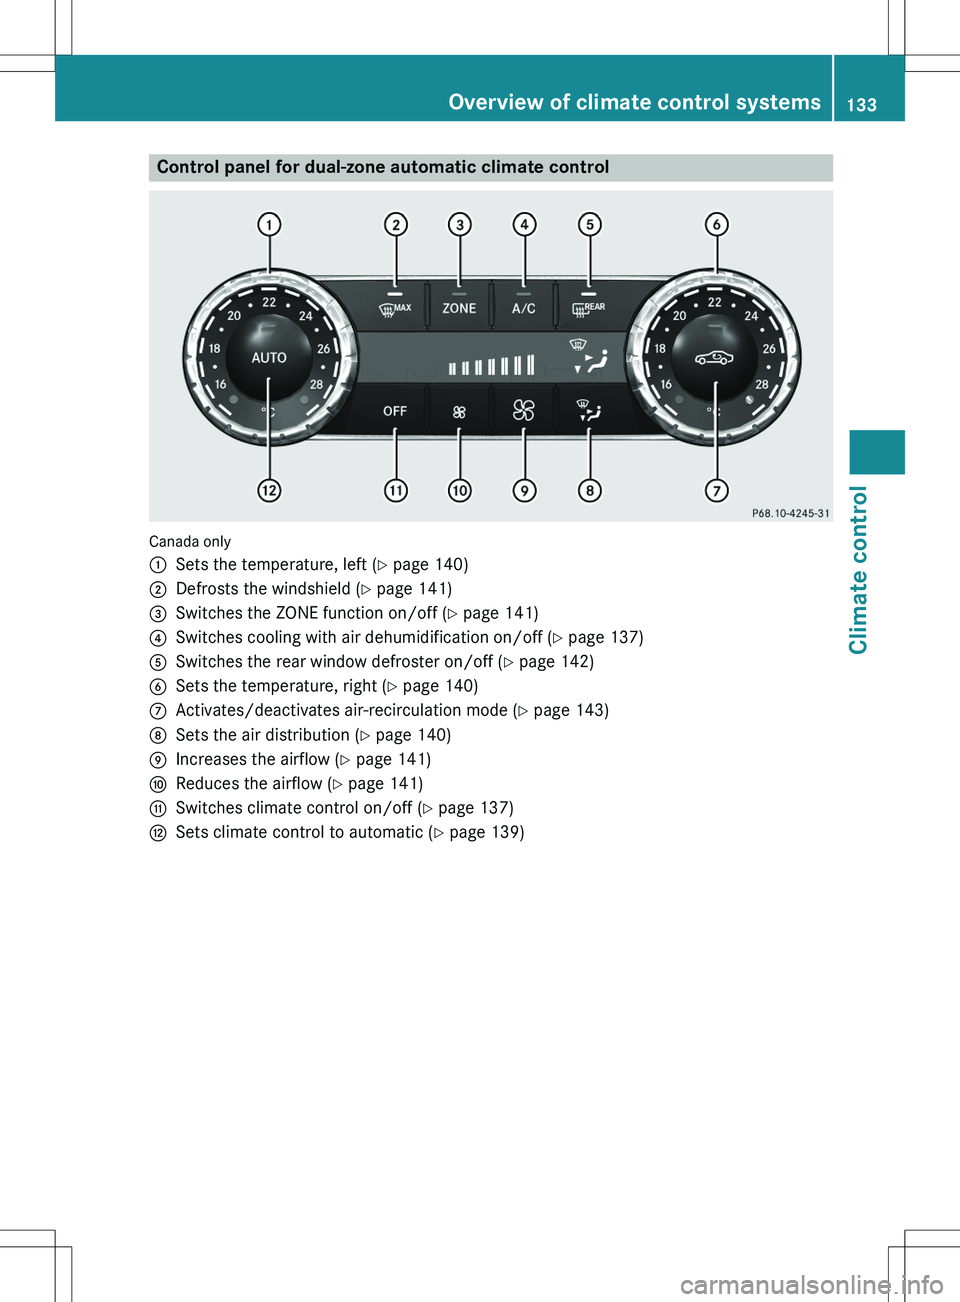
Control panel for dual-zone automatic climate control
Canada only :
Sets the temperature, left (Y page 140)
;Defrosts the windshield ( Y page 141)
=Switches the ZONE function on/off ( Y page 141)
?Switches cooling with air dehumidification on/off ( Y page 137)
ASwitches the rear window defroster on/off ( Y page 142)
BSets the temperature, right ( Y page 140)
CActivates/deactivates air-recirculation mode ( Y page 143)
DSets the air distribution ( Y page 140)
EIncreases the airflow ( Y page 141)
FReduces the airflow ( Y page 141)
GSwitches climate control on/off ( Y page 137)
HSets climate control to automatic ( Y page 139)
Overview of climate control systems133
Climate control
Page 136 of 386

USA only :
Sets the temperature, left (Y page 140)
;Defrosts the windshield ( Y page 141)
=Switches maximum cooling on/off ( Y page 142)
?Switches cooling with air dehumidification on/off ( Y page 137)
ASwitches the rear window defroster on/off ( Y page 142)
BSets the temperature, right ( Y page 140)
CActivates/deactivates air-recirculation mode ( Y page 143)
DSets the air distribution ( Y page 140)
EIncreases the airflow ( Y page 141)
FReduces the airflow ( Y page 141)
GSwitches climate control on/off ( Y page 137)
HSets climate control to automatic ( Y page 139)
Optimum use of dual-zone climate
control
Climate control system
The following contains notes and recommen-
dations on optimum use of dual-zone climate control.
R Activate climate control using the à and
¿ buttons. The indicator lamps in the
à and ¿ buttons light up.
R Set the temperature to 72 ‡ (22 †).
R Only use the "Windshield defrosting" func-
tion briefly until the windshield is clear
again. R
Only use air-recirculation mode briefly, e.g.
if there are unpleasant outside odors or
when in a tunnel. The windows could oth-
erwise fog up, since no fresh air is drawn
into the vehicle in air-recirculation mode.
R Use the ZONE function to adopt the tem-
perature settings on the driver's side for
the front-passenger side as well. The indi-
cator lamp in the á button goes out.
ECO start/stop function
During automatic engine switch-off, the cli-
mate control system only operates at a
reduced capacity. If you require the full cli-
mate control output, you can switch off the
134Overview of climate control systems
Climate control