2015 MERCEDES-BENZ GLK-CLASS SUV instrument cluster
[x] Cancel search: instrument clusterPage 73 of 386

Important safety notes
iObserve the "Important safety notes" sec-
tion ( Y page 68).
GWARNING
If ESP ®
is malfunctioning, ESP ®
is unable to
stabilize the vehicle. Additionally, further driv- ing safety systems are deactivated. This
increases the risk of skidding and an accident.
Drive on carefully. Have ESP ®
checked at a
qualified specialist workshop.
! If you test the parking brake using a brake
dynamometer, switch the ignition off.
Application of the brakes by ESP ®
may oth-
erwise destroy the brake system.
Vehicles without 4MATIC: observe the notes
on ESP ®
(Y page 327) when towing the vehi-
cle with a raised rear axle.
! Vehicles with 4MATIC: function or per-
formance tests may only be carried out on
a 2-axle dynamometer. Before you operate the vehicle on such a dynamometer, please
consult a qualified workshop. You could
otherwise damage the drive train or the
brake system.
ESP ®
is only deactivated if the å warning
lamp is lit continuously.
If the ÷ warning lamp and the å warn-
ing lamp are lit continuously, ESP ®
is not
available due to a malfunction.
Observe the information on warning lamps
( Y page 264) and display messages which
may be shown in the instrument cluster
( Y page 236).
iOnly use wheels with the recommended
tire sizes. Only then will ESP ®
function
properly.
Characteristics of ESP®
General information
If the ÷ ESP®
warning lamp goes out
before beginning the journey, ESP ®
is auto-
matically active.
If ESP ®
intervenes, the ÷ ESP®
warning
lamp flashes in the instrument cluster.
If ESP ®
intervenes:
X Do not deactivate ESP ®
under any circum-
stances.
X Only depress the accelerator pedal as far as
necessary when pulling away.
X Adapt your driving style to suit the prevail-
ing road and weather conditions.
ECO start/stop function
The ECO start/stop function switches the
engine off automatically when the vehicle
stops moving. The engine starts automati-
cally when the driver wants to pull away again. ESP ®
remains in its previously selected sta-
tus. Example: if ESP®
was deactivated before
the engine was switched off, ESP ®
remains
deactivated when the engine is switched on
again.
Deactivating/activating ESP®
Important safety notes
iObserve the "Important safety notes" sec-
tion ( Y page 68).
You can select between the following sta-
tuses of ESP:
R ESP ®
is activated.
R ESP ®
is deactivated.
GWARNING
If you deactivate ESP ®
, ESP ®
no longer sta-
bilizes the vehicle. There is an increased risk
of skidding and an accident.
Only deactivate ESP ®
in the situations descri-
bed in the following.
Driving safety systems71
Safety
Z
Page 74 of 386

It may be best to deactivate ESP®
in the fol-
lowing situations:
R when using snow chains
R in deep snow
R on sand or gravel
iActivate ESP ®
as soon as the situations
described above no longer apply. ESP ®
will
otherwise not be able to stabilize the vehi-
cle if the vehicle starts to skid or a wheel
starts to spin.
! Avoid spinning the driven wheels for an
extended period with ESP ®
deactivated.
You could otherwise damage the drivetrain.
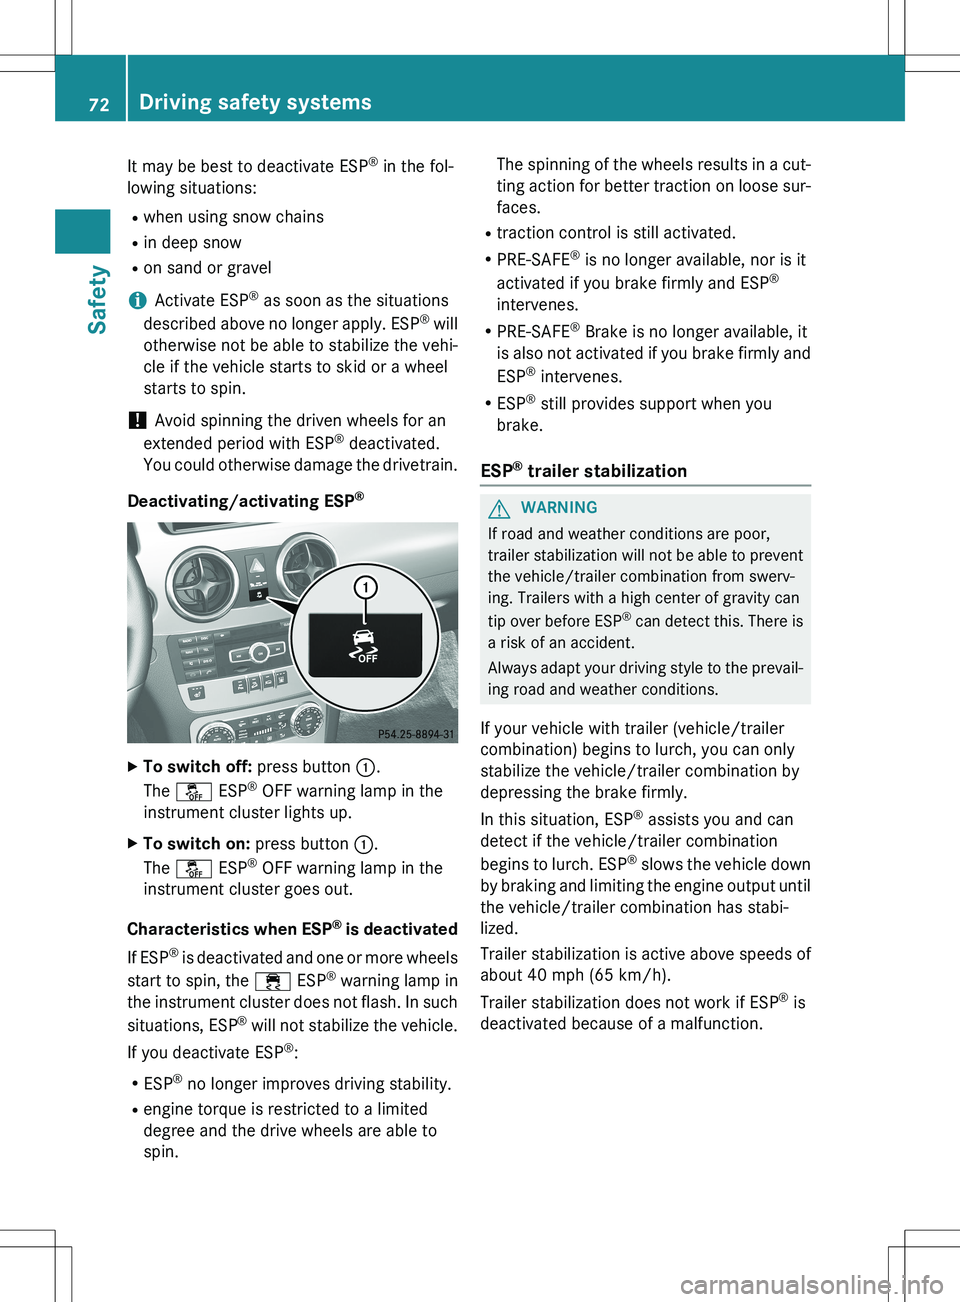
Deactivating/activating ESP ®
X
To switch off: press button :.
The å ESP®
OFF warning lamp in the
instrument cluster lights up.
X To switch on: press button :.
The å ESP®
OFF warning lamp in the
instrument cluster goes out.
Characteristics when ESP ®
is deactivated
If ESP ®
is deactivated and one or more wheels
start to spin, the ÷ ESP®
warning lamp in
the instrument cluster does not flash. In such
situations, ESP ®
will not stabilize the vehicle.
If you deactivate ESP ®
:
R ESP ®
no longer improves driving stability.
R engine torque is restricted to a limited
degree and the drive wheels are able to
spin. The spinning of the wheels results in a cut-
ting action for better traction on loose sur-faces.
R traction control is still activated.
R PRE-SAFE ®
is no longer available, nor is it
activated if you brake firmly and ESP ®
intervenes.
R PRE-SAFE ®
Brake is no longer available, it
is also not activated if you brake firmly and
ESP ®
intervenes.
R ESP ®
still provides support when you
brake.
ESP® trailer stabilization
GWARNING
If road and weather conditions are poor,
trailer stabilization will not be able to prevent the vehicle/trailer combination from swerv-
ing. Trailers with a high center of gravity can
tip over before ESP ®
can detect this. There is
a risk of an accident.
Always adapt your driving style to the prevail- ing road and weather conditions.
If your vehicle with trailer (vehicle/trailer
combination) begins to lurch, you can only
stabilize the vehicle/trailer combination by
depressing the brake firmly.
In this situation, ESP ®
assists you and can
detect if the vehicle/trailer combination
begins to lurch. ESP ®
slows the vehicle down
by braking and limiting the engine output until
the vehicle/trailer combination has stabi-
lized.
Trailer stabilization is active above speeds of
about 40 mph (65 km/h).
Trailer stabilization does not work if ESP ®
is
deactivated because of a malfunction.
72Driving safety systems
Safety
Page 76 of 386

In the event of snowfall or heavy rain, the rec-
ognition can be impaired.
Recognition by the radar sensor system is
also impaired in the event of:
R there is dirt on the sensors or anything else
covering the sensors
R there is interference by other radar sources
R there are strong radar reflections, for
example in parking garages
R a narrow vehicle traveling in front, e.g. a
motorbike
R a vehicle traveling in front on a different line
relative to the center of your vehicle
Following damage to the front end of the vehi-
cle, have the configuration and operation of
the radar sensors checked at a qualified spe-
cialist workshop. This also applies to colli-
sions at low speeds where there is no visible
damage to the front of the vehicle.
Function
X To activate/deactivate: activate or deac-
tivate PRE-SAFE ®
Brake in the on-board
computer ( Y page 229).
If the PRE-SAFE ®
Brake is not activated, the
æ symbol appears in the multifunction
display.
Starting at a speed of around 4 mph (7 km/h),
this function warns you if you rapidly
approach a vehicle in front. An intermittent
warning tone will then sound and the ·
distance warning lamp will light up in the
instrument cluster.
X Brake immediately to defuse the situation.
or
X Take evasive action provided it is safe to do
so.
PRE-SAFE ®
Brake can also brake the vehicle
automatically under the following conditions: R the driver and front-passenger have their
seat belts fastened and
R the vehicle speed is between approx-
imately 4 mph (7 km/h) and 124 mph
(200 km/h)
At speeds of up to approximately 40 mph
(70 km/h) PRE-SAFE ®
Brake can also detect
stationary objects. Examples of stationary
objects are stopped or parked vehicles.
iIf there is an increased risk of collision,
preventive passenger protection measures
(PRE-SAFE ®
) are activated.
If the risk of collision with the vehicle in front
remains and you do not brake, take evasive
action or accelerate significantly, the vehicle
may perform automatic emergency braking,
up to the point of full brake application. Auto- matic emergency braking is not performed
until immediately prior to an imminent acci-
dent.
You can prevent the intervention of the PRE-
SAFE ®
Brake at any time by:
R depressing the accelerator pedal further.
R activating kickdown.
R releasing the brake pedal.
The braking action of PRE-SAFE ®
Brake is
ended automatically if:
R you maneuver to avoid the obstacle.
R there is no longer any danger of a collision.
R there is no longer an obstacle detected in
front of your vehicle.
Protection against theft
Immobilizer
The immobilizer prevents your vehicle from
being started without the correct SmartKey.
X To activate with the SmartKey: remove
the SmartKey from the ignition lock.
X To activate with KEYLESS-GO: switch the
ignition off and open the driver's door.
X To deactivate: switch on the ignition.
74Protection against theft
Safety
Page 118 of 386

Useful information
iThis Operator's Manual describes all
models and all standard and optional equip- ment of your vehicle available at the time of
publication of the Operator's Manual.
Country-specific differences are possible.
Please note that your vehicle may not be
equipped with all features described. This
also applies to safety-related systems and
functions.
iRead the information on qualified special-
ist workshops ( Y page 27).
Exterior lighting
General notes
For reasons of safety, Mercedes-Benz recom-
mends that you drive with the lights switchedon even during the daytime. In some coun-
tries, operation of the headlamps varies due
to legal requirements and self-imposed obli-
gations.
Setting the exterior lighting
Setting options
Exterior lighting can be set using: R the light switch
R the combination switch ( Y page 118)
R the on-board computer ( Y page 231)
Light switch
Operation
1 WLeft-hand standing lamps
2 XRight-hand standing lamps
3 TParking lamps, license plate and
instrument cluster lighting
4 ÃAutomatic headlamp mode, control-
led by the light sensor
5 LLow-beam/high-beam headlamps
B RRear fog lamp
C NFog lamp (only vehicles with front
fog lamps)
If you hear a warning tone when you leave the
vehicle, the lights may still be switched on. X Turn the light switch to Ã.
The exterior lighting (except the parking/
standing lamps) switches off automatically if
you: R remove the SmartKey from the ignition lock
R open the driver's door with the SmartKey in
position 0
Automatic headlamp mode
GWARNING
When the light switch is set to Ã, the low-
beam headlamps may not be switched on
automatically if there is fog, snow or other
causes of poor visibility due to the weather
conditions such as spray. There is a risk of an
accident.
In such situations, turn the light switch to L .
116Exterior lighting
Lights and windshield wipers
Page 120 of 386

XPress the N button.
The green N indicator lamp in the instru-
ment cluster lights up.
X To switch off the front fog lamps: press
the N button.
The green N indicator lamp in the instru-
ment cluster goes out.
Only vehicles with front fog lamps have the
fog lamps function.
Rear fog lamp
The rear fog lamp improves visibility of your
vehicle for the traffic behind in the event of
thick fog. Please take note of the country-
specific regulations for the use of rear fog
lamps. X To switch on the rear fog lamps: turn the
SmartKey in the ignition lock to position 2
or start the engine.
X Turn the light switch to L or à .
X Press the R button.
The yellow R indicator lamp in the
instrument cluster lights up.
X To switch off the rear fog lamp: press the
R button.
The yellow R indicator lamp in the
instrument cluster goes out.
Parking lamps
! If the battery has been excessively dis-
charged, the parking lamps or standing
lamps are automatically switched off to
enable the next engine start. Always park
your vehicle safely and sufficiently lit
according to legal standards. Avoid the
continuous use of the T parking lamps
for several hours. If possible, switch on theX right or the W left standing lamp.
X To switch on: turn the light switch to T.
The green indicator lamp in the instrument cluster lights up.
Standing lamps
Switching on the standing lamps ensures the corresponding side of the vehicle is illumina-
ted. X
To switch on the standing lamps: the
SmartKey is not in the ignition lock or it is in position 0.
X Turn the light switch to W (left-hand side
of the vehicle) or X (right-hand side of
the vehicle).
Combination switch
Turn signal
:High-beam headlamps
;Turn signal, right
=High-beam flasher
?Turn signal, left
X To indicate briefly: press the combination
switch briefly to the pressure point in the
direction of arrow ; or ?.
The corresponding turn signal flashes three
times.
X To indicate: press the combination switch
beyond the pressure point in the direction
of arrow ; or ?.
High-beam headlamps
X
To switch on the high-beam headlamps:
turn the SmartKey in the ignition lock to
position 2 or start the engine.
X Turn the light switch to L or à .
X Press the combination switch beyond the
pressure point in the direction of arrow :.
In the à position, the high-beam head-
lamps are only switched on when it is dark
and the engine is running.
118Exterior lighting
Lights and windshield wipers
Page 121 of 386

The K indicator lamp in the instrument
cluster lights up when the high-beam head-
lamps are switched on.
X To switch off the high-beam head-
lamps: move the combination switch back
to its normal position.
The K indicator lamp in the instrument
cluster goes out.
Vehicles with Adaptive Highbeam Assist:
when Adaptive Highbeam Assist is active, it
controls activation of the high-beam head-
lamps ( Y page 120).
High-beam flasher
X
To switch on: turn the SmartKey in the
ignition lock to position 1 or 2 or start the
engine.
X Pull the combination switch in the direction
of arrow =.
Hazard warning lamps
The hazard warning lamps automatically
switch on if:
R an air bag is deployed or
R the vehicle decelerates rapidly from a
speed of above 45 mph (70 km/h) and
comes to a standstill
X To switch on the hazard warning lamps:
press button :.
All turn signals flash. If you now switch on a turn signal using the combination switch, only the turn signal lamp on the corre-
sponding side of the vehicle will flash.
X To switch off the hazard warning lamps:
press button :.
The hazard warning lamps switch off auto-
matically if the vehicle reaches a speed of
above 6 mph (10 km/h) again after a full
brake application.
iThe hazard warning lamps still operate if
the ignition is switched off.
Headlamp cleaning system
The headlamps are cleaned automatically if
the "Wipe with washer fluid" function is oper-
ated five times while the lights are on and the engine is running ( Y page 126). When you
switch off the ignition, the automatic head-
lamp cleaning system is reset and counting is resumed from 0.
Active light function
The active light function is a system that
moves the headlamps according to the steer-
ing movements of the front wheels. In this
way, relevant areas remain illuminated while
driving. This allows you to recognize pedes-
trians, cyclists and animals.
Active: when the lights are switched on.
Exterior lighting119
Lights and windshield wipers
Z
Page 123 of 386

In particular, the detection of obstacles can
be restricted if there is: Rpoor visibility, e.g. due to fog, heavy rain or
snow
R dirt on the sensors or the sensors are
obscured
Switching Adaptive Highbeam Assist
on/off
XTo activate: turn the light switch to Ã.
X Press the combination switch beyond the
pressure point in the direction of arrow :
( Y page 118).
The _ indicator lamp in the multifunc-
tion display lights up if it is dark and the
light sensor activates the low-beam head-
lamps.
If you are driving at speeds above approx-
imately 28 mph (45 km/h):
The headlamp range is set automatically
depending on the distance between the
vehicle and other road users.
If you are driving at speeds above approx-
imately 35 mph (55 km/h) and no other
road users have been detected:
The high-beam headlamps are switched on
automatically. The K indicator lamp in
the instrument cluster also lights up.
If you are driving at speeds below approx-
imately 30 mph (45 km/h) or other road
users have been detected or the roads are adequately lit:
The high-beam headlamps are switched off
automatically. The K indicator lamp in
the instrument cluster goes out. The _
indicator lamp in the multifunction display
remains lit.
X To deactivate: move the combination
switch back to its normal position.
The _ indicator lamp in the multifunc-
tion display goes out.
Headlamps fogged up on the inside
Certain climatic and physical conditions may
cause moisture to form in the headlamp. This moisture does not affect the functionality of
the headlamp.
Interior lighting
Overview of interior lighting
Front overhead control panel :
u Switches the rear interior lighting
on/off
;| Switches the automatic interior
lighting control on/off
=p Switches the right-hand front read-
ing lamp on/off
?c Switches the front interior lighting
on/off
Ap Switches the left-hand front reading
lamp on/off
Interior lighting121
Lights and windshield wipers
Z
Page 129 of 386

Switching the rear window wiper on/
off
Combination switch :
è Switch
2ô Wipes with washer fluid
3I Switches on intermittent wiping
40 Switches off intermittent wiping
5ô Wipes with washer fluid
X Turn the SmartKey to position 1 or 2 in the
ignition lock ( Y page 149).
X Turn switch : on the combination switch
to the corresponding position.
When the rear window wiper is switched on,
the icon appears in the instrument cluster.
Replacing the wiper blades
Important safety notes
GWARNING
If the windshield wipers begin to move while
you are changing the wiper blades, you could be trapped by the wiper arm. There is a risk of
injury.
Always switch off the windshield wipers and
ignition before changing the wiper blades.
! Never open the hood/tailgate if a wiper
arm has been folded away from the wind-
shield/rear window.
Never fold a windshield wiper arm without a
wiper blade back onto the windshield/rear window. Hold the windshield wiper arm firmly when
you change the wiper blade. If you release
the wiper arm without a wiper blade and it
falls onto the windshield/rear window, the
windshield/rear window may be damaged
by the force of the impact.
Mercedes-Benz recommends that you have the wiper blades changed at a qualified
specialist workshop.
! To avoid damaging the wiper blades,
make sure that you touch only the wiper
arm of the wiper.
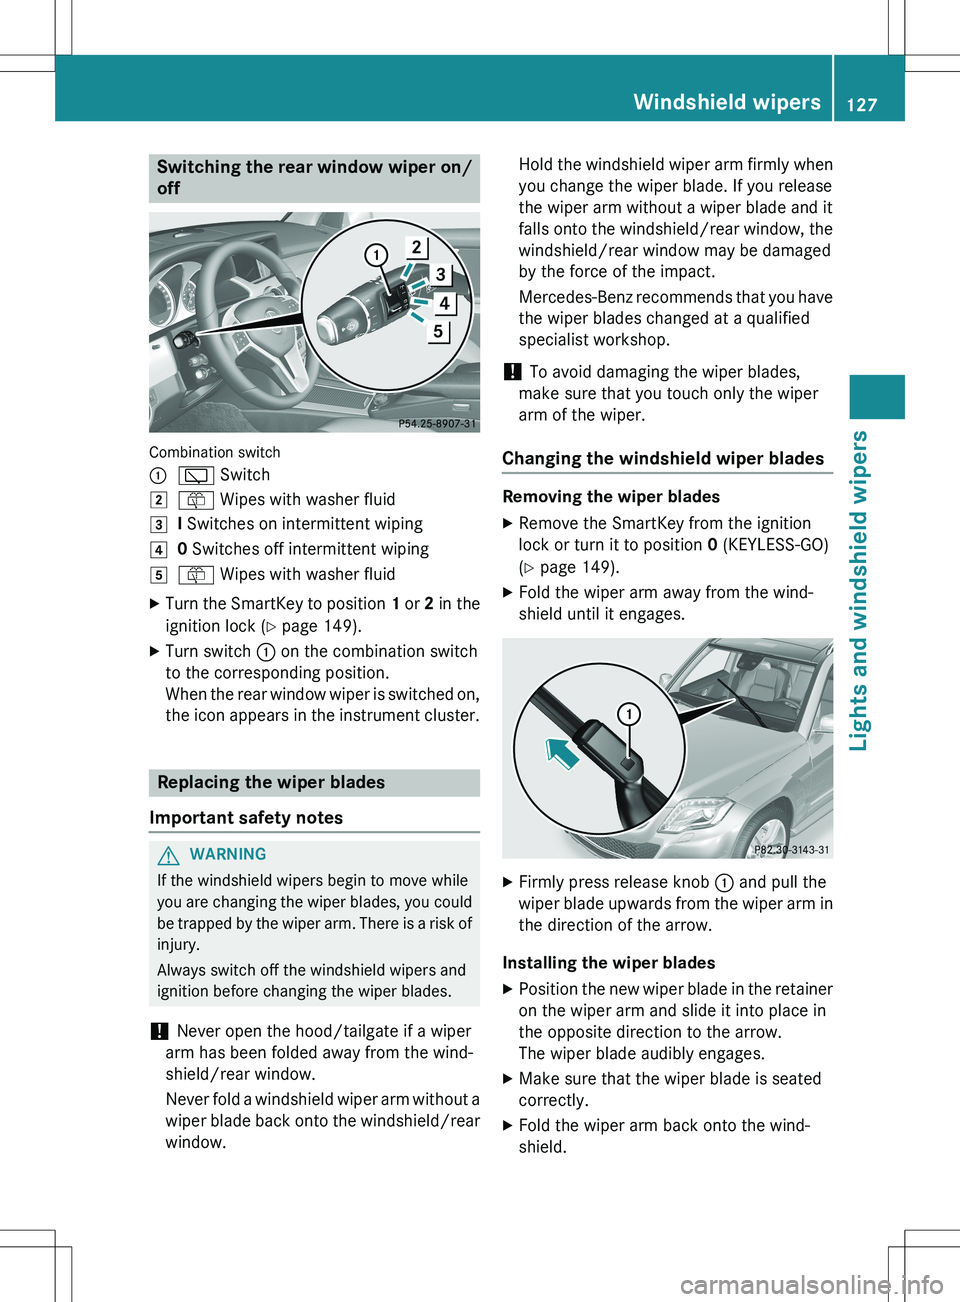
Changing the windshield wiper blades
Removing the wiper blades
X Remove the SmartKey from the ignition
lock or turn it to position 0 (KEYLESS-GO)
( Y page 149).
X Fold the wiper arm away from the wind-
shield until it engages.
XFirmly press release knob : and pull the
wiper blade upwards from the wiper arm in the direction of the arrow.
Installing the wiper blades
X Position the new wiper blade in the retainer
on the wiper arm and slide it into place in
the opposite direction to the arrow.
The wiper blade audibly engages.
X Make sure that the wiper blade is seated
correctly.
X Fold the wiper arm back onto the wind-
shield.
Windshield wipers127
Lights and windshield wipers
Z