2015 MERCEDES-BENZ GLE SUV keyless
[x] Cancel search: keylessPage 99 of 453
Closing the tailgate automatically
X
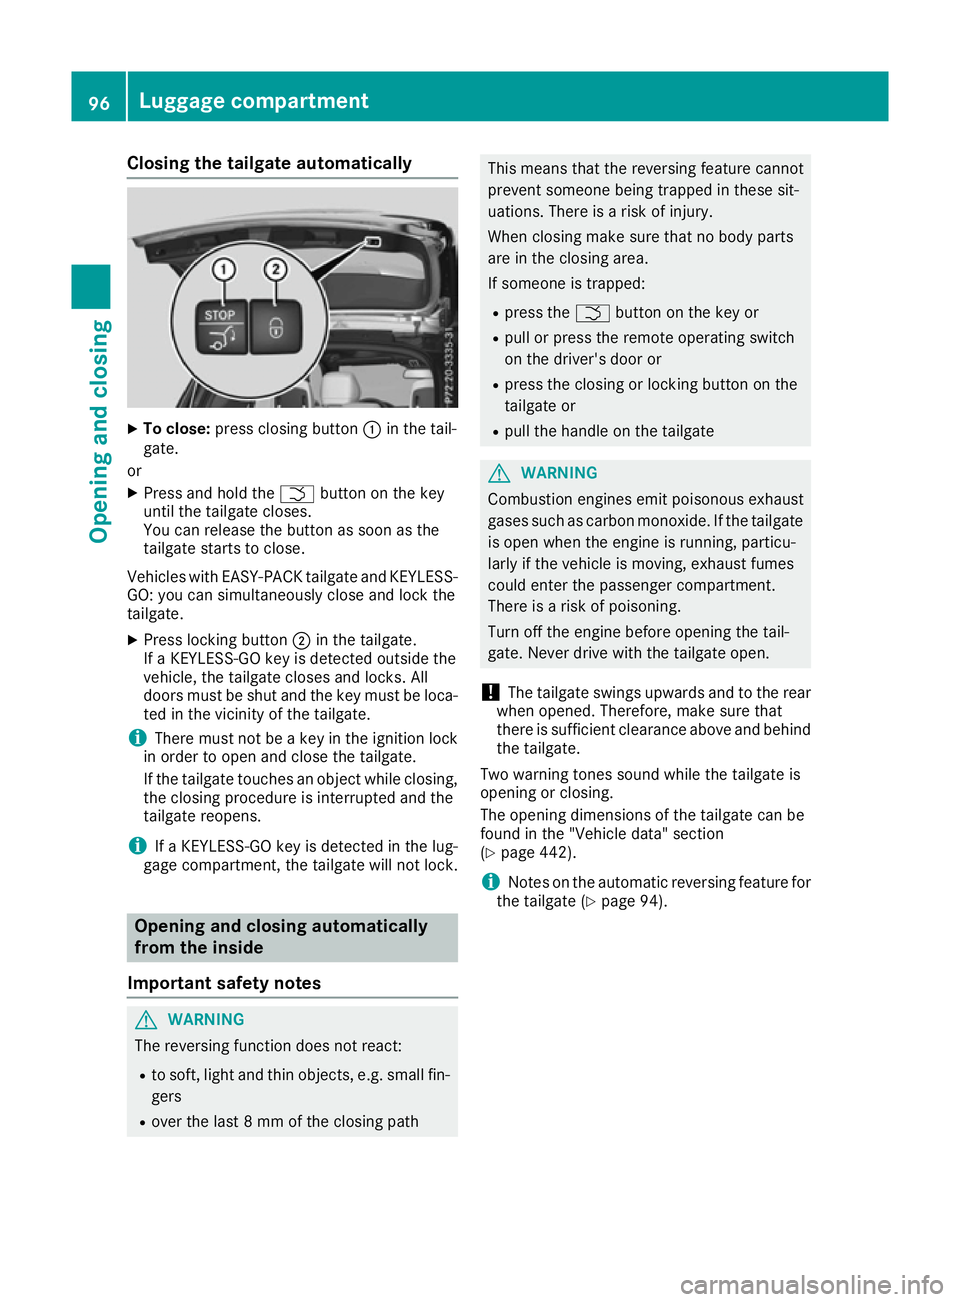
To close: press closing button :in the tail-
gate.
or
X Press and hold the Fbutton on the key
until the tailgate closes.
You can release the button as soon as the
tailgate starts to close.
Vehicles with EASY-PACK tailgate and KEYLESS-
GO: you can simultaneously close and lock the
tailgate.
X Press locking button ;in the tailgate.
If a KEYLESS-GO key is detected outside the
vehicle, the tailgate closes and locks. All
doors must be shut and the key must be loca- ted in the vicinity of the tailgate.
i There must not be a key in the ignition lock
in order to open and close the tailgate.
If the tailgate touches an object while closing, the closing procedure is interrupted and the
tailgate reopens.
i If a KEYLESS-GO key is detected in the lug-
gage compartment, the tailgate will not lock. Opening and closing automatically
from the inside
Important safety notes G
WARNING
The reversing function does not react:
R to soft, light and thin objects, e.g. small fin-
gers
R over the last 8 mm of the closing path This means that the reversing feature cannot
prevent someone being trapped in these sit-
uations. There is a risk of injury.
When closing make sure that no body parts
are in the closing area.
If someone is trapped:
R press the Fbutton on the key or
R pull or press the remote operating switch
on the driver's door or
R press the closing or locking button on the
tailgate or
R pull the handle on the tailgate G
WARNING
Combustion engines emit poisonous exhaust
gases such as carbon monoxide. If the tailgate is open when the engine is running, particu-
larly if the vehicle is moving, exhaust fumes
could enter the passenger compartment.
There is a risk of poisoning.
Turn off the engine before opening the tail-
gate. Never drive with the tailgate open.
! The tailgate swings upwards and to the rear
when opened. Therefore, make sure that
there is sufficient clearance above and behind
the tailgate.
Two warning tones sound while the tailgate is
opening or closing.
The opening dimensions of the tailgate can be
found in the "Vehicle data" section
(Y page 442).
i Notes on the automatic reversing feature for
the tailgate (Y page 94).96
Luggage compartmentOpening and closing
Page 102 of 453
X
To close manually: pull the corresponding
button and hold it.
X To close fully: pull the button beyond the
point of resistance and release it.
Automatic operation is started.
X To interrupt automatic operation: press/
pull the corresponding switch again.
If you press/pull the switch beyond the point of resistance and release, automatic operation is
started in the corresponding direction. You can
stop automatic operation by pressing/pulling
again.
You can continue to operate the side windows
after switching off the engine or removing the
key. This function remains active for five
minutes or until the driver's or front-passenger
door is opened.
The side windows cannot be operated from the
rear when the override feature for the side win-
dows is activated (Y page 69). Convenience opening feature
General notes Vehicles with KEYLESS-GO or KEYLESS-GO
start function:
you can ventilate the vehicle
before you start driving.
To do this, the key is used to carry out the fol-
lowing functions simultaneously:
R unlock the vehicle
R open the side windows
R open the sliding sunroof or the panorama slid-
ing sunroof and the roller sunblinds
R switch on the seat ventilation for the driver's
seat
The convenience opening feature can only be
operated using the key. The key must be close to
the vehicle. For vehicles without KEYLESS-GO,
the key must be near the driver's door handle.
The "convenience opening" feature is also avail-
able when the vehicle is unlocked. Convenience opening feature X
Vehicles without KEYLESS-GO: point the tip
of the key at the door handle on the driver's
door.
X Press and hold the %button until the side
windows and the sliding sunroof or panorama
sliding sunroof are in the desired position.
If the roller sunblinds of the panorama sliding
sunroof are closed, the roller sunblinds are
opened first.
X Press and hold the %button again until the
panorama sliding sunroof is in the desired
position.
X To interrupt convenience opening: release
the % button. Convenience closing feature
Important safety notes G
WARNING
When the convenience closing feature is oper- ating, parts of the body could become trapped
in the closing area of the side window and the
sliding sunroof. There is a risk of injury.
Observe the complete closing procedure
when the convenience closing feature is oper-
ating. When closing make sure that no parts of the body are in the closing area.
When you lock the vehicle, you can simultane-
ously: R close the side windows
R close the sliding sunroof or the panorama
sliding sunroof
On vehicles with a panorama sliding sunroof,
you can then close the roller sunblinds.
Proceed as follows if someone is trapped:
R Release the &button to interrupt the clos-
ing procedure.
R Press and hold the %button to open.
Vehicles with KEYLESS-GO:
R Release the sensor surfaces on the exterior
door handle to interrupt the closing proce-
dure.
R To open, pull the same door handle immedi-
ately and hold it firmly. The side windows and the sliding sunroof open for as long as the Side windows
99Opening and closing Z
Page 103 of 453
door handle is held and the door is not
opened.
Notes on the automatic reversing feature for:
R the side windows (Y page 98)
R the sliding sunroof (Y page 102)
R the panorama sliding sunroof (Y page 102)
Using the key The key must be close to the vehicle. For vehi-
cles without KEYLESS-GO, the key must be near
the driver's door handle.
X Vehicles without KEYLESS-GO: point the tip
of the key at the door handle on the driver's
door.
X Press and hold the &button until the side
windows and the sliding sunroof or the pano-
rama sliding sunroof are fully closed.
X Make sure that all the side windows and the
sliding sunroof or panorama sliding sunroof
are closed.
On vehicles with a panorama sliding sunroof: X Press and hold the &button again until the
roller sunblinds of the panorama sliding sun-
roof close.
X To interrupt convenience closing: release
the & button.
Using KEYLESS-GO X
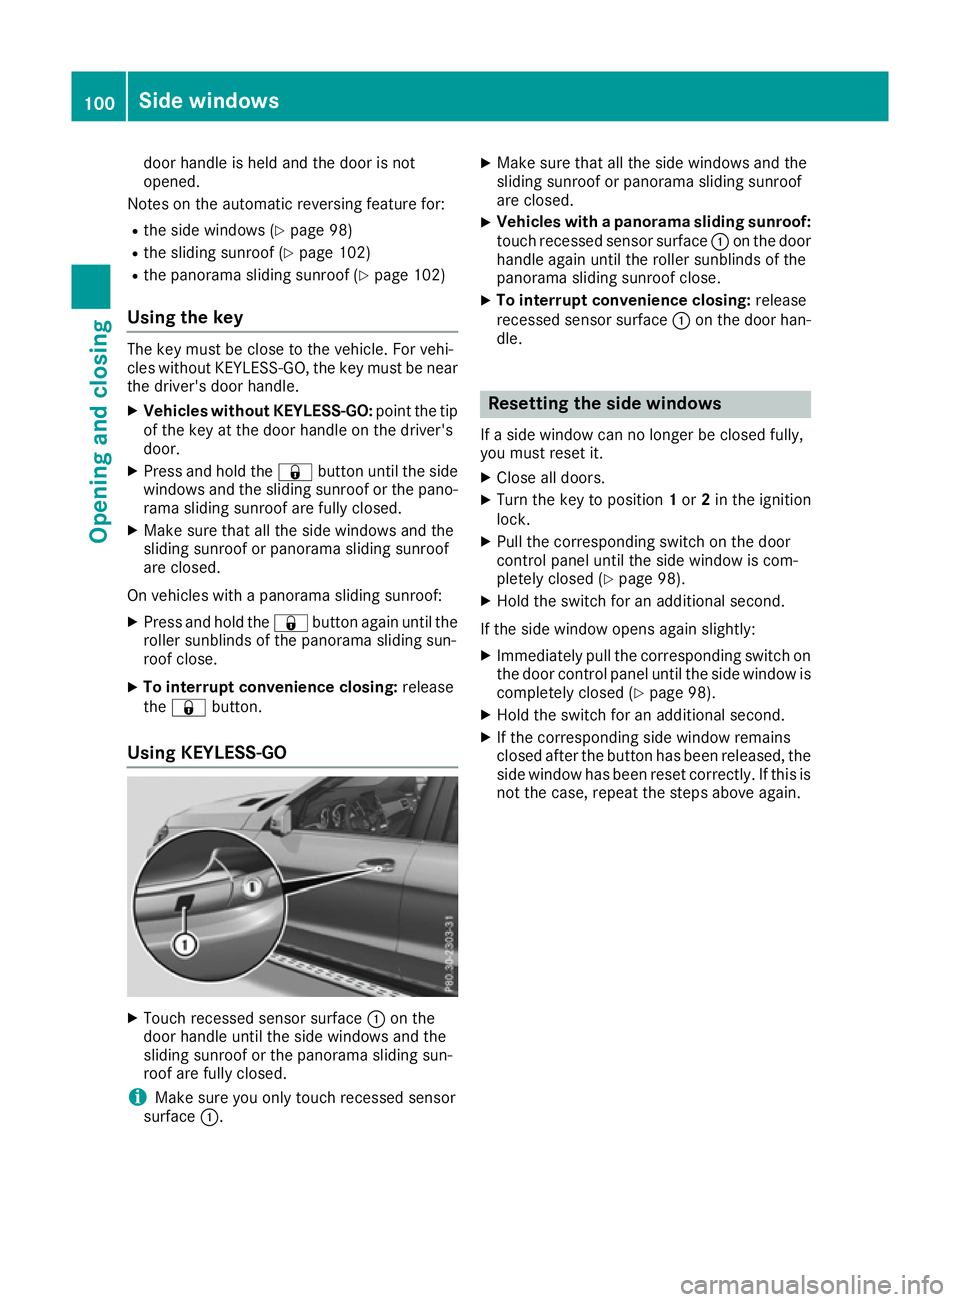
Touch recessed sensor surface :on the
door handle until the side windows and the
sliding sunroof or the panorama sliding sun-
roof are fully closed.
i Make sure you only touch recessed sensor
surface :. X
Make sure that all the side windows and the
sliding sunroof or panorama sliding sunroof
are closed.
X Vehicles with a panorama sliding sunroof:
touch recessed sensor surface :on the door
handle again until the roller sunblinds of the
panorama sliding sunroof close.
X To interrupt convenience closing: release
recessed sensor surface :on the door han-
dle. Resetting the side windows
If a side window can no longer be closed fully,
you must reset it.
X Close all doors.
X Turn the key to position 1or 2in the ignition
lock.
X Pull the corresponding switch on the door
control panel until the side window is com-
pletely closed (Y page 98).
X Hold the switch for an additional second.
If the side window opens again slightly: X Immediately pull the corresponding switch on
the door control panel until the side window is completely closed (Y page 98).
X Hold the switch for an additional second.
X If the corresponding side window remains
closed after the button has been released, the
side window has been reset correctly. If this is
not the case, repeat the steps above again. 100
Side windowsOpening and closing
Page 118 of 453
Adjusting the steering wheel electri-
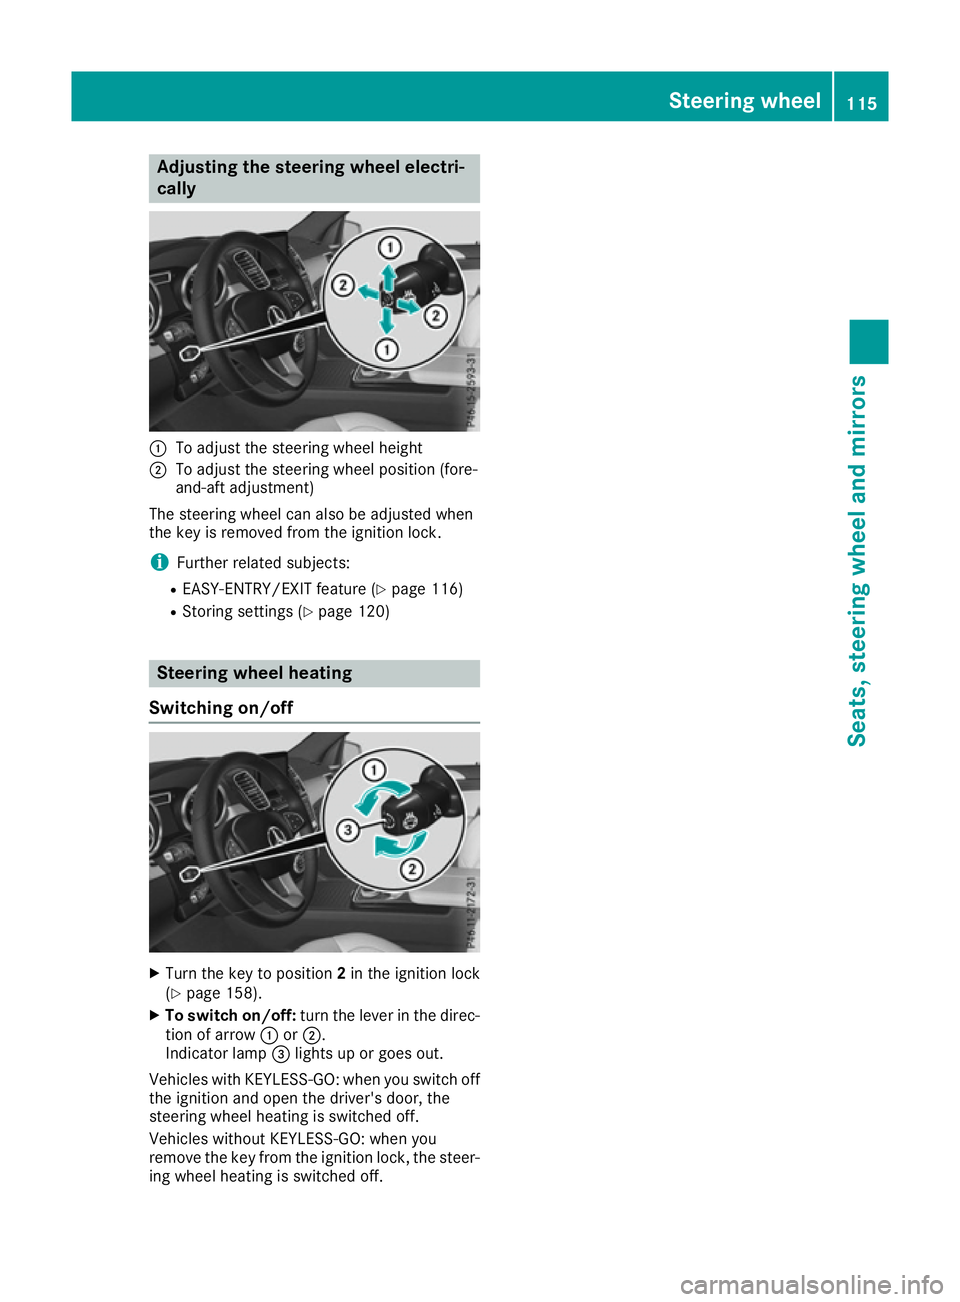
cally :
To adjust the steering wheel height
; To adjust the steering wheel position (fore-
and-aft adjustment)
The steering wheel can also be adjusted when
the key is removed from the ignition lock.
i Further related subjects:
R EASY-ENTRY/EXIT feature (Y page 116)
R Storing settings (Y page 120) Steering wheel heating
Switching on/off X
Turn the key to position 2in the ignition lock
(Y page 158).
X To switch on/off: turn the lever in the direc-
tion of arrow :or;.
Indicator lamp =lights up or goes out.
Vehicles with KEYLESS-GO: when you switch off the ignition and open the driver's door, the
steering wheel heating is switched off.
Vehicles without KEYLESS-GO: when you
remove the key from the ignition lock, the steer-
ing wheel heating is switched off. Steering wheel
115Seats, steering wheel and mirrors Z
Page 119 of 453
Problems with the steering wheel heating
Problem
Possible causes/consequences and
M
MSolutions The steering wheel heat-
ing has switched itself
off prematurely or can-
not be switched on. The on-board voltage is too low because too many electrical consum-
ers are switched on.
X Switch off electrical consumers that you do not need, such as the
rear window heating or interior lighting. EASY-ENTRY/EXIT feature
Important safety notes G
WARNING
When the EASY-ENTRY/EXIT feature adjusts
the steering wheel, you and other vehicle
occupants – particularly children – could
become trapped. There is a risk of injury.
While the EASY-ENTRY/EXIT feature is mak-
ing adjustments, make sure that no one has
any body parts in the sweep of the steering
wheel.
Move the steering wheel adjustment lever if
there is a risk of entrapment by the steering
wheel. The adjustment process is stopped.
Press one of the memory function position but-
tons. This function is only available on vehicles
with a memory function. G
WARNING
If children activate the EASY-ENTRY/EXIT fea- ture, they can become trapped, particularly
when unattended. There is a risk of injury.
When leaving the vehicle, always take the key with you and lock the vehicle. Never leave
children unattended in the vehicle. G
WARNING
If you drive off while the EASY-ENTRY/EXIT
feature is making adjustments, you could lose
control of the vehicle. There is a risk of an
accident.
Always wait until the adjustment process is
complete before driving off.
The EASY-ENTRY/EXIT feature makes getting in
and out of your vehicle easier. You can activate and deactivate the EASY-
ENTRY/EXIT feature in the on-board computer
(Y page 296).
Position of the steering wheel when the EASY-ENTRY/EXIT feature is active The steering wheel tilts upwards if you:
R remove the key from the ignition lock
R open the driver's door and KEYLESS-GO is in
position 1
R open the driver's door and the key is in posi-
tion 0or 1in the ignition lock
i The steering wheel only moves upwards if it
has not already reached the upper stop.
Position of the steering wheel for driv-
ing The steering wheel is moved to the previously
set position if:
R the driver's door is closed and
R you insert the key into the ignition lock
or
R you press the Start/Stop button once on vehi-
cles with KEYLESS-GO
If you close the driver's door with the key inser- ted in the ignition lock, the steering wheel is
automatically moved to the previously set posi-
tion.
The last position of the steering column is stored when you:
R switch the ignition off
R save the setting with the memory function
(Y page 120). 116
Steering wheelSeats, steering wheel and mirrors
Page 134 of 453
Switching the rear window wiper on/
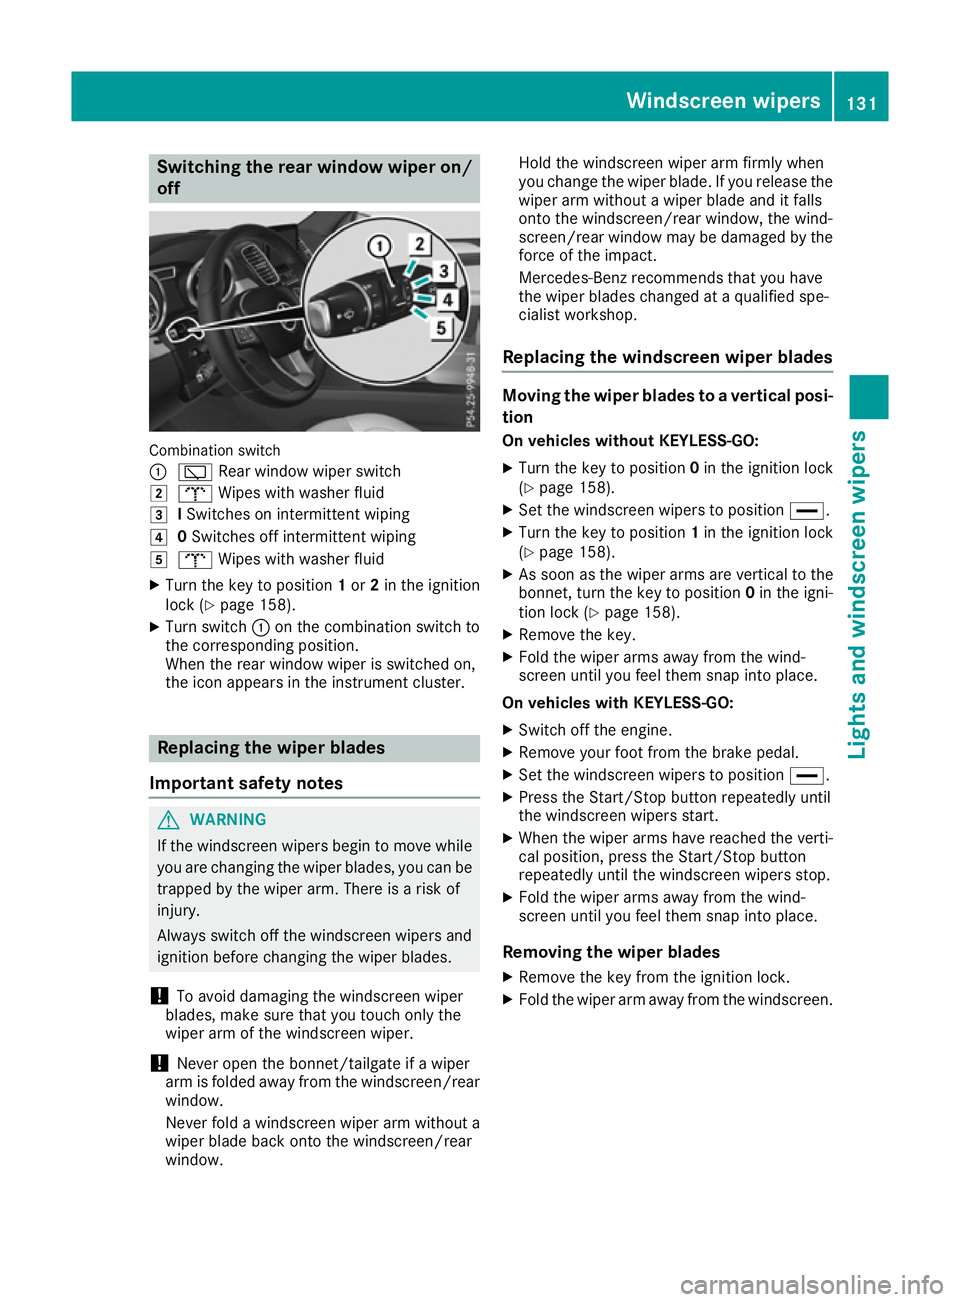
off Combination switch
:
è Rear window wiper switch
2 b Wipes with washer fluid
3 ISwitches on intermittent wiping
4 0Switches off intermittent wiping
5 b Wipes with washer fluid
X Turn the key to position 1or 2in the ignition
lock (Y page 158).
X Turn switch :on the combination switch to
the corresponding position.
When the rear window wiper is switched on,
the icon appears in the instrument cluster. Replacing the wiper blades
Important safety notes G
WARNING
If the windscreen wipers begin to move while
you are changing the wiper blades, you can be trapped by the wiper arm. There is a risk of
injury.
Always switch off the windscreen wipers and
ignition before changing the wiper blades.
! To avoid damaging the windscreen wiper
blades, make sure that you touch only the
wiper arm of the windscreen wiper.
! Never open the bonnet/tailgate if a wiper
arm is folded away from the windscreen/rear
window.
Never fold a windscreen wiper arm without a
wiper blade back onto the windscreen/rear
window. Hold the windscreen wiper arm firmly when
you change the wiper blade. If you release the
wiper arm without a wiper blade and it falls
onto the windscreen/rear window, the wind-
screen/rear window may be damaged by the
force of the impact.
Mercedes-Benz recommends that you have
the wiper blades changed at a qualified spe-
cialist workshop.
Replacing the windscreen wiper blades Moving the wiper blades to a vertical posi-
tion
On vehicles without KEYLESS-GO:
X Turn the key to position 0in the ignition lock
(Y page 158).
X Set the windscreen wipers to position °.
X Turn the key to position 1in the ignition lock
(Y page 158).
X As soon as the wiper arms are vertical to the
bonnet, turn the key to position 0in the igni-
tion lock (Y page 158).
X Remove the key.
X Fold the wiper arms away from the wind-
screen until you feel them snap into place.
On vehicles with KEYLESS-GO:
X Switch off the engine.
X Remove your foot from the brake pedal.
X Set the windscreen wipers to position °.
X Press the Start/Stop button repeatedly until
the windscreen wipers start.
X When the wiper arms have reached the verti-
cal position, press the Start/Stop button
repeatedly until the windscreen wipers stop.
X Fold the wiper arms away from the wind-
screen until you feel them snap into place.
Removing the wiper blades X Remove the key from the ignition lock.
X Fold the wiper arm away from the windscreen. Windscreen wipers
131Lights and windscreen wipers Z
Page 135 of 453
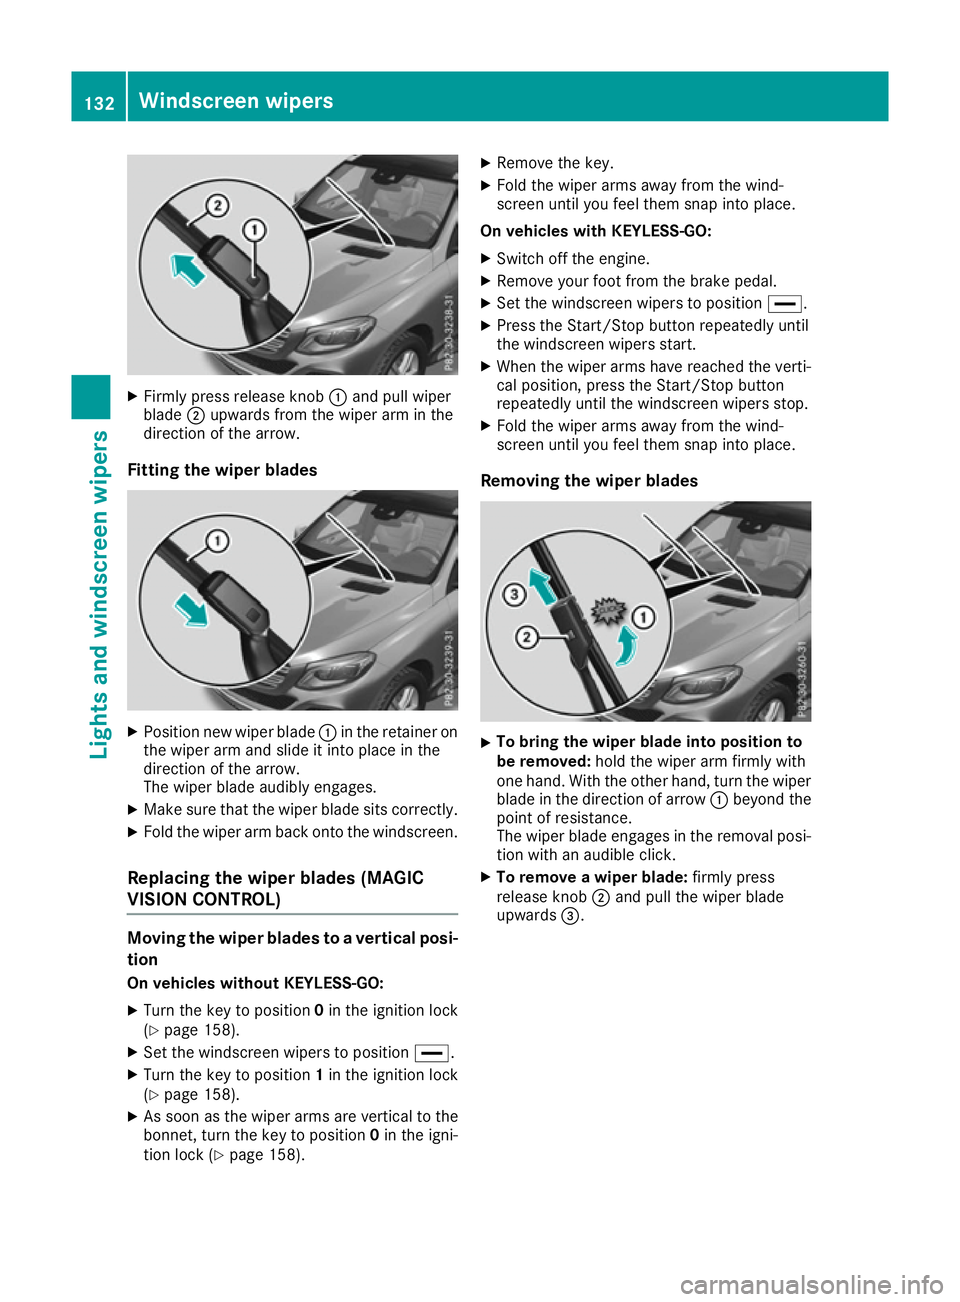
X
Firmly press release knob :and pull wiper
blade ;upwards from the wiper arm in the
direction of the arrow.
Fitting the wiper blades X
Position new wiper blade :in the retainer on
the wiper arm and slide it into place in the
direction of the arrow.
The wiper blade audibly engages.
X Make sure that the wiper blade sits correctly.
X Fold the wiper arm back onto the windscreen.
Replacing the wiper blades (MAGIC
VISION CONTROL) Moving the wiper blades to a vertical posi-
tion
On vehicles without KEYLESS-GO:
X Turn the key to position 0in the ignition lock
(Y page 158).
X Set the windscreen wipers to position °.
X Turn the key to position 1in the ignition lock
(Y page 158).
X As soon as the wiper arms are vertical to the
bonnet, turn the key to position 0in the igni-
tion lock (Y page 158). X
Remove the key.
X Fold the wiper arms away from the wind-
screen until you feel them snap into place.
On vehicles with KEYLESS-GO:
X Switch off the engine.
X Remove your foot from the brake pedal.
X Set the windscreen wipers to position °.
X Press the Start/Stop button repeatedly until
the windscreen wipers start.
X When the wiper arms have reached the verti-
cal position, press the Start/Stop button
repeatedly until the windscreen wipers stop.
X Fold the wiper arms away from the wind-
screen until you feel them snap into place.
Removing the wiper blades X
To bring the wiper blade into position to
be removed:
hold the wiper arm firmly with
one hand. With the other hand, turn the wiper blade in the direction of arrow :beyond the
point of resistance.
The wiper blade engages in the removal posi-
tion with an audible click.
X To remove a wiper blade: firmly press
release knob ;and pull the wiper blade
upwards =. 132
Windscreen wipersLights and windscreen wipers
Page 161 of 453
G
WARNING
If you switch off the ignition while driving,
safety-relevant functions are only available
with limitations, or not at all. This could affect, for example, the power steering and the brake
boosting effect. You will require considerably
more effort to steer and brake. There is a risk of an accident.
Do not switch off the ignition while driving. G
WARNING
If the parking brake has not been fully
released when driving, the parking brake can:
R overheat and cause a fire
R lose its hold function.
There is a risk of fire and an accident. Release
the parking brake fully before driving off.
! Do not warm up the engine when the vehicle
is stationary. Drive off immediately. Avoid
high engine speeds and driving at full throttle
until the engine has reached its operating
temperature.
Only shift the automatic transmission to the
desired drive position when the vehicle is sta-
tionary.
Where possible, avoid spinning the drive
wheels when pulling away on slippery roads.
You could otherwise damage the drive train.
! Mercedes-AMG vehicles:
at low engine oil
temperatures (below +20 †), the maximum
engine speed is restricted in order to protect the engine. To protect the engine and main-
tain smooth engine operation, avoid driving at
full throttle when the engine is cold.
Observe the important safety notes for PLUG-IN HYBRID vehicles (Y page 41). Key positions
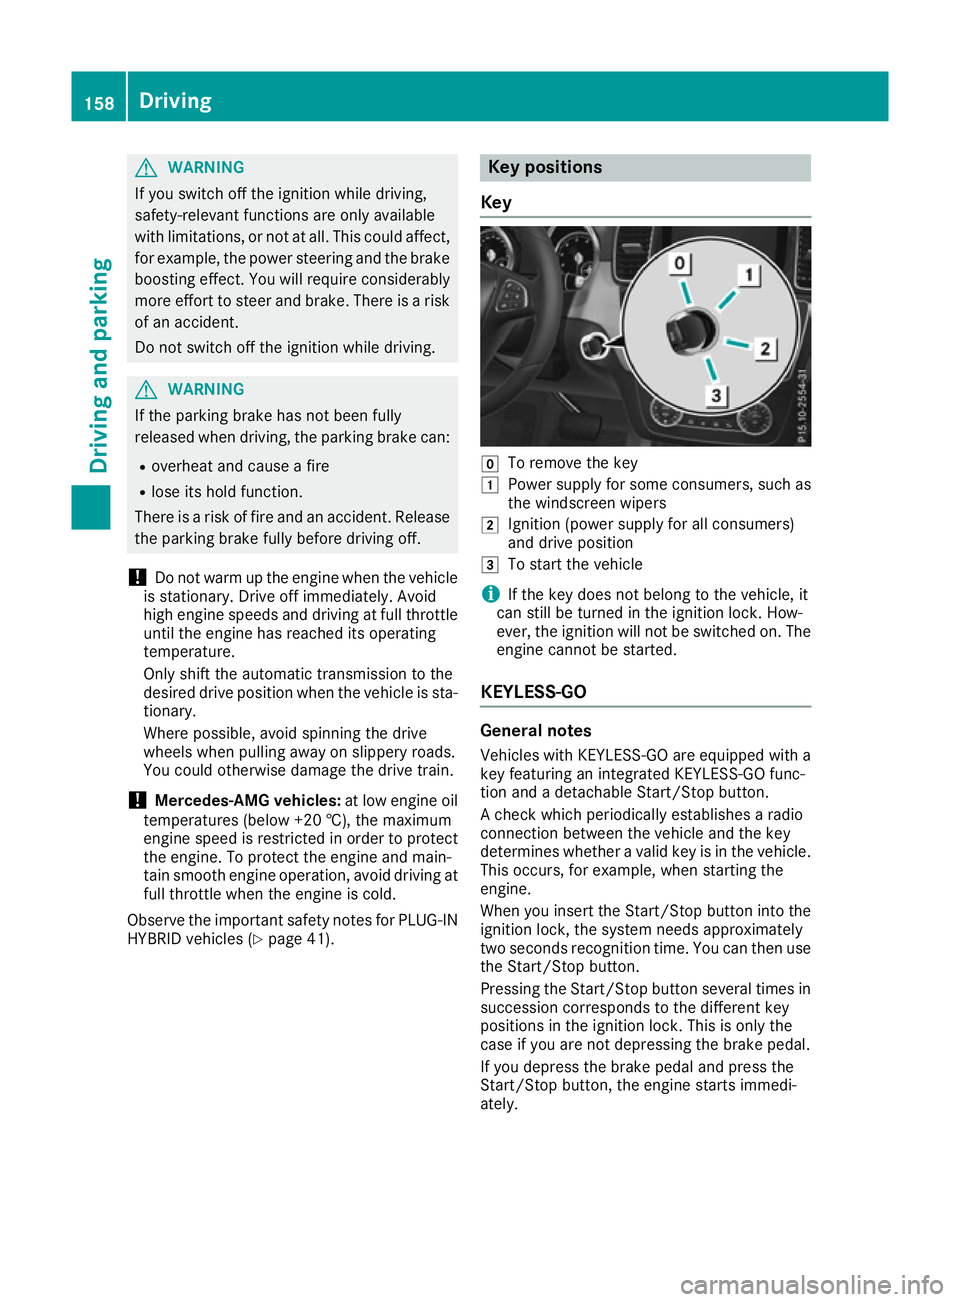
Key g
To remove the key
1 Power supply for some consumers, such as
the windscreen wipers
2 Ignition (power supply for all consumers)
and drive position
3 To start the vehicle
i If the key does not belong to the vehicle, it
can still be turned in the ignition lock. How-
ever, the ignition will not be switched on. The
engine cannot be started.
KEYLESS-GO General notes
Vehicles with KEYLESS-GO are equipped with a
key featuring an integrated KEYLESS-GO func-
tion and a detachable Start/Stop button.
A check which periodically establishes a radio
connection between the vehicle and the key
determines whether a valid key is in the vehicle. This occurs, for example, when starting the
engine.
When you insert the Start/Stop button into the
ignition lock, the system needs approximately
two seconds recognition time. You can then use the Start/Stop button.
Pressing the Start/Stop button several times in
succession corresponds to the different key
positions in the ignition lock. This is only the
case if you are not depressing the brake pedal.
If you depress the brake pedal and press the
Start/Stop button, the engine starts immedi-
ately. 158
DrivingDriving and parking