2015 MERCEDES-BENZ GLE SUV warning light
[x] Cancel search: warning lightPage 19 of 453
On and Offroad menu (on-board
computer)
.......................................... 297
On-board computer
AMG menu .....................................2 97
Assistance menu ........................... 289
Audio menu ................................... 287
Convenience submenu .................. 296
Display messages .......................... 300
Displaying a service message ....... .378
DISTRONIC PLUS ........................... 213
Factory setting submenu .............. .297
Heating submenu ........................... 295
HYBRID menu ................................ 292
Important safety notes .................. 281
Instrument cluster submenu .......... 293
Light submenu ............................... 293
Menu overview .............................. 284
Message memory .......................... 300
Navigation menu ............................ 286
On and Offroad menu .................... 297
Operating the TV ............................ 288
Operating video DVD ..................... 288
Operation ....................................... 282
RACETIMER ................................... 298
Service menu ................................. 291
Settings menu ............................... 292
Standard displa y............................ 284
Telephone menu ............................ 288
Trip menu ...................................... 284
Vehicle submenu ........................... 294
Operating instructions
Vehicle equipment ........................... 26
Operating safety
Declaration of conformity ................ 27
Important safety note ...................... 26
Operating system
see On-board computer
Outside temperature display ........... 282
Overhead control panel ...................... 39
Override feature
Rear side window s........................... 69 P
Paint code .......................................... 434
Paintwork (cleaning instructions) ... 380
Panic alarm .......................................... 43 Panorama sliding sunroof
Important safety information ......... 101
Opening/closing the roller sun-
blind ............................................... 104
Operating ....................................... 103
Operating the roller sunblinds for
the sliding sunroof ......................... 103
Problem (malfunction) ................... 106
Rain closing feature ....................... 103
Reversing feature ........................... 102
Parking
Important safety notes .................. 191
Parking brake ................................ 192
Position of exterior mirror, front-
passenger side ............................... 119
Reversing camera .......................... 232
see PARKTRONIC
Parking aid
Active Parking Assist ..................... 228
see 360° camera
see Exterior mirrors
see PARKTRONIC
Parking assistance
see PARKTRONIC
Parking brake
Display message ............................ 304
Electric parking brake .................... 192
Warning lamp ................................. 346
Parking lamps
Display message ............................ 314
Switching on/of f........................... 122
PARKTRONIC
Deactivating/activating ................. 227
Driving system ............................... 225
Function/note s............................. 225
Important safety notes .................. 225
Problem (fault) ............................... 228
Sensor rang e................................. 225
Trailer towing ................................. 225
Warning display ............................. 226
PASSENGER AIR BAG
Display message ............................ 311
Indicator lamps ................................ 44
Problems (malfunctions) ................ 311
Pets in the vehicle ............................... 70
Plastic trim (cleaning instruc-
tions) .................................................. 384 16
Index
Page 25 of 453
With both axles on the ground .......4
01
Towing eye ......................................... 387
Traffic Sign Assist
Activating/deactivating the warn-ing function ................................... .290
Display message ............................ 325
Function/notes ............................ .242
Important safety notes .................. 242
Instrument cluster display ............. 243
Trailer coupling
see Towing a trailer
Trailer towing
7-pin connector ............................ .278
Blind Spot Assist ............................ 246
Cleaning the trailer tow hitch ......... 383
Coupling up a trailer ..................... .275
Decoupling a trailer ....................... 276
Driving tips ................................... .273
Important safety notes .................. 272
Lights display message .................. 313
Mounting dimensions .................... 446
Parktronic ...................................... 225
Power supply ................................. 277
Problem (fault) ............................... 279
Trailer loads ................................... 447
Transmission
see Automatic transmission
Transmission position display ......... 168
Transmission position display
(DIRECT SELECT lever) ......................168
Transporting the vehicle .................. 401
Travelling uphill
Brow of hill ..................................... 202
Driving downhill ............................ .202
Maximum gradient-climbing capa-
bility ............................................... 202
Trim pieces (cleaning instruc-
tions) ................................................. .384
Trip computer (on-board com-
puter) ................................................. .284
Trip meter
Calling up ....................................... 284
Resetting (on-board computer) ...... 285
Turn signals
Changing bulbs (front) ................... 130
Switching on/off ........................... 123 TV
Operating (on-board computer) ..... 288
see Separate operating instructions
Two-way radio
Frequencies ................................... 433
Installation ..................................... 433
Transmission output (maximum ).... 433
Type identification plate
see Vehicle identification plate
Tyre inflation compressor
see TIREFIT kit
Tyre pressure
Calling up (on-board computer) ..... 411
Display message ............................ 330
Not reached (TIREFIT) .................... 391
Reached (TIREFIT) .......................... 391
Recommended ............................... 408
Tyre pressure loss warning
General notes ................................ 410
Important safety notes .................. 410
Restarting ...................................... 410
Tyre pressure monitor
Checking the tyre pressure elec-
tronically ........................................ 411
Function/note s............................. 411
General notes ................................ 411
Important safety notes .................. 411
Radio type approval for the tyre
pressure monitor ........................... 413
Restarting ...................................... 412
Warning lamp ................................. 350
Warning message .......................... 412
Tyres
Changing a whee l.......................... 413
Checking ........................................ 406
Direction of rotation ...................... 414
Display message ............................ 330
General notes ................................ 418
Important safety notes .................. 405
Information on driving .................... 405
M+S tyres ...................................... 407
MOExtended tyre s......................... 407
Replacing ....................................... 413
Service life ..................................... 406
Storing ........................................... 414
Tyre size (data ).............................. 418
Tyre tread ...................................... 406
Wheel and tyre combinations ........ 419 22
Index
Page 33 of 453
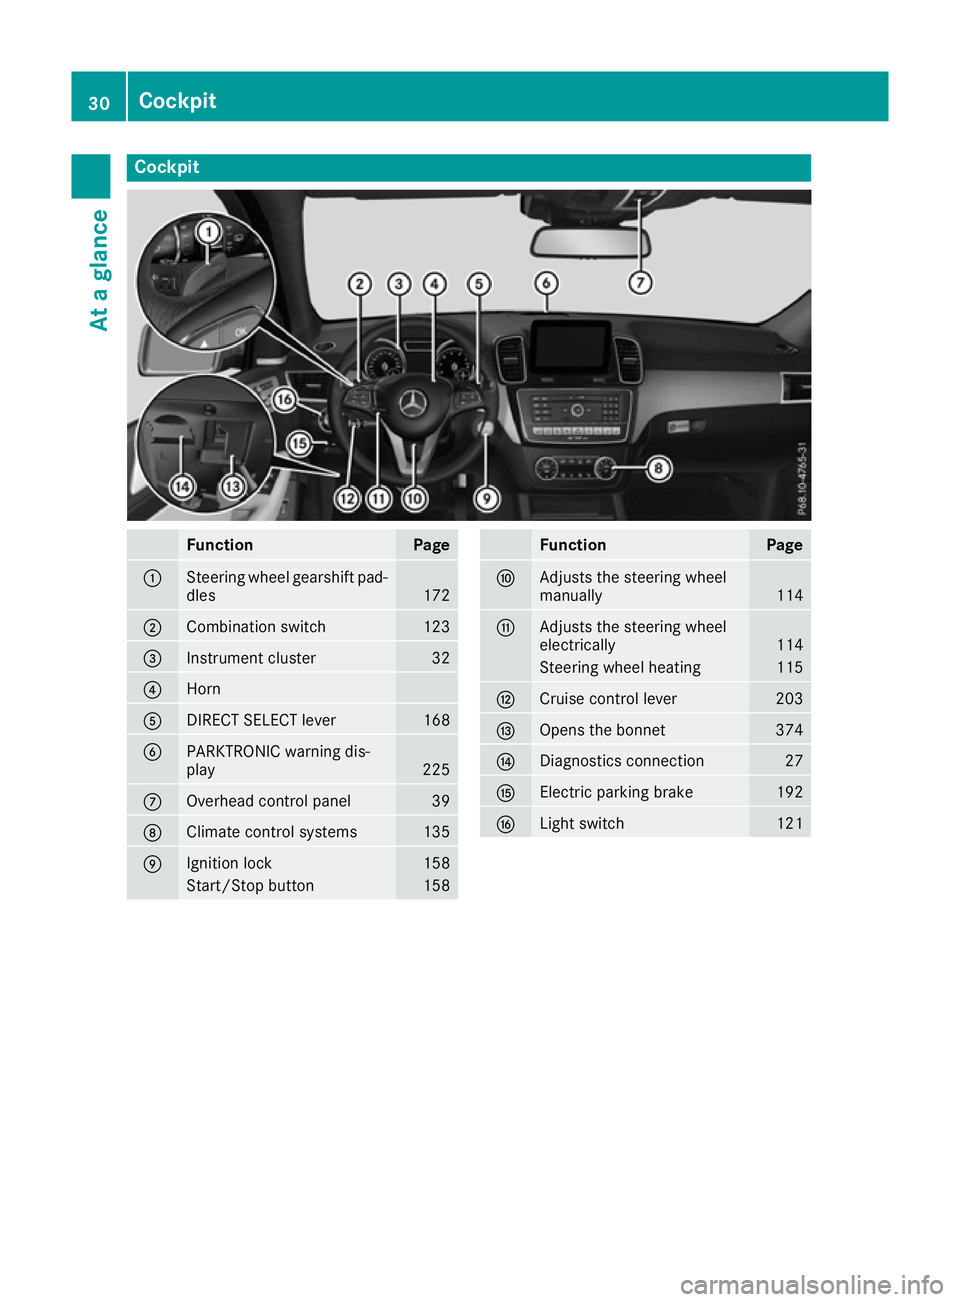
Cockpit
Function Page
:
Steering wheel gearshift pad-
dles 172
;
Combination switch 123
=
Instrument cluster 32
?
Horn
A
DIRECT SELECT lever 168
B
PARKTRONIC warning dis-
play
225
C
Overhead control panel 39
D
Climate control systems 135
E
Ignition lock 158
Start/Stop button 158 Function Page
F
Adjusts the steering wheel
manually
114
G
Adjusts the steering wheel
electrically
114
Steering wheel heating 115
H
Cruise control lever 203
I
Opens the bonnet 374
J
Diagnostics connection 27
K
Electric parking brake 192
L
Light switch 12130
CockpitAt a glance
Page 34 of 453
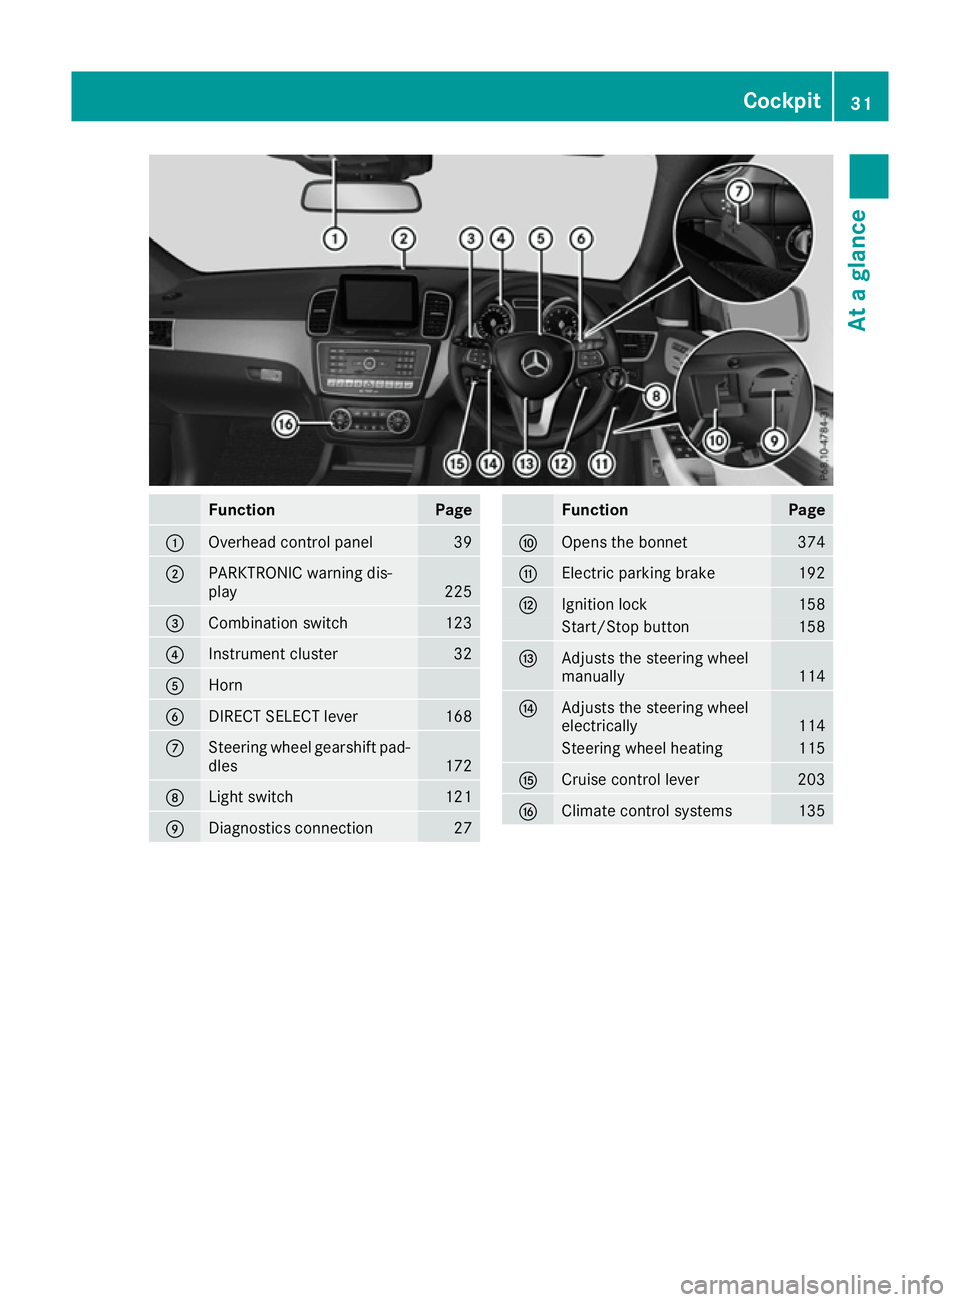
Function Page
:
Overhead control panel 39
;
PARKTRONIC warning dis-
play
225
=
Combination switch 123
?
Instrument cluster 32
A
Horn
B
DIRECT SELECT lever 168
C
Steering wheel gearshift pad-
dles 172
D
Light switch 121
E
Diagnostics connection 27 Function Page
F
Opens the bonnet 374
G
Electric parking brake 192
H
Ignition lock 158
Start/Stop button 158
I
Adjusts the steering wheel
manually
114
J
Adjusts the steering wheel
electrically
114
Steering wheel heating 115
K
Cruise control lever 203
L
Climate control systems 135Cockpit
31At a glance
Page 45 of 453
Deactivate the hybrid system manually if:
R the 6 restraint system warning lamp in the
instrument cluster lights up after an accident
R the vehicle is badly damaged, e.g. after an
accident, and the restraint system compo-
nents were not activated
R the vehicle is badly damaged and has to be
towed or transported
X If possible, move the vehicle out of the
danger zone:
shift the automatic transmis-
sion into position N.
X Release the electric parking brake.
X Roll the vehicle to a safe place and park it
safely.
Get assistance from others if necessary.
The vehicle is locked automatically when the
ignition is switched on and the wheels are turn-
ing. There is therefore a risk of being locked out
if the vehicle is being pushed or tested on a
dynamometer.
X Switch the ignition off.
X Shift the automatic transmission to park posi-
tion P.
Apply the electric parking brake
(Y page 192).
Secure the vehicle against rolling away
(Y page 414).
X To use the high-voltage switch-off device:
open the tailgate.
X Lift the luggage compartment floor upwards
(Y page 359).
X Pull off the right-hand trim in the luggage
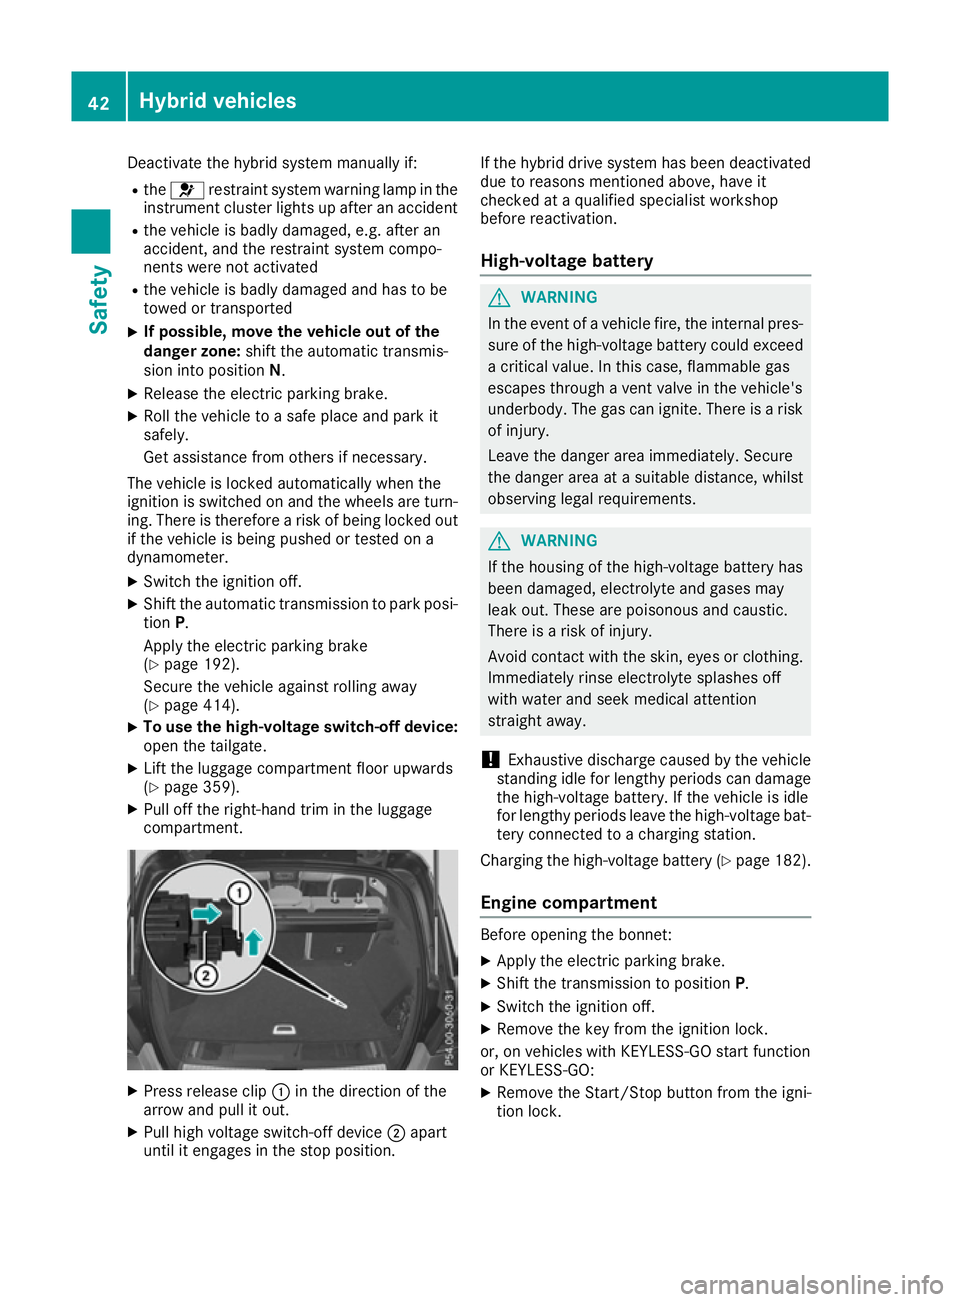
compartment. X
Press release clip :in the direction of the
arrow and pull it out.
X Pull high voltage switch-off device ;apart
until it engages in the stop position. If the hybrid drive system has been deactivated
due to reasons mentioned above, have it
checked at a qualified specialist workshop
before reactivation.
High-voltage battery G
WARNING
In the event of a vehicle fire, the internal pres- sure of the high-voltage battery could exceeda critical value. In this case, flammable gas
escapes through a vent valve in the vehicle's
underbody. The gas can ignite. There is a risk
of injury.
Leave the danger area immediately. Secure
the danger area at a suitable distance, whilst
observing legal requirements. G
WARNING
If the housing of the high-voltage battery has
been damaged, electrolyte and gases may
leak out. These are poisonous and caustic.
There is a risk of injury.
Avoid contact with the skin, eyes or clothing. Immediately rinse electrolyte splashes off
with water and seek medical attention
straight away.
! Exhaustive discharge caused by the vehicle
standing idle for lengthy periods can damage
the high-voltage battery. If the vehicle is idle
for lengthy periods leave the high-voltage bat- tery connected to a charging station.
Charging the high-voltage battery (Y page 182).
Engine compartment Before opening the bonnet:
X Apply the electric parking brake.
X Shift the transmission to position P.
X Switch the ignition off.
X Remove the key from the ignition lock.
or, on vehicles with KEYLESS-GO start function
or KEYLESS ‑GO:
X Remove the Start/Stop button from the igni-
tion lock. 42
Hybrid vehiclesSafety
Page 47 of 453
unexpectedly, for example. There is an
increased risk of injury, possibly even fatal.
Never modify parts of the restraint system. Do not attempt to modify the wiring as well as
electronic components or their software.
If it is necessary to modify an airbag system to
accommodate a person with disabilities, con-
tact a Mercedes-Benz Service Centre. Restraint system warning lamp
The functions of the restraint system are
checked after the ignition is switched on and at
regular intervals while the engine is running.
Therefore, malfunctions can be detected in
good time.
The 6 restraint system warning lamp in the
instrument cluster lights up when the ignition is switched on. It goes out no later than a few sec-
onds after the vehicle is started. The compo-
nents of the restraint system are in operational
readiness.
A malfunction has occurred if the 6restraint
system warning lamp:
R does not light up after the ignition is switched
on
R does not go out after a few seconds with the
engine running
R lights up again while the engine is running
All vehicles, except hybrid vehicles: G
WARNING
If the restraint system is malfunctioning,
restraint system components may be trig-
gered unintentionally or might not be trig-
gered at all in the event of an accident with a high rate of vehicle deceleration. This can
effect belt tensioners or airbags, for example. There is an increased risk of serious or even
fatal injuries.
Have the restraint system checked and
repaired immediately at a qualified specialist
workshop.
Hybrid vehicles: G
DANGER
If the restraint system is malfunctioning,
restraint system components may be trig-
gered unintentionally or might not be trig-
gered at all in the event of an accident with a high rate of vehicle deceleration. This can
effect belt tensioners or airbags, for example. In addition, the vehicle's high-voltage electri-
cal system may not be deactivated as inten-
ded in the event of an accident. Touching
damaged components of the vehicle's high-
voltage electrical system could result in an
electric shock. There is an increased risk of
injury, possibly even fatal.
Have the restraint system checked and
repaired immediately at a qualified specialist
workshop. After an accident, immediately
switch the ignition off and remove the key
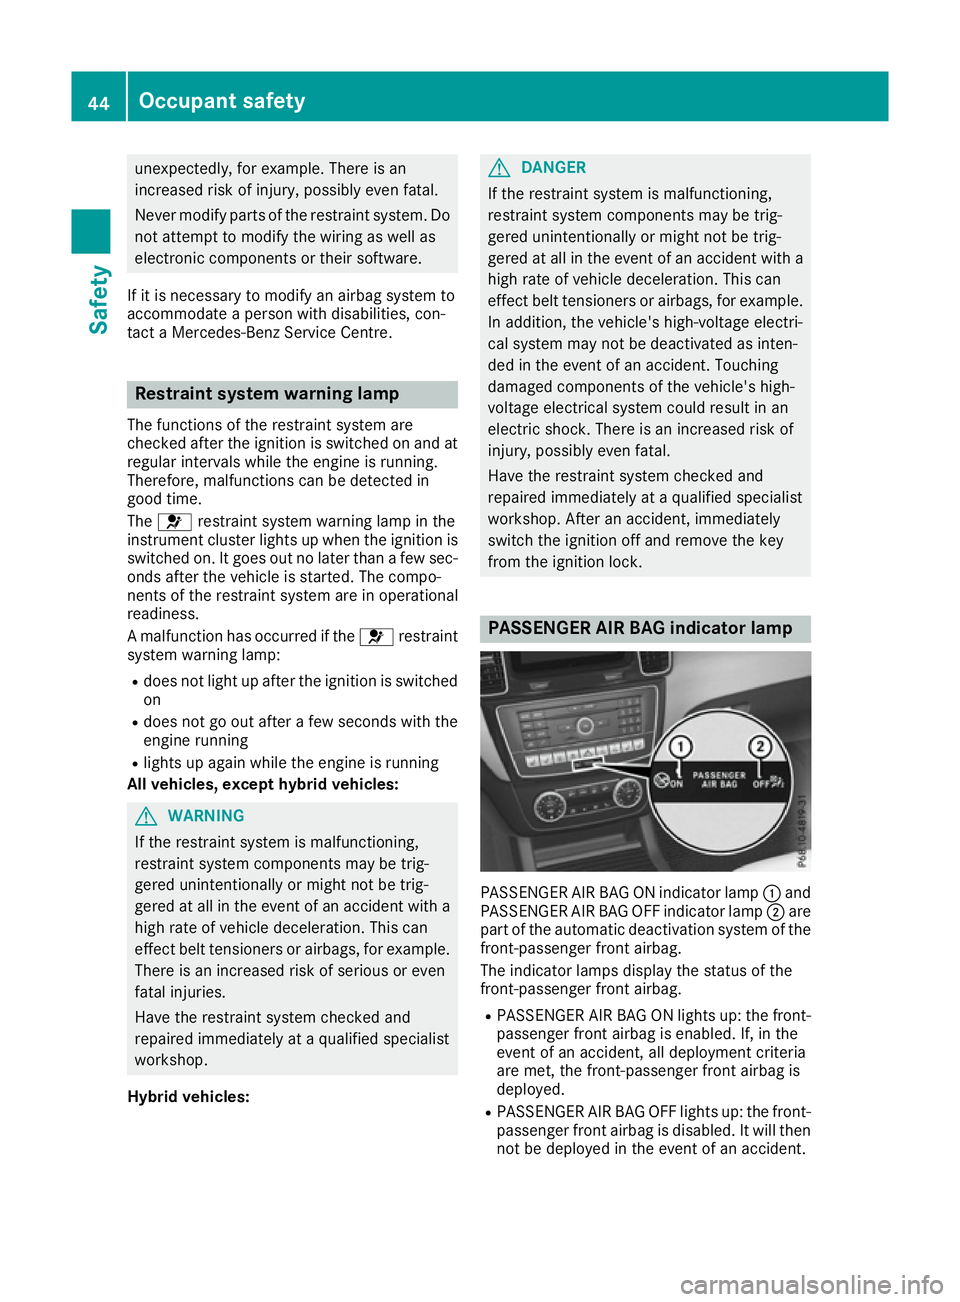
from the ignition lock. PASSENGER AIR BAG indicator lamp
PASSENGER AIR BAG ON indicator lamp
:and
PASSENGER AIR BAG OFF indicator lamp ;are
part of the automatic deactivation system of the front-passenger front airbag.
The indicator lamps display the status of the
front-passenger front airbag.
R PASSENGER AIR BAG ON lights up: the front-
passenger front airbag is enabled. If, in the
event of an accident, all deployment criteria
are met, the front-passenger front airbag is
deployed.
R PASSENGER AIR BAG OFF lights up: the front-
passenger front airbag is disabled. It will then
not be deployed in the event of an accident. 44
Occupant safetySafety
Page 48 of 453
Depending on the person in the front-passenger
seat, the front-passenger front airbag must
either be disabled or enabled; see the following
points. You must make sure of this both before
and during a journey.
R Children in a rearward-facing child
restraint system: the PASSENGER AIR BAG
OFF indicator lamp must be lit. The front-
passenger front airbag is disabled. It is imper- ative to observe the notes on the "Automatic
front-passenger front airbag deactivation sys-
tem" (Y page 51) and on "Children in the
vehicle" (Y page 58).
R Children in a forward-facing child
restraint system: depending on the installed
child restraint system and the age and size of
the child, the front-passenger front airbag is
either disabled or enabled. Therefore, it is
imperative to observe the notes on the "Auto- matic front-passenger front airbag deactiva-
tion system" (Y page 51) and on "Children in
the vehicle" (Y page 58).
R All other persons: the PASSENGER AIR BAG
ON indicator lamp must be lit. The front-
passenger front airbag is enabled. Depending on the build of the person on the front-
passenger seat, the PASSENGER AIR BAG
OFF indicator lamp may light up. The front-
passenger front airbag is disabled. It will then
not be deployed in the event of an accident. In this case, the front-passenger seat should notbe used.
It is imperative to observe the notes on the
"Automatic front-passenger front airbag
deactivation system" (Y page 51) as well as
on "Seat belts" (Y page 45) and "Airbags"
(Y page 48). There you can also find infor-
mation on the correct seat position. Seat belts
Introduction A correctly worn seat belt is the most effective
means of restraining the movement of vehicle
occupants in the event of a collision or if the
vehicle overturns. This reduces the risk of vehi-
cle occupants coming into contact with parts of
the vehicle interior or being ejected from it. The
seat belt also helps to keep the vehicle occu-
pants in the best position in relation to the air-
bag being deployed. The seat belt system consists of:
R seat belts
R belt tensioners for the front seat belts and the
outer seat belts in the rear
R belt force limiters
If the seat belt is pulled quickly or sharply from
the belt outlet, the inertia reel locks. The belt
strap cannot be pulled out any further.
The belt tensioner tightens the seat belt in the
event of a collision so that it fits tightly across
your body. However, it does not pull the vehicle
occupants back in the direction of the seat
backrest.
The belt tensioner does not, however, correct an
incorrect seat position or correct the routing of a seat belt that is worn incorrectly.
If the seat belt is also fitted with a belt force
limiter and this is triggered, the force exerted by
the seat belt on the vehicle occupant is reduced.
The belt force limiters on the front seats are
synchronised with the front airbags, which take
on a part of the deceleration force. This can
reduce the forces to which the vehicle occu-
pants are subjected during an accident.
! If the co-driver's seat is not occupied, do not
engage the seat belt tongue in the buckle on
the co-driver's seat. Otherwise, the belt ten-
sioner could be triggered in the event of an
accident and would have to be replaced.
Important safety notes G
WARNING
The seat belt cannot perform its intended pro- tective function if it is not fastened correctly. Also, an improperly fastened seat belt can
cause additional injuries in the event of an
accident, sudden braking or abrupt changes
of direction. There is an increased risk of
injury, possibly even fatal.
Always make sure that all vehicle occupants
are wearing their seat belt properly and are
seated correctly. G
WARNING
The seat belt does not offer the intended level of protection if you have not moved the back-
rest to an almost vertical position. When brak-
ing or in the event of an accident, you could Occupant safety
45Safety
Z
Page 51 of 453
hold on to the seat belt tightly while it is adjust-
ing.
You can switch the seat-belt adjustment on and
off in the on-board computer (Y page 296).
Belt warning for the driver and front
passenger The
7 seat belt warning lamp in the instru-
ment cluster is a reminder that all vehicle occu-
pants must wear their seat belts. It may light up
continuously or flash. In addition, a warning tone may sound.
The 7 seat belt warning lamp goes out and
the warning tone ceases when the driver and the
front passenger have fastened their seat belts.
i More information on the
7seat belt
warning lamp can be found under "Warning
and indicator lamps in the instrument cluster,
seat belt" (Y page 337).
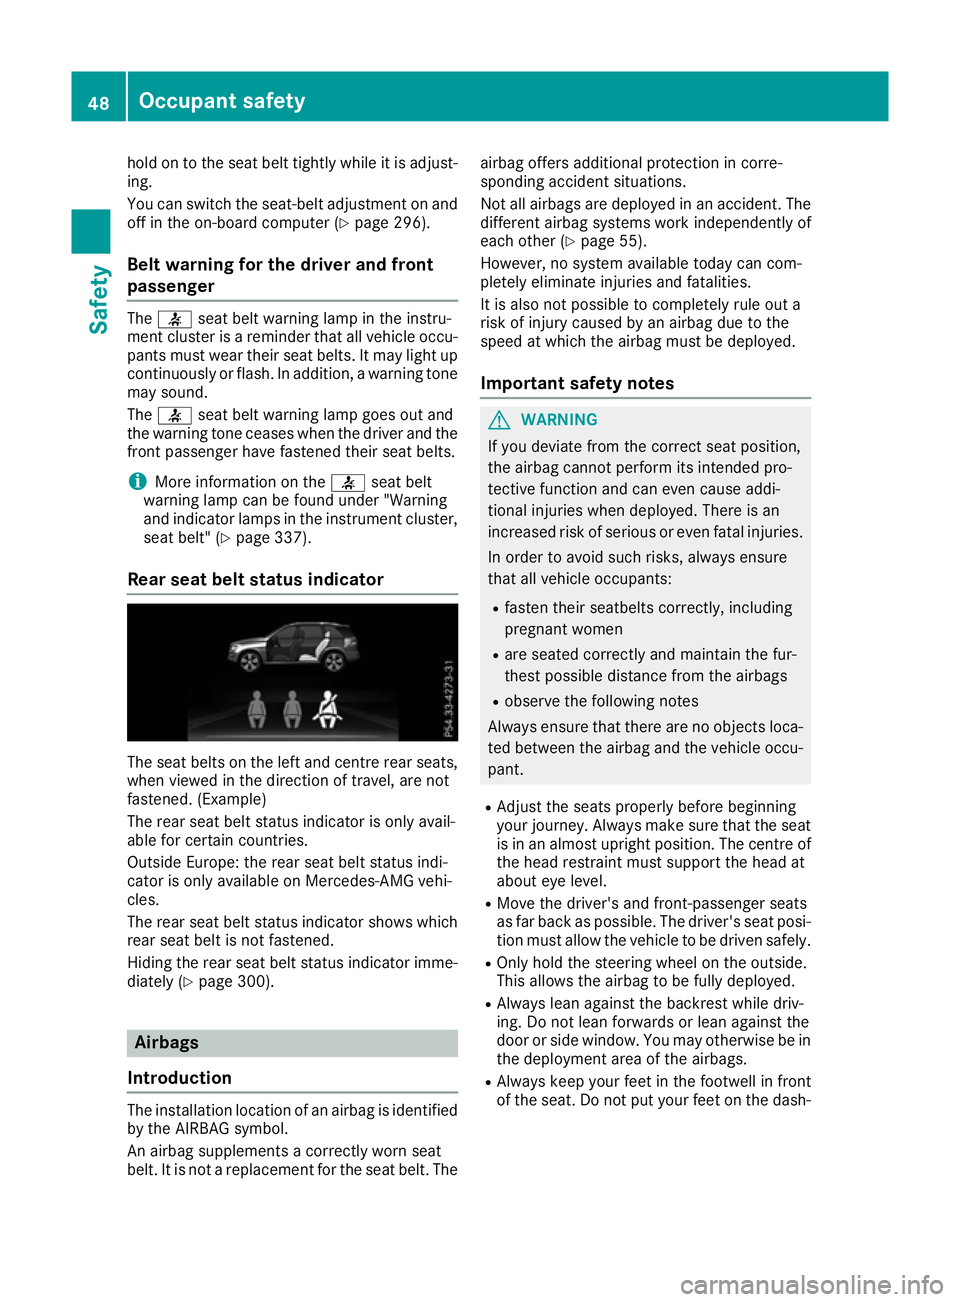
Rear seat belt status indicator The seat belts on the left and centre rear seats,
when viewed in the direction of travel, are not
fastened. (Example)
The rear seat belt status indicator is only avail-
able for certain countries.
Outside Europe: the rear seat belt status indi-
cator is only available on Mercedes-AMG vehi-
cles.
The rear seat belt status indicator shows which rear seat belt is not fastened.
Hiding the rear seat belt status indicator imme-
diately (Y page 300). Airbags
Introduction The installation location of an airbag is identified
by the AIRBAG symbol.
An airbag supplements a correctly worn seat
belt. It is not a replacement for the seat belt. The airbag offers additional protection in corre-
sponding accident situations.
Not all airbags are deployed in an accident. The
different airbag systems work independently of
each other (Y page 55).
However, no system available today can com-
pletely eliminate injuries and fatalities.
It is also not possible to completely rule out a
risk of injury caused by an airbag due to the
speed at which the airbag must be deployed.
Important safety notes G
WARNING
If you deviate from the correct seat position,
the airbag cannot perform its intended pro-
tective function and can even cause addi-
tional injuries when deployed. There is an
increased risk of serious or even fatal injuries.
In order to avoid such risks, always ensure
that all vehicle occupants:
R fasten their seatbelts correctly, including
pregnant women
R are seated correctly and maintain the fur-
thest possible distance from the airbags
R observe the following notes
Always ensure that there are no objects loca-
ted between the airbag and the vehicle occu-
pant.
R Adjust the seats properly before beginning
your journey. Always make sure that the seat
is in an almost upright position. The centre of
the head restraint must support the head at
about eye level.
R Move the driver's and front-passenger seats
as far back as possible. The driver's seat posi-
tion must allow the vehicle to be driven safely.
R Only hold the steering wheel on the outside.
This allows the airbag to be fully deployed.
R Always lean against the backrest while driv-
ing. Do not lean forwards or lean against the
door or side window. You may otherwise be in
the deployment area of the airbags.
R Always keep your feet in the footwell in front
of the seat. Do not put your feet on the dash- 48
Occupant safetySafety