2015 MERCEDES-BENZ GLE SUV phone
[x] Cancel search: phonePage 286 of 453
Left control panel
=
; R
Calls up the menu and menu bar 9
: Press briefly:
R Scrolls through lists
R Selects a submenu or function
R In the Audio Audio menu: selects the
previous or next station, when the preset list or station list is active,
or an audio track or video scene
R In the Tel
Tel(telephone) menu:
switches to the phone book and
selects a name or telephone num-
ber 9
: Press and hold:
R
In the Audio Audio menu: selects a pre-
set list or a station list in the
desired frequency range, or
selects an audio track or video
scene using rapid scrolling
R In the Tel
Tel (Telephone) menu:
starts rapid scrolling if the phone
book is open a R
Confirms the selection or display
message
R In the Tel Tel(Telephone) menu:
switches to the telephone book
and starts dialling the selected
number % Press briefly:
R Back
R Switches off voice-operated navi-
gation or LINGUATRONIC
R Hides display messages or calls up
the last Trip Tripmenu function used
R Exits the telephone book/redial
memory % Press and hold:
R
Calls up the standard display in the
Trip Trip menu Right control panel
~ R
Rejects or ends a call
R Exits the telephone book/redial
memory 6 R
Makes or accepts a call
R Switches to the redial memory W
X R
Adjusts the volume 8 R
Mute ? R
Switches on voice-operated navi-
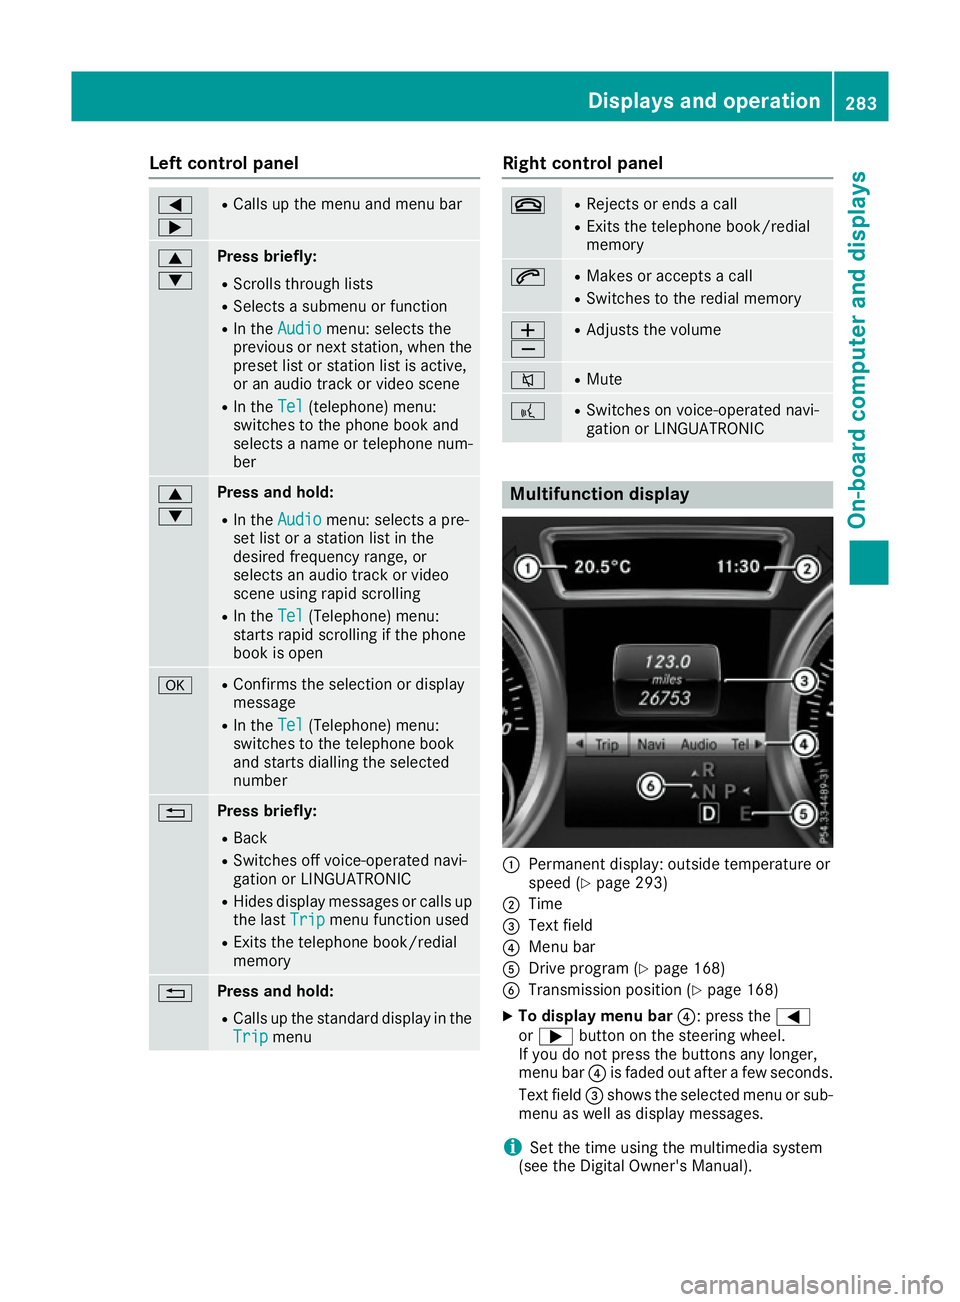
gation or LINGUATRONIC Multifunction display
:
Permanent display: outside temperature or
speed (Y page 293)
; Time
= Text field
? Menu bar
A Drive program (Y page 168)
B Transmission position (Y page 168)
X To display menu bar ?: press the=
or ; button on the steering wheel.
If you do not press the buttons any longer,
menu bar ?is faded out after a few seconds.
Text field =shows the selected menu or sub-
menu as well as display messages.
i Set the time using the multimedia system
(see the Digital Owner's Manual). Displays and operation
283On-board computer and displays Z
Page 287 of 453
Possible displays in the multifunction dis-
play:
R ZGearshift recommendation, when shifting
manually (Y page 172)
R j Active Parking Assist (Y page 228)
R ¯ Cruise control (Y page 203)
R LIM
LIM SPEEDTRONIC (Y page 205)
R READY
READY PLUG-IN HYBRID operation activated
(PLUG-IN HYBRID vehicles) (Y page 266)
R HYBRID
HYBRID operating mode, additional operating
mode displays (PLUG-IN HYBRID vehicles)
(Y page 261)
R è Electric range (PLUG-IN HYBRID vehi-
cles) (Y page 261)
R LOW RANGE
LOW RANGE LOW RANGE off-road gear
(Y page 255)
R _ Adaptive Highbeam Assist Plus
(Y page 126)
R è ECO start/stop function (Y page 161)
R ë HOLD function (Y page 219)
R a DISTRONIC PLUS Steering Assist and
Stop&Go Pilot (Y page 214)
R 120 km/h!
120 km/h! Maximum permissible speed
exceeded (only for certain countries)
R DSR
DSR Downhill Speed Regulation
(Y page 252) Menus and submenus
Menu overview
Press the =or; button on the steering
wheel to call up the menu bar and select a menu.
Operating the on-board computer (Y page 282).
Depending on the equipment fitted in the vehi-
cle, you can call up the following menus:
R Trip
Trip menu (Y page 284)
R Navi Navi menu (navigation instructions)
(Y page 286)
R Audio
Audio menu (Y page 287)
R Tel
Tel menu (telephone) (Y page 288)
R Assist.
Assist. menu (assistance) (Y page 289)
R Serv.
Serv. menu (Y page 291)
R Settings
Settings menu (settings) (Y page 292)
R ON&OFFROAD
ON&OFFROAD menu (Ypage 297)
R AMG AMG menu (Mercedes-AMG vehicles)
(Y page 297) Trip menu
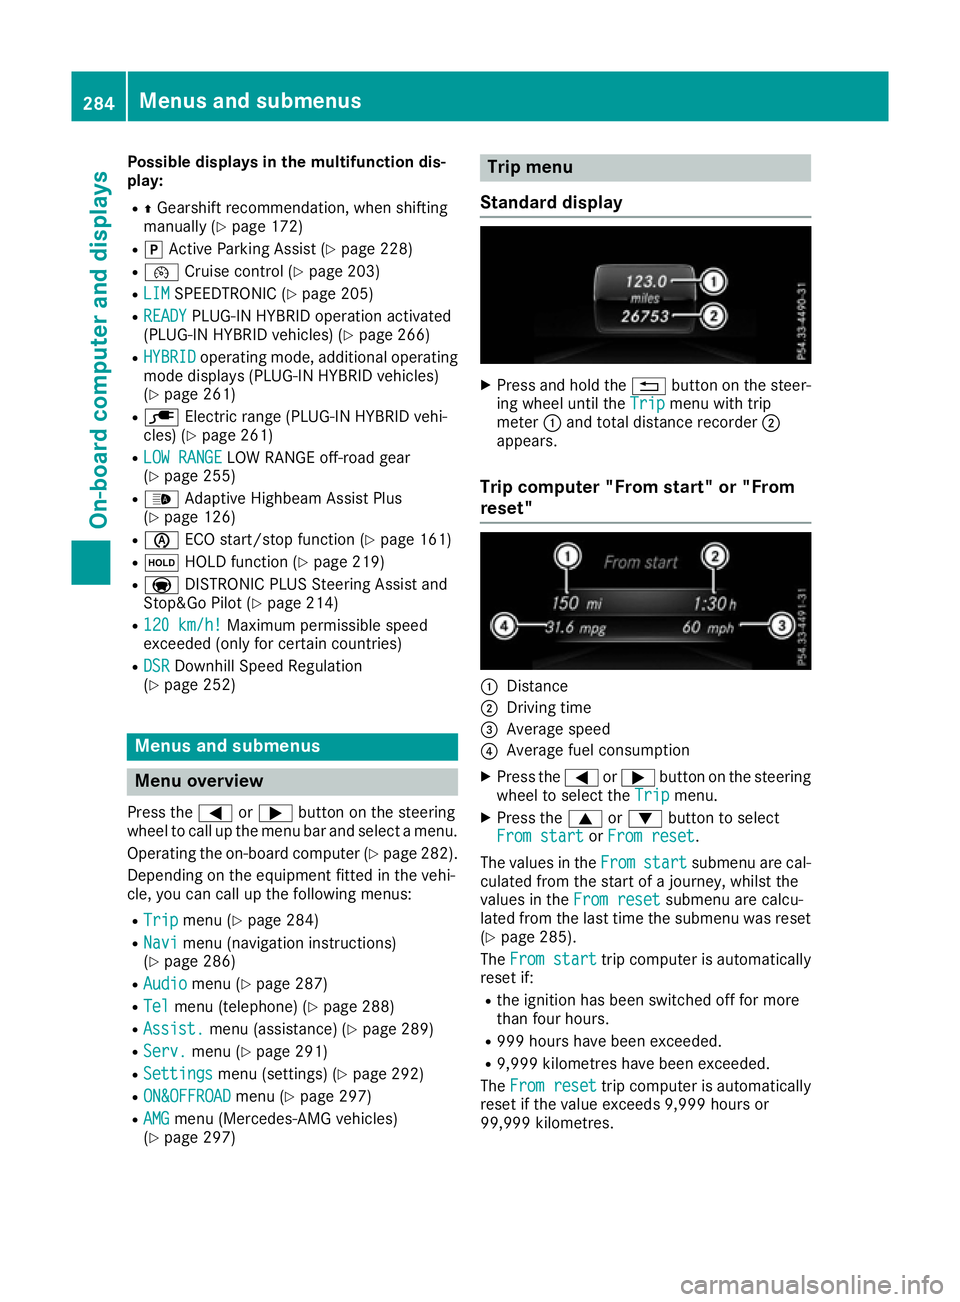
Standard display X
Press and hold the %button on the steer-
ing wheel until the Trip Tripmenu with trip
meter :and total distance recorder ;
appears.
Trip computer "From start" or "From
reset" :
Distance
; Driving time
= Average speed
? Average fuel consumption
X Press the =or; button on the steering
wheel to select the Trip Tripmenu.
X Press the 9or: button to select
From start
From start orFrom reset
From reset.
The values in the From
Fromstart
start submenu are cal-
culated from the start of a journey, whilst the
values in the From reset
From resetsubmenu are calcu-
lated from the last time the submenu was reset
(Y page 285).
The From start
From start trip computer is automatically
reset if:
R the ignition has been switched off for more
than four hours.
R 999 hours have been exceeded.
R 9,999 kilometres have been exceeded.
The From reset From reset trip computer is automatically
reset if the value exceeds 9,999 hours or
99,999 kilometres. 284
Menus and submenusOn-board computer and displays
Page 291 of 453
Video DVD operation
X
Switch on the multimedia system and select
video DVD; see the separate operating
instructions.
X Press the =or; button on the steering
wheel to select the Audio
Audio menu.
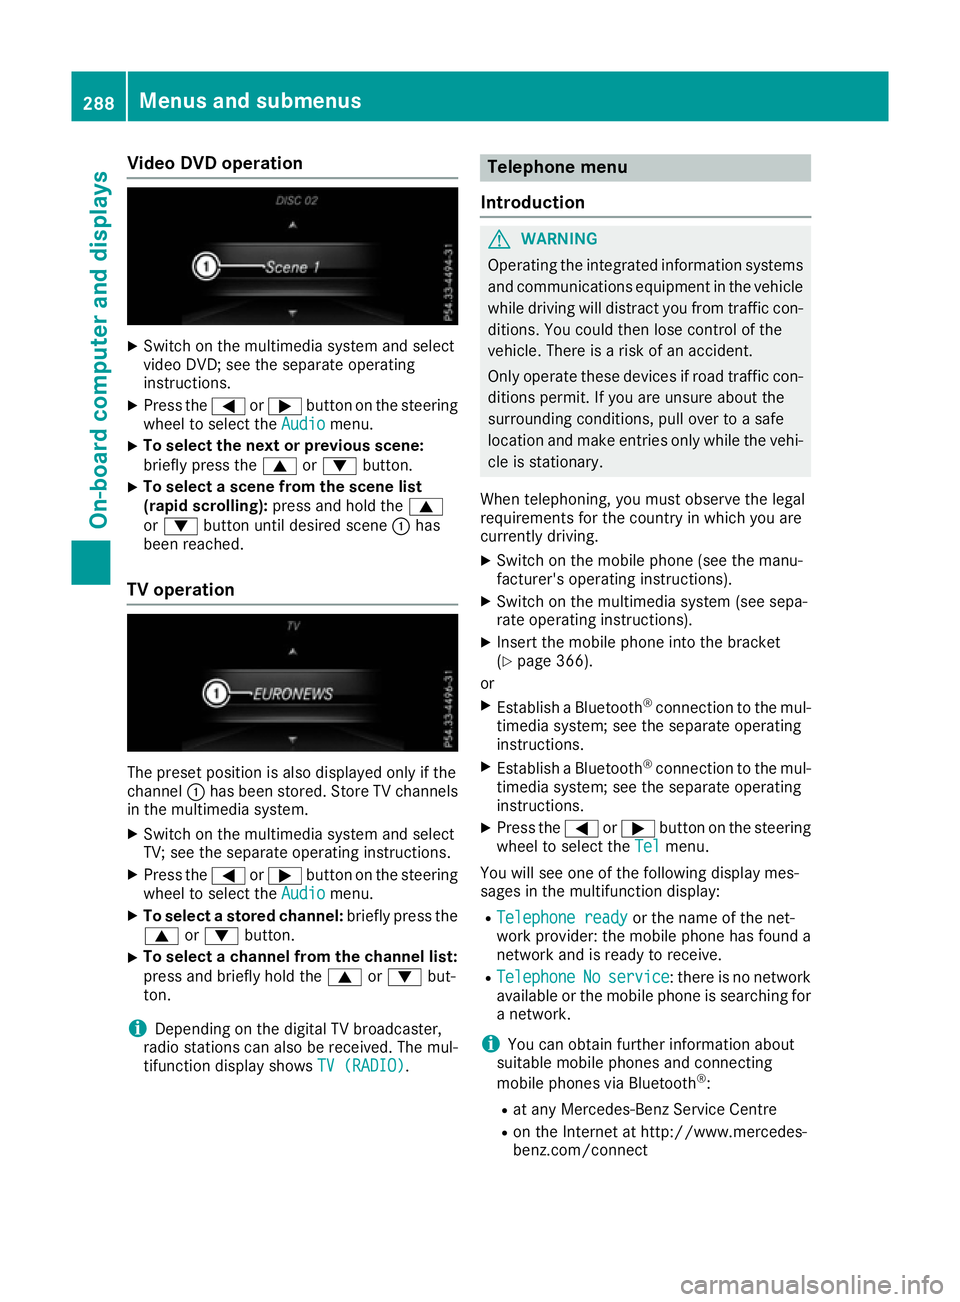
X To select the next or previous scene:
briefly press the 9or: button.
X To select a scene from the scene list
(rapid scrolling): press and hold the 9
or : button until desired scene :has
been reached.
TV operation The preset position is also displayed only if the
channel :has been stored. Store TV channels
in the multimedia system.
X Switch on the multimedia system and select
TV; see the separate operating instructions.
X Press the =or; button on the steering
wheel to select the Audio
Audio menu.
X To select a stored channel: briefly press the
9 or: button.
X To select a channel from the channel list:
press and briefly hold the
9or: but-
ton.
i Depending on the digital TV broadcaster,
radio stations can also be received. The mul-
tifunction display shows TV (RADIO) TV (RADIO). Telephone menu
Introduction G
WARNING
Operating the integrated information systems and communications equipment in the vehicle
while driving will distract you from traffic con-
ditions. You could then lose control of the
vehicle. There is a risk of an accident.
Only operate these devices if road traffic con-
ditions permit. If you are unsure about the
surrounding conditions, pull over to a safe
location and make entries only while the vehi-
cle is stationary.
When telephoning, you must observe the legal
requirements for the country in which you are
currently driving. X Switch on the mobile phone (see the manu-
facturer's operating instructions).
X Switch on the multimedia system (see sepa-
rate operating instructions).
X Insert the mobile phone into the bracket
(Y page 366).
or X Establish a Bluetooth ®
connection to the mul-
timedia system; see the separate operating
instructions.
X Establish a Bluetooth ®
connection to the mul-
timedia system; see the separate operating
instructions.
X Press the =or; button on the steering
wheel to select the Tel
Tel menu.
You will see one of the following display mes-
sages in the multifunction display:
R Telephone ready Telephone ready or the name of the net-
work provider: the mobile phone has found a
network and is ready to receive.
R Telephone
Telephone No
Noservice
service: there is no network
available or the mobile phone is searching for a network.
i You can obtain further information about
suitable mobile phones and connecting
mobile phones via Bluetooth ®
:
R at any Mercedes-Benz Service Centre
R on the Internet at http://www.mercedes-
benz.com/connect 288
Menus and submenusOn-board computer and displays
Page 292 of 453
Accepting a call
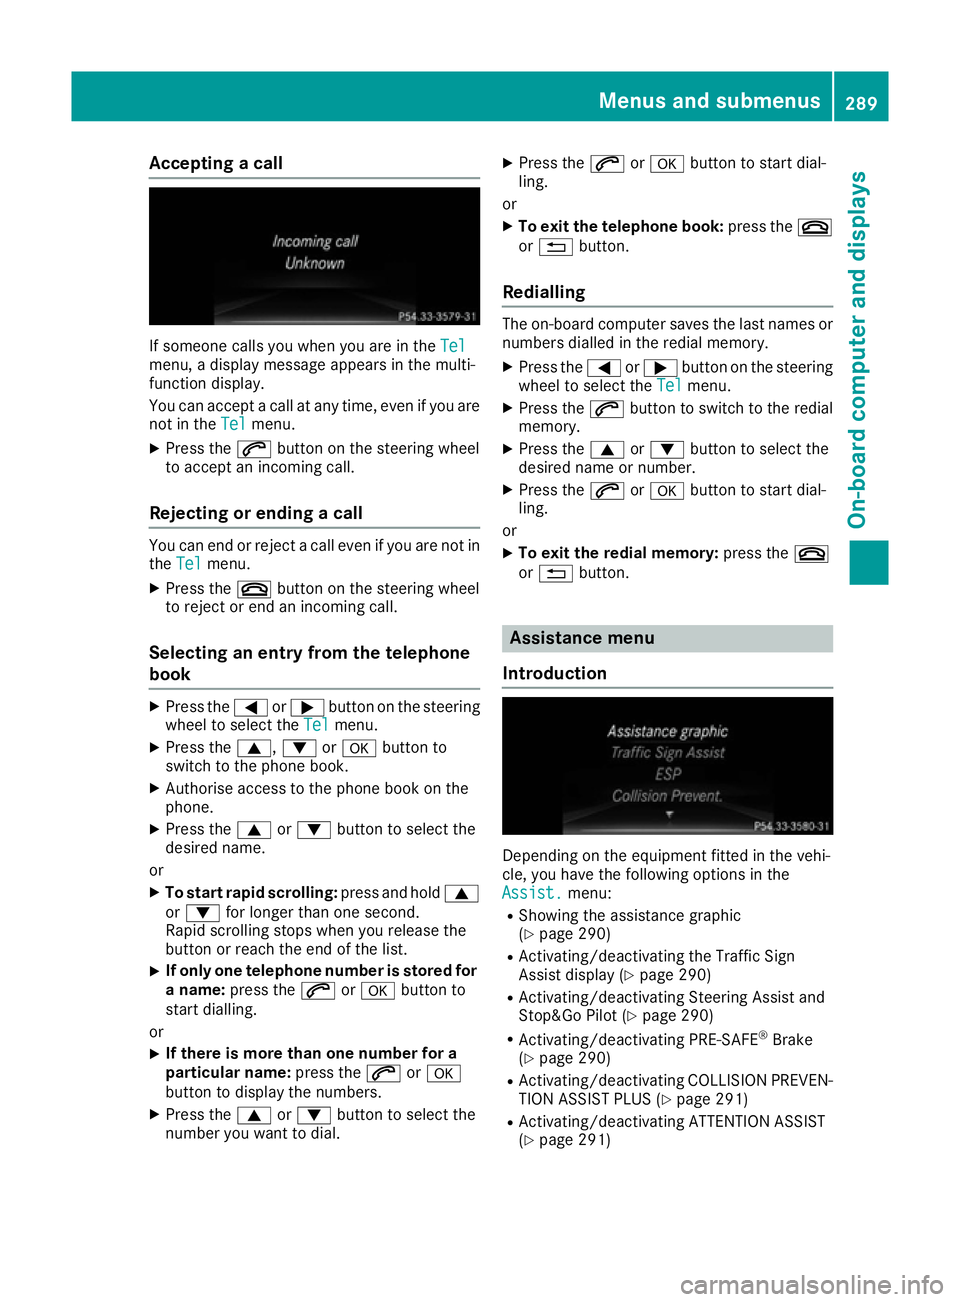
If someone calls you when you are in the
Tel
Tel
menu, a display message appears in the multi-
function display.
You can accept a call at any time, even if you are
not in the Tel
Tel menu.
X Press the 6button on the steering wheel
to accept an incoming call.
Rejecting or ending a call You can end or reject a call even if you are not in
the Tel
Tel menu.
X Press the ~button on the steering wheel
to reject or end an incoming call.
Selecting an entry from the telephone
book X
Press the =or; button on the steering
wheel to select the Tel
Tel menu.
X Press the 9,:ora button to
switch to the phone book.
X Authorise access to the phone book on the
phone.
X Press the 9or: button to select the
desired name.
or
X To start rapid scrolling: press and hold9
or : for longer than one second.
Rapid scrolling stops when you release the
button or reach the end of the list.
X If only one telephone number is stored for
a name: press the 6ora button to
start dialling.
or
X If there is more than one number for a
particular name: press the6ora
button to display the numbers.
X Press the 9or: button to select the
number you want to dial. X
Press the 6ora button to start dial-
ling.
or
X To exit the telephone book: press the~
or % button.
Redialling The on-board computer saves the last names or
numbers dialled in the redial memory.
X Press the =or; button on the steering
wheel to select the Tel Telmenu.
X Press the 6button to switch to the redial
memory.
X Press the 9or: button to select the
desired name or number.
X Press the 6ora button to start dial-
ling.
or X To exit the redial memory: press the~
or % button. Assistance menu
Introduction Depending on the equipment fitted in the vehi-
cle, you have the following options in the
Assist. Assist. menu:
R Showing the assistance graphic
(Y page 290)
R Activating/deactivating the Traffic Sign
Assist display (Y page 290)
R Activating/deactivating Steering Assist and
Stop&Go Pilot (Y page 290)
R Activating/deactivating PRE-SAFE ®
Brake
(Y page 290)
R Activating/deactivating COLLISION PREVEN-
TION ASSIST PLUS (Y page 291)
R Activating/deactivating ATTENTION ASSIST
(Y page 291) Menus and sub
menus
289On-board computer and displays Z
Page 339 of 453
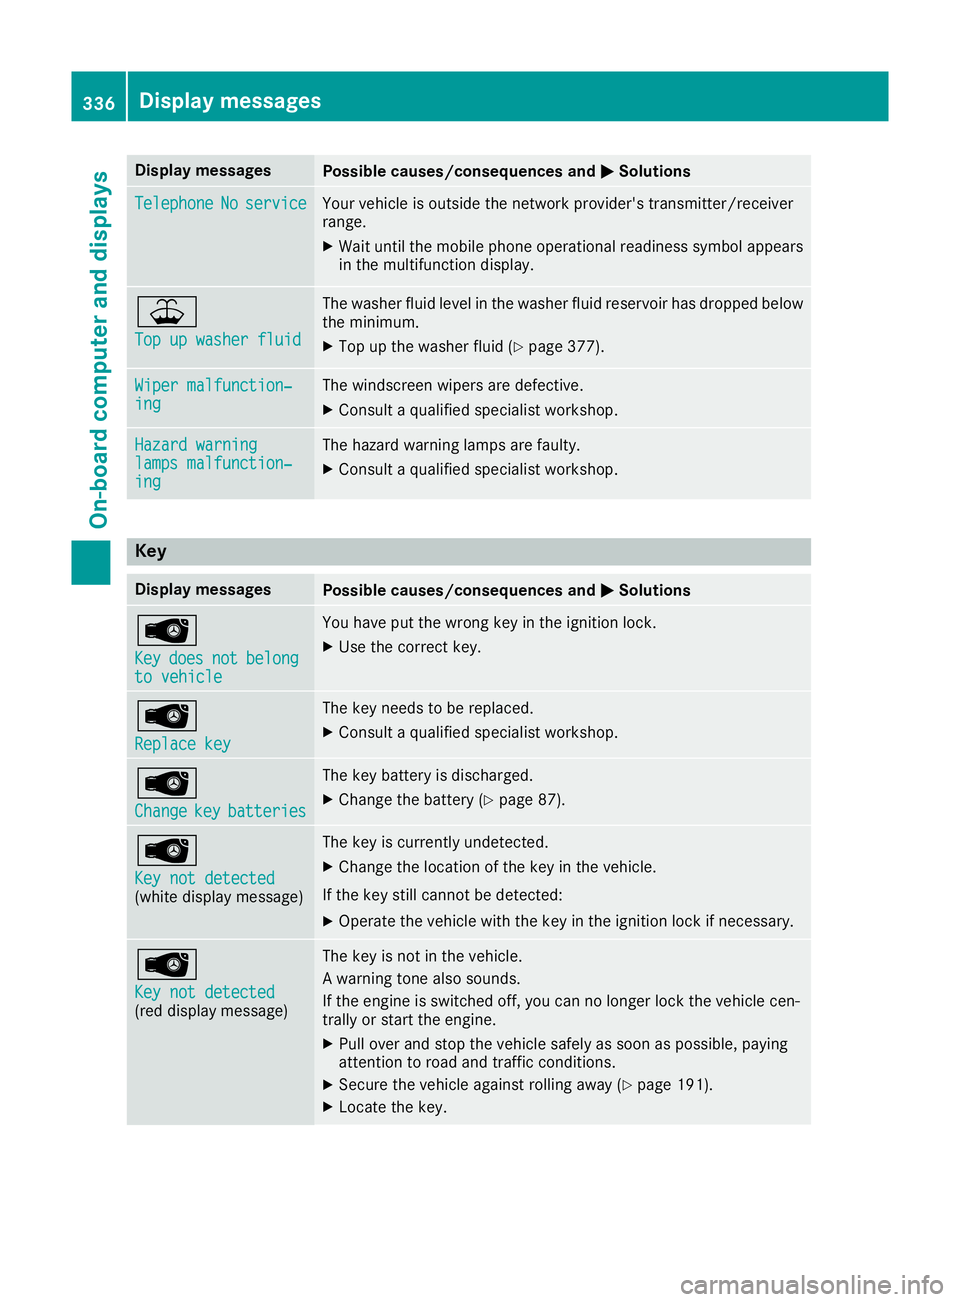
Display messages
Possible causes/consequences and
M
MSolutions Telephone
Telephone
No
Noservice
service Your vehicle is outside the network provider's transmitter/receiver
range.
X Wait until the mobile phone operational readiness symbol appears
in the multifunction display. ¥
Top up washer fluid Top up washer fluid The washer fluid level in the washer fluid reservoir has dropped below
the minimum.
X Top up the washer fluid (Y page 377).Wiper malfunction‐
Wiper malfunction‐
ing ing The windscreen wipers are defective.
X Consult a qualified specialist workshop. Hazard warning
Hazard warning
lamps malfunction‐ lamps malfunction‐
ing ing The hazard warning lamps are faulty.
X Consult a qualified specialist workshop. Key
Display messages
Possible causes/consequences and
M
MSolutions Â
Key Key
does
does not
notbelong
belong
to vehicle
to vehicle You have put the wrong key in the ignition lock.
X Use the correct key. Â
Replace key Replace key The key needs to be replaced.
X Consult a qualified specialist workshop. Â
Change Change
key
keybatteries
batteries The key battery is discharged.
X Change the battery (Y page 87).Â
Key not detected Key not detected
(white display message) The key is currently undetected.
X Change the location of the key in the vehicle.
If the key still cannot be detected:
X Operate the vehicle with the key in the ignition lock if necessary. Â
Key not detected Key not detected
(red display message) The key is not in the vehicle.
A warning tone also sounds.
If the engine is switched off, you can no longer lock the vehicle cen-
trally or start the engine.
X Pull over and stop the vehicle safely as soon as possible, paying
attention to road and traffic conditions.
X Secure the vehicle against rolling away (Y page 191).
X Locate the key. 336
Display
messagesOn-board computer and displays
Page 355 of 453
R
Always store objects so that they cannot be
flung around in these or in similar situa-
tions.
R Always make sure that objects do not pro-
trude from stowage compartments, lug-
gage nets or stowage nets.
R Close lockable stowage compartments
while driving.
R Stow and secure objects that are heavy,
hard, pointy, sharp-edged, fragile or too
large in the luggage compartment.
Observe the loading guidelines (Y page 351).
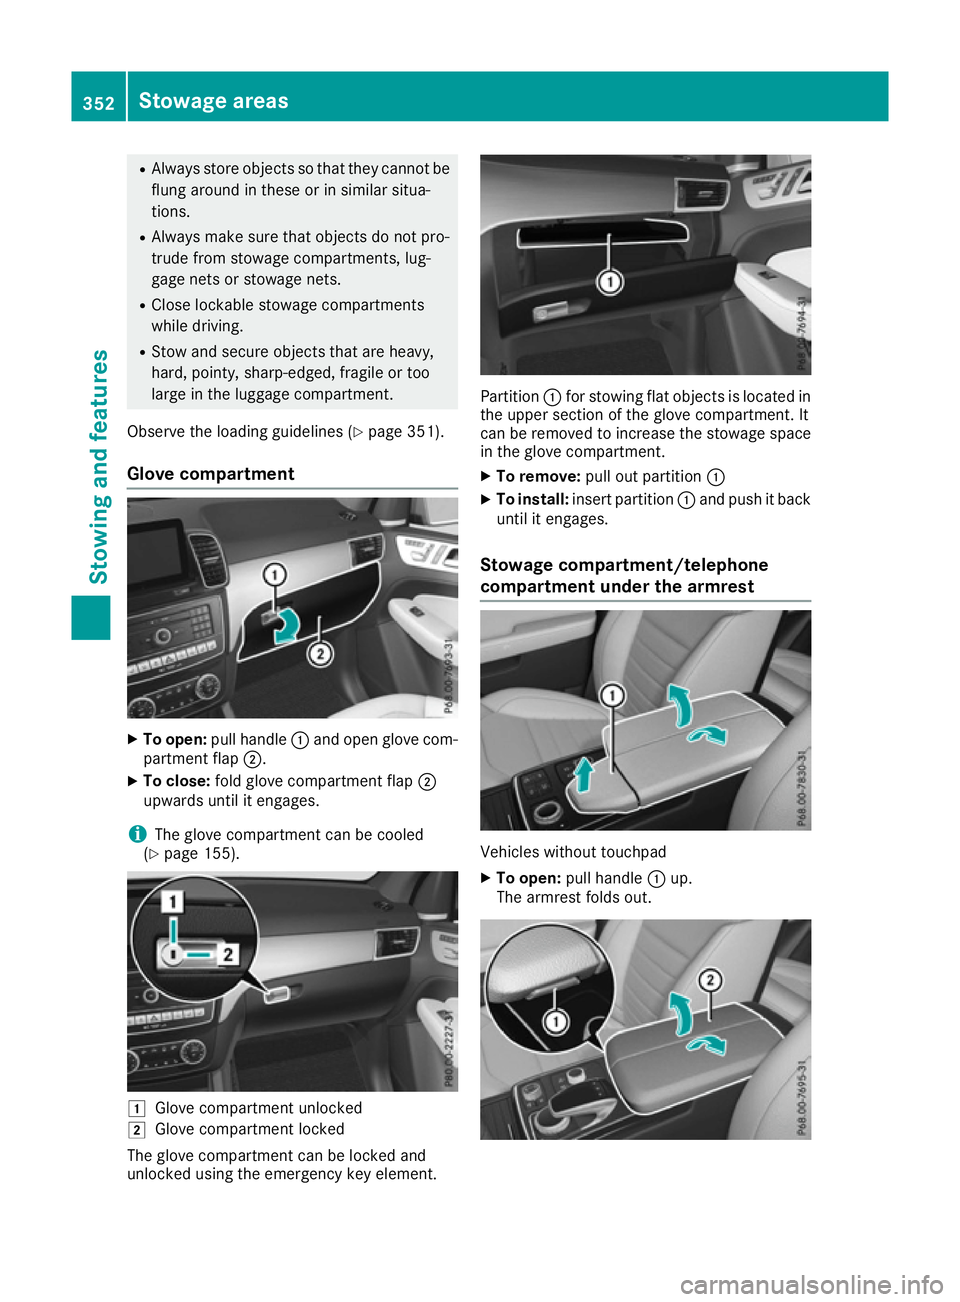
Glove compartment X
To open: pull handle :and open glove com-
partment flap ;.
X To close: fold glove compartment flap ;
upwards until it engages.
i The glove compartment can be cooled
(Y page 155). 1
Glove compartment unlocked
2 Glove compartment locked
The glove compartment can be locked and
unlocked using the emergency key element. Partition
:for stowing flat objects is located in
the upper section of the glove compartment. It
can be removed to increase the stowage space in the glove compartment.
X To remove: pull out partition :
X To install: insert partition :and push it back
until it engages.
Stowage compartment/telephone
compartment under the armrest Vehicles without touchpad
X To open: pull handle :up.
The armrest folds out. 352
Stowage areasSto
wing an d features
Page 356 of 453
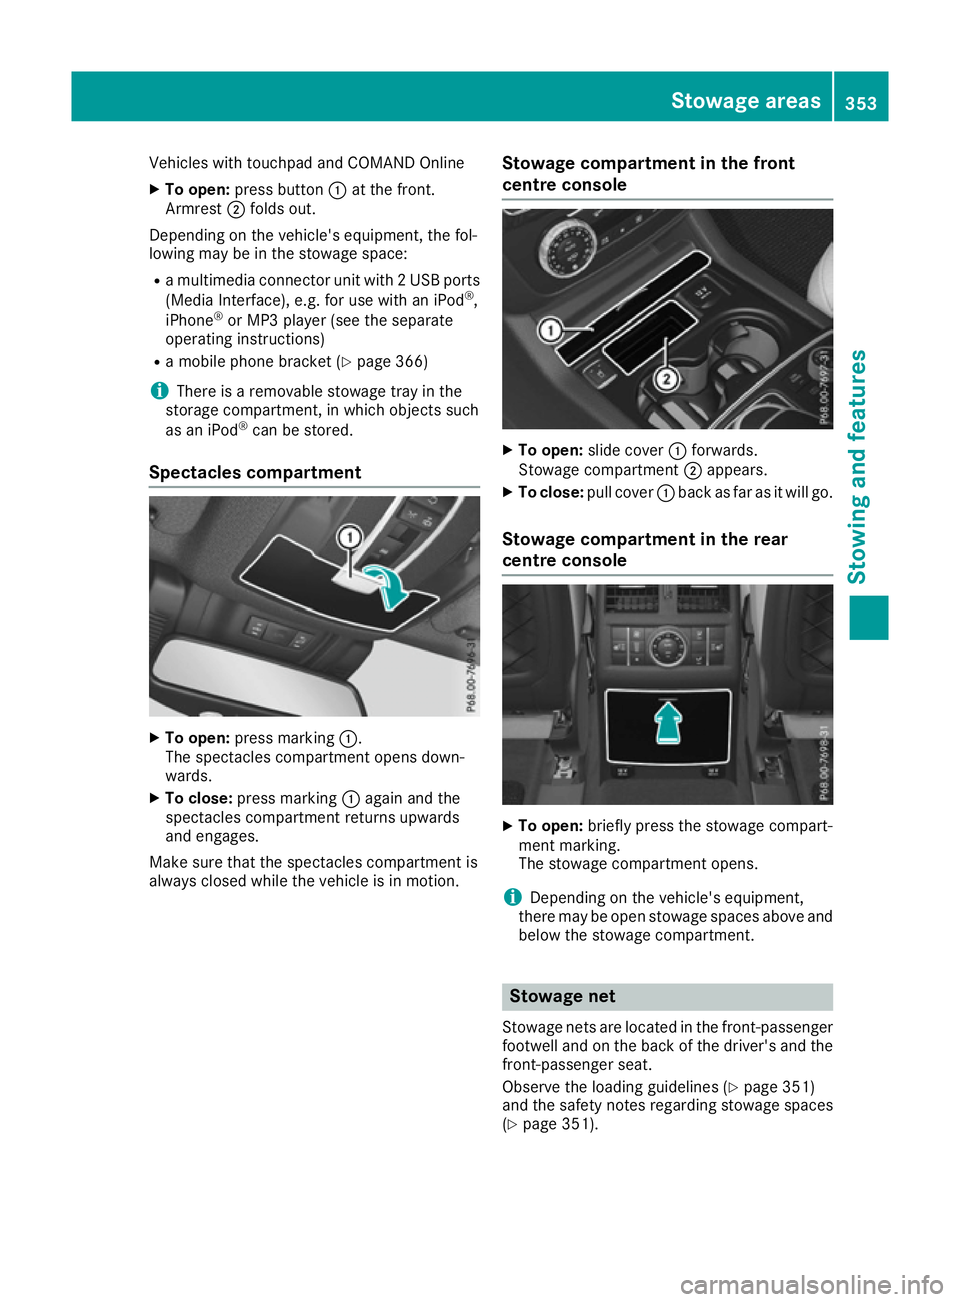
Vehicles with touchpad and COMAND Online
X To open: press button :at the front.
Armrest ;folds out.
Depending on the vehicle's equipment, the fol-
lowing may be in the stowage space:
R a multimedia connector unit with 2 USB ports
(Media Interface), e.g. for use with an iPod ®
,
iPhone ®
or MP3 player (see the separate
operating instructions)
R a mobile phone bracket (Y page 366)
i There is a removable stowage tray in the
storage compartment, in which objects such
as an iPod ®
can be stored.
Spectacles compartment X
To open: press marking :.
The spectacles compartment opens down-
wards.
X To close: press marking :again and the
spectacles compartment returns upwards
and engages.
Make sure that the spectacles compartment is
always closed while the vehicle is in motion. Stowage compartment in the front
centre console X
To open: slide cover :forwards.
Stowage compartment ;appears.
X To close: pull cover :back as far as it will go.
Stowage compartment in the rear
centre console X
To open: briefly press the stowage compart-
ment marking.
The stowage compartment opens.
i Depending on the vehicle's equipment,
there may be open stowage spaces above and
below the stowage compartment. Stowage net
Stowage nets are located in the front-passenger footwell and on the back of the driver's and thefront-passenger seat.
Observe the loading guidelines (Y page 351)
and the safety notes regarding stowage spaces
(Y page 351). Stowage areas
353Stowing and features Z
Page 364 of 453
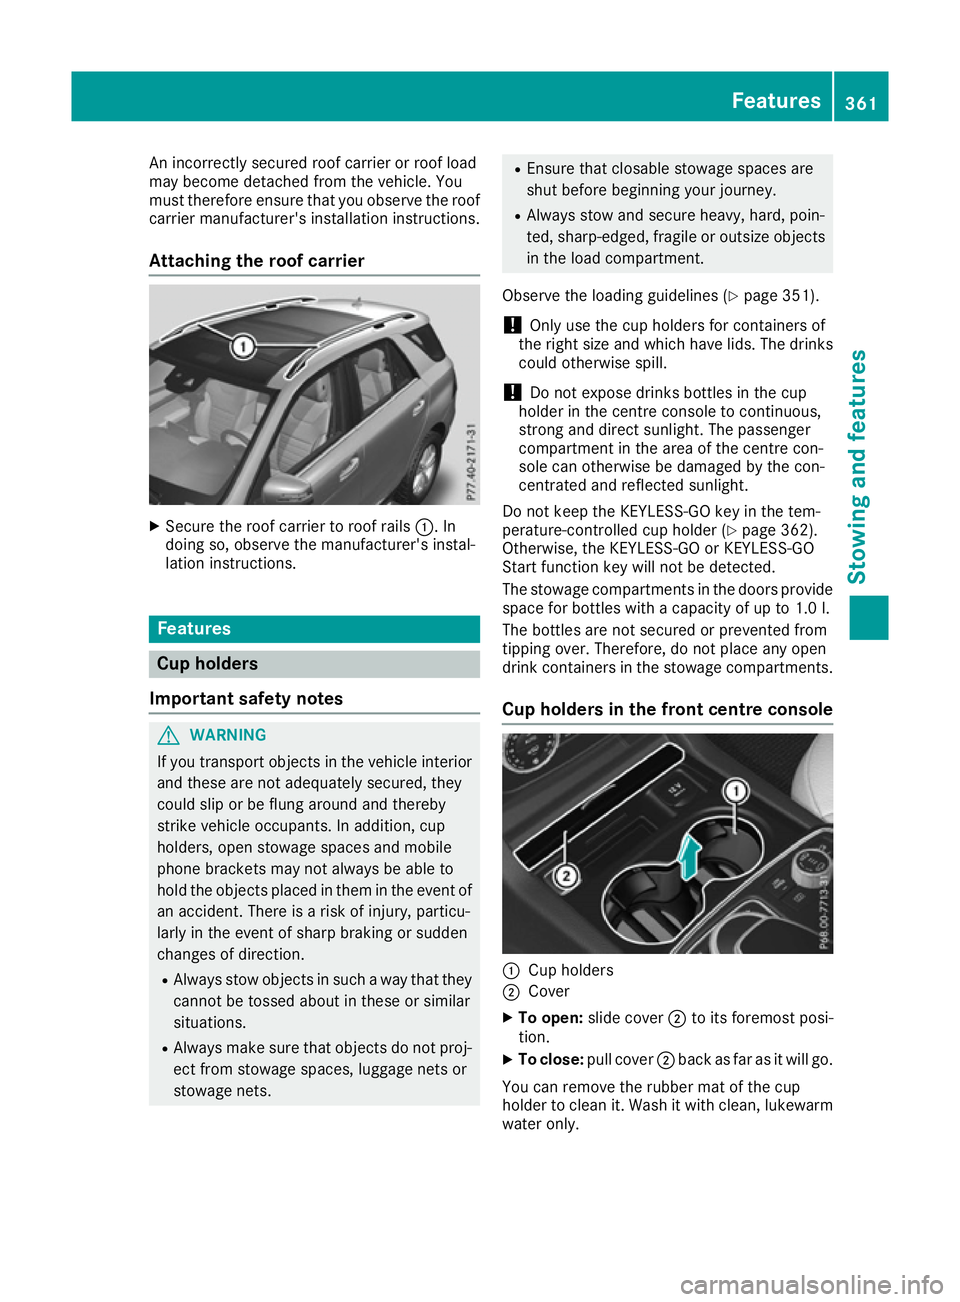
An incorrectly secured roof carrier or roof load
may become detached from the vehicle. You
must therefore ensure that you observe the roof
carrier manufacturer's installation instructions.
Attaching the roof carrier X
Secure the roof carrier to roof rails :. In
doing so, observe the manufacturer's instal-
lation instructions. Features
Cup holders
Important safety notes G
WARNING
If you transport objects in the vehicle interior and these are not adequately secured, they
could slip or be flung around and thereby
strike vehicle occupants. In addition, cup
holders, open stowage spaces and mobile
phone brackets may not always be able to
hold the objects placed in them in the event of an accident. There is a risk of injury, particu-
larly in the event of sharp braking or sudden
changes of direction.
R Always stow objects in such a way that they
cannot be tossed about in these or similar
situations.
R Always make sure that objects do not proj-
ect from stowage spaces, luggage nets or
stowage nets. R
Ensure that closable stowage spaces are
shut before beginning your journey.
R Always stow and secure heavy, hard, poin-
ted, sharp-edged, fragile or outsize objects
in the load compartment.
Observe the loading guidelines (Y page 351).
! Only use the cup holders for containers of
the right size and which have lids. The drinks
could otherwise spill.
! Do not expose drinks bottles in the cup
holder in the centre console to continuous,
strong and direct sunlight. The passenger
compartment in the area of the centre con-
sole can otherwise be damaged by the con-
centrated and reflected sunlight.
Do not keep the KEYLESS-GO key in the tem-
perature-controlled cup holder (Y page 362).
Otherwise, the KEYLESS-GO or KEYLESS-GO
Start function key will not be detected.
The stowage compartments in the doors provide
space for bottles with a capacity of up to 1.0 l.
The bottles are not secured or prevented from
tipping over. Therefore, do not place any open
drink containers in the stowage compartments.
Cup holders in the front centre console :
Cup holders
; Cover
X To open: slide cover ;to its foremost posi-
tion.
X To close: pull cover ;back as far as it will go.
You can remove the rubber mat of the cup
holder to clean it. Wash it with clean, lukewarm water only. Features
361Stowing and features Z