2015 MERCEDES-BENZ GLE COUPE remote start
[x] Cancel search: remote startPage 7 of 393
Triggering ......................................... 49
Windowbag ...................................... 44
AIRMATIC package
ADS (Adaptive Damping System) ... 195
Function/notes ............................. 194
Alarm
ATA (Anti-Theft Alarm system) ......... 75
Switching off (ATA) .......................... 75
Switching the function on/off
(ATA) ................................................ 75
AMG
RIDE CONTROL sports suspen-
sion ................................................ 198
AMG menu (on-board computer) ..... 250
Anti-glare film .................................... 317
Approach/departure angle .............. 177
Aquaplaning ....................................... 173
Ashtray ............................................... 308
Assistance display (on-board com-
puter) .................................................. 243
Assistance menu (on-board com-
puter) .................................................. 243
ASSYST PLUS
Displaying a service message ........ 323
Hiding a service message .............. 323
Resetting the service interval dis-
play ................................................ 323
Service message ............................3 22
Special service requirements ......... 323
ATA (Anti-Theft Alarm system)
Activating/deactivating ................... 75
Function .......................................... .75
Switching off the alarm .................... 75
ATTENTION ASSIST
Activating/deactivating ................. 244
Display message ............................ 272
Function/note s............................. 214
Audio menu (on-board computer) .... 241
AUTO lights
Display message ............................ 268
see Lights
Automatic engine start (ECO start/
stop function) .................................... 150
Automatic engine switch-off (ECO
start/stop function) .......................... 150 Automatic front-passenger front
airbag deactivation
Display message ............................ 264
Automatic front-passenger front
airbag deactivation system
Operation ......................................... 45
Problems ......................................... 49
System self-test ............................... 47
Automatic headlamp mode .............. 115
Automatic transmission
Accelerator pedal position ............. 156
Changing gear ............................... 156
DIRECT SELECT lever ..................... 154
Display message ............................ 281
Drive program display .................... 154
Drive programs .............................. 158
Driving tips .................................... 156
DYNAMIC SELECT controlle r......... 153
Emergency running mode .............. 161
Engaging drive position .................. 156
Engaging neutral ............................ 155
Engaging park position automati-
cally ............................................... 155
Engaging reverse gear ................... 155
Engaging the park position ............ 154
Gliding mod e................................. 157
Kickdown ....................................... 157
Manual shifting .............................. 158
Oil temperature (on-board com-
puter, Mercedes-AMG vehicles) ..... 250
Overview ........................................ 154
Problem (fault) ............................... 161
Pulling away ................................... 149
Starting the engine ........................ 148
Steering wheel gearshift paddle s... 158
Trailer towing ................................. 157
Transmission position display ........ 154
Transmission positions .................. 156
Automatic transmission emer-
gency running mode ......................... 161
Auxiliary heating
Setting ........................................... 247
Auxiliary heating/ventilation
Display message ............................ 284
Important safety notes .................. 138
Problem (display message) ............ 142
Remote control .............................. 139
Setting the departure time ............. 140 4
Index
Page 81 of 393
Useful information
i This Owner's Manual describes all models,
series and optional equipment for your vehi-
cle that were available at the time of going to
press. National variations are possible. Note
that your vehicle may not be equipped with all
of the functions described. This is also the
case for systems and functions relevant to
safety.
i Read the information on qualified specialist
workshops: (Y page 25). Key
Important safety notes
United Kingdom only: G
WARNING
When the double locks are activated, the
doors can no longer be opened from the
inside. People in the vehicle can no longer get out, e.g. in hazardous situations. There is a
risk of injury.
Therefore, do not leave any people unsuper-
vised in the vehicle, particularly children, eld-
erly people or people in need of special assis-
tance. Do not activate the double lock when
people are in the vehicle.
All countries: G
WARNING
If children are left unsupervised in the vehicle, they can:
R open doors and endanger other persons or
road users
R climb out and be injured by the traffic
R operate vehicle equipment and, for exam-
ple, trap themselves.
Children could also set the vehicle in motion, for example by:
R releasing the parking brake
R shifting the automatic transmission out of
park position P
R starting the engine. There is a risk of an accident and injury.
When leaving the vehicle, always take the key
with you and lock the vehicle. Never leave
children unattended in the vehicle. Always
keep the key out of reach of children. G
WARNING
If you attach heavy or large objects to the key, the key could be unintentionally turned in the
ignition lock. This could cause the engine to
be switched off. There is a risk of an accident.
Do not attach any heavy or large objects to the
key. Remove any bulky keyrings before insert-
ing the key into the ignition lock.
! Keep the key away from strong magnetic
fields. Otherwise, the remote control function could be affected.
Strong magnetic fields can occur in the vicin-
ity of powerful electrical installations.
Do not keep the key: R with electronic devices, e.g. a mobile phone
or another key
R with metallic objects, e.g. coins or metal film
R inside metallic objects, e.g. a metal case
This can affect the key's functionality.
Do not keep the KEYLESS-GO or KEYLESS-GO
Start function key in the temperature-controlled
cup holder. Otherwise, the KEYLESS-GO or KEY- LESS-GO Start function key will not be detected.
Vehicles with KEYLESS-GO start function: do
not keep the key in the luggage compartment.
Otherwise, the key may not be detected, e.g.
when starting the engine using the Start/Stop
button.
Only for the United Kingdom: if the vehicle
has been locked with the key from the outside,
the double lock function is activated as stand-
ard. It is then not possible to open the doors
from inside the vehicle. 78
KeyOpening and closing
Page 92 of 393
Opening and closing manually from
outside
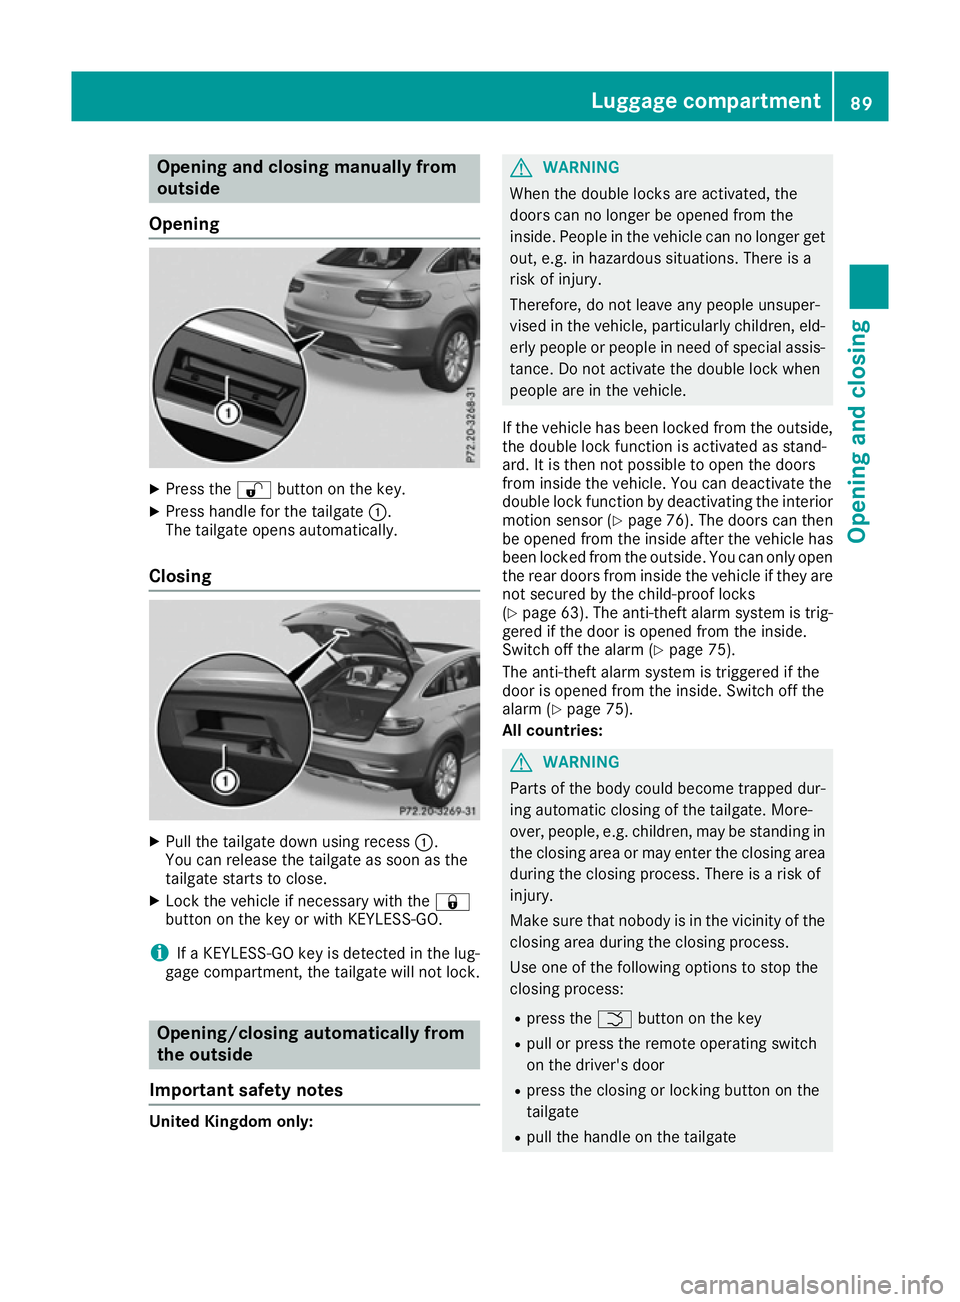
Opening X
Press the %button on the key.
X Press handle for the tailgate :.
The tailgate opens automatically.
Closing X
Pull the tailgate down using recess :.
You can release the tailgate as soon as the
tailgate starts to close.
X Lock the vehicle if necessary with the &
button on the key or with KEYLESS-GO.
i If a KEYLESS-GO key is detected in the lug-
gage compartment, the tailgate will not lock. Opening/closing automatically from
the outside
Important safety notes United Kingdom only: G
WARNING
When the double locks are activated, the
doors can no longer be opened from the
inside. People in the vehicle can no longer get out, e.g. in hazardous situations. There is a
risk of injury.
Therefore, do not leave any people unsuper-
vised in the vehicle, particularly children, eld-
erly people or people in need of special assis-
tance. Do not activate the double lock when
people are in the vehicle.
If the vehicle has been locked from the outside, the double lock function is activated as stand-
ard. It is then not possible to open the doors
from inside the vehicle. You can deactivate the
double lock function by deactivating the interior
motion sensor (Y page 76). The doors can then
be opened from the inside after the vehicle has
been locked from the outside. You can only open the rear doors from inside the vehicle if they are
not secured by the child-proof locks
(Y page 63). The anti-theft alarm system is trig-
gered if the door is opened from the inside.
Switch off the alarm (Y page 75).
The anti-theft alarm system is triggered if the
door is opened from the inside. Switch off the
alarm (Y page 75).
All countries: G
WARNING
Parts of the body could become trapped dur-
ing automatic closing of the tailgate. More-
over, people, e.g. children, may be standing in the closing area or may enter the closing area
during the closing process. There is a risk of
injury.
Make sure that nobody is in the vicinity of the closing area during the closing process.
Use one of the following options to stop the
closing process:
R press the Fbutton on the key
R pull or press the remote operating switch
on the driver's door
R press the closing or locking button on the
tailgate
R pull the handle on the tailgate Luggage compartment
89Opening and closing Z
Page 143 of 393
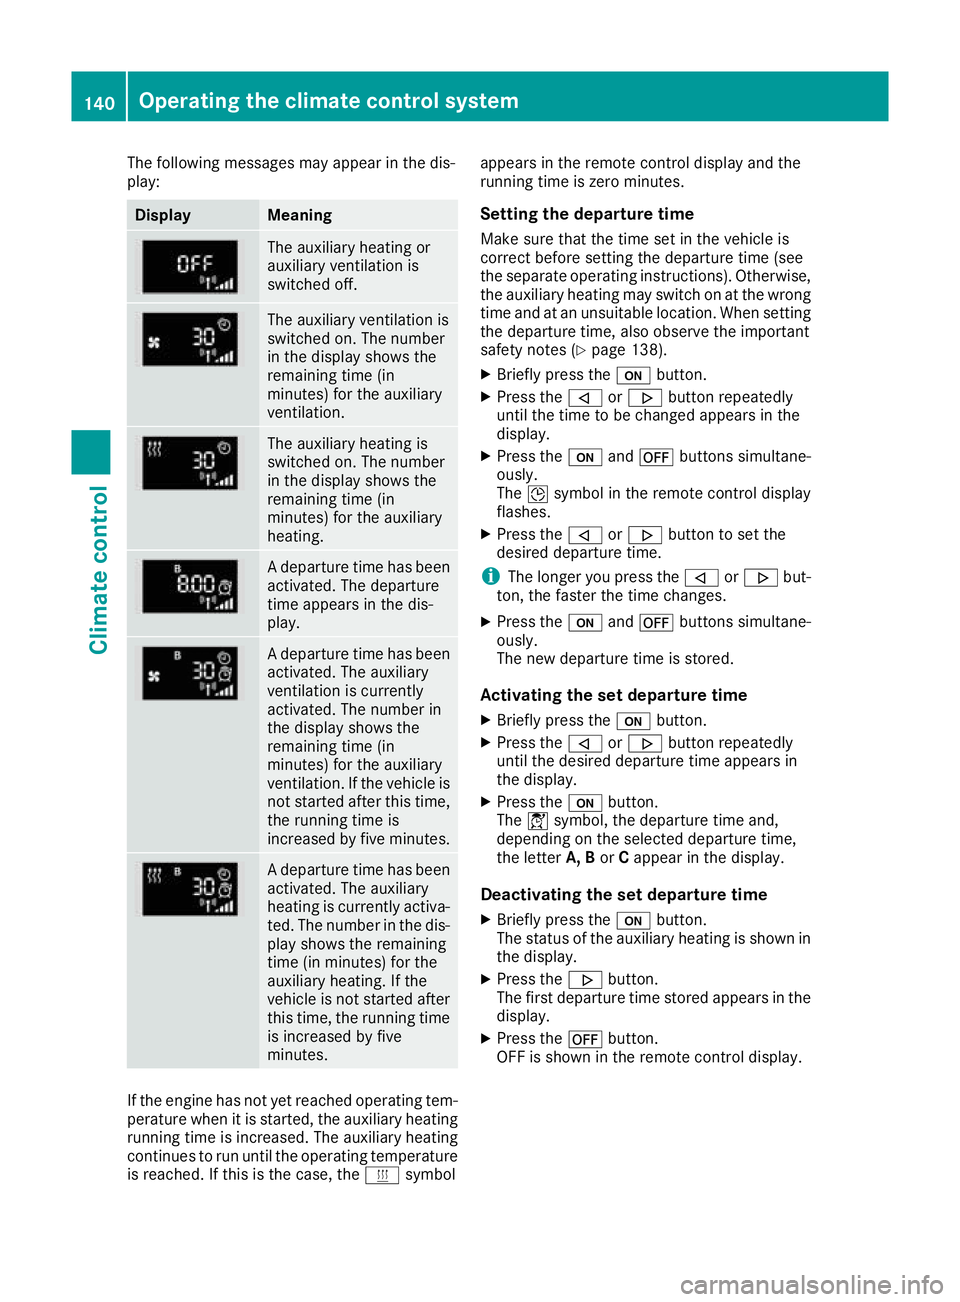
The following messages may appear in the dis-
play: Display Meaning
The auxiliary heating or
auxiliary ventilation is
switched off.
The auxiliary ventilation is
switched on. The number
in the display shows the
remaining time (in
minutes) for the auxiliary
ventilation.
The auxiliary heating is
switched on. The number
in the display shows the
remaining time (in
minutes) for the auxiliary
heating.
A departure time has been
activated. The departure
time appears in the dis-
play. A departure time has been
activated. The auxiliary
ventilation is currently
activated. The number in
the display shows the
remaining time (in
minutes) for the auxiliary
ventilation. If the vehicle is
not started after this time, the running time is
increased by five minutes. A departure time has been
activated. The auxiliary
heating is currently activa-
ted. The number in the dis- play shows the remaining
time (in minutes) for the
auxiliary heating. If the
vehicle is not started after
this time, the running time is increased by five
minutes. If the engine has not yet reached operating tem-
perature when it is started, the auxiliary heating running time is increased. The auxiliary heating
continues to run until the operating temperature
is reached. If this is the case, the ysymbol appears in the remote control display and the
running time is zero minutes.
Setting the departure time
Make sure that the time set in the vehicle is
correct before setting the departure time (see
the separate operating instructions). Otherwise, the auxiliary heating may switch on at the wrong
time and at an unsuitable location. When setting the departure time, also observe the important
safety notes (Y page 138).
X Briefly press the ubutton.
X Press the ,or. button repeatedly
until the time to be changed appears in the
display.
X Press the uand^ buttons simultane-
ously.
The Îsymbol in the remote control display
flashes.
X Press the ,or. button to set the
desired departure time.
i The longer you press the
,or. but-
ton, the faster the time changes.
X Press the uand^ buttons simultane-
ously.
The new departure time is stored.
Activating the set departure time
X Briefly press the ubutton.
X Press the ,or. button repeatedly
until the desired departure time appears in
the display.
X Press the ubutton.
The Ísymbol, the departure time and,
depending on the selected departure time,
the letter A, BorCappear in the display.
Deactivating the set departure time
X Briefly press the ubutton.
The status of the auxiliary heating is shown in the display.
X Press the .button.
The first departure time stored appears in the
display.
X Press the ^button.
OFF is shown in the remote control display. 140
Operating the climate control systemClimate control
Page 145 of 393
Problems with the auxiliary heating/ventilation
Problem
Possible causes/consequences and
M
MSolutions FAIL¨ The signal transmission between the transmitter and the vehicle is
faulty.
X
Change your position in relation to the vehicle, moving closer if
necessary.
X Make another attempt to switch the auxiliary heating or auxiliary
ventilation on or off using the remote control. FAIL The auxiliary heating/ventilation cannot be switched on or has
switched itself off.
The starter battery is not sufficiently charged.
X Charge the starter battery.
X Make another attempt to switch on the auxiliary heating/ventilation
using the remote control. The auxiliary heating cannot be switched on or has switched itself off.
The fuel tank content is below the reserve fuel level.
X Refuel at the nearest filling station.
X Make another attempt to switch on the auxiliary heating/ventilation
using the remote control. The auxiliary heating/ventilation cannot be switched on or has
switched itself off.
The auxiliary heating/ventilation is malfunctioning.
X Have the auxiliary heating/ventilation checked at a qualified spe-
cialist workshop. Adjusting the air vents
Important safety notes
G
WARNING
Very hot or very cold air can flow from the air vents. This could result in burns or frostbite in the immediate vicinity of the air vents. There
is a risk of injury.
Make sure that all vehicle occupants always
maintain a sufficient distance to the air out-
lets. If necessary, redirect the airflow to
another area of the vehicle interior.
In order to ensure the direct flow of fresh air
through the air vents into the vehicle interior,
please observe the following notes:
R keep the air inlet grille on the bonnet and in
the engine compartment on the front- passenger side free of blockages, such as ice,
snow or leaves.
R never cover the vents or ventilation grilles in
the vehicle interior
i For virtually draught-free ventilation, adjust
the sliders of the air vents to the centre posi- tion. 142
Adjusting the air ventsClimate control
Page 150 of 393
To start the vehicle without actively using the
key:
R the Start/Stop button must be inserted in the
ignition lock
R the key must be in the vehicle
R the vehicle must not be locked with the key or
KEYLESS-GO (Y page 79)
Do not keep the key:
R with electronic devices, e.g. a mobile phone
or another key
R with metallic objects, e.g. coins or metal film
R inside metallic objects, e.g. a metal case
This can affect the key's functionality.
Do not keep the key in the temperature-control- led cup holder (Y page 307). Otherwise, the key
is not detected.
If you lock the vehicle with the key's remote
control or with KEYLESS-GO, after a short time:
R you will not be able to switch on the ignition
with the Start/Stop button
R you will not be able to start the engine with the
Start/Stop button until the vehicle is
unlocked again
If you lock the vehicle centrally using the button
on the front door (Y page 85), you can continue
to start the engine with the Start/Stop button.
The engine can be switched off while the vehicle is in motion by pressing and holding the Start/
Stop button for three seconds. This function
operates independently of the ECO start/stop
automatic engine switch-off function.
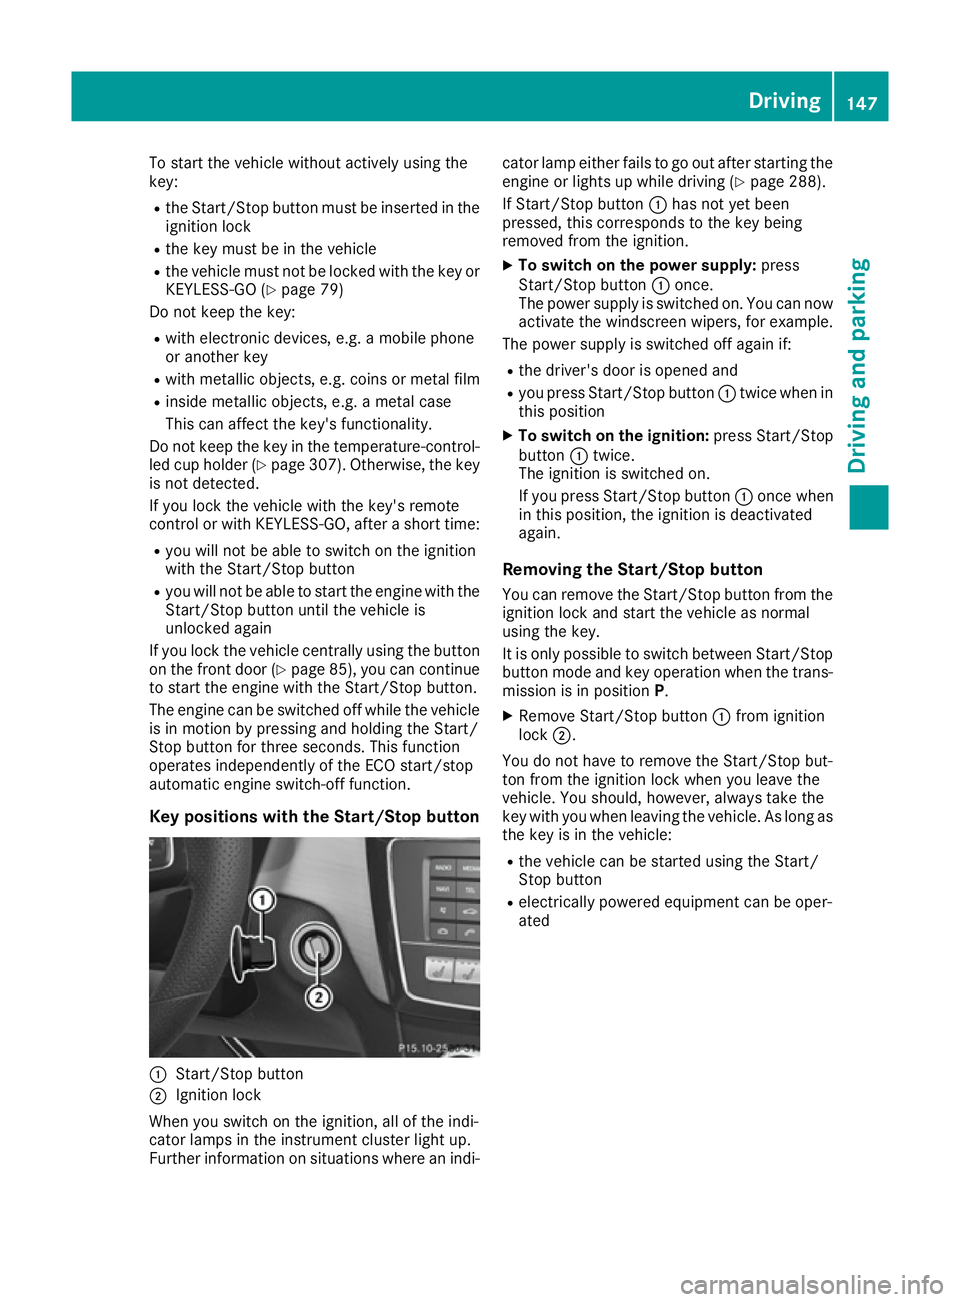
Key positions with the Start/Stop button :
Start/Stop button
; Ignition lock
When you switch on the ignition, all of the indi-
cator lamps in the instrument cluster light up.
Further information on situations where an indi- cator lamp either fails to go out after starting the
engine or lights up while driving (Y page 288).
If Start/Stop button :has not yet been
pressed, this corresponds to the key being
removed from the ignition.
X To switch on the power supply: press
Start/Stop button :once.
The power supply is switched on. You can now activate the windscreen wipers, for example.
The power supply is switched off again if:
R the driver's door is opened and
R you press Start/Stop button :twice when in
this position
X To switch on the ignition: press Start/Stop
button :twice.
The ignition is switched on.
If you press Start/Stop button :once when
in this position, the ignition is deactivated
again.
Removing the Start/Stop button
You can remove the Start/Stop button from the ignition lock and start the vehicle as normal
using the key.
It is only possible to switch between Start/Stop
button mode and key operation when the trans-
mission is in position P.
X Remove Start/Stop button :from ignition
lock ;.
You do not have to remove the Start/Stop but-
ton from the ignition lock when you leave the
vehicle. You should, however, always take the
key with you when leaving the vehicle. As long as
the key is in the vehicle:
R the vehicle can be started using the Start/
Stop button
R electrically powered equipment can be oper-
ated Driving
147Driving and parking Z
Page 315 of 393
When programming a garage door opener, park
the vehicle outside the garage. Do not run the
engine while programming.
The garage door opener is only available for cer- tain countries. Observe the legal requirements
for each individual country.
The HomeLink ®
garage door opener is compat-
ible with most European garage and gate opener
drives. More information on HomeLink ®
and/or
compatible products is available:
R at a qualified specialist workshop
R via the HomeLink ®
Hotline
(0) 08000 466 354 65 or alternatively
+49 (0) 6838 907-277
R on the Internet at http://www.homelink.com
Important safety notes G
WARNING
When you operate or program the garage door with the integrated garage door opener, per-
sons in the range of movement of the garage
door can become trapped or struck by the
garage door. There is a risk of injury.
When using the integrated garage door
opener, always make sure that nobody is
within the range of movement of the garage
door. G
WARNING
Combustion engines emit poisonous exhaust
gases such as carbon monoxide. Inhaling
these exhaust gases leads to poisoning. There is a risk of fatal injury. Therefore never leave
the engine running in enclosed spaces with-
out sufficient ventilation.
Programming Programming buttons
Pay attention to the "Important safety notes"
(Y page 312). Garage door remote control
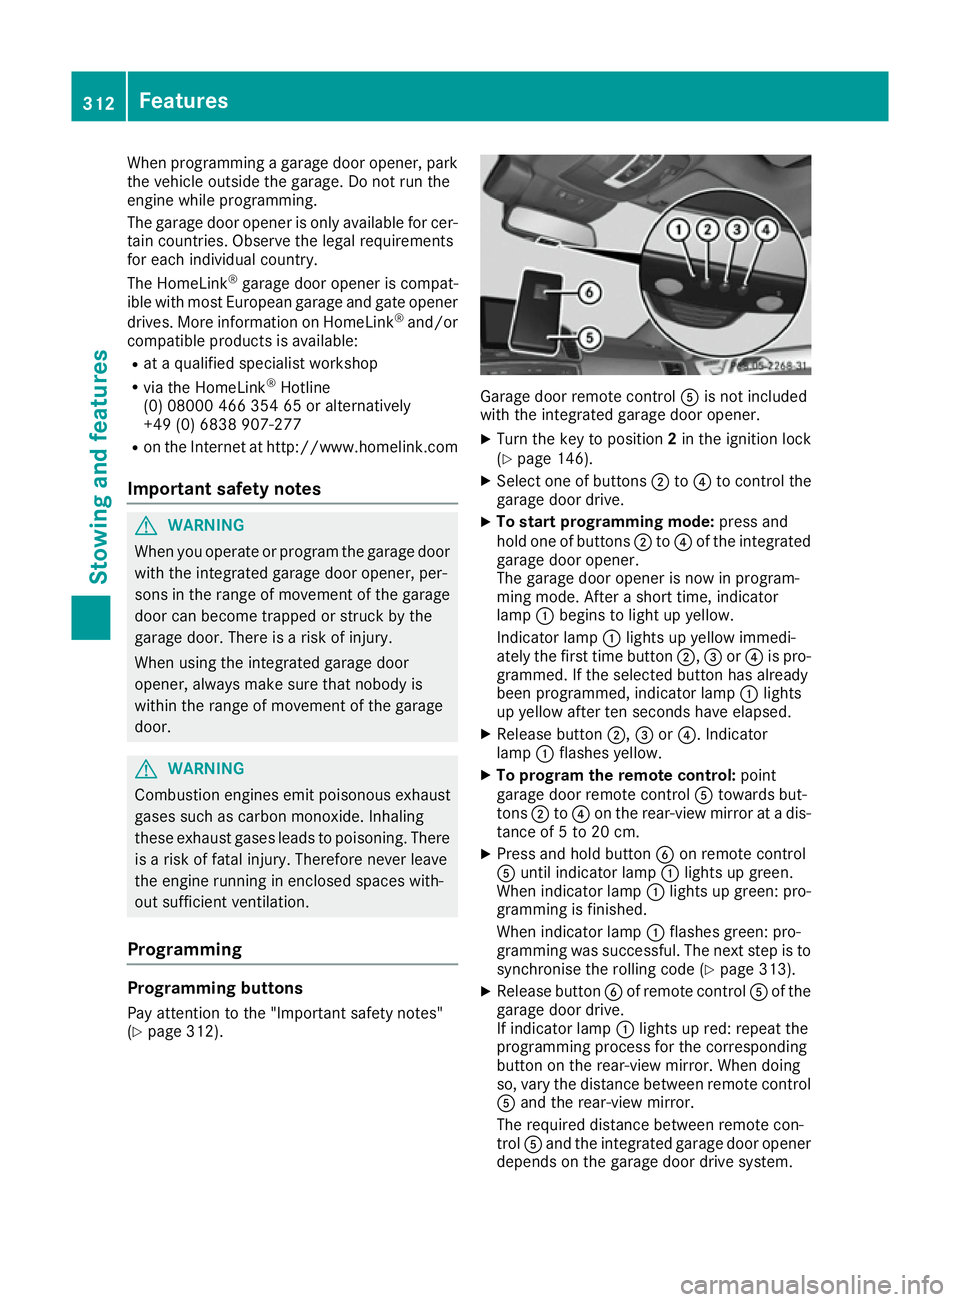
Ais not included
with the integrated garage door opener.
X Turn the key to position 2in the ignition lock
(Y page 146).
X Select one of buttons ;to? to control the
garage door drive.
X To start programming mode: press and
hold one of buttons ;to? of the integrated
garage door opener.
The garage door opener is now in program-
ming mode. After a short time, indicator
lamp :begins to light up yellow.
Indicator lamp :lights up yellow immedi-
ately the first time button ;,=or? is pro-
grammed. If the selected button has already
been programmed, indicator lamp :lights
up yellow after ten seconds have elapsed.
X Release button ;,=or?. Indicator
lamp :flashes yellow.
X To program the remote control: point
garage door remote control Atowards but-
tons ;to? on the rear-view mirror at a dis-
tance of 5 to 20 cm.
X Press and hold button Bon remote control
A until indicator lamp :lights up green.
When indicator lamp :lights up green: pro-
gramming is finished.
When indicator lamp :flashes green: pro-
gramming was successful. The next step is to
synchronise the rolling code (Y page 313).
X Release button Bof remote control Aof the
garage door drive.
If indicator lamp :lights up red: repeat the
programming process for the corresponding
button on the rear-view mirror. When doing
so, vary the distance between remote control A and the rear-view mirror.
The required distance between remote con-
trol Aand the integrated garage door opener
depends on the garage door drive system. 312
FeaturesStowing and features