2015 MERCEDES-BENZ G-CLASS SUV ECU
[x] Cancel search: ECUPage 194 of 274

Useful information
iThis Operator's Manual describes all
models and all standard and optional equip- ment of your vehicle available at the time of
publication of the Operator's Manual.
Country-specific differences are possible.
Please note that your vehicle may not be
equipped with all features described. This
also applies to safety-related systems and
functions.
iRead the information on qualified special-
ist workshops: ( Ypage 28).
Loading guidelines
GWARNING
If objects, luggage or loads are not secured or
not secured sufficiently, they could slip, tip
over or be flung around and thereby hit vehicle
occupants. There is a risk of injury, particu-
larly in the event of sudden braking or a sud-
den change in direction.
Always store objects so that they cannot be
flung around. Secure objects, luggage or
loads against slipping or tipping before the
journey.
GWARNING
If you distribute the load unevenly in the vehi- cle, the handling as well as the steering and
braking characteristics are severely affected.
There is a risk of an accident.
Distribute the load evenly in the vehicle.
Secure the load to prevent it from slipping.
GWARNING
The exhaust tail pipe and tail pipe trim can
become very hot. If you come into contact
with these parts of the vehicle, you could burn
yourself. There is a risk of injury.
Always be particularly careful around the
exhaust tail pipe and the tail pipe trim. Allow
these components to cool down before touch-
ing them.
GWARNING
Combustion engines emit poisonous exhaust
gases such as carbon monoxide. If the tail-
gate/rear door is open when the engine is
running, particularly if the vehicle is moving,
exhaust fumes could enter the passenger
compartment. There is a risk of poisoning.
Turn off the engine before opening the tail-
gate/rear door. Never drive off with the tail-
gate/rear door open.
Driving, braking and steering characteristics
change depending on:
R type of load
R weight
R the center of gravity of the load
You should therefore load your vehicle as
shown in the illustrations.
The gross vehicle weight (GVW) is the vehicle
weight including fuel, vehicle tool kit, spare
wheel, accessories installed, vehicle occu-
pants and luggage/load.
Do not exceed the load limit or permitted
gross vehicle weight rating (GVWR) for your
vehicle. The gross load limit and the GVWR
are specified on the vehicle identification
plate on the B-pillar of the driver's door( Y page 258).
The load must also be distributed so that the weight on each axle never exceeds the grossaxle weight rating (GAWR) for the front and
rear axles. The specifications for GVWR and
GAWR are on the vehicle identification plate
on the B-pillar of the driver's door( Y page 258).
192Loading guidelines
Stowage and features
Page 195 of 274
Further information can be found in the
"Loading the vehicle" section (Ypage 238).
Observe the following notes when transport-
ing a load:
R Position heavy loads as far forwards as pos-
sible and as low down in the cargo com-
partment as possible.
iTransport loads when possible in the
cargo compartment. You should only use
the cargo compartment enlargement if the
load does not fit in the cargo compartment.
R Always place the load against the backrests
of the front seats or rear seats.
R Use the cargo tie-down rings and the parcel
nets to transport loads and luggage.
R Use cargo tie-down rings and fastening
materials appropriate for the weight and
size of the load.
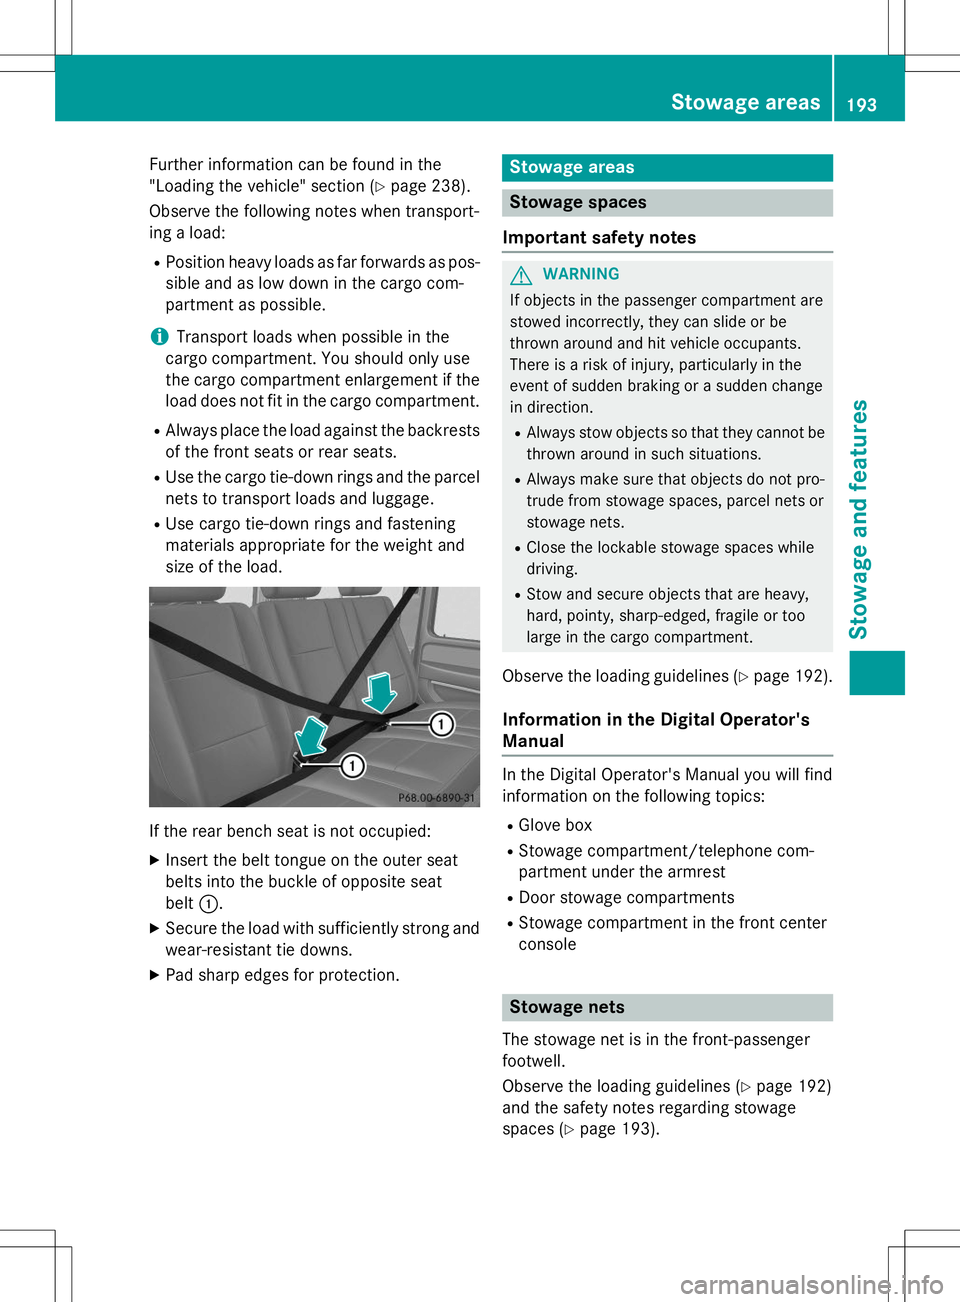
If the rear bench seat is not occupied: XInsert the belt tongue on the outer seat
belts into the buckle of opposite seat
belt :.
X Secure the load with sufficiently strong and
wear-resistant tie downs.
X Pad sharp edges for protection.
Stowage areas
Stowage spaces
Important safety notes
GWARNING
If objects in the passenger compartment are
stowed incorrectly, they can slide or be
thrown around and hit vehicle occupants.
There is a risk of injury, particularly in the
event of sudden braking or a sudden change
in direction. R Always stow objects so that they cannot be
thrown around in such situations.
R Always make sure that objects do not pro-
trude from stowage spaces, parcel nets or
stowage nets.
R Close the lockable stowage spaces while
driving.
R Stow and secure objects that are heavy,
hard, pointy, sharp-edged, fragile or too
large in the cargo compartment.
Observe the loading guidelines ( Ypage 192).
Information in the Digital Operator'sManual
In the Digital Operator's Manual you will find
information on the following topics: R
Glove box
R Stowage compartment/telephone com-
partment under the armrest
R Door stowage compartments
R Stowage compartment in the front center
console
Stowage nets
The stowage net is in the front-passenger
footwell.
Observe the loading guidelines ( Ypage 192)
and the safety notes regarding stowage
spaces ( Ypage 193).
Stowage areas193
Stowage and features
Z
Page 197 of 274
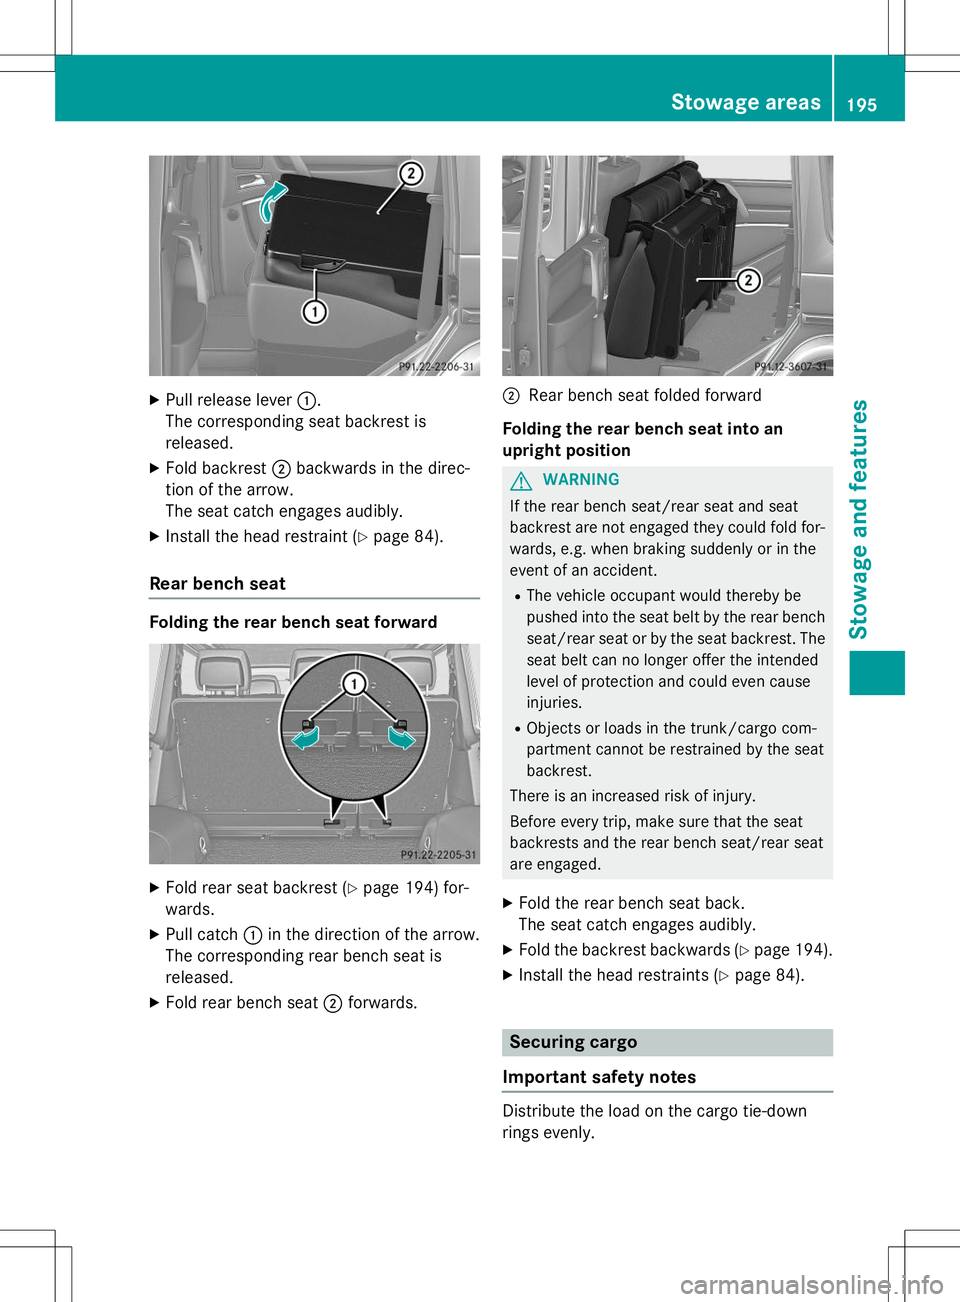
XPull release lever :.
The corresponding seat backrest is released.
X Fold backrest ;backwards in the direc-
tion of the arrow.
The seat catch engages audibly.
X Install the head restraint ( Ypage 84).
Rear bench seat
Folding the rear bench seat forward
X
Fold rear seat backrest ( Ypage 194) for-
wards.
X Pull catch :in the direction of the arrow.
The corresponding rear bench seat is released.
X Fold rear bench seat ;forwards.
;Rear bench seat folded forward
Folding the rear bench seat into an
upright position
GWARNING
If the rear bench seat/rear seat and seat
backrest are not engaged they could fold for- wards, e.g. when braking suddenly or in the
event of an accident. R The vehicle occupant would thereby be
pushed into the seat belt by the rear bench
seat/rear seat or by the seat backrest. The
seat belt can no longer offer the intended
level of protection and could even causeinjuries.
R Objects or loads in the trunk/cargo com-
partment cannot be restrained by the seat
backrest.
There is an increased risk of injury.
Before every trip, make sure that the seat
backrests and the rear bench seat/rear seat
are engaged.
X Fold the rear bench seat back.
The seat catch engages audibly.
X Fold the backrest backwards ( Ypage 194).
X Install the head restraints ( Ypage 84).
Securing cargo
Important safety notes
Distribute the load on the cargo tie-down
rings evenly.
Stowage areas195
Stowage and features
Z
Page 198 of 274
Do not tamper with or repair cargo tie-down
points, cargo tie-down rings or tie downs.
Have maintenance work as well as modifica-
tions, installations and conversions carried
out at a qualified specialist workshop(Y page 28).
Observe the following notes on securing
loads:
R Secure the load using the cargo tie-down
rings.
R Do not use elastic straps or nets to secure
a load, as these are only intended as an
anti-slip protection for light loads.
R Do not route tie-downs across sharp edges
or corners.
R Pad sharp edges for protection.
R Only use tie downs that have been checked
in accordance with applicable standards,
e.g. lashing nets or lashing straps.
R Fill the spaces between the load and the
cargo compartment walls and the wheel
housing in a form-locking way. Only use
dimensionally stable transportation aids
for this, such as chocks, wooden fixings or
padding.
Cargo tie-down rings in the cargo com-
partment
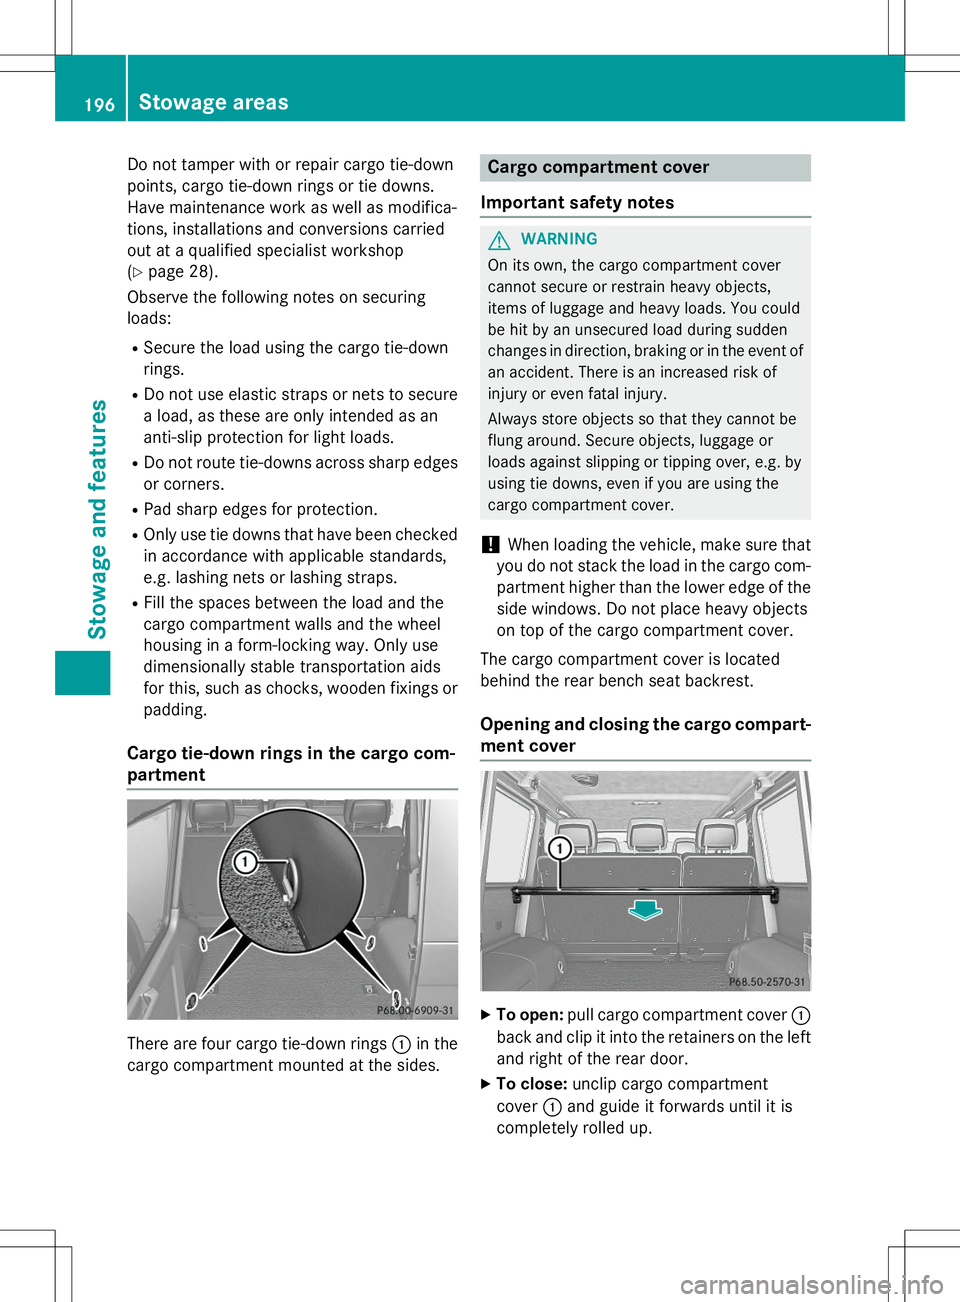
There are four cargo tie-down rings :in the
cargo compartment mounted at the sides.
Cargo compartment cover
Important safety notes
GWARNING
On its own, the cargo compartment cover
cannot secure or restrain heavy objects,
items of luggage and heavy loads. You could
be hit by an unsecured load during sudden
changes in direction, braking or in the event of an accident. There is an increased risk of
injury or even fatal injury.
Always store objects so that they cannot be
flung around. Secure objects, luggage or
loads against slipping or tipping over, e.g. by
using tie downs, even if you are using the
cargo compartment cover.
!When loading the vehicle, make sure that
you do not stack the load in the cargo com-
partment higher than the lower edge of the side windows. Do not place heavy objects
on top of the cargo compartment cover.
The cargo compartment cover is located
behind the rear bench seat backrest.
Opening and closing the cargo compart-
ment cover
X To open: pull cargo compartment cover :
back and clip it into the retainers on the left and right of the rear door.
X To close: unclip cargo compartment
cover :and guide it forwards until it is
completely rolled up.
196Sto wage areas
Stowage an d features
Page 200 of 274
phone network, a valid SIM card and a sub-scription to a security service.
R the battery is sufficiently charged.
R the corresponding mobile phone network is
available for transmitting data to the Cus-
tomer Center.
iDetermining the location of the vehicle on
a map is only possible if there is sufficient
GPS reception and the vehicle position can
be forwarded to the Customer Center.
The mbrace system
To adjust the volume during an mbrace call,
proceed as follows:
X Press the WorX button on the mul-
tifunction steering wheel.
or
X Use the COMAND volume control.
The mbrace system provides three different
services:
R Automatic and manual emergency call
R Roadside Assistance call
R MB Info call
USA only: you can find more information and
a description of all available features under
"Owners Online" at http://
www.mbusa.com .
System self-test
GWARNING
A malfunction in the system has been detec-
ted if one of the following conditions occurs:
R the indicator lamp in the SOS button does
not light up during the system self-diagno-sis.
R the indicator lamp in the ºRoadside
Assistance button does not light up during
the system self-diagnosis.
R the indicator lamp in the Einformation
button does not light up during the system
self-diagnosis.
R the indicator lamp in the SOS button, º
Roadside Assistance button or Einfor-
mation button continues to be lit red after
the system self-diagnosis.
R the
TeleAidinoperativeorTeleAid
not activatedmessage appears on the
multifunction display after the system self-
diagnosis.
If a malfunction is indicated as outlined above,
the system may not operate as expected. In
the event of an emergency, assistance must
be summoned by other means.
Have the system checked at the nearest
authorized Mercedes-Benz Center or contact
the following service hotlines:
R USA: Response Center at
1-888-990-9007
R Canada: Customer Service at
1-888-923-8367
After you have switched on the ignition, the
system carries out a self-diagnosis.
Emergency call
Important safety notes
GWARNING
If the indicator lamp in the SOS button is
flashing continuously and there was no voice
connection to the Response Center estab-
lished, then the mbrace system could not ini- tiate an emergency call (e.g. the relevant cel-
lular phone network is not available).
The message
Call Failedappears in the
multifunction display for approximately
10 seconds.
Should this occur, assistance must be sum-
moned by other means.
!You must have a license agreement to
activate the mbrace service. Ensure that
your system is activated and ready for use, and press the EMB Info call button to
register. If one of these steps is not carried
out, it may not be possible to activate thesystem.
198Features
Stowage and features
Page 204 of 274
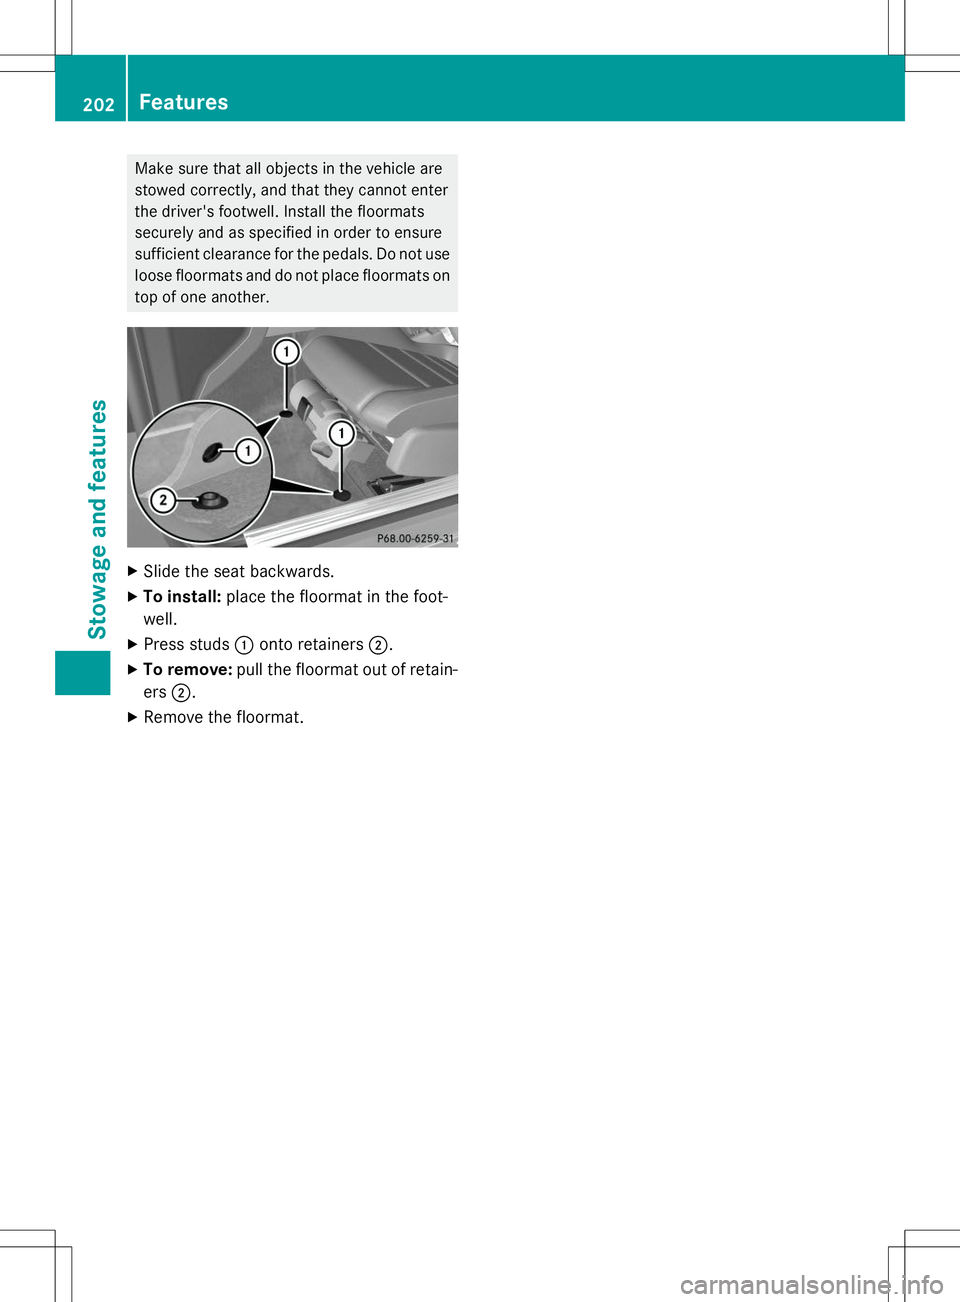
Make sure that all objects in the vehicle are
stowed correctly, and that they cannot enter
the driver's footwell. Install the floormats
securely and as specified in order to ensure
sufficient clearance for the pedals. Do not useloose floormats and do not place floormats ontop of one another.
X Slide the seat backwards.
X To install: place the floormat in the foot-
well.
X Press studs :onto retainers ;.
X To remove: pull the floormat out of retain-
ers ;.
X Remove the floormat.
202Features
Stowage and features
Page 209 of 274

XSwitch off the engine.
X If the engine is at normal operating tem-
perature: wait about five minutes before
carrying out the measurement.
X If the engine is not at normal operating
temperature: e.g. if the engine was only
started briefly, wait approximately
30 minutes before carrying out the meas-
urement.
iIf you wish to cancel the measurement,
press the 9or: button on the mul-
tifunction steering wheel.
Adding engine oil
GWARNING
Certain components in the engine compart-
ment, such as the engine, radiator and parts
of the exhaust system, can become very hot.
Working in the engine compartment poses a
risk of injury.
Where possible, let the engine cool down and touch only the components described in the
following.
GWARNING
If engine oil comes into contact with hot com- ponents in the engine compartment, it may
ignite. There is a risk of fire and injury.
Make sure that engine oil is not spilled next to
the filler neck. Let the engine cool down and
thoroughly clean the engine oil off the com-
ponents before starting the engine.
HEnvironmental note
When adding oil, take care not to spill any. If
oil enters the soil or waterways, it is harmful to the environment.
!Only use engine oils and oil filters that
have been approved for vehicles with a ser-
vice system. You can obtain a list of the
engine oils and oil filters tested and
approved in accordance with the
Mercedes-Benz Specifications for Service Products at any Mercedes-Benz Service
center.
Damage to the engine or exhaust system is
caused by the following:
R using engine oils and oil filters that have
not been specifically approved for the
service system
R replacing engine oil and oil filters after
the interval for replacement specified by
the service system has been exceeded
R using engine oil additives.
!Do not add too much oil. If the oil level is
above the "max" mark on the dipstick, too
much oil has been added. This can lead to
damage to the engine or the catalytic con-
verter. Have excess oil siphoned off.
Example: engine oil cap
X Turn cap :counter-clockwise and remove
it.
X Add the amount of oil required.
Observe the specifications in the on-board
computer when doing so or fill carefully to the maximum mark on the oil dipstick.
Further information on engine oil ( Y page 262).
iThe difference between the minimum
mark and the maximum mark on the oil
dipstick is approximately 2.1 US qt (2 l).
X Replac e cap:on the filler neck and
tighten clockwise.
Ensure that the cap locks into placesecurely.
Engine compartment207
Maintenance and care
Z
Page 218 of 274

iWhen re-installing trim panel?, make
sure that retainer Aengages in recess B.
Removing the spare wheel
The spare wheel is heavy. Take particular note
of this when removing the spare wheel.
X Remove wheel nuts :.
X Remove the spare wheel.
Mounting the wheel
After changing a wheel:
X Repair or replace the damaged wheel as
soon as possible and secure the spare
wheel in place again.
X Secure the damaged wheel on the spare
wheel bracket with wheel nuts :. When
doing so, make sure that the wheel cannot
come loose.
X When re-installing trim panel ?, make sure
that retainer Bengages in recess A
( Y page 215). X
Make sure that tab ;is below when re-
installing cover ring :(Y page 215).
X For safety reasons, regularly check to
ensure that the wheel is securely fastened.
Flat tire
Preparing the vehicle
XStop the vehicle on solid, non-slippery and
level ground, as far away as possible from
traffic.
X Switch on the hazard warning lamps(Y page 90).
X Apply the parking brake.
X Bring the front wheels into the straight-
ahead position.
X Move the selector lever to position P.
X Switch off the engine.
X Remove the SmartKey from the ignitionlock.
The steering wheel lock stays active for as
long as the SmartKey is removed.
X All occupants must get out of the vehicle.
Make sure that they are not endangered as
they do so.
X Make sure that no one is near the danger
area while a wheel is being changed. Any-
one who is not directly assisting in the
wheel change should, for example, stand
behind the barrier.
X Get out of the vehicle. Pay attention to traf-
fic conditions when doing so.
X Close the driver's door.
Battery (vehicle)
Important safety notes
Special tools and expert knowledge are
required when working on the battery, e.g.
removal and installation. You should there-
fore have all work involving the battery car-
ried out at a qualified specialist workshop.
216Battery (vehicle)
Roadside Assistance