2015 MERCEDES-BENZ G-CLASS SUV wheel
[x] Cancel search: wheelPage 87 of 274
interrupted, e.g. if the battery has been com-pletely discharged or disconnected.
X Make sure that the cup holder on the center
console is folded down ( Ypage 197).
X Move the seat as far forward as possible
and the head restraint in as far as possible.
Rear seat head restraints
Important safety notes
GWARNING
If head restraints are not installed and adjus-
ted correctly, they cannot provide protection
as intended. There is an increased risk of
injury in the head and neck area, e.g. in the
event of an accident or when braking.
Always drive with the head restraints instal-
led. Before driving off, make sure for every
vehicle occupant that the center of the head
restraint supports the back of the head at
about eye level.
Observe the following when adjusting the
head restraints: X Do not rotate the head restraints of the
front and rear seats.
Otherwise, you cannot adjust the height
and angle of the head restraints correctly.
X Adjust the head restraint so that it is as
close as possible to your head.
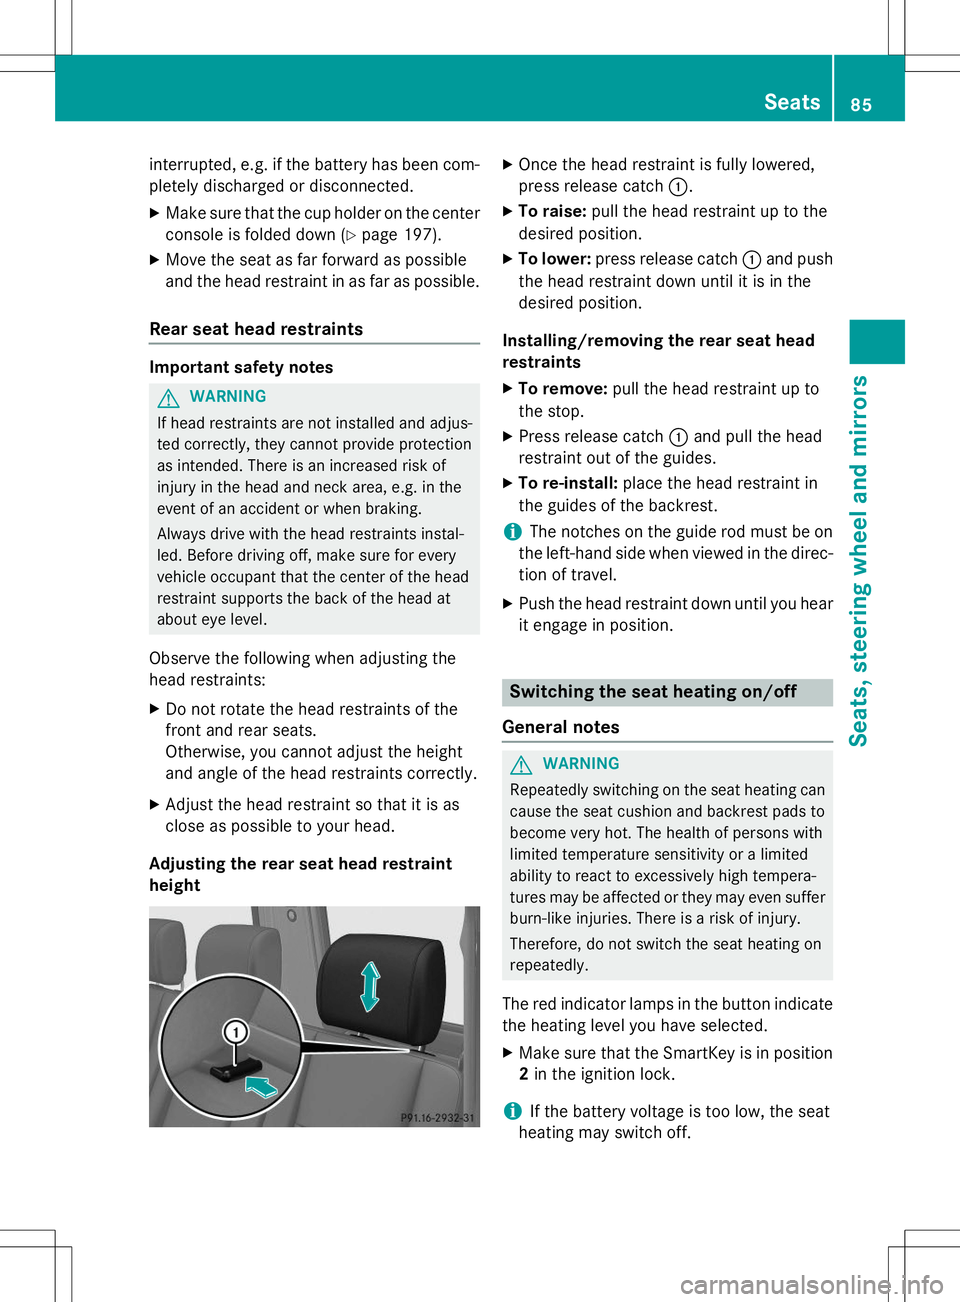
Adjusting the rear seat head restraintheight
X Once the head restraint is fully lowered,
press release catch :.
X To raise: pull the head restraint up to the
desired position.
X To lower: press release catch :and push
the head restraint down until it is in the
desired position.
Installing/removing the rear seat head
restraints
X To remove: pull the head restraint up to
the stop.
X Press release catch :and pull the head
restraint out of the guides.
X To re-install: place the head restraint in
the guides of the backrest.
iThe notches on the guide rod must be on
the left-hand side when viewed in the direc- tion of travel.
X Push the head restraint down until you hear
it engage in position.
Switching the seat heating on/off
General notes
GWARNING
Repeatedly switching on the seat heating can
cause the seat cushion and backrest pads to
become very hot. The health of persons with
limited temperature sensitivity or a limited
ability to react to excessively high tempera-
tures may be affected or they may even suffer burn-like injuries. There is a risk of injury.
Therefore, do not switch the seat heating on
repeatedly.
The red indicator lamps in the button indicate the heating level you have selected.
X Make sure that the SmartKey is in position
2 in the ignition lock.
iIf the battery voltage is too low, the seat
heating may switch off.
Seats85
Seats, steering wheel and mirrors
Z
Page 88 of 274
One or more of the indicator lamps in the
seat heating button are flashing.
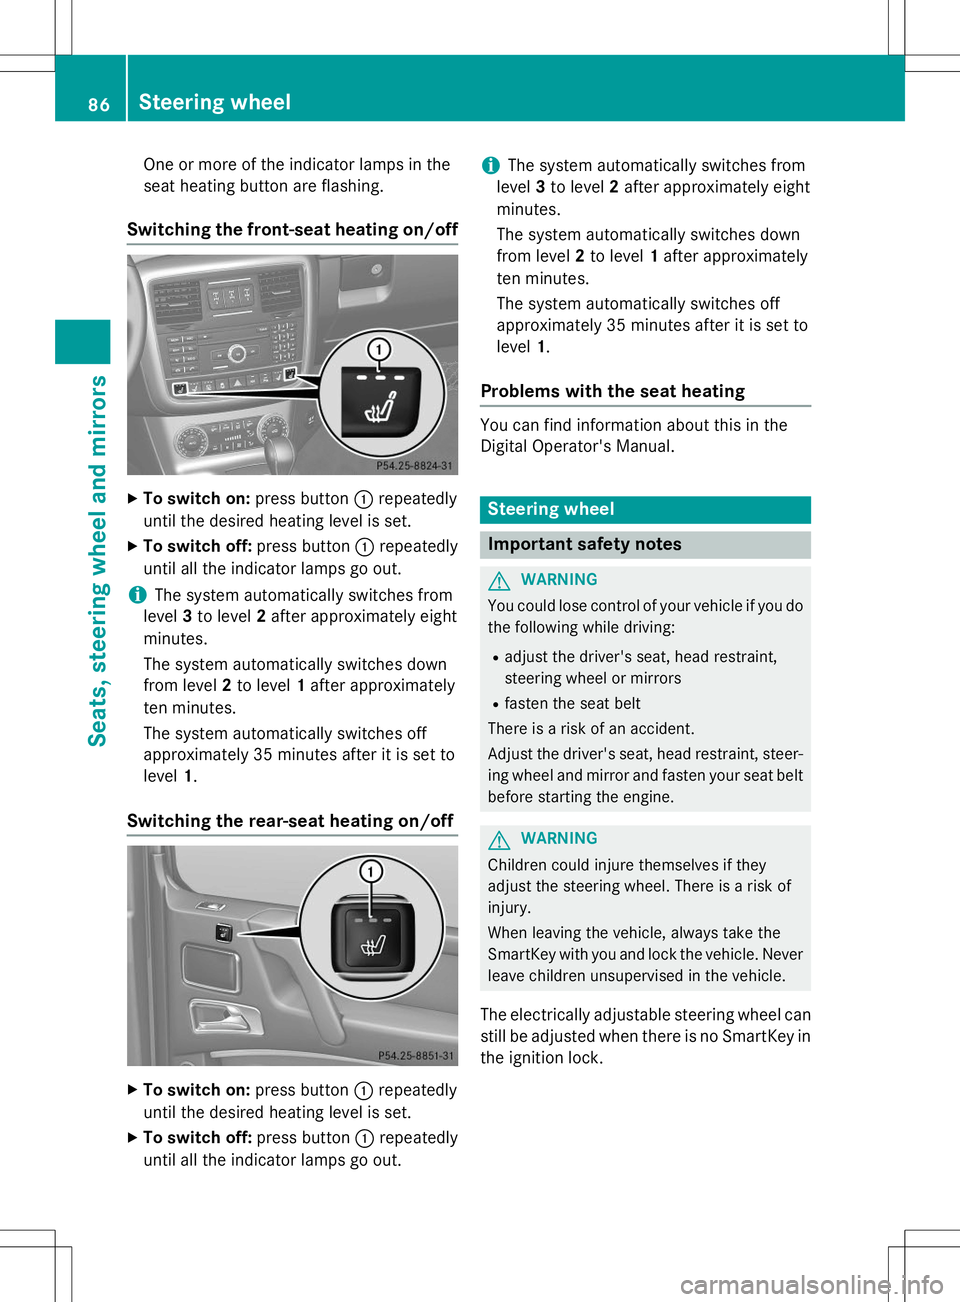
Switching the front-seat heating on/off
XTo switch on: press button:repeatedly
until the desired heating level is set.
X To switch off: press button:repeatedly
until all the indicator lamps go out.
iThe system automatically switches from
level 3to level 2after approximately eight
minutes.
The system automatically switches down
from level 2to level 1after approximately
ten minutes.
The system automatically switches off
approximately 35 minutes after it is set tolevel 1.
Switching the rear-seat heating on/off
X
To switch on: press button:repeatedly
until the desired heating level is set.
X To switch off: press button:repeatedly
until all the indicator lamps go out.
iThe system automatically switches from
level 3to level 2after approximately eight
minutes.
The system automatically switches down
from level 2to level 1after approximately
ten minutes.
The system automatically switches off
approximately 35 minutes after it is set tolevel 1.
Problems with the seat heating
You can find information about this in the
Digital Operator's Manual.
Steering wheel
Important safety notes
GWARNING
You could lose control of your vehicle if you do
the following while driving:
R adjust the driver's seat, head restraint,
steering wheel or mirrors
R fasten the seat belt
There is a risk of an accident.
Adjust the driver's seat, head restraint, steer-
ing wheel and mirror and fasten your seat belt before starting the engine.
GWARNING
Children could injure themselves if they
adjust the steering wheel. There is a risk ofinjury.
When leaving the vehicle, always take the
SmartKey with you and lock the vehicle. Neverleave children unsupervised in the vehicle.
The electrically adjustable steering wheel can
still be adjusted when there is no SmartKey in
the ignition lock.
86Steering wheel
Seats, steering wheel and mirrors
Page 89 of 274
Information in the Digital Operator's
Manual
In the Digital Operator's Manual you will find
information on the following topics: RAdjusting the steering wheel
R Steering wheel heating
R EASY-ENTRY/EXIT feature
Mirrors
In the Digital Operator's Manual you will find
information on the following topics:
R Rear-view mirror
R Exterior mirrors
R Automatic anti-glare mirrors
R Parking position for the exterior mirror on
the front-passenger side
Memory functions
In the Digital Operator's Manual you will find
information on the following topics:
R Storing settings
R Calling up a stored setting
Memory functions87
Seats , steering wheel and mirrors
Z
Page 94 of 274

Combination switch
:High-beam headlamps
;Turn signal, right
=High-beam flasher
?Turn signal, left
In the Digital Operator's Manual you will find
information on the following topics: R Turn signals
R High-beam headlamps
R High-beam flasher
Cornering light function
The cornering light function improves the illu-
mination of the road over a wide angle in the direction you are turning, enabling better vis-
ibility in tight bends, for example. The corner- ing light function can only be activated if the
low-beam headlamps are switched on and the
fog lamps are switched off.
Active: if you are driving at speeds below
25 mph (40 km/ h)and switch on the turn
signal or turn the steering wheel. Not active:
if you are driving at speeds above
25 mph (40 km/h) or switch off the turn sig-
nal or turn the steering wheel to the straight-
ahead position.
The cornering lamp may remain lit for a short
time, but is automatically switched off after
no more than three minutes.
Interior lighting
An overview of the interior lighting and the
overhead control panel can be found in the
"At a glance" section.
In the Digital Operator's Manual you will find
information on the following topics: R Automatic interior lighting control
R Manual interior lighting control
R Courtesy lighting in the front doors
Replacing bulbs
Important safety notes
GDANGER
Xenon bulbs carry a high voltage. You can get
an electric shock if you remove the cover of
the Xenon bulb and touch the electrical con-
tacts. There is a risk of fatal injury.
Never touch the parts or the electrical con-
tacts of the Xenon bulb. Always have work on
the Xenon bulbs carried out at a qualified spe-
cialist workshop.
GWARNING
Bulbs, lamps and connectors can get very hot when operating. If you change a bulb, you
could burn yourself on these components.
There is a risk of injury.
Allow these components to cool down beforechanging a bulb.
Do not use a bulb that has been dropped or if
its glass tube has been scratched.
92Replacing bulbs
Lights and windshield wipers
Page 105 of 274
the driver's footwell. Install the floormats
securely and as specified in order to ensure
sufficient clearance for the pedals. Do not useloose floormats and do not place floormats ontop of one another.
GWARNING
Unsuitable footwear can hinder correct usage of the pedals, e.g.:
R shoes with thick soles
R shoes with high heels
R slippers
There is a risk of an accident.
Wear suitable footwear to ensure correct
usage of the pedals.
GWARNING
If you switch off the ignition while driving,
safety-relevant functions are only available
with limitations, or not at all. This could affect, for example, the power steering and the brake
boosting effect. You will require considerably
more effort to steer and brake. There is a risk
of an accident.
Do not switch off the ignition while driving.
GWARNING
If the parking brake has not been fully
released when driving, the parking brake can:
R overheat and cause a fire
R lose its hold function.
There is a risk of fire and an accident. Release
the parking brake fully before driving off.
!Warm up the engine quickly. Do not use
the engine's full performance until it has
reached operating temperature.
Only shift the automatic transmission to
the desired drive position when the vehicle
is stationary.
Where possible, avoid spinning the drive
wheels when pulling away on slippery
roads. You could otherwise damage the
drive train.
!Avoid high engine speeds when the
engine is cold. The engine's service life
could otherwise be significantly shortened.
Do not use the engine's full performance
until it has reached operating temperature.
!AMG vehicles: at low engine oil temper-
atures below 68 ‡ (+20 †), the maximum
engine speed is restricted in order to pro-
tect the engine. To protect the engine and
maintain smooth engine operation, avoid
driving at full throttle when the engine is
cold.
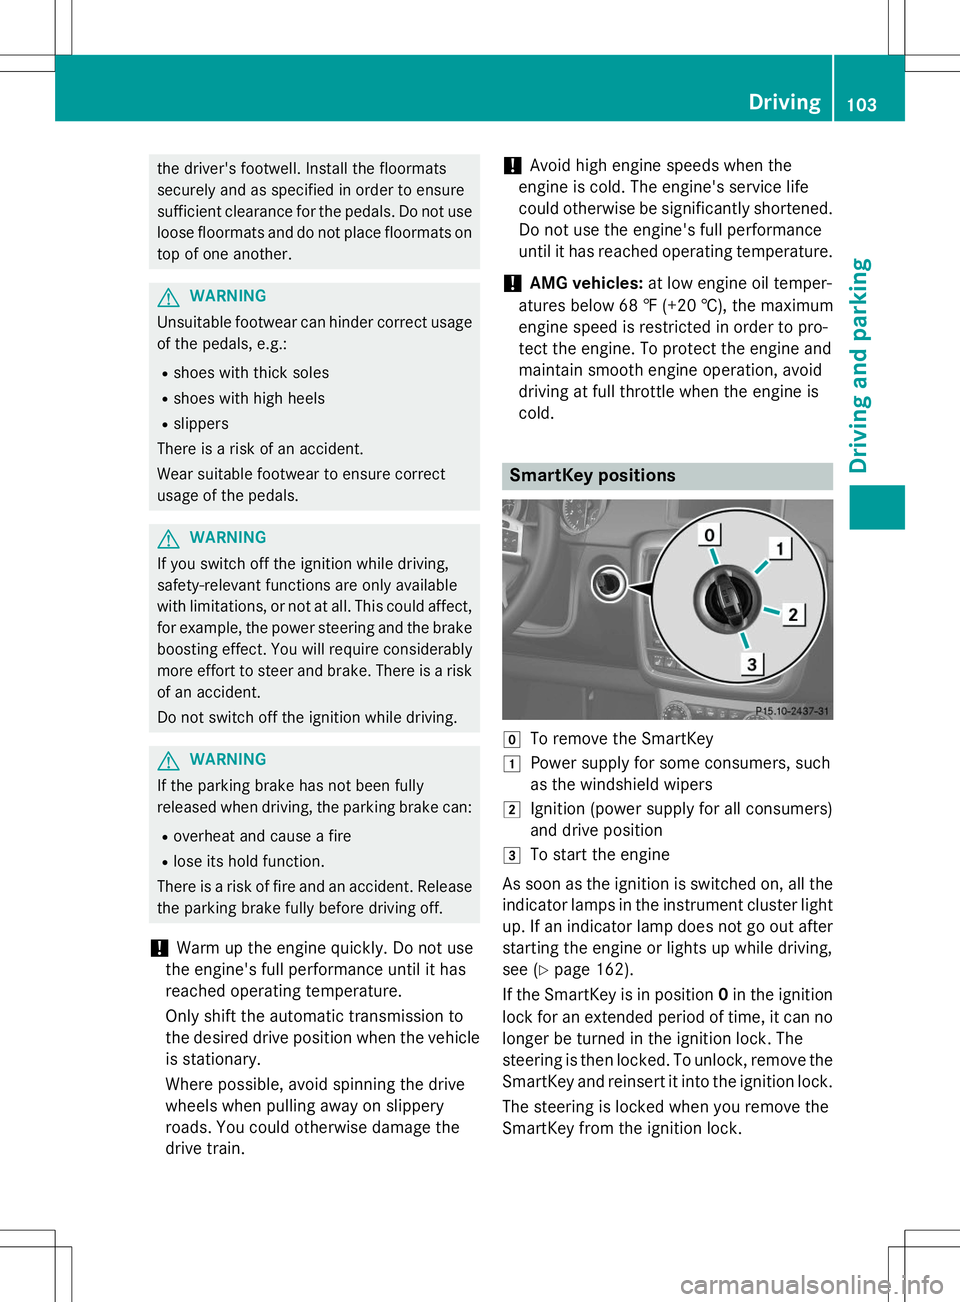
SmartKey positions
gTo remove the SmartKey
1Power supply for some consumers, such
as the windshield wipers
2Ignition (power supply for all consumers)
and drive position
3To start the engine
As soon as the ignition is switched on, all the
indicator lamps in the instrument cluster light up. If an indicator lamp does not go out after
starting the engine or lights up while driving,
see ( Ypage 162).
If the SmartKey is in position 0in the ignition
lock for an extended period of time, it can no
longer be turned in the ignition lock. The
steering is then locked. To unlock, remove the SmartKey and reinsert it into the ignition lock.
The steering is locked when you remove the
SmartKey from the ignition lock.
Driving103
Driving an d parking
Z
Page 109 of 274
Information in the Digital Operator's
Manual
In the Digital Operator's Manual you will find
information on the following topics: RTransmission position and drive program
display
R Transmission positions
R Changing gear
R Driving tips
R Program selector button
R Steering wheel paddle shifters
R Automatic drive program
R Manual drive program
R Shift ranges
R Problems with the transmission
Manual drive program
General information
The manual drive program is only available on AMG vehicles . In manual drive program M,
you can permanently change gear yourself by
using the steering wheel paddle shifters. The
transmission must be in position D. The gear
currently selected and engaged is shown in
the multifunction display.
Manual drive program Mdiffers from drive
programs Eand Swith regard to spontaneity,
responsiveness and smoothness of gear
changes.
Switching on the manual drive program
X Shift the transmission to position D.
X Press the program selector button repeat-
edly until Mappears in the multifunction
display, see Digital Operator's Manual.
Upshifting
!In manual drive program M, the automatic
transmission does not shift up automati-
cally even when the engine limiting speed
for the current gear is reached. When the engine limiting speed is reached, the fuel
supply is cut to prevent the engine from
overrevving. Always make sure that the
engine speed does not reach the red area of
the tachometer. There is otherwise a risk of
engine damage.
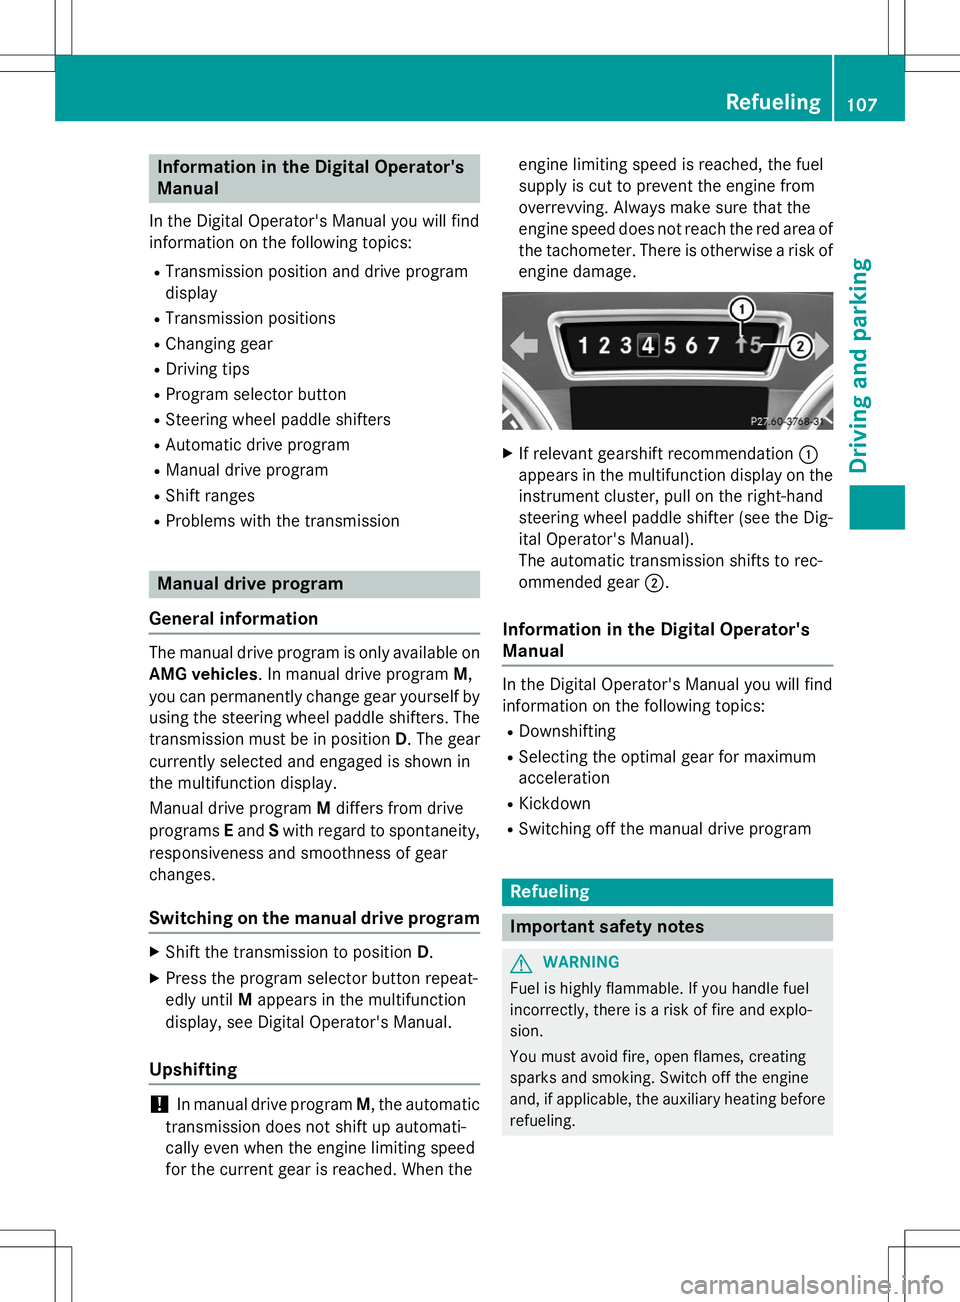
X If relevant gearshift recommendation :
appears in the multifunction display on the instrument cluster, pull on the right-hand
steering wheel paddle shifter (see the Dig-
ital Operator's Manual).
The automatic transmission shifts to rec-
ommended gear ;.
Information in the Digital Operator's
Manual
In the Digital Operator's Manual you will find
information on the following topics:
R Downshifting
R Selecting the optimal gear for maximum
acceleration
R Kickdown
R Switching off the manual drive program
Refueling
Important safety notes
GWARNING
Fuel is highly flammable. If you handle fuel
incorrectly, there is a risk of fire and explo-
sion.
You must avoid fire, open flames, creating
sparks and smoking. Switch off the engine
and, if applicable, the auxiliary heating before
refueling.
Refueling107
Driving and pa rking
Z
Page 113 of 274
GWARNING
If you switch off the ignition while driving,
safety-relevant functions are only available
with limitations, or not at all. This could affect,for example, the power steering and the brake
boosting effect. You will require considerably
more effort to steer and brake. There is a risk
of an accident.
Do not switch off the ignition while driving.
Switching off the engine
Important safety notes
GWARNING
If you switch off the ignition while driving,
safety-relevant functions are only available
with limitations, or not at all. This could affect, for example, the power steering and the brake
boosting effect. You will require considerably
more effort to steer and brake. There is a risk
of an accident.
Do not switch off the ignition while driving.
GWARNING
The automatic transmission switches to neu-
tral position Nwhen you switch off the engine.
The vehicle may roll away. There is a risk of an
accident.
After switching off the engine, always switch
to parking position P. Prevent the parked vehi-
cle from rolling away by applying the parkingbrake.
Information in the Digital Operator'sManual
A description of how to switch off the engine
can be found in the Digital Operator's Manual.
Parking brake
GWARNING
If you must brake the vehicle with the parking brake, the braking distance is considerably
longer and the wheels could lock. There is anincreased danger of skidding and accidents.
Only use the parking brake to brake the vehi-cle when the service brake is faulty. Do not
apply the parking brake too firmly. If the
wheels lock, release the parking brake until
the wheels begin turning again.
GWARNING
If you leave children unsupervised in the vehi- cle, they could set it in motion by, for example:
R release the parking brake.
R shift the automatic transmission out of the
parking position P.
R start the engine.
In addition, they may operate vehicle equip-
ment and become trapped. There is a risk of
an accident and injury.
When leaving the vehicle, always take the
SmartKey with you and lock the vehicle. Never
leave children unsupervised in the vehicle.
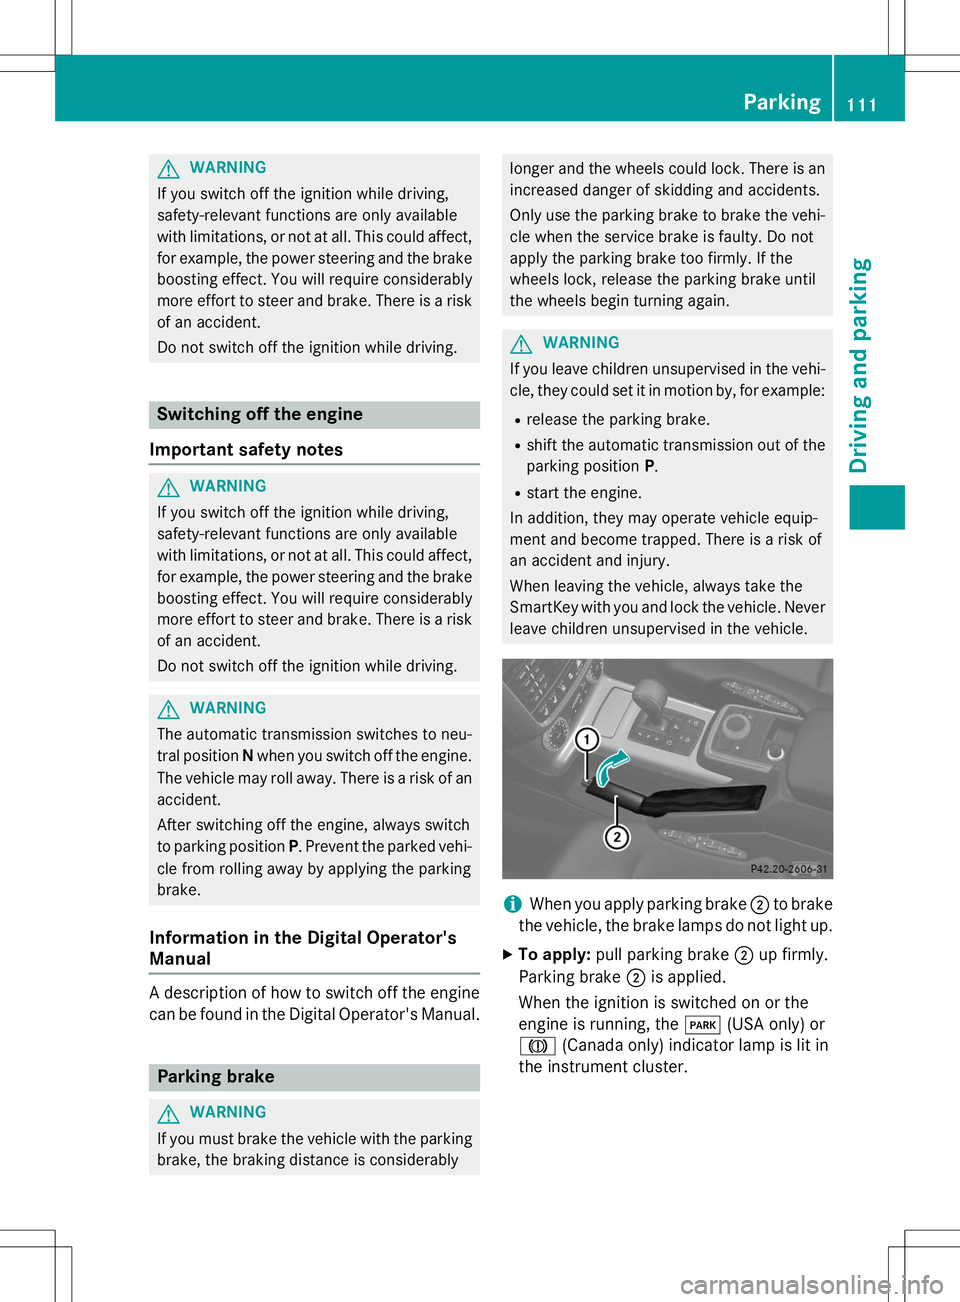
iWhen you apply parking brake ;to brake
the vehicle, the brake lamps do not light up.
X To apply: pull parking brake ;up firmly.
Parking brake ;is applied.
When the ignition is switched on or the
engine is running, the F(USA only) or
J (Canada only) indicator lamp is lit in
the instrument cluster.
Parking111
Driving and parking
Z
Page 115 of 274

Do not place your foot under the brake pedal.Keep the area under the brake pedal free from
obstructions.
If you fail to adapt your driving style, cruise
control can neither reduce the risk of acci-
dent nor override the laws of physics. Cruise
control cannot take account of road, weather and traffic conditions. Cruise control is only
an aid. You are responsible for the distance to
the vehicle in front, for vehicle speed and for braking in good time. Adjust your driving style to the traffic conditions. Only engage cruise
control when the current road, weather and
traffic conditions permit it to be done safely.
Drive carefully and maintain a suitable dis-
tance to the vehicle in front.
Do not use cruise control: R in traffic conditions that do not allow you to
drive at a constant speed, e.g. heavy traffic,
on winding roads or off-road
R on slippery road surfaces. Braking or accel-
erating could cause the drive wheels to lose
traction and the vehicle could then skid
R when there is poor visibility, e.g. due to fog,
heavy rain or snow
General notes
Cruise control maintains a constant road
speed for you. On long and steep downhill
gradients, especially if the vehicle is laden,
you must select shift range 1,2 or 3in good
time. By doing so, you will make use of the
braking effect of the engine. This relieves the load on the brake system and prevents the
brakes from overheating and wearing too
quickly.
Use cruise control only if road and traffic con-
ditions make it appropriate to maintain a
steady speed for a prolonged period. You can store any road speed above 20 mph
(30 km/h).
iCruise control should not be activated
when driving off-road.
Cruise control lever
:To activate or increase speed
;LIM indicator lamp
=To activate at the current speed/last
stored speed
?To activate or reduce speed
ATo switch between cruise control and var-
iable SPEEDTRONIC
BTo deactivate cruise control
You can operate cruise control and variable
SPEEDTRONIC with the cruise control lever.
When you activate cruise control, the stored
speed is shown in the multifunction display
for five seconds.
The LIM indicator lamp on the cruise control
lever indicates which system you have selec- ted:
R LIM indicator lamp off: cruise control is
selected.
R LIM indicator lamp on: variable SPEED-
TRONIC is selected.
Activation conditions
To activate cruise control, all of the following
activation conditions must be fulfilled:
R the parking brake must be released.
R you are driving faster than 20 mph
(30 km/h).
R ESP ®
must be active, but not intervening.
R the transmission must be in position D.
Driving systems113
Driving an d parking
Z