2015 MERCEDES-BENZ G-CLASS SUV brake
[x] Cancel search: brakePage 69 of 274

XIf appropriate for the driving conditions,
engage the LOW RANGE off-road gear
( Y page 132).
Traction control is part of ESP ®
.
Traction control brakes the drive wheels indi-
vidually if they spin. This enables you to pull
away and accelerate on slippery surfaces, for
example if the road surface is slippery on one
side. In addition, more drive torque is trans-
ferred to the wheel or wheels with traction.
Traction control remains active, even if you
deactivate ESP ®
.
Traction control is no longer active above a
speed of approximately 37 mph (60 km/h).
Traction control brakes the drive wheels indi-
vidually if they spin. This enables you to pull
away and accelerate on slippery surfaces, for
example if the road surface is slippery on one
side. In addition, more drive torque is trans-
ferred to the wheel or wheels with traction.
Deactivating/activating ESP®
iObserve the "Important safety notes" sec-
tion ( Ypage 64).
GWARNING
If you deactivate ESP ®
, ESP ®
no longer sta-
bilizes the vehicle. There is an increased risk
of skidding and an accident.
Only deactivate ESP ®
in the situations descri-
bed in the following.
!Avoid spinning the driven wheels for an
extended period with ESP ®
deactivated.
You could otherwise damage the drivetrain.
X To deactivate: press button:until the
å warning lamp lights up in the instru-
ment cluster.
X To activate: press button :until the å
warning lamp goes out in the instrument cluster.
ESP ®
is activated automatically when the
engine is started.
iVehicles with the ECO start/stop func-
tion: the ECO start/stop function automat-
ically switches the engine off when the
vehicle comes to a stop. The engine starts
automatically when the driver wants to pull
away again. ESP ®
remains in its previously
selected status. For example, if ESP ®
was
deactivated before the engine was
switched off, ESP ®
remains deactivated
when the engine is switched on again.
It may be best to deactivate ESP ®
in the fol-
lowing situations:
R when using snow chains
R in deep snow
R on sand or gravel
If you deactivate ESP ®
:
R ESP ®
no longer improves driving stability.
R the engine's torque is no longer limited and
the drive wheels can spin. The spinning of
the wheels results in a cutting action, which
provides better grip.
R traction control is still activated.
R ESP ®
still provides support when you
brake.
R and are driving at above 37 mph (60 km/h)
(on AMG vehicles above 62 mph
(100 km/h)), ESP ®
still intervenes when
one wheel reaches its grip limit even
though it is deactivated.
iIf ESP ®
is deactivated and one or more
wheels start to spin, the ÷warning lamp
in the instrument cluster flashes. In such
situations, ESP ®
will not stabilize the vehi-
cle.
Driving safety systems67
Safety
Z
Page 70 of 274
iIf ESP®
is deactivated, it is reactivated
automatically if you are driving at above
37 mph (60 km/h) (on AMG vehicles above
62 mph (100 km/h)) or you exceed a cer-
tain lateral acceleration.
Trailer stabilization
GWARNING
If road and weather conditions are poor,
trailer stabilization will not be able to prevent the vehicle/trailer combination from swerv-
ing. Trailers with a high center of gravity can
tip over before ESP ®
can detect this. There is
a risk of an accident.
Always adapt your driving style to the prevail- ing road and weather conditions.
Trailer stabilization does not work if ESP ®
is
deactivated because of a malfunction.
If your vehicle with trailer (vehicle/trailer
combination) begins to lurch, you can only
stabilize the vehicle/trailer combination by
depressing the brake firmly.
In this situation, ESP ®
assists you and can
detect if the vehicle/trailer combination
begins to lurch. ESP ®
slows the vehicle down
by braking and limiting the engine output until the vehicle/trailer combination has stabi- lized.
Trailer stabilization is active above speeds of
about 37 mph (60 km/h).
EBD (electronic brake force distribu- tion)
iObserve the "Important safety notes" sec-
tion ( Ypage 64).
GWARNING
If EBD is malfunctioning, the rear wheels can
lock, e.g. under full braking. This increases the
risk of skidding and an accident.
You should therefore adapt your driving style
to the different handling characteristics. Have
the brake system checked at a qualified spe-
cialist workshop.
Observe information regarding indicator and
warning lamps ( Ypage 163) as well as dis-
play messages ( Ypage 148).
EBD monitors and controls the brake pres-
sure on the rear wheels to improve driving
stability while braking.
ADAPTIVE BRAKE
ADAPTIVE BRAKE provides increased braking
safety. In addition to the braking function,
ADAPTIVE BRAKE also has the HOLD function
( Y page 126) and hill start assist
( Y page 105).
Theft deterrent locking system
Immobilizer
X
To activate: remove the SmartKey from
the ignition lock.
X To deactivate: switch on the ignition.
The immobilizer prevents your vehicle from
being started without the correct SmartKey.
When leaving the vehicle, always take the
SmartKey with you and lock the vehicle. The
engine can be started by anyone with a valid
SmartKey that is left inside the vehicle.
iThe immobilizer is always deactivated
when you start the engine.
In the event that the engine cannot be star-
ted when the starter battery is fully
charged, the immobilizer may be faulty.
Contact an authorized Mercedes-Benz
Center or call 1-800-FOR-MERCedes (in the USA) or 1-800-387-0100 (in Canada).
68Theft deterrent locking system
Safety
Page 74 of 274
Useful information
iThis Operator's Manual describes all
models and all standard and optional equip- ment of your vehicle available at the time of
publication of the Operator's Manual.
Country-specific differences are possible.
Please note that your vehicle may not be
equipped with all features described. This
also applies to safety-related systems and
functions.
iRead the information on qualified special-
ist workshops: ( Ypage 28).
SmartKey
Important safety notes
GWARNING
If persons, particularly children are subjected
to prolonged exposure to extreme heat or
cold, there is a risk of injury, possibly even
fatal. Never leave children unattended in thevehicle.
GWARNING
If you attach heavy or large objects to the
SmartKey, the SmartKey could be uninten-
tionally turned in the ignition lock. This could
cause the engine to be switched off. There is arisk of an accident.
Do not attach any heavy or large objects to the
SmartKey. Remove any bulky key rings before
inserting the SmartKey into the ignition lock.
GWARNING
If you attach heavy or large objects to the
SmartKey, the SmartKey could be uninten-
tionally turned in the ignition lock. This could
cause the engine to be switched off. There is a risk of an accident.
Do not attach any heavy or large objects to the
SmartKey. Remove any bulky key rings before
inserting the SmartKey into the ignition lock.
SmartKey functions
GWARNING
If children are left unsupervised in the vehicle, they could:
R open the doors, thus endangering other
people or road users.
R get out and disrupt traffic.
R operate the vehicle's equipment.
Additionally, children could set the vehicle in
motion if, for example, they:
R release the parking brake.
R shift the automatic transmission out of park
position P or shift manual transmission into
neutral.
R start the engine.
There is a risk of an accident and injury.
When leaving the vehicle, always take the
SmartKey with you and lock the vehicle. Never leave children or animals unattended in the
vehicle. Always keep the SmartKey out of
reach of children.
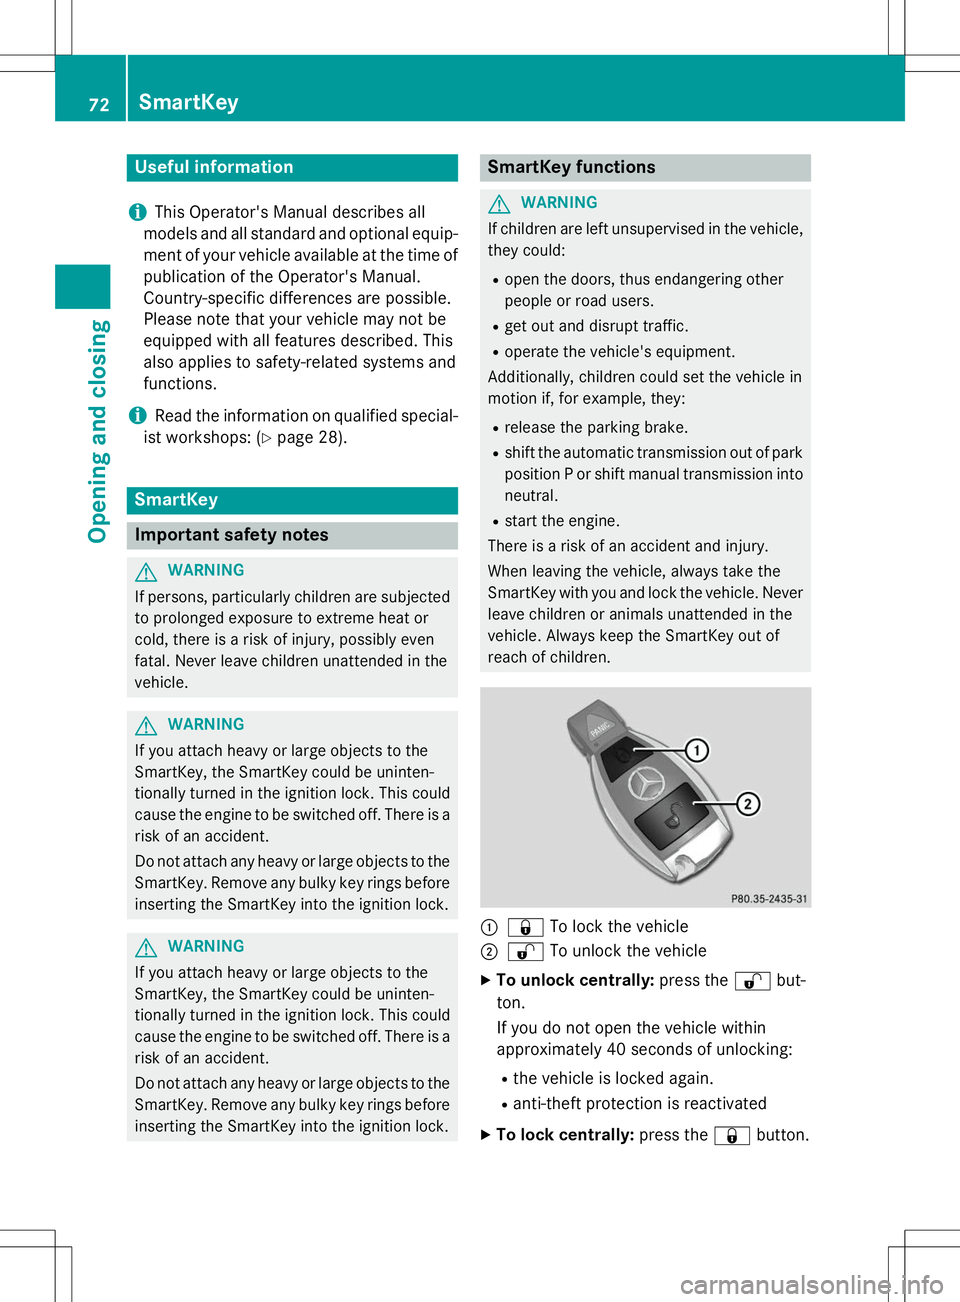
:& To lock the vehicle
;%To unlock the vehicle
X To unlock centrally: press the%but-
ton.
If you do not open the vehicle within
approximately 40 seconds of unlocking: R the vehicle is locked again.
R anti-theft protection is reactivated
X To lock centrally: press the&button.
72SmartKey
Opening and closing
Page 77 of 274
Doors
Important safety notes
GWARNING
When leaving the vehicle, always remove the
SmartKey from the ignition lock. Always take
the SmartKey with you and lock the vehicle.
Do not leave children unsupervised in the
vehicle, even if they are secured in a child
restraint system, and do not give them accessto an unlocked vehicle. A child's unsupervised
access to a vehicle could result in an accident
and/or serious personal injury. They could: R injure themselves on vehicle parts
R be seriously or fatally injured by extreme
heat or cold
R injure themselves or have an accident with
vehicle equipment that may still be in oper-
ation even after the SmartKey has been
removed from the ignition, such as the seat
adjustment, steering wheel adjustment or
memory function.
If children open a door, they could cause
severe or even fatal injury to other persons; if they get out of the vehicle, they could injure
themselves when doing so or be seriously or
even fatally injured by any passing traffic.
Do not expose the child restraint system to
direct sunlight. The child restraint system's
metal parts, for example, could become very
hot, and a child could be burned on these
parts.
GWARNING
Do not carry heavy or hard objects in the
passenger compartment or cargo compart-
ment unless they are firmly secured in place.
Unsecured or improperly positioned cargo
increases a child's risk of injury in the event of
R strong braking maneuvers
R sudden changes of direction
R an accident
GWARNING
If children are left unsupervised in the vehicle,
they could:
R open the doors, thus endangering other
people or road users.
R get out and disrupt traffic.
R operate the vehicle's equipment.
Additionally, children could set the vehicle in
motion if, for example, they:
R release the parking brake.
R shift the automatic transmission out of park
position P or shift manual transmission into
neutral.
R start the engine.
There is a risk of an accident and injury.
When leaving the vehicle, always take the
SmartKey with you and lock the vehicle. Never leave children or animals unattended in the
vehicle. Always keep the SmartKey out of
reach of children.
Information in the Digital Operator's
Manual
In the Digital Operator's Manual you will find
information on the following topics: R Unlocking and opening doors from the
inside
R Centrally locking and unlocking the vehicle
from the inside
R Automatic locking feature
R Power closing
R Unlocking the driver's door (mechanical
key)
R Locking the vehicle (mechanical key)
R Opening and closing the rear door
Doors75
Opening and closing
Z
Page 95 of 274

The bulb may explode if:
R you touch it
R it is hot
R you drop it
R you scratch it
Only operate bulbs in enclosed lamps
designed for that purpose. Only install spare
bulbs of the same type and the specified volt- age.
Marks on the glass tube reduce the service
life of the bulbs. Do not touch the glass tube
with your bare hands. If necessary, clean the
glass tube when cold with alcohol or spirit and
rub it off with a lint-free cloth.
Protect bulbs from moisture during opera-
tion. Do not allow bulbs to come into contact
with liquids.
Xenon bulbs
If your vehicle is equipped with Xenon bulbs,
you can recognize this by the following: the
cone of light from the Xenon bulbs moves
from the top to the bottom and back again
when you start the engine. For this to be
observed, the lights must be switched on
before starting the engine.
Bulbs and lamps are an important aspect of
vehicle safety. You must therefore make sure that these function correctly at all times.
Have the headlamp setting checked regularly.
LED lamps
You can replace neither Xenon bulbs nor LED
bulbs. Have LED bulbs changed at a qualified specialist workshop.
Bulbs and lamps are an important aspect of
vehicle safety. You must therefore make sure
that these function correctly at all times.
Have the headlamp setting checked regularly.
Before changing bulbs
Have the following bulbs replaced at a quali-
fied specialist workshop:
R Additional turn signals in the exterior mir-rors
R High-mounted brake lamp R
High-beam/low-beam headlamps (Xenonbulbs)
R Daytime running lamps
R Parking lamps/standing lamps
R License plate lamp
iIndividual segments of the license plate
lamp LEDs may fail without a display mes-
sage appearing in the multifunction dis-
play. Regularly check the license plate
lamp. If necessary, visit a qualified special-
ist workshop.
You can replace the following bulbs:
R Fog lamp/cornering light with fog lamp
function
R Turn signal lamp (front)
R Brake/tail lamp
R Turn signal lamp (rear)
R Tail lamps/standing lamps
R Backup lamp
R Rear Fog Lamp
R Side marker lamps
Other bulbs
There are bulbs other than the Xenon bulbs
that you cannot replace yourself. Only replace the bulbs listed ( Ypage 94). Have the bulbs
that you cannot replace yourself replaced at a
qualified specialist workshop.
If you require assistance replacing bulbs, con-
sult a qualified specialist workshop.
Do not touch the glass tube of new bulbs with your bare hands. Even minor contamination
can burn into the glass surface and reduce
the service life of the bulbs. Always use a lint-
free cloth or only touch the base of the bulb
when installing.
Only use bulbs of the correct type.
If the new bulb still does not light up, consult a qualified specialist workshop.
Bulbs and lamps are an important aspect of
vehicle safety. You must therefore make surethat these function correctly at all times.
Have the headlamp setting checked regularly.
Replacing bulbs93
Lights and windshield wipers
Z
Page 96 of 274

Overview: changing bulbs/bulb types
Front bulbs
You can replace the following bulbs. The bulb
type can be found in the legend.
:Turn signal lamp: 1156 NA
;Side marker lamp: T 4 W
=Cornering light function with fog lamp
function: H11 55 W (except AMG vehicles)
Rear bulbs
You can replace the following bulbs. The bulb
type can be found in the legend.
:Tail lamp/standing lamp: W 5 W
;Brake lamp/tail lamp: P 21/5 W
=Turn signal lamp: PY 21 W
?Side marker lamp: T 4 W
ABackup lamp: P 21 W
BRear fog lamp: P 21 W
Changing the front bulbs
Side marker lamps
!Do not fasten the screws too tightly. You
could otherwise damage the lens.
Front side marker lamp (example)
The bulbs of the front and rear side marker
lamps are changed in the same way.
X Switch off the lights.
X Unscrew screws :.
X Remove housing ;.
X
Remove dust cover =.
X Push the catch to the side and pull the bulb
holder with the bulb out of housing ;.
94Replacing bulbs
Lights and windshield wipers
Page 104 of 274
Useful information
iThis Operator's Manual describes all
models and all standard and optional equip- ment of your vehicle available at the time of
publication of the Operator's Manual.
Country-specific differences are possible.
Please note that your vehicle may not be
equipped with all features described. This
also applies to safety-related systems and
functions.
iRead the information on qualified special-
ist workshops: ( Ypage 28).
Notes on breaking-in a new vehicle
Important safety notes
New and replaced brake pads and discs only
reach their optimum braking effect after sev-
eral hundred kilometers of driving. Compen-
sate for this by applying greater force to the
brake pedal.
The first 1000 miles (1500 km)
The more you look after the engine when it is
new, the more satisfied you will be with its
performance in the future. R You should therefore drive at varying vehi-
cle and engine speeds for the first
1,000 miles (1,500 km).
R Avoid heavy loads, e.g. driving at full throt-
tle, during this period.
R Change gear in good time, before the tach-
ometer needle is Ôof the way to the red
area of the tachometer.
R Do not manually shift to a lower gear to
brake the vehicle.
R Try to avoid depressing the accelerator
pedal beyond the point of resistance (kick-
down).
R Only select shift ranges 3,2 or 1when driv-
ing slowly, e.g. in mountainous terrain. After 1,000 miles (1,500 km), you can
increase the engine speed gradually and bring
the vehicle to full speed.
Additional breaking-in notes for AMG vehi- cles:
R Do not drive faster than 85 mph
(140 km/h) for the first 1,000 miles
(1,500 km).
R Only allow the engine to reach a maximum
engine speed of 4,500 rpm briefly.
R Change gear in good time.
R Avoid driving off-road before the differen-
tial oil change at 2,000 miles (3,000 km).
R Ideally, for the first 1,000 miles (1,500 km),
drive in program C.
iYou should also observe these breaking-
in notes if the engine or parts of the drive
train on your vehicle have been replaced.
iAlways observe the respective speed lim-
its.
AMG vehicles with self-locking rear
axle differential
Change the oil after a breaking-in period of
2,000 miles (3,000 km) to improve protection
of the differential. This oil change prolongs
the service life of the differential. Have the oil change carried out at a qualified specialist
workshop. Mercedes-Benz recommends that
you use an authorized Mercedes-Benz Center for this purpose.
Driving
Important safety notes
GWARNING
Objects in the driver's footwell can restrict thepedal travel or obstruct a depressed pedal.
The operating and road safety of the vehicle is
jeopardized. There is a risk of an accident.
Make sure that all objects in the vehicle are
stowed correctly, and that they cannot enter
102Driving
Driving and parking
Page 105 of 274
the driver's footwell. Install the floormats
securely and as specified in order to ensure
sufficient clearance for the pedals. Do not useloose floormats and do not place floormats ontop of one another.
GWARNING
Unsuitable footwear can hinder correct usage of the pedals, e.g.:
R shoes with thick soles
R shoes with high heels
R slippers
There is a risk of an accident.
Wear suitable footwear to ensure correct
usage of the pedals.
GWARNING
If you switch off the ignition while driving,
safety-relevant functions are only available
with limitations, or not at all. This could affect, for example, the power steering and the brake
boosting effect. You will require considerably
more effort to steer and brake. There is a risk
of an accident.
Do not switch off the ignition while driving.
GWARNING
If the parking brake has not been fully
released when driving, the parking brake can:
R overheat and cause a fire
R lose its hold function.
There is a risk of fire and an accident. Release
the parking brake fully before driving off.
!Warm up the engine quickly. Do not use
the engine's full performance until it has
reached operating temperature.
Only shift the automatic transmission to
the desired drive position when the vehicle
is stationary.
Where possible, avoid spinning the drive
wheels when pulling away on slippery
roads. You could otherwise damage the
drive train.
!Avoid high engine speeds when the
engine is cold. The engine's service life
could otherwise be significantly shortened.
Do not use the engine's full performance
until it has reached operating temperature.
!AMG vehicles: at low engine oil temper-
atures below 68 ‡ (+20 †), the maximum
engine speed is restricted in order to pro-
tect the engine. To protect the engine and
maintain smooth engine operation, avoid
driving at full throttle when the engine is
cold.
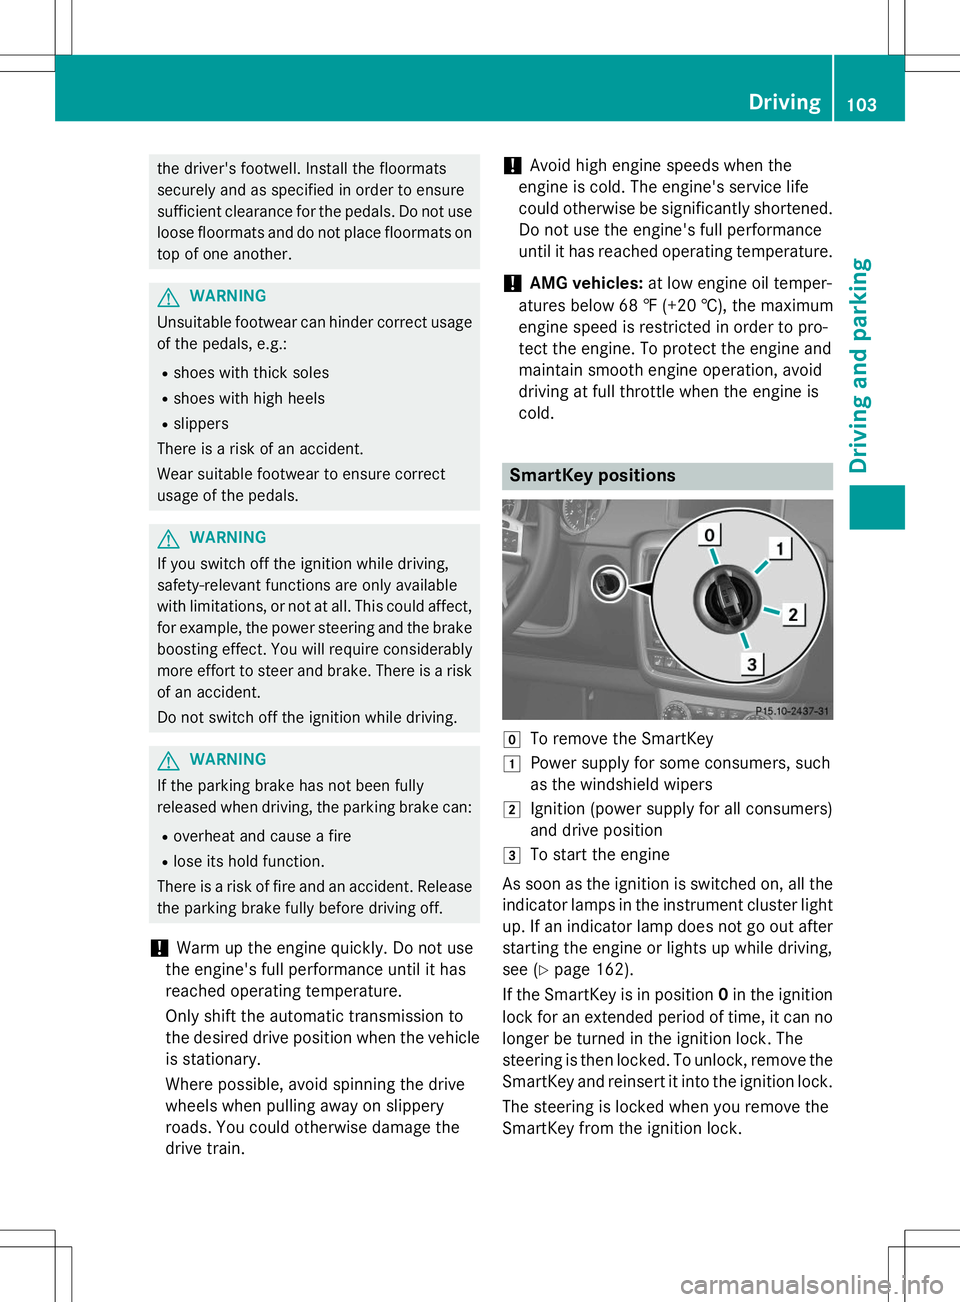
SmartKey positions
gTo remove the SmartKey
1Power supply for some consumers, such
as the windshield wipers
2Ignition (power supply for all consumers)
and drive position
3To start the engine
As soon as the ignition is switched on, all the
indicator lamps in the instrument cluster light up. If an indicator lamp does not go out after
starting the engine or lights up while driving,
see ( Ypage 162).
If the SmartKey is in position 0in the ignition
lock for an extended period of time, it can no
longer be turned in the ignition lock. The
steering is then locked. To unlock, remove the SmartKey and reinsert it into the ignition lock.
The steering is locked when you remove the
SmartKey from the ignition lock.
Driving103
Driving an d parking
Z