2015 MERCEDES-BENZ E-CLASS SALOON wheel
[x] Cancel search: wheelPage 92 of 497
You can prevent the intervention of PRE-
SAFE ®
Brak eata ny tim eby:
R depressing the accelerator pedal further
R activatin gkickdown
R releasin gthe brak epedal
The braking action of PRE-SAFE ®
Brak eis
ended automatically if:
R you manoeuvre to avoid the obstacle
R there is no longer arisk of collision
R there is no longer an obstacle detected in
front of your vehicle STEER CONTROL
General notes STEER CONTROL helps you by transmitting a
noticeable steerin gforce to the steering
wheel in the direction required for vehicle
stabilisation.
This steerin gsupport is provided in particular
if:
R both right wheels or both left wheels are on
as lippery road surfac ewhen you brake
heavily
R the vehicle starts to skid
Important safet ynotes i
Observe the "Importan
tsafet ynotes" sec-
tion (Y page 77).
No steerin gsupport is provided by STEER
CONTROL ,if:
R ESP ®
is malfunctioning
R the steerin gisfaulty
Power steerin gwill, however ,continue to
function. Protection against theft
Immobiliser
The immobiliser prevent syour vehicle from
being started without the correc tkey. X
To activat ewith th ekey: remove the key
fro mt he ignition lock.
X To activat ewith KEYLESS-GO: switchthe
ignition off and open the driver's door.
X To deactivate: switchont he ignition.
When leavin gthe vehicle, always tak ethe key
with you and lock the vehicle. Anyone can
star tthe engin eifavalid key has been left
inside the vehicle.
i The immobiliser is always deactivated
when you star tthe engine. ATA (Anti-Theft Alar
msystem) X
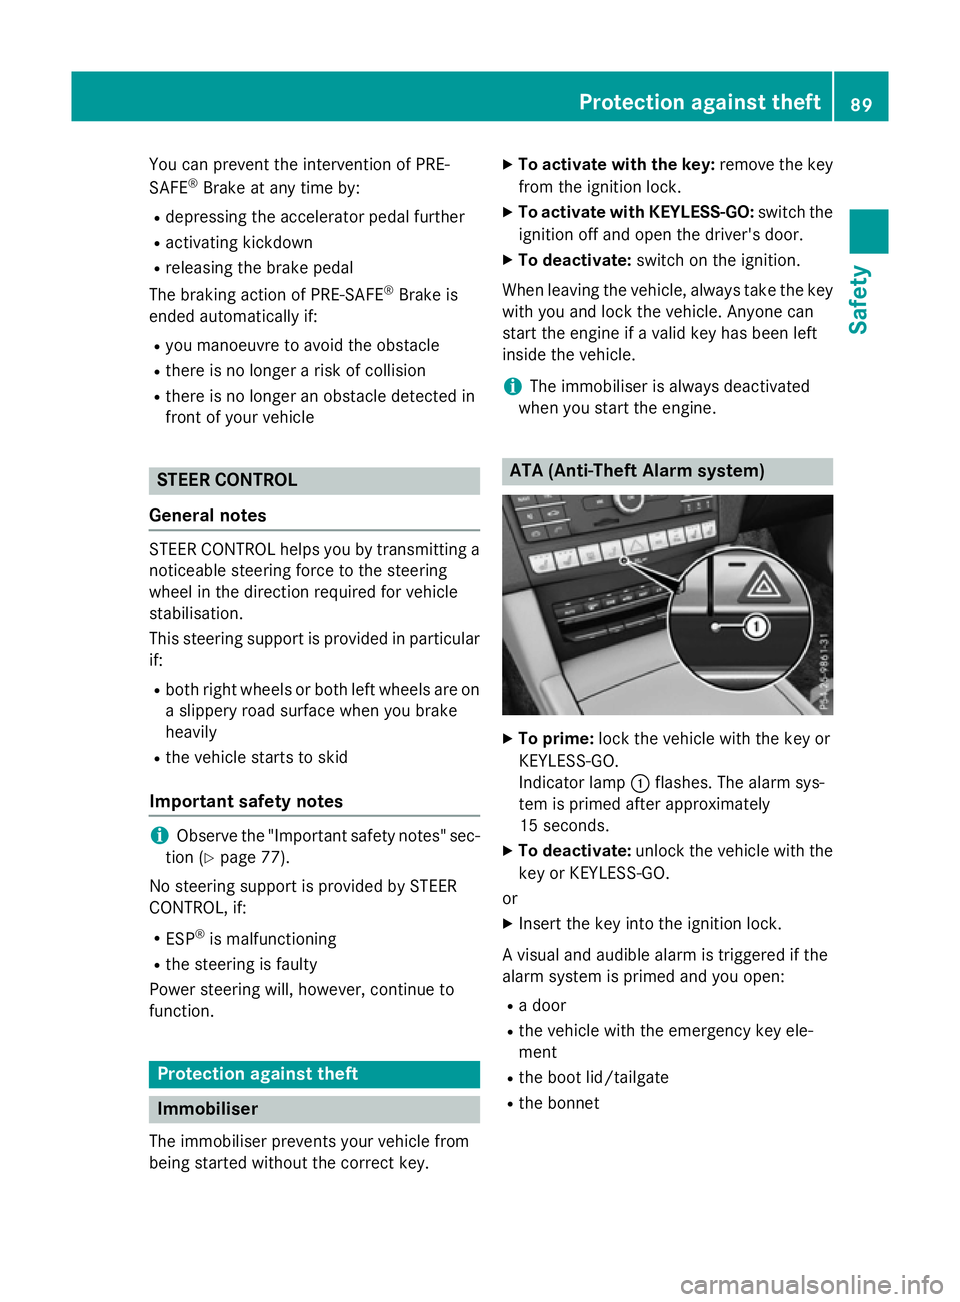
To prime: lock the vehicle with the key or
KEYLESS-GO.
Indicator lamp :flashes .The alarm sys-
tem is prime dafter approximately
15 seconds.
X To deactivate: unlockthe vehicle with the
key or KEYLESS-GO.
or X Insert the key int othe ignition lock.
Av isual and audible alarm is triggered if the
alarm system is primed and you open:
R ad oor
R the vehicle with the emergenc ykey ele-
ment
R the boot lid/tailgate
R the bonnet Protection against theft
89Safety Z
Page 103 of 497

Problem
Possible causes/consequences and
M
MSolutions The engine cannot be
started using the key. The on-board voltage is too low.
X Switch off non-essential consumers, e.g. seat heating or interior
lighting, and try to start the engine again.
If this does not work:
X Check the starter battery and charge it if necessary
(Y page 404).
or
X Jump-start the vehicle (Y page 405).
or
X Consult aqualified specialist workshop. Only for vehicles with
manual transmission:
The engine cannot be
started using the key. The steering lock is mechanically blocked.
X Remove the key and reinsert it into the ignition lock. While doing
this, turn the steering wheel in both directions. The engine cannot be
started using KEYLESS-
GO. The key is in the
vehicle. The vehicle is locked.
X Unlock the vehicle and try to start the vehicle again. There is interference from
apowerful source of radio waves.
X Start your vehicle with the key in the ignition lock. Doors
Important safety notes
United Kingdom only: G
WARNING
When the double locks are activated, the
doors can no longer be opened from the
inside. People in the vehicle can no longer get out, e.g. in hazardous situations. There is a
risk of injury.
Therefore, do not leave any people unsuper-
vised in the vehicle, particularly children, eld-
erly people or people in need of special assis-
tance. Do not activate the double lock when
people are in the vehicle.
If the vehicle has been locked from the out-
side, the double lock function is activated as
standard. It is then not possible to open the
doors from inside the vehicle. You can deac- tivate the double lock function by deactivat-
ing the interior motion sensor (Y page 91).
The doors can then be opened from the inside after the vehicle has been locked from the
outside.
The anti-theft alarm system is triggered if thedoor is opened from the inside. Switch off the
alarm (Y page 89).
All countries: G
WARNING
If children are left unsupervised in the vehicle, they could:
R open doors, thereby endangering other per-
sons or road users
R get out and be struck by oncomingt raffic
R operate vehicle equipment and become
trapped, for example 100
DoorsOpening and closing
Page 105 of 497
tivate the double lock functio
nbydeactivat-
ing the interior motion senso r(Ypage 91).
Fo ra ll countries: Youc an onl yopent he rear
doors fro minsid ethe vehicl eiftheya renot
secured by the child-proo floc ks (Y page 76).
When aloc ked door is opene dfromi nsid ethe
vehicle, the previou sunlocking proces swill
be observe difthe vehicl ehasbeen:
R locked with the locking button for the cen-
tra lloc king or
R locked automatically
Th ev ehicl ewillbef ullyunlocke difithadpre-
viousl ybeenf ully unlocked. Onl ythe door
which ha sbeeno penedf romt he insid eis
unlocke difonlyt he driver's door ha dbeen
previousl yunlocked. Automatic lockin
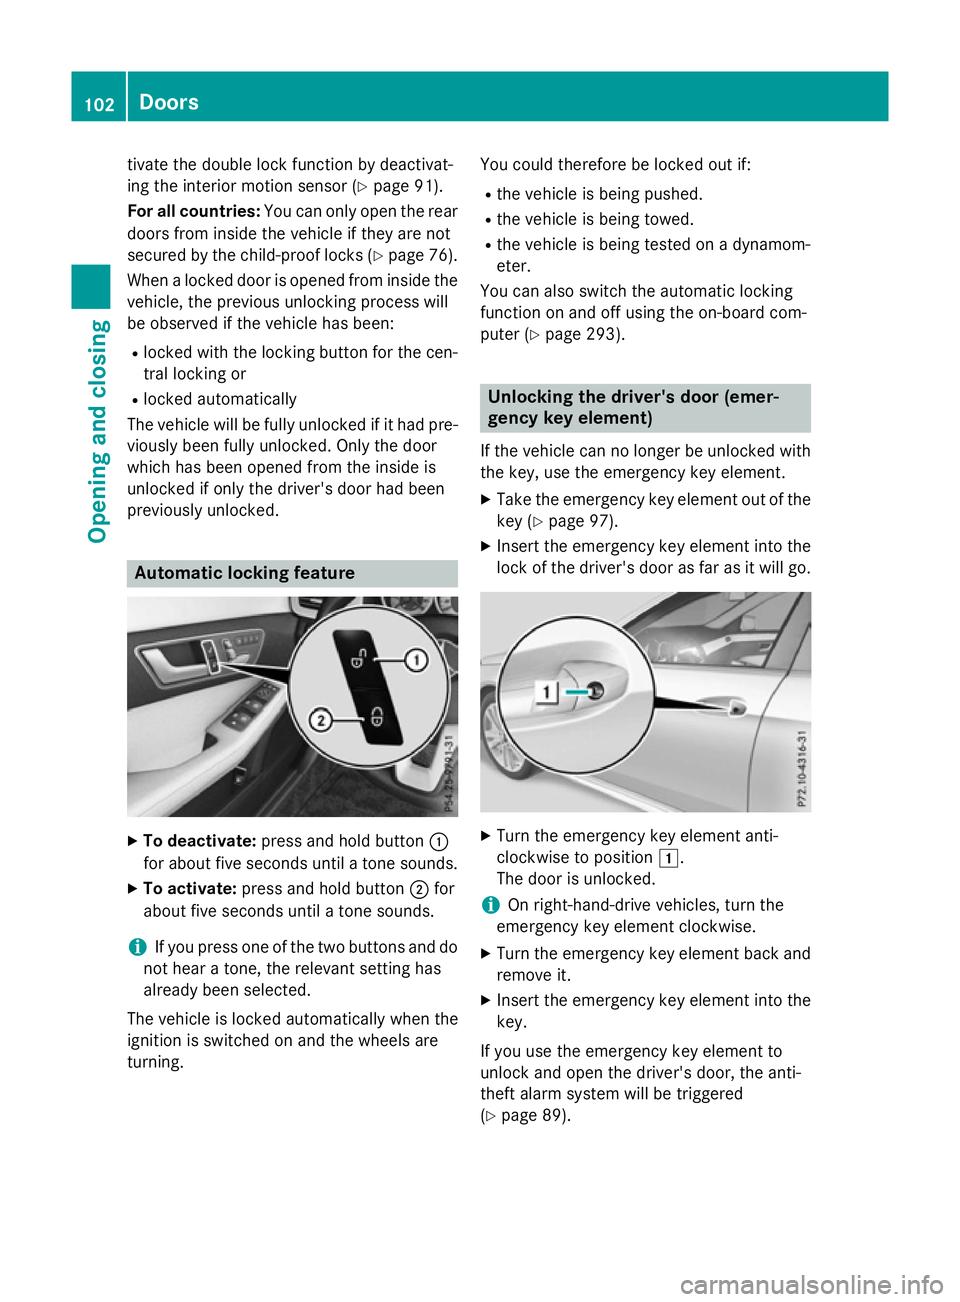
gfeature X
To deactivate: press and hold button :
for abou tfives econd suntilat one sounds.
X To activate: press and hold button ;for
abou tfives econd suntilat one sounds.
i If yo
upress one of the two buttons and do
not hear atone ,the relevant setting has
already been selected.
Th ev ehicl eislocked automaticall ywhent he
ignition is switched on and the wheels are
turning. Yo
uc ould therefore be locked ou tif:
R the vehicl eisbeing pushed.
R the vehicl eisbeing towed.
R the vehicl eisbeing tested on adynamom-
eter.
Yo uc an also switch the automatic locking
functio nonand off using the on-board com-
puter (Y page 293). Unlockin
gthe driver' sdoor(em er-
genc ykeyelement)
If the vehicl ecan no longe rbeunlocke dwith
the key ,use the emergency key element.
X Take the emergency key element ou tofthe
key (Y page 97).
X Insert the emergency key element into the
lock of the driver's door as fa rasitwillg o. X
Turn the emergency key element anti-
clockwise to position 1.
Th ed oorisu nlocked.
i On right-hand-drive vehicles
,tur nt he
emergency key element clockwise.
X Turn the emergency key element back and
remove it.
X Insert the emergency key element into the
key.
If yo uusethe emergency key element to
unlock and open the driver's door, the anti-
theft alar msystemw illbet riggered
(Y page 89). 102
DoorsOpenin
gand closing
Page 124 of 497
Useful information
............................122
Correct driver's seat position ..........122
Seats .................................................. 123
Steering wheel .................................. 133
Mirrors ............................................... 136
Memor yfunction ............................... 139 121Seats, steering wheel and mirrors
Page 125 of 497

Useful information
i This Owner's Manual describes all mod-
els, series and optional equipment for your
vehicle that were available at the time of
going to press. National variation sare pos-
sible. Not ethat your vehicle may not be
equipped with all of the function sdescri-
bed. This is also the case for system sand
function srelevan ttosafety.
i Read the information on qualified special-
ist workshops: (Y page 27). Correct driver's seat position
G
WARNING
You could lose contro lofthe vehicle while
drivin gifyou:
R adjust the driver' sseat, steering wheel or
mirrors
R faste nthe seat belt
There is arisk of an accident.
Adjust the driver' sseat, head restraint ,steer-
ing wheel and mirrors and faste nyour seat
belt before starting the engine. X
Observ ethe safet yguidelines on seat
adjustment (Y page 123).
X Make sure that seat =is correctly adjus-
ted.
Manual and electrical seat adjustment
(Y page 124)
Electrical seat adjustment (Y page 124)
When adjusting the seat, make sure that:
R you are as far away from the driver' sairbag
as possible
R you are sitting in anormal upright position
R you can faste nthe seat belt properly
R you have moved the backrest to an almost
vertical position
R you have set the seat angle so that your
thighs are gently supported
R you can depress the pedals properly
X Check whether the head restraint is adjus-
ted correctly.
When doing so, make sure that you have
adjusted the head restraint so that the back
of your head is supported at eye level by the centre of the head restraint.
X Observ ethe safet yguidelines on steering
wheel adjustment (Y page 133).
X Make sure that steering wheel :is adjus-
ted correctly.
Adjustin gthe steering wheel manually
(Y page 133)
Adjustin gthe steering wheel electrically
(Y page 134)
When adjusting the steering wheel, make
sure that:
R you can hold the steering wheel with your
arms slightly bent
R you can move your legs freely
R you can see all the displays in the instru-
ment cluster clearly
X Observ ethe safet yguidelines for seat belts
(Y page 46).
X Check whether you have fastened seat
belt ;properly (Y page 48).122
Correct driver's seat positionSeats, steering wheel and mirrors
Page 126 of 497
The seat belt should:
R fit snugly across your body
R be routed across the middle of your shoul-
der
R be routed across your hips in the pelvic
area
X Before starting off, adjust the rear-view mir-
ror and the exterior mirrors so that you
have agood view of road and traffic condi-
tions (Y page 136).
X Vehicles with amemor yfunction: save
the seat, steerin gwheel and exterior mirror
settings with the memory function
(Y page 139). Seats
Important safety notes
G
WARNING
If children adjust the seats, they could
become trapped, especially if they are unat-
tended. There is arisk of injury.
When leaving the vehicle, alway stake the key
with you and lock the vehicle. Never leave
children unattended in the vehicle.
The seats can still be adjusted when there is
no key in the ignition lock. G
WARNING
The head restraints cannot provide the inten-
ded protection unless they are fitted and
adjusted correctly. There is an increased risk of injury to the head and neck in the event of
an accident or sudden braking, for example.
Always drive with the head restraints fitted.
Ensure that the centre of the head restraints
support the back of each vehicle occupant's
head at eye level before driving off.
Observe the safety notes on "Airbags"
(Y page 50) and "Children in the vehicle"
(Y page 58). G
WARNING
You could lose control of the vehicle while
driving if you:
R adjust the driver's seat, steerin gwheel or
mirrors
R fasten the seat belt
There is arisk of an accident.
Adjust the driver's seat, head restraint, steer-
ing wheel and mirrors and fasten your seat
belt before starting the engine. G
WARNING
If you adjust the seat height carelessly, you or other vehicle occupant scould be trapped and
thereby injured. Children in particular could
accidentally press the electrical seat adjust-
ment button sand become trapped. There is a
risk of injury.
While moving the seats, make sure that your
hands or other body parts do not get under the
lever assembly of the seat adjustmen tsys-
tem. G
WARNING
When adjusting aseat, you or another vehicle
occupant could become trapped by the guide rail of the seat, for instance. There is arisk of
injury.
Make sure that no one has any part of their
body within the sweep of the seat when
adjusting it.
! To avoid damage to the seats and the seat
heating, observe the following information:
R do not spill any liquids on the seats. If
liquid is spilled on the seats, dry them as
soon as possible.
R if the seat covers are damp or wet, do not
switch on the seat heating. The seat
heating should also not be used to dry
the seats.
R clean the seat covers as recommended;
see "Interior care".
R do not transport heavy loads on the
seats. Do not place sharp object sonthe Seats
123Seats, steering wheel and mirrors Z
Page 127 of 497
seat cushions, e.g. knives, nails or tools.
The seats should only be occupied by
passengers, if possible.
R when the seat heating is in operation, do
not cover the seats with insulating mate-
rials, e.g. blankets, coats, bags, seat cov- ers, child seats or booster seats.
! Make sure that there are no objects in the
footwell under or behind the seats when
moving the seats back. There is arisk that
the seats and/or the objects could be dam- aged.
i The head restraints in the front seats are
fitted with the NECK-PRO system
(Y page 55). For this reason, it is not pos-
sible to remove the head restraints from
the front seats.
Vehicles without the through-loading fea-
ture: the head restraints cannot be
removed from the rear-compartment
seats.
For more information, contact aqualified
specialist workshop.
i Further related subjects:
R Through-loading facility in the rear bench
seat (Saloon)
R EASY-PACK through-loading facility in
the rear bench seat (Estate)
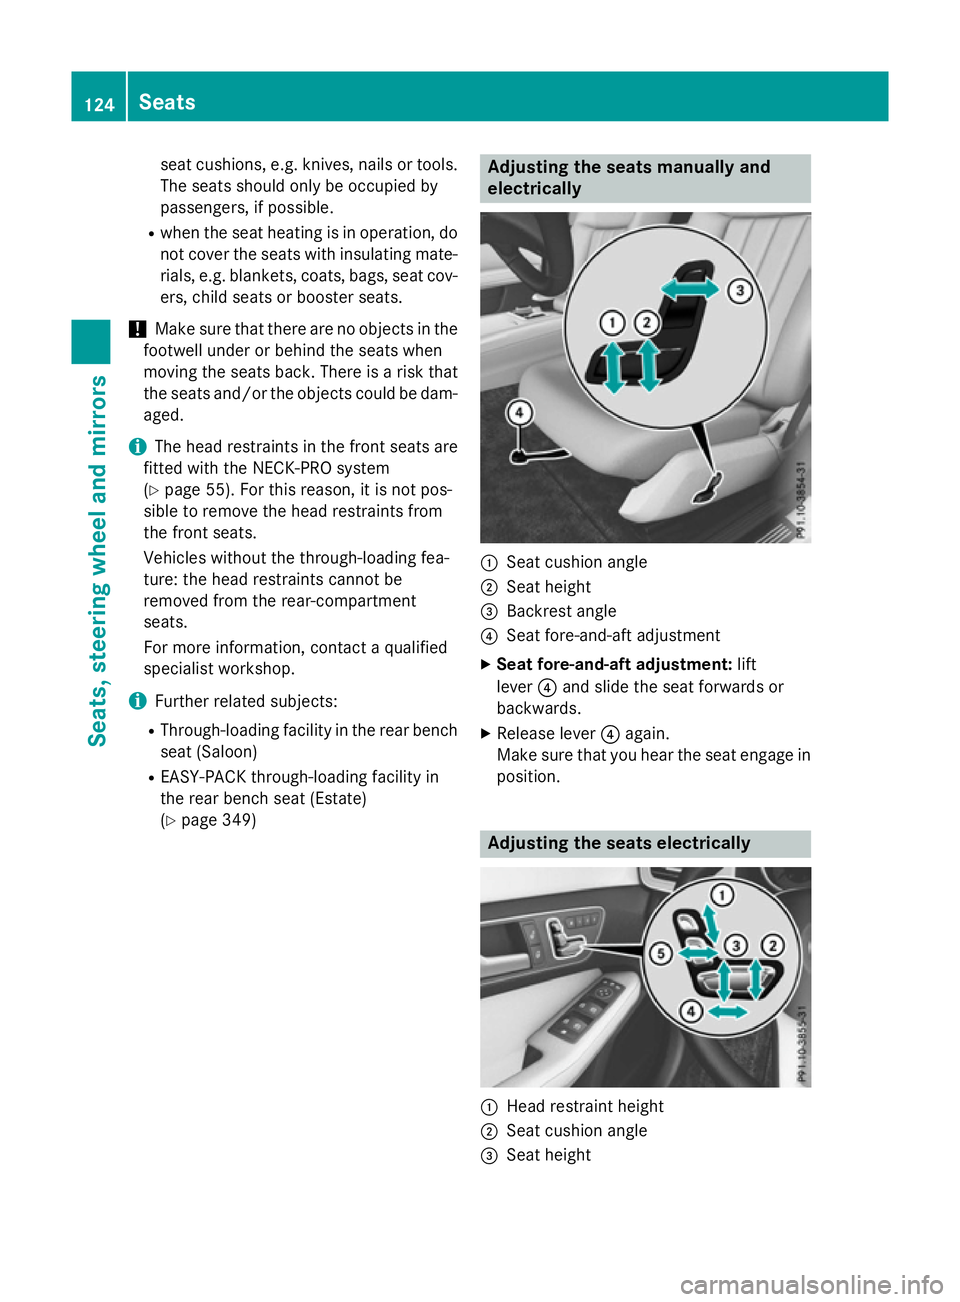
(Y page 349) Adjusting the seats manually and
electrically
:
Seat cushion angle
; Seat height
= Backrest angle
? Seat fore-and-aft adjustment
X Seat fore-and-aft adjustment: lift
lever ?and slide the seat forwards or
backwards.
X Release lever ?again.
Make sure that you hear the seat engage in
position. Adjusting the seats electrically
:
Head restraint height
; Seat cushion angle
= Seat height 124
SeatsSeats, steering wheela
nd mirrors
Page 128 of 497
?
Sea tfore-and-aft adjustment
A Backrest angle
i Vehicles with memory function: if PRE-
SAFE ®
is activate dand the front-passenger
sea tisinanu nfavourable position, it is
move dtoab etter position.
i Yo
uc an store the sea tsettings using the
memory function (Y page 139).
i Vehicles with the through-loading feature
and memory function: if yo ufoldd owna
rea rseatb ackrest, the respective front
sea tism ovedforward sslightl yifneces-
sary.
i Vehicles with memory function: when the
sea tism ovedforward sorbackwards ,the
headrest is move dupordowna utomati-
cally. Adjustin
gthe hea drestraints
Important safety notes G
WARNING
Yo uc ould lose contro lofthe vehicl ewhile
driving if you:
R adjus tthe driver' sseat, steering wheel or
mirrors
R fasten the sea tbelt
There is ariskofana ccident.
Adjust the driver' sseat, hea drestraint, steer-
ing wheel and mirrors and fasten your seat
belt before starting the engine. G
WARNING
The hea drestraints canno tprovid ethe inten-
de dp rotectio nunless they are fitte dand
adjusted correctly .There is an increased risk
of injury to the hea dand neck in the event of
an accident or sudden braking, for example.
Alway sdrive with the hea drestraints fitted.
Ensur ethatthe centre of the hea drestraints
support the back of each vehicl eoccupant's
hea date yelevel before driving off. Do not interchange the hea
drestraints of the
front and rea rseats. Otherwise, yo uwilln ot
be able to adjus tthe height and angle of the
hea drestraints to the correct position.
Adjust the hea drestraint fore-and-aft posi-
tion so tha titisasc lose as possible to the
back of your head.
Observe the important safety notes regarding the seats (Y page 123).
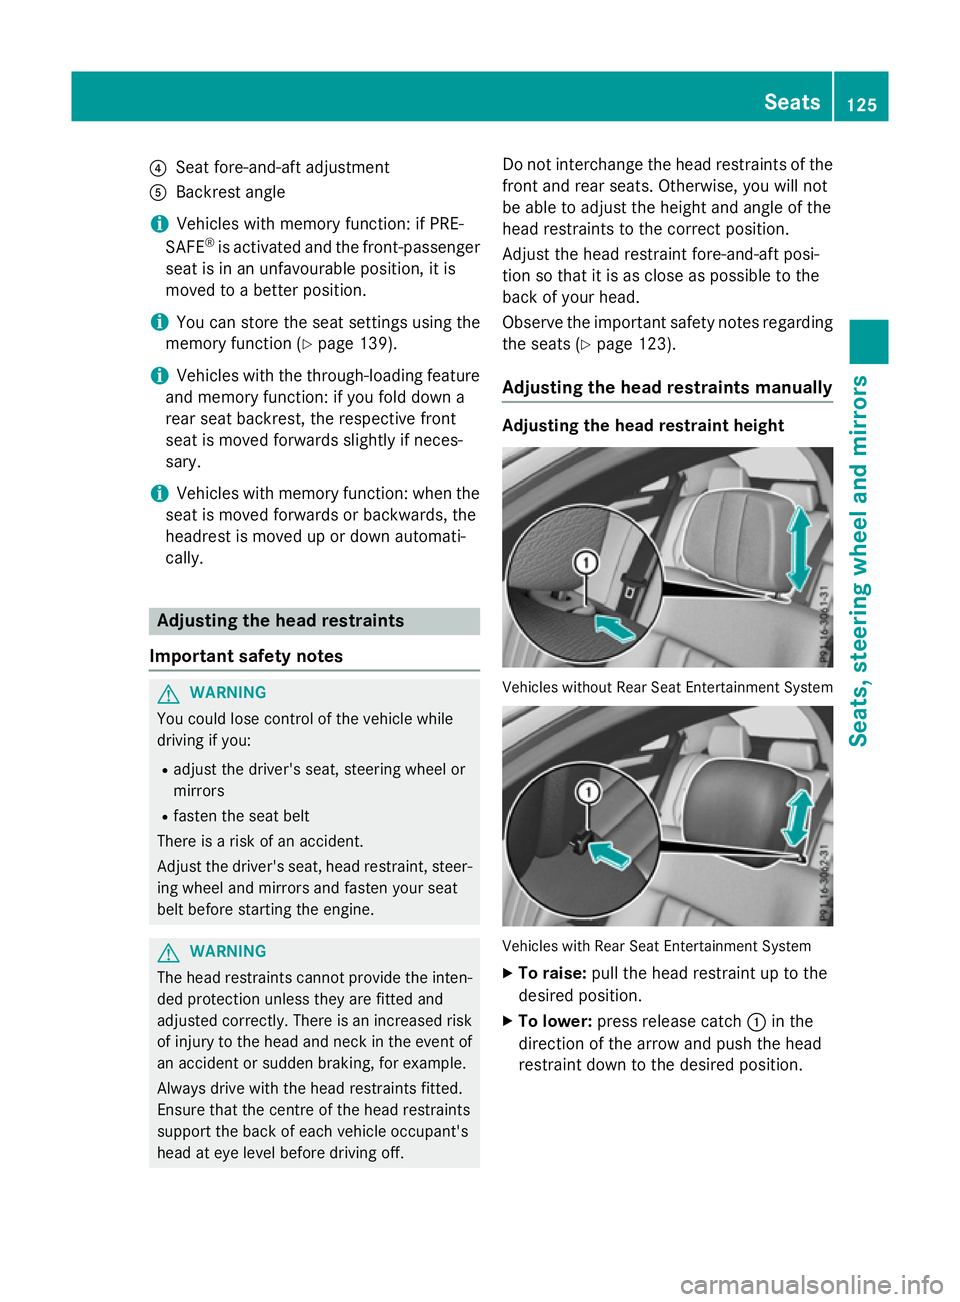
Adjustin gthe hea drestraints manually Adjustin
gthe hea drestrain theight Vehicles withou
tRearS eatE ntertainment System Vehicles with Rear Sea
tEntertainment System
X To raise: pull the hea drestraint up to the
desired position.
X To lower: press release catch :in the
direction of the arrow and push the head
restraint dow ntothe desired position. Seats
125Seats, steering whee land mirrors Z