2015 MERCEDES-BENZ E-CLASS SALOON tow
[x] Cancel search: towPage 106 of 497
Locking th
evehicle (emergency key
element)
If th evehicle can no longer be locked with the
key, use th eemergency key element.
X Open th edriver' sdoor.
X Close th efront-pa ssenger door ,the rear
door sand th eboot lid/tailgate.
X Pres sthe locking button (Y page 101).
X Chec kwhether th elocking knobs on the
front-passenger door and th erear doors
are still visible. Pres sthe locking knobs
down by han difnecessary.
X Close th edriver' sdoor.
X Take th eemergency key element out of the
key (Y page 97).
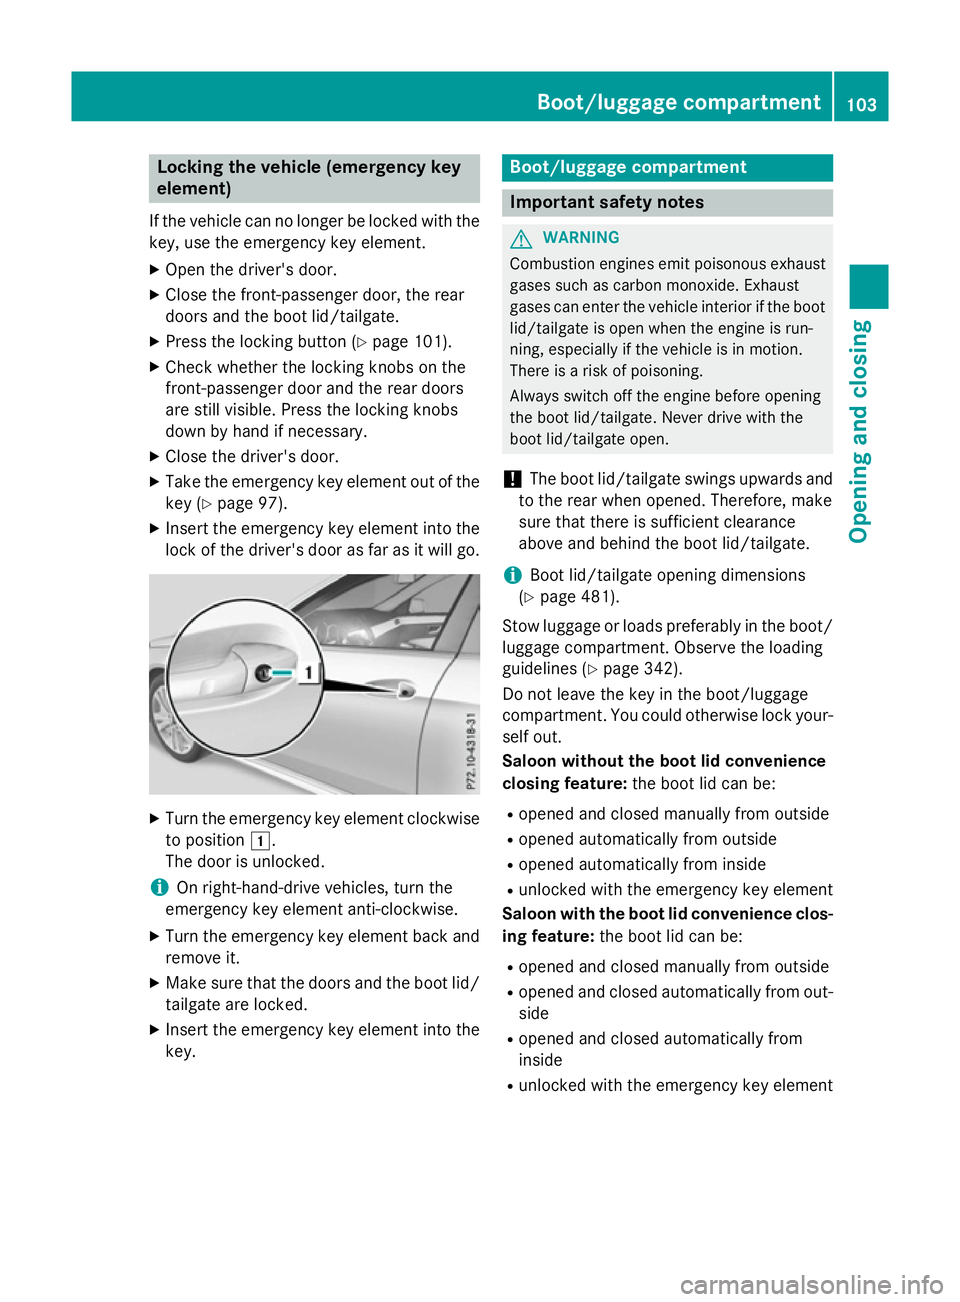
X Inser tthe emergency key element int othe
lock of th edriver' sdoor as far as it will go. X
Turn th eemergency key element clockwise
to position 1.
The door is unlocked.
i On right-hand-driv
evehicles, tur nthe
emergency key element anti-clockwise.
X Turn th eemergency key element back and
remove it.
X Mak esure that th edoor sand th eboot lid/
tailgate are locked.
X Inser tthe emergency key element int othe
key. Boot/luggage compartment
Important safety notes
G
WARNING
Combustio nengine semit poisonous exhaust
gases such as carbon monoxide. Exhaust
gases can enter th evehicle interio riftheboot
lid/tailgat eisopen when th eengine is run-
ning, especially if th evehicle is in motion.
Ther eisar isk of poisoning.
Always switch off th eengine before opening
th eb oot lid/tailgate. Never driv ewith the
boot lid/tailgat eopen.
! The boot lid/tailgat
eswings upwards and
to th erear when opened. Therefore, make
sure that there is sufficient clearance
above and behin dthe boot lid/tailgate.
i Boo
tlid/tailgat eopening dimensions
(Y page 481).
Stow luggage or loads preferably in th eboot/
luggage compartment. Observe th eloading
guidelines (Y page 342).
Do no tleave th ekey in th eboot/luggage
compartment. You could otherwise lock your- self out.
Saloon without th eboot lid convenience
closing feature: theb oot lid can be:
R opened and closed manually from outside
R opened automatically from outside
R opened automatically from inside
R unlocked with th eemergency key element
Saloon with th eboot lid convenience clos-
ing feature: theb oot lid can be:
R opened and closed manually from outside
R opened and closed automatically from out-
side
R opened and closed automatically from
inside
R unlocked with th eemergency key element Boot/luggage compartment
103Opening and closing Z
Page 131 of 497
Adjusting th
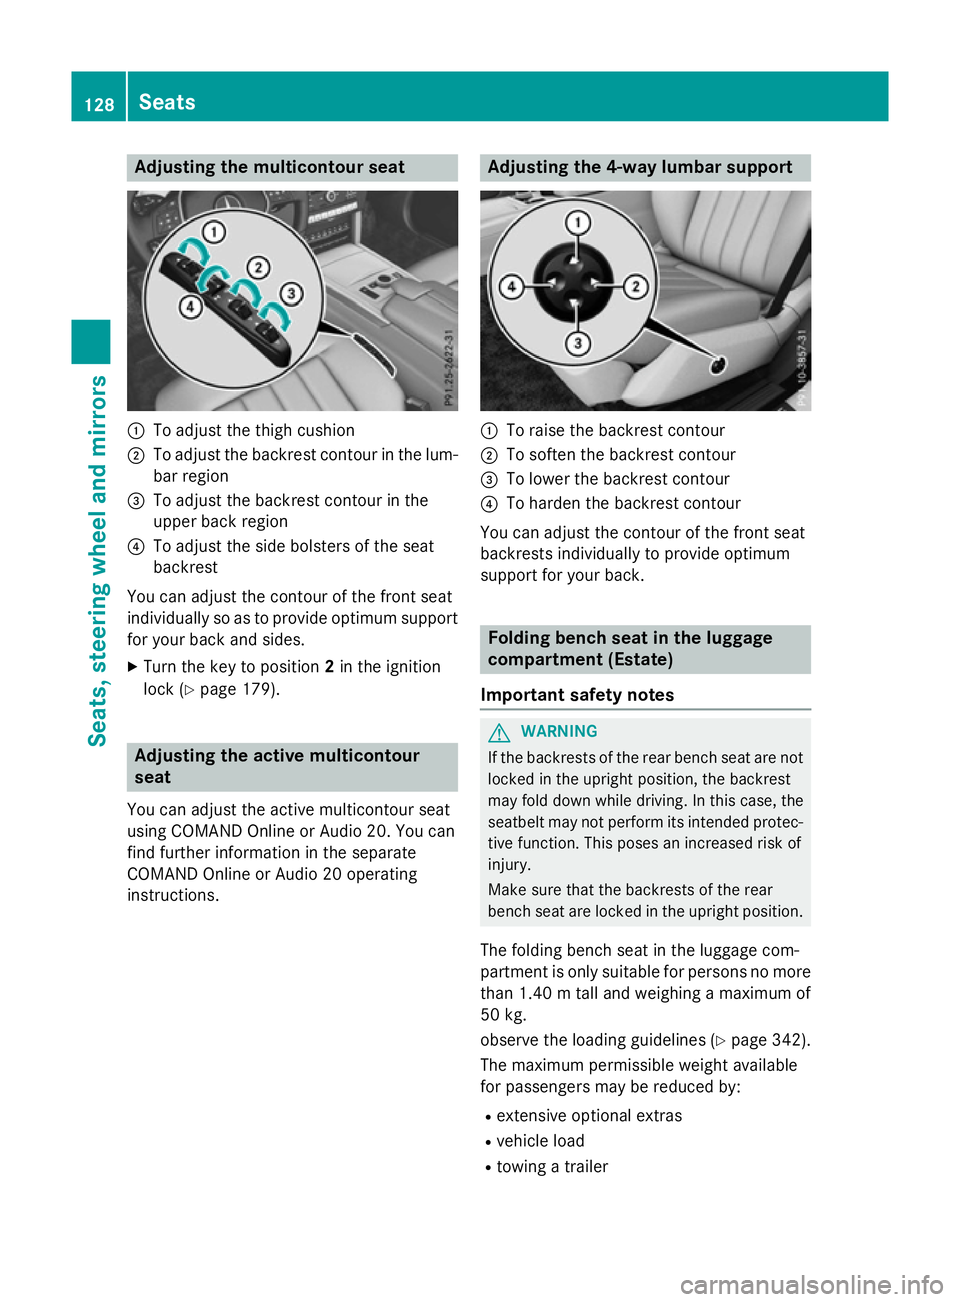
emulticontour seat :
To adjust th ethigh cushion
; To adjust th ebackrest contour in th elum-
bar region
= To adjust th ebackrest contour in the
upper bac kregion
? To adjust th eside bolsters of th eseat
backrest
You can adjust th econtou rofthefron tseat
individually so as to provide optimum support
for your bac kand sides.
X Turn th ekeyto position 2in th eignition
loc k(Ypage 179). Adjusting th
eactive multicontour
seat
You can adjust th eactive multicontour seat
usin gCOMAND Onlin eorAudio 20 .You can
fin df urther information in th eseparate
COMAND Onlin eorAudio 20 operating
instructions. Adjusting th
e4-wa ylumbar support :
To rais ethe backrest contour
; To softe nthe backrest contour
= To lower th ebackrest contour
? To harden th ebackrest contour
You can adjust th econtou rofthefron tseat
backrest sindividually to provide optimum
support for your back. Folding bench sea
tintheluggage
compartmen t(Estate)
Important safety notes G
WARNING
If th ebackrest softherear bench seat are not
locke dintheupright position ,the backrest
may fol ddown while driving. In this case, the
seatbelt may no tperfor mitsintended protec-
tive function .This poses an increased ris kof
injury.
Mak esuret hatthe backrest softherear
bench seat are locke dintheupright position.
The foldin gbench seat in th eluggag ecom-
partmen tisonlys uitable for person snomore
than 1.40 mtalla nd weighing amaximum of
50 kg.
observ ethe loadin gguidelines (Y page 342).
The maximum permissible weigh tavailable
for passenger smay be reduce dby:
R extensive optional extras
R vehicl eload
R towin gatrailer 128
SeatsSeats
,steering wheel and mirrors
Page 146 of 497

4
Ã
Automatic headlamp mode, control-
le dbyt he light sensor
5 L
Dipped-beam/main-bea mhead-
lamps
B R
Rear foglamp
If yo uhearaw arning tone when yo uleave the
vehicle, the lights ma ystill be switched on.
X Turn the light switch to Ã.
The exterio rlighting (excep tthe side lamps/
parking lamps )switches off automaticall yif
you:
R remove the key fro mthe ignition lock
R open the driver's door with the key in posi-
tion 0
Automati cheadlamp mode G
WARNING
Whe nthe light switch is set to Ã,the
dipped-beam headlamps ma ynot be switched
on automaticall yifthereisf og,snow or other
causes of poor visibility du etothe weather
conditions such as spray .There is ariskofan
accident.
In such situations, tur nthe light switch to
L.
The automatic headlamp featur eisonlyan
aid. The driver is responsibl efor the vehicle
lighting at al ltimes.
à is the preferred light switch setting. The
light setting is automaticall yselecte daccord-
ing to the brightness of the ambient light
(exception: poor visibility du etoweather con-
ditions such as fog ,snow or spray):
R key in position 1in the ignition lock: the
side lamps ar eswitched on or off automat-
icall ydepen ding on the brightness of the
ambient light
R with the engine running :ifyouhave
switched on the daytime driving lights func-
tio nint he on-board computer, the daytime
driving lights or the side lamps and dipped-
beam headlamps ar eswitched on or off
automaticall ydepen ding on the brightness
of the ambient light X
To switc honautomatic headlamp
mode: turnthe light switch to Ã.
The daytime driving lights improv ethe detect-
ability of your vehicl eduring the day. Here,
the daytime driving lights functio nmustbe
switched on via the on-board computer
(Y page 290).
When the side lamps and dipped-beam head- lamps ar eswitched on, the green T(side
lamps )and L (dipped-bea mheadlam ps)
indicator lamps in the instrument cluster light
up.
Dipped-beam headlamps G
WARNING
Whe nthe light switch is set to Ã,the
dipped-beam headlamps ma ynot be switched
on automaticall yifthereisf og,snow or other
causes of poor visibility du etothe weather
conditions such as spray .There is ariskofan
accident.
In such situations, tur nthe light switch to
L.
When the ignition is switched on and the light
switch is in the Lposition, the side lamps
and dipped-beam headlamps ar eswitched on
eve nift he light sensor does not sens edark
ambient light conditions. Thi sisadvanta-
geou swhent her eisf og or rain.
X To switc honthe dipped-beam head-
lamps: turnthe key in the ignition lock to
position 2or start the engine.
X Turn the light switch to L.
The green Lindicator lamp in the instru-
ment cluster lights up.
Rea rfoglamp
The rea rfoglamp improves the visibility of
your vehicl einheavyfog for the following
traffic. Please observe the country-specific
laws on the us eofrearfoglamps.
X To switc honthe rear foglamp: turnthe
key in the ignition lock to position 2or start
the engine.
X Turn the light switch to LorÃ. Exterior lighting
143Lights andwindscreen wipers Z
Page 168 of 497
X
To deactivate: press the¬button.
The indicator lamp above the ¬button
goe sout.T he previous settings ar ereacti-
vated .Air-recirculatio nmoder emains
deactivated.
or X Press the Ãbutton.
The indicator lamp above the ¬button
goe sout.A irflo wand ai rdistributio nareset
to automatic mode.
or
X THERMATI Cautomatic climate control:
press temperatur eadjustment switch E
or H up or down (Y page 157).
THERMOTRONIC automatic climate con-
trol :press temperatur eadjustment switch
F orJ up or down (Y page 159). Demistin
gthe windows
Window smisted up on the inside X
Activate the ¿cooling with ai rdehu-
midification function.
X Activate automatic mode Ã.
X Adjust the side ai rvents so tha tthe heated
ai risd irecte dtowards the side windows.
X If the windows continue to mis tup,activate
the "Windscreen demisting "fun ction ¬.
i Yo
us houl donlys elect thi ssetting until
the windscree nisc lear again.
Window smisted up on the outside X
THERMATI Cautomatic climate control:
press ai rdistributio nadjustment switch F
up or down (Y page 157), unti lthe P or
O symbo lappears in the display.
X THERMOTRONIC automatic climate con-
trol :press ai rdistributio nadjustment
switch Iup or down (Y page 159), until
the P orO symbo lappears in the
display.
X Adjust the side ai rvents so tha tnoairis
directe dtowards the side windows. Rea
rwindo wh eating
General notes The rea
rwindo wh eating ha sahighc urrent
draw. Yo ushoul dtherefore switch it off as
soo nasthe windo wisclear.Ito therwise
switches off automaticall yafter several
minutes.
If the battery voltag eistoo low, the rea rwin-
do wh eating ma yswitch off.
Switchin gon/off X
Turn the key to position 2in the ignition
lock (Y page 179).
X Press the ¤button.
The indicator lamp above the ¤button
lights up or goe sout. Operatin
gthe climate contro lsystem
165Climate control
Page 180 of 497
Useful information
............................178
Running-in notes ............................... 178
Driving ............................................... 178
Manual transmission ........................188
Automatic transmission ...................189
Refuelling ........................................... 200
Parking ............................................... 205
Driving tips ........................................ 207
Driving systems ................................ 211
Towing atrailer ................................. 266 177Driving and parking
Page 181 of 497

Useful information
i This Owner's Manual describes all mod-
els, series and optional equipment for your
vehicle that were available at the time of
going to press. National variation sare pos-
sible. Not ethat your vehicle may not be
equipped with all of the function sdescri-
bed. This is also the case for system sand
function srelevan ttosafety.
i Read the information on qualified special-
ist workshops: (Y page 27). Running-in notes
Important safet
ynotes
In certain drivin gand drivin gsafet ysystems,
the sensors adjust automatically while acer-
tain distance is being driven after the vehicle has been delivered or after repairs. Full sys-
tem effectiveness is not reached until the end
of this teach-in process.
Brak epads/linings and discs that are either
new or have been replaced only achieve opti- mum brakin geffec tafter several hundred kil-
ometres of driving. Compensate for the
reduced brakin geffec tbya pplying greater
forc etot he brake pedal. The first 1,500 km
If you treat the engin ewith sufficient care
from the very start ,you will be rewarded with
excellent performanc efor the remainder of
the engine's life.
R Driv eatv arying road speeds and engine
speeds for the first 1,50 0km.
R Avoid overstraining the vehicle during this
period, e.g. drivin gatfull throttle.
R Change gear in good time, before the rev
counter needle is Ôof the way to the red
area of the rev counter. R
Do not shift down agear manually in order
to brake.
R Vehicles with automatic transmission:
try to avoid depressin gthe accelerator
pedal beyond the point of resistance (kick-
down).
Additional running-in notes for AMG vehicles:
R Do not drive at speeds above 140 km/ hfor
the first 1,500 km.
R Only allow the engine to reach amaximum
engine speed of 4,500 rpm briefly.
After 1,500 km, you may graduall yaccelerate
the vehicle to full road and engine speeds.
i You should also observe these notes on
running-in if the engine or parts of the drive
train on your vehicle have been replaced. AMG vehicles with self-locking rear
axle differential
Your vehicle is equipped with aself-locking
differential on the rear axle.
Change the oil to improve protection of the
rear axle differential:
R after arunning-in period of 3,000 km
R every 50,000 km or 3years
These oil changes prolong the service life of
the differential. Have the oil change carried
out at aqualified specialist workshop. Driving
Important safety notes
G
WARNING
Object sinthe driver's footwell may restrict
the clearance around the pedals or block a
depressed pedal. This jeopardises the oper-
ating and road safety of the vehicle. There is a risk of an accident.
Stow all object ssecurely in the vehicle so that
they do not get into the driver's footwell.
Always fit the floormats securely and as pre-
scribed in order to ensure that there is always 178
DrivingDriving and parking
Page 191 of 497

Problem
Possible causes/consequences and
M
MSolutions Vehicles with
apetrol
engine:
The engine is not run-
ning smoothly and is
misfiring. There is
amalfunction in the engine electronics or in amechanical
componentoft he engine management system.
X Only depress the accelerator pedal slightly.
Otherwise, non-combusted fuel may get into the catalytic con-
verter and damage it.
X Have the cause rectified immediately at aqualified specialist
workshop. The coolant tempera-
ture display is showing
more than 120 †. The
coolant warning lamp
may also be on and a
warning tone may
sound. The coolant level is too low. The coolant is too hot and the engine
is no longer being cooled sufficiently.
X Stop as soon as possible and allow the engine and the coolant to
cool down.
X Check the coolant level (Y page 382). Observe the warning
notes as you do so and top up the coolant if necessary. If the coolant level is correct,t
he engine radiator fan may be faulty.
The coolant is too hot and the engine is no longer being cooled
sufficiently.
X If the coolant temperature is below 120 †, you can continue
driving to the nearest qualified specialist workshop.
X Avoid heavy loads on the engine as you do so, e.g. driving in
mountainous terrain and stop-start traffic. Manual transmission
Gear lever
! Only engage gear when the clutch pedal is
depressed.
! When shifting between
5thand 6thgear,
you should always push the gear lever all
the way to the right. Otherwise, you could
shift unintentionally into 3rdor4th gear
and damage the transmission.
If you shift down at too high aspeed (trans-
mission braking), this can cause the engine to overrev, leading to engine damage.
Do not use the clutch bite point to keep the
vehicle stationary on uphill gradients.
There is otherwise arisk of damaging the
clutch.
! On long and steep downhill gradients,
especially if the vehicle is laden or towing a trailer, you must shift into gear
1, 2or3in
good time. This uses the engine's braking
effect.T his relieves the load on the brake
system and preventst he brakes from over-
heating and wearing too quickly. k
Reverse gear
1 -6
Forward gears 188
Manual transmissionDriving and parking
Page 196 of 497
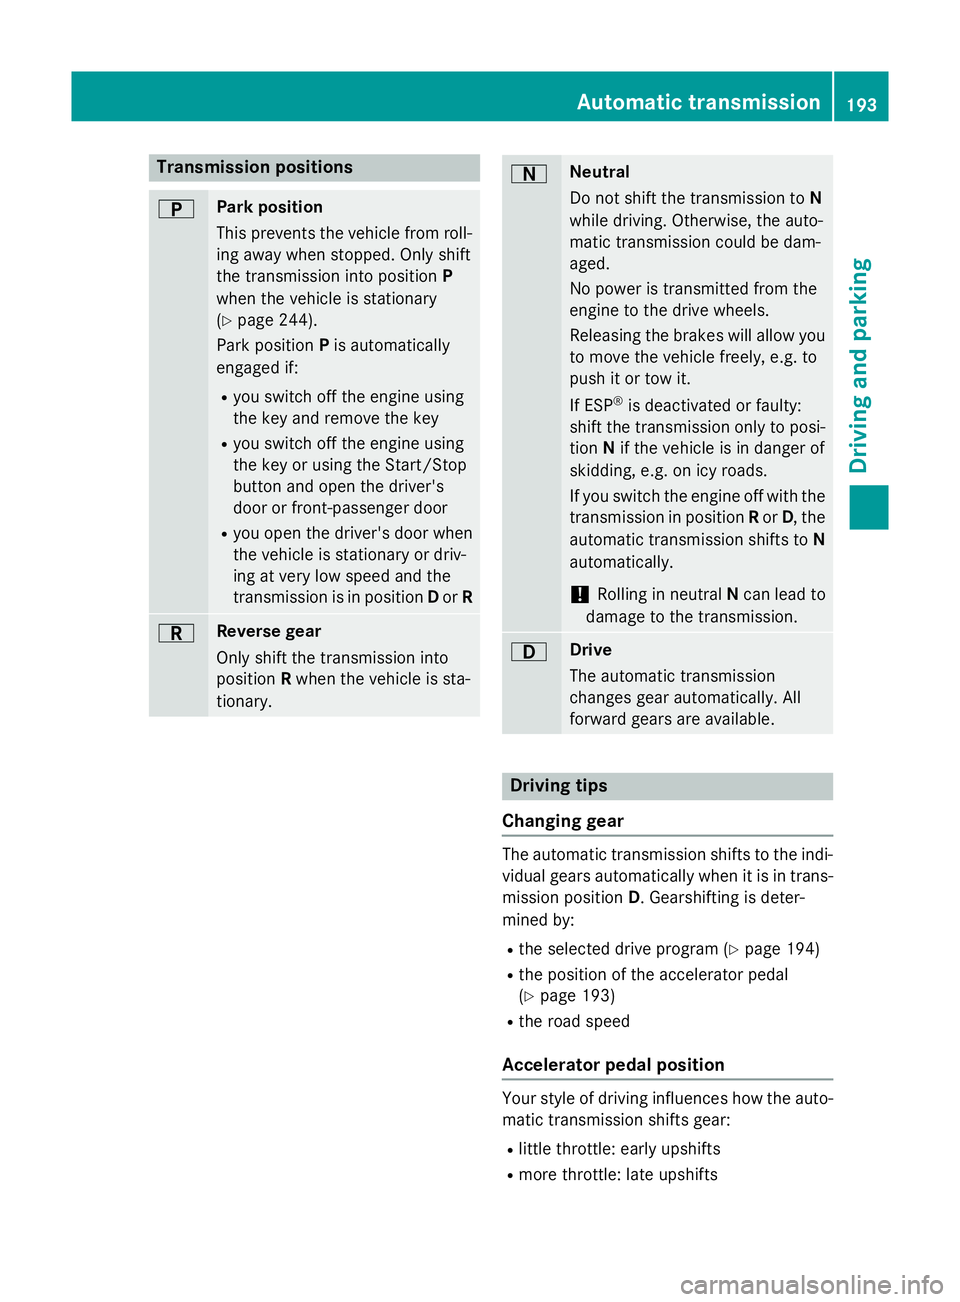
Transmission positions
B Park position
Thi
sprevents the vehicl efromr oll-
ing away when stopped. Onl yshift
the transmission into position P
when the vehicl eisstationary
(Y page 244).
Park position Pis automatically
engaged if:
R yo us witch off the engine using
the key and remove the key
R yo us witch off the engine using
the key or using the Start/Stop
button and open the driver's
door or front-passenge rdoor
R yo uo pent he driver's door when
the vehicl eisstationar yordriv-
ing at ver ylow spee dand the
transmission is in position Dor R C Revers
egear
Onl yshift the transmission into
position Rwhen the vehicl eissta-
tionary. A Neutral
Do not shift the transmission to
N
whil edriving .Otherwise, the auto-
matic transmission could be dam-
aged.
No powe ristransmitted fro mthe
engine to the drive wheels.
Releasing the brakes will allo wyou
to mov ethe vehicl efreely, e.g .to
push it or tow it.
If ESP ®
is deactivated or faulty:
shift the transmission onl ytoposi-
tion Nif the vehicl eisindangerof
skidding ,e.g.oni cy roads.
If yo uswitch the engine off with the
transmission in position Ror D,t he
automatic transmission shifts to N
automatically.
! Rolling in neutral
Ncan lead to
damage to the transmission. 7 Drive
The automatic transmission
change sgeara utomatically. All
forward gear sareavailable. Driving tips
Changin ggear The automatic transmission shifts to the indi-
vidua lgears automaticall ywhenitisint rans-
mission position D.Gearshifting is deter-
mined by:
R the selected drive progra m(Ypage 194)
R the positio nofthe accelerator pedal
(Y page 193)
R the roa dspeed
Accelerator peda lposition Your style of driving influences how the auto-
matic transmission shifts gear:
R little throttle :early upshifts
R mor ethrottle :lat eu pshifts Automati
ctransmission
193Driving andparking Z