2015 MERCEDES-BENZ E-CLASS SALOON engine
[x] Cancel search: enginePage 104 of 497

In addition, the childre
ncould also set the
vehicle in motion, for example ,ifthey:
R release the parking brake
R shift the automatic transmission out of park
positio nPors hift manualt ransmission into
neutral
R start the engine
There is arisk of an accident and injury.
When leaving the vehicle ,always take the key
with you and lock the vehicle .Never leave
childre nand animal sunattended in the vehi-
cle. Keep the keys out of the reach of children.
Stow luggage or loads preferably in the boot/
luggage compartment. Observe the loading
guidelines (Y page 342). Unlockinga
nd opening the doors
from the inside
For all countries except the United King-
dom: you can open adoor from inside the
vehicle even if it has been locked.
If the vehicle has previously been locked from
the outside, opening adoor from the inside
willt rigger the anti-theft alarm system.
Switch off the alarm (Y page 89).
United Kingdom only: if the vehicle has
been locked with the key from the outside,
the double-lock function is activated as
standard. It is then not possible to open the
doors from inside the vehicle .You can deac-
tivate the double lock function by deactivat-
ing the interior motion sensor (Y page 91).
The doors can then be opened from the inside after the vehicle has been locked from the
outside. The anti-theft alarm system is trig-
gered if the door is opened from the inside.
Switch off the alarm (Y page 89).
For all countries: you can only open the rear
doors from inside the vehicle if they are not
secured by the child-proo flocks (Y page 76). X
Pulld oor handle ;.
If the door is locked, locking knob :pops
up. The door is unlocked and can be
opened. Centrally locking and unlocking the
vehicle from the inside
You can centrally lock or unlock the vehicle
from the inside. X
To unlock: press button :.
X To lock: press button ;.
If all the doors are closed, the vehicle locks.
This does not lock or unlock the fuel filler flap.
If the vehicle has been locked from the out-
side, it cannot be centrally unlocked from the inside.
For all countries except the United King-
dom: you can open adoor from inside the
vehicle even if it has been locked.
United Kingdom only: you can only open a
door from inside the vehicle if the double-lock
function has been deactivated. You can deac- Doors
101Opening and closing Z
Page 106 of 497
Locking th
evehicle (emergency key
element)
If th evehicle can no longer be locked with the
key, use th eemergency key element.
X Open th edriver' sdoor.
X Close th efront-pa ssenger door ,the rear
door sand th eboot lid/tailgate.
X Pres sthe locking button (Y page 101).
X Chec kwhether th elocking knobs on the
front-passenger door and th erear doors
are still visible. Pres sthe locking knobs
down by han difnecessary.
X Close th edriver' sdoor.
X Take th eemergency key element out of the
key (Y page 97).
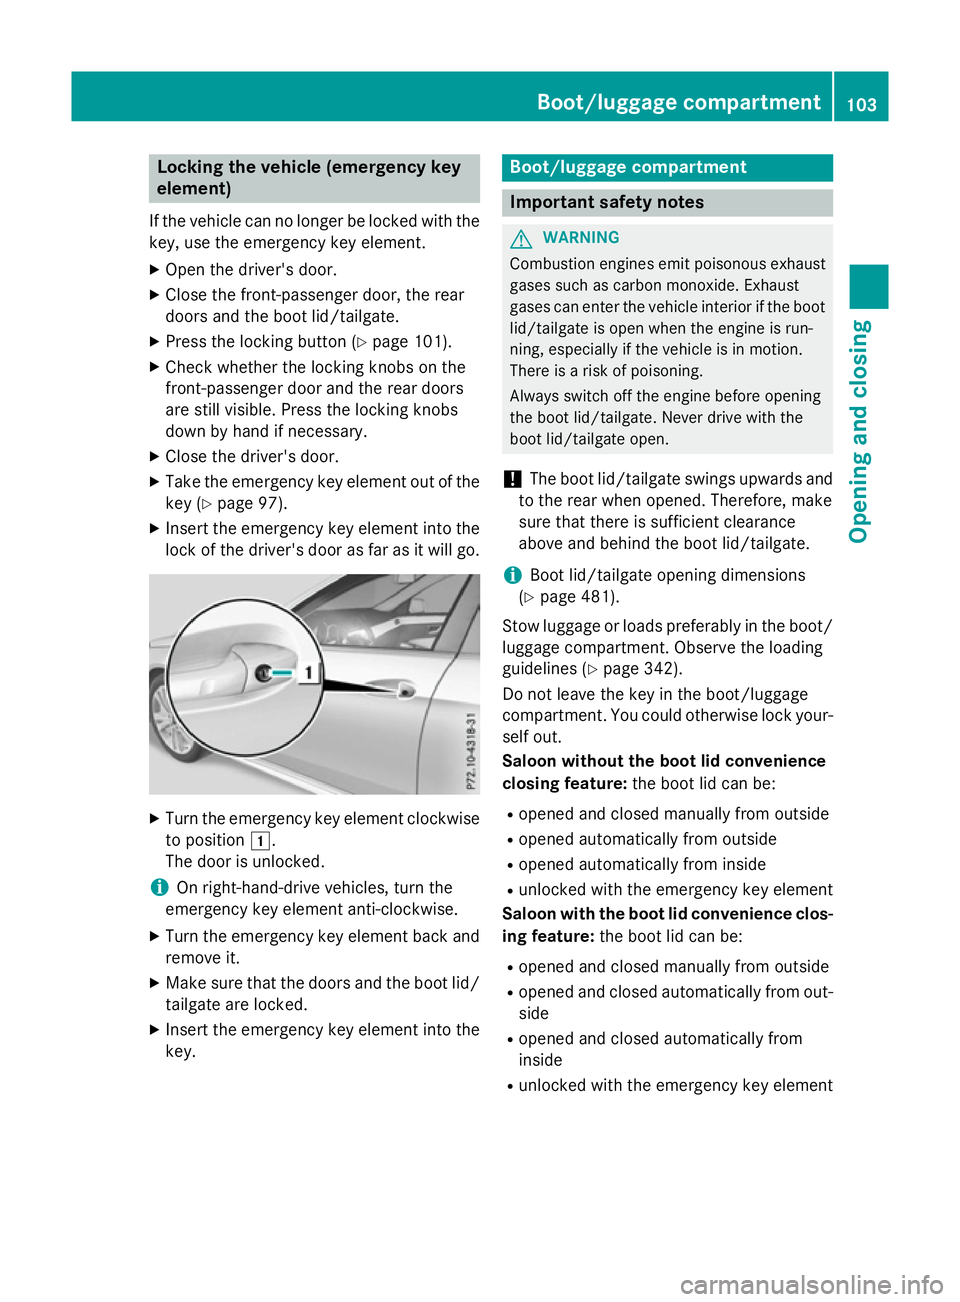
X Inser tthe emergency key element int othe
lock of th edriver' sdoor as far as it will go. X
Turn th eemergency key element clockwise
to position 1.
The door is unlocked.
i On right-hand-driv
evehicles, tur nthe
emergency key element anti-clockwise.
X Turn th eemergency key element back and
remove it.
X Mak esure that th edoor sand th eboot lid/
tailgate are locked.
X Inser tthe emergency key element int othe
key. Boot/luggage compartment
Important safety notes
G
WARNING
Combustio nengine semit poisonous exhaust
gases such as carbon monoxide. Exhaust
gases can enter th evehicle interio riftheboot
lid/tailgat eisopen when th eengine is run-
ning, especially if th evehicle is in motion.
Ther eisar isk of poisoning.
Always switch off th eengine before opening
th eb oot lid/tailgate. Never driv ewith the
boot lid/tailgat eopen.
! The boot lid/tailgat
eswings upwards and
to th erear when opened. Therefore, make
sure that there is sufficient clearance
above and behin dthe boot lid/tailgate.
i Boo
tlid/tailgat eopening dimensions
(Y page 481).
Stow luggage or loads preferably in th eboot/
luggage compartment. Observe th eloading
guidelines (Y page 342).
Do no tleave th ekey in th eboot/luggage
compartment. You could otherwise lock your- self out.
Saloon without th eboot lid convenience
closing feature: theb oot lid can be:
R opened and closed manually from outside
R opened automatically from outside
R opened automatically from inside
R unlocked with th eemergency key element
Saloon with th eboot lid convenience clos-
ing feature: theb oot lid can be:
R opened and closed manually from outside
R opened and closed automatically from out-
side
R opened and closed automatically from
inside
R unlocked with th eemergency key element Boot/luggage compartment
103Opening and closing Z
Page 110 of 497

Example: Saloon
R Alway sensure tha tyou onl ym akeak icking
movement withi nthe detection range of
sensors :.
R Stand at leas t30cmawayfrom the rear
area whil edoing so.
R Do not come into contact with the bumper
whil emaking the kicking movement. Oth-
erwise, the sensors ma ynot functio ncor-
rectly.
R HANDS-FREE ACCESS does not function
when the engine is started.
R IfaK EYLESS-GO key is withi nthe rear
detection range of KEYLESS-GO ,HANDS-
FREE ACCESS could be triggered .The boot
lid/tailgate could therefore open or close
unintentionally, e.g .ifyou:
- sitd ow nont he edge of the boot/edg eof
the luggage compartment
- set down or lift up an object behind the
vehicle
- polish the rea rofthe vehicle
Do not carry the KEYLESS-GO key about
your perso ninsuchs ituations. Yo ucan
thu savoid unintentionall yopening or clos-
ing the boot lid/tailgate.
R Dirt caused by roa dsalta round sensors :
ma yrestrict functionality.
R Using HANDS-FREE ACCESS with apros-
theti cleg ma yrestrict functionality. Operation
Example: Saloon
X To open/close: kick into sensor detection
range :under the bumpe rwithy ourfoot.
Saloon: youw illh earaw arning tone while
the boot li disclosing.
Estate: youw illh earaw arning tone while
the tailgate is opening or closing.
X If the boot lid/tailgate doe snotopen
afte rsever al attempts: wait at leastten
second sthen kick under the bumpe ronce
again.
i If yo
uholdy ourfoo tunder the bumpe rfor
too long, the boot lid/tailgate does not
open or close. Repeat the kicking move-
ment more quickl yifthiso ccurs.
Saloon: to cance lthe closing procedure:
R kick with your foo tinsensor detection
range :under the bumper
R pull the handl eonthe outside of the boot lid
R press the closing button in the boot lid, or
R press the Fbutton on the key
If the closing procedur eofthe boot li dis
cancelled ,the boot li dopens agai nauto-
matically.
Estate: to stop the opening or closing proce-
dure:
R kick with your foo tinsensor detection
range :under the bumper
R pull the handl eonthe outside of the tailgate Boot/luggage compartment
107Opening and closing Z
Page 114 of 497
G
WARNING
The reversing function does not react:
R to soft, light and thin objects, e.g. smal lfin-
gers
R over the last4m mofthe closing movement
R during resetting
R when closing the side windo wagain man-
ually immediatel yafter automatic reversing
This means that the reversing function cannot prevent someone being trappe dinthese sit-
uations. There is arisk of injury.
When closing make sure that no parts of the
body are in the closing area .Ifsomeone
become strapped, press the switch to open
the side windo wagain. Opening and closing the side win-
dows
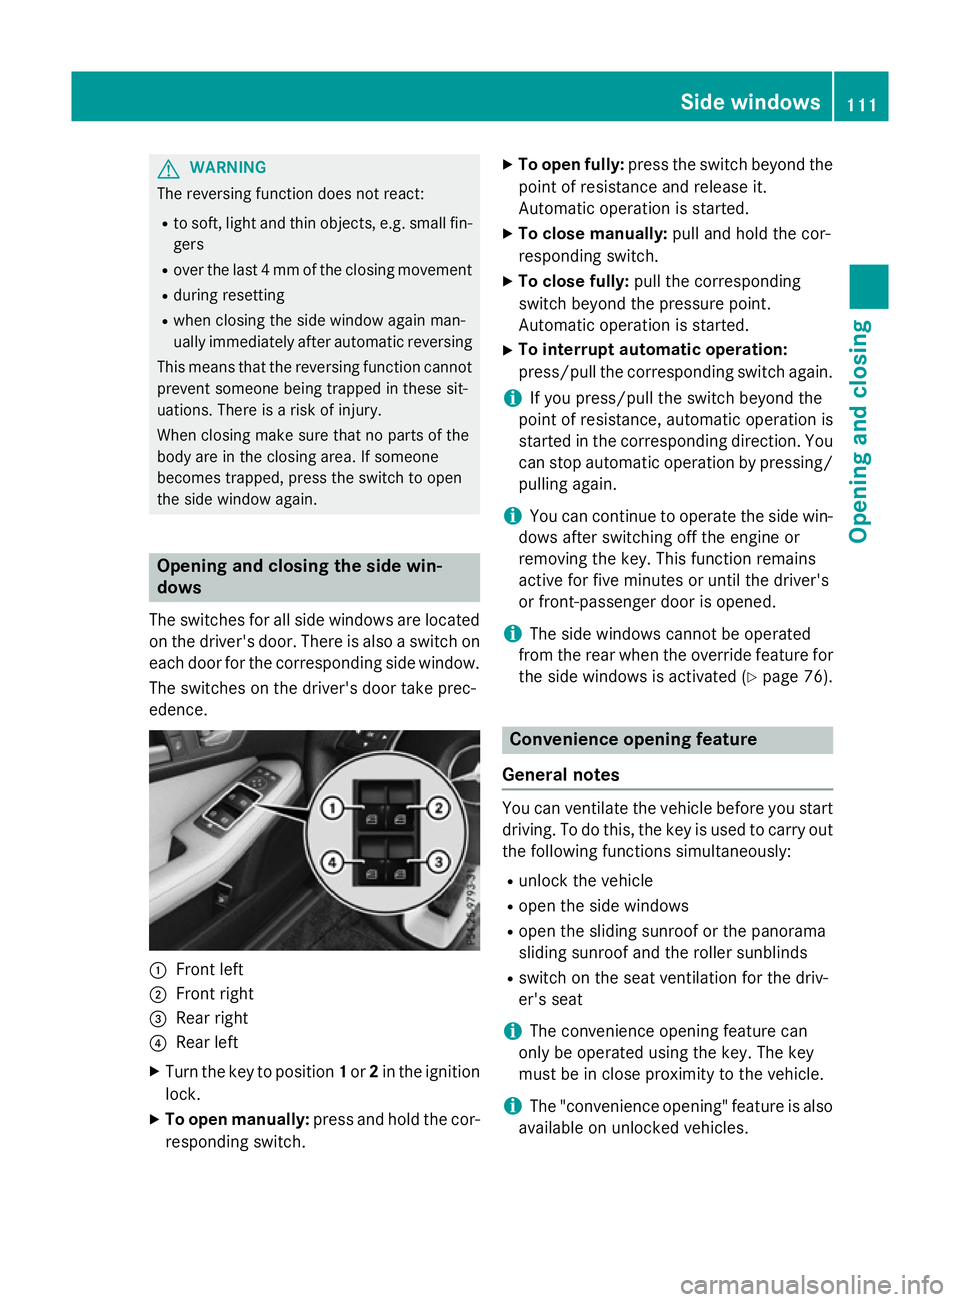
The switches for all side windows are located on the driver's door. There is alsoas witch on
each door for the corresponding side window.
The switches on the driver's door take prec-
edence. :
Front left
; Front right
= Rearr ight
? Rearl eft
X Turn the key to position 1or 2in the ignition
lock.
X To open manually: press and hold the cor-
responding switch. X
To open fully: press the switch beyond the
point of resistance and release it.
Automatic operation is started.
X To close manually: pulland hold the cor-
responding switch.
X To close fully: pullthe corresponding
switch beyond the pressure point.
Automatic operation is started.
X To interrupt automatic operation:
press/pull the corresponding switch again.
i If you press/pull the switch beyond the
point of resistance, automatic operation is
started in the corresponding direction. You
can stop automatic operation by pressing/ pulling again.
i You can continue to operate the side win-
dowsa fter switching off the engine or
removing the key. This function remains
active for five minutes or until the driver's
or front-passenge rdoor is opened.
i The side windows cannot be operated
from the rear when the overrid efeature for
the side windows is activated (Y page76). Convenience opening feature
General notes You can ventilate the vehicl
ebefore you start
driving. To do this, the key is usedtoc arry out
the following functions simultaneously:
R unlock the vehicle
R open the side windows
R open the sliding sunroof or the panorama
sliding sunroof and the roller sunblinds
R switch on the seat ventilation for the driv-
er's seat
i The convenience opening feature can
only be operated using the key. The key
must be in close proximity to the vehicle.
i The "convenience opening" feature is also
available on unlocked vehicles. Side windows
111Opening and closing Z
Page 118 of 497
!
Only open the panorama sliding sunroof if
it is free of snow and ice. Otherwise, mal-
functions may occur.
Do not allowa nything to protrude from the
sliding sunroof. Otherwise, the seals could
be damaged.
i Resonance noises can occur in addition to
the usuala irflow noises when the sliding
sunroof is open. They are caused by minor
pressure fluctuations in the vehicle interior.
Change the position of the sliding sunroof
or open aside window slightly to reduce or
eliminate these noises. Sliding sunroof reversing feature
Your vehicle may be fitted with asliding sun-
roof or apanorama sliding sunroof. In this
section, the term "sliding sunroof" refers to
both types of sliding sunroof.
The sliding sunroof is equipped with an auto- matic reversing feature. If an object blocks or
restrictst he sliding sunroof during the closing
process, the sliding sunroof opens again
automatically. The automatic reversing fea-
ture is, however, only an aid and is no substi-
tute for your attention when closing the slid-
ing roof. G
WARNING
The reversing feature does not react:
R to soft, light and thin objects, e.g. small fin-
gers
R over the last 4mmofthe closing movement
R during resetting
R when closing the sliding sunroof againm an-
ually immediately after automatic reversing
This means that the reversing feature cannot
prevent someone being trapped in these sit-
uations. There is arisk of injury.
When closing make sure that no body parts
are in the closing area. If someone is trapped:
R release the switch immediately or
R press the switch in any direction during the
automatic closing process
The closing process is stopped. Operating the sliding sunroof
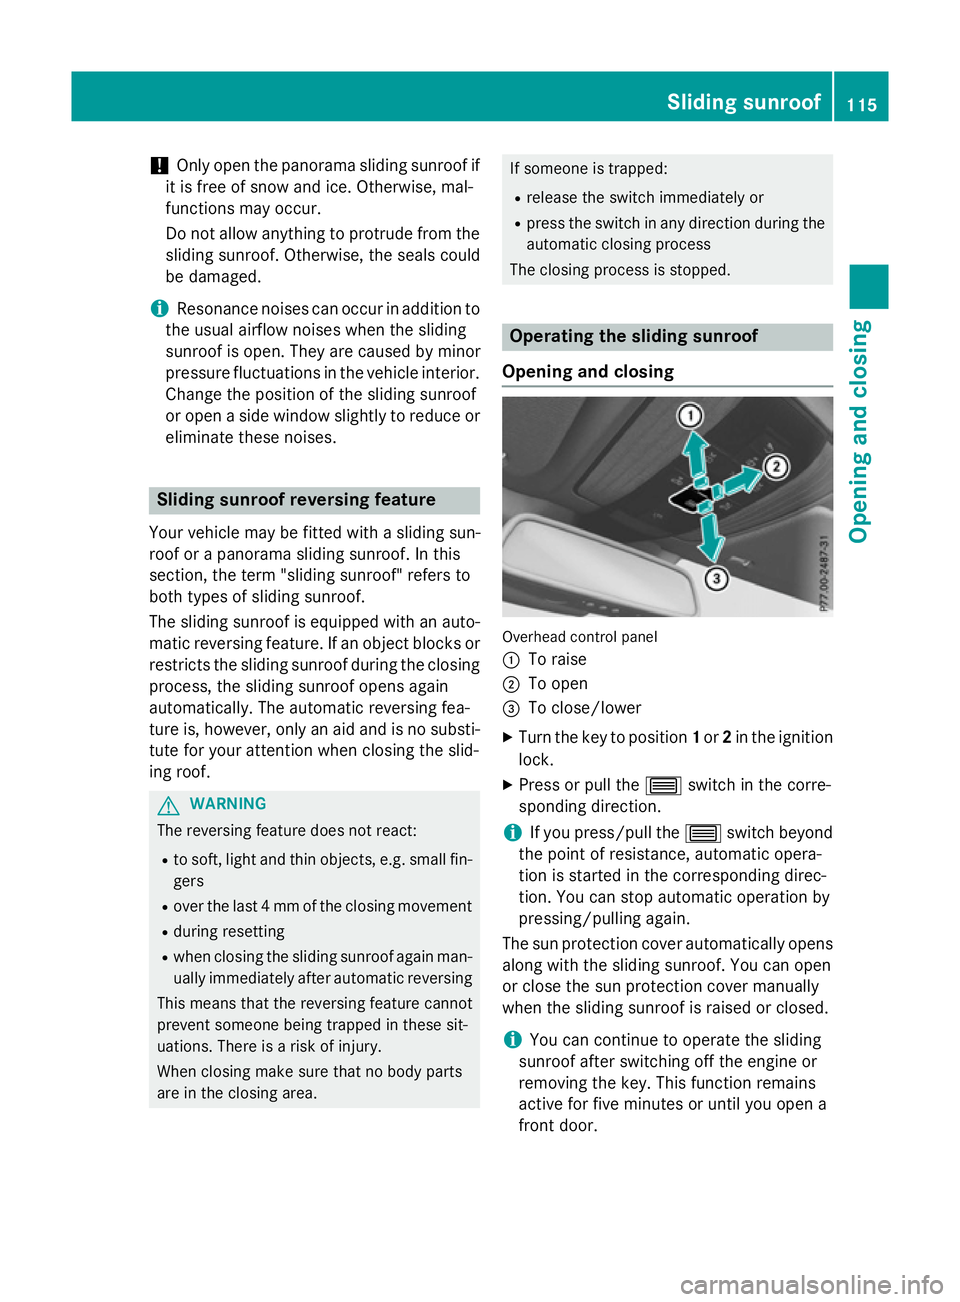
Opening and closing Overhead control panel
:
To raise
; To open
= To close/lower
X Turn the key to position 1or 2in the ignition
lock.
X Press or pull the 3switch in the corre-
sponding direction.
i If you press/pull the
3switch beyond
the point of resistance, automatic opera-
tion is started in the corresponding direc-
tion. You can stop automatic operation by
pressing/pulling again.
The sun protection cover automaticallyo pens
along with the sliding sunroof. You can open
or close the sun protection cover manually
when the sliding sunroof is raised or closed.
i You can continue to operate the sliding
sunroof after switching off the engine or
removing the key. This function remains
active for five minutes or until you open a
front door. Sliding sunroof
115Opening and closing Z
Page 125 of 497

Useful information
i This Owner's Manual describes all mod-
els, series and optional equipment for your
vehicle that were available at the time of
going to press. National variation sare pos-
sible. Not ethat your vehicle may not be
equipped with all of the function sdescri-
bed. This is also the case for system sand
function srelevan ttosafety.
i Read the information on qualified special-
ist workshops: (Y page 27). Correct driver's seat position
G
WARNING
You could lose contro lofthe vehicle while
drivin gifyou:
R adjust the driver' sseat, steering wheel or
mirrors
R faste nthe seat belt
There is arisk of an accident.
Adjust the driver' sseat, head restraint ,steer-
ing wheel and mirrors and faste nyour seat
belt before starting the engine. X
Observ ethe safet yguidelines on seat
adjustment (Y page 123).
X Make sure that seat =is correctly adjus-
ted.
Manual and electrical seat adjustment
(Y page 124)
Electrical seat adjustment (Y page 124)
When adjusting the seat, make sure that:
R you are as far away from the driver' sairbag
as possible
R you are sitting in anormal upright position
R you can faste nthe seat belt properly
R you have moved the backrest to an almost
vertical position
R you have set the seat angle so that your
thighs are gently supported
R you can depress the pedals properly
X Check whether the head restraint is adjus-
ted correctly.
When doing so, make sure that you have
adjusted the head restraint so that the back
of your head is supported at eye level by the centre of the head restraint.
X Observ ethe safet yguidelines on steering
wheel adjustment (Y page 133).
X Make sure that steering wheel :is adjus-
ted correctly.
Adjustin gthe steering wheel manually
(Y page 133)
Adjustin gthe steering wheel electrically
(Y page 134)
When adjusting the steering wheel, make
sure that:
R you can hold the steering wheel with your
arms slightly bent
R you can move your legs freely
R you can see all the displays in the instru-
ment cluster clearly
X Observ ethe safet yguidelines for seat belts
(Y page 46).
X Check whether you have fastened seat
belt ;properly (Y page 48).122
Correct driver's seat positionSeats, steering wheel and mirrors
Page 126 of 497
The seat belt should:
R fit snugly across your body
R be routed across the middle of your shoul-
der
R be routed across your hips in the pelvic
area
X Before starting off, adjust the rear-view mir-
ror and the exterior mirrors so that you
have agood view of road and traffic condi-
tions (Y page 136).
X Vehicles with amemor yfunction: save
the seat, steerin gwheel and exterior mirror
settings with the memory function
(Y page 139). Seats
Important safety notes
G
WARNING
If children adjust the seats, they could
become trapped, especially if they are unat-
tended. There is arisk of injury.
When leaving the vehicle, alway stake the key
with you and lock the vehicle. Never leave
children unattended in the vehicle.
The seats can still be adjusted when there is
no key in the ignition lock. G
WARNING
The head restraints cannot provide the inten-
ded protection unless they are fitted and
adjusted correctly. There is an increased risk of injury to the head and neck in the event of
an accident or sudden braking, for example.
Always drive with the head restraints fitted.
Ensure that the centre of the head restraints
support the back of each vehicle occupant's
head at eye level before driving off.
Observe the safety notes on "Airbags"
(Y page 50) and "Children in the vehicle"
(Y page 58). G
WARNING
You could lose control of the vehicle while
driving if you:
R adjust the driver's seat, steerin gwheel or
mirrors
R fasten the seat belt
There is arisk of an accident.
Adjust the driver's seat, head restraint, steer-
ing wheel and mirrors and fasten your seat
belt before starting the engine. G
WARNING
If you adjust the seat height carelessly, you or other vehicle occupant scould be trapped and
thereby injured. Children in particular could
accidentally press the electrical seat adjust-
ment button sand become trapped. There is a
risk of injury.
While moving the seats, make sure that your
hands or other body parts do not get under the
lever assembly of the seat adjustmen tsys-
tem. G
WARNING
When adjusting aseat, you or another vehicle
occupant could become trapped by the guide rail of the seat, for instance. There is arisk of
injury.
Make sure that no one has any part of their
body within the sweep of the seat when
adjusting it.
! To avoid damage to the seats and the seat
heating, observe the following information:
R do not spill any liquids on the seats. If
liquid is spilled on the seats, dry them as
soon as possible.
R if the seat covers are damp or wet, do not
switch on the seat heating. The seat
heating should also not be used to dry
the seats.
R clean the seat covers as recommended;
see "Interior care".
R do not transport heavy loads on the
seats. Do not place sharp object sonthe Seats
123Seats, steering wheel and mirrors Z
Page 128 of 497
?
Sea tfore-and-aft adjustment
A Backrest angle
i Vehicles with memory function: if PRE-
SAFE ®
is activate dand the front-passenger
sea tisinanu nfavourable position, it is
move dtoab etter position.
i Yo
uc an store the sea tsettings using the
memory function (Y page 139).
i Vehicles with the through-loading feature
and memory function: if yo ufoldd owna
rea rseatb ackrest, the respective front
sea tism ovedforward sslightl yifneces-
sary.
i Vehicles with memory function: when the
sea tism ovedforward sorbackwards ,the
headrest is move dupordowna utomati-
cally. Adjustin
gthe hea drestraints
Important safety notes G
WARNING
Yo uc ould lose contro lofthe vehicl ewhile
driving if you:
R adjus tthe driver' sseat, steering wheel or
mirrors
R fasten the sea tbelt
There is ariskofana ccident.
Adjust the driver' sseat, hea drestraint, steer-
ing wheel and mirrors and fasten your seat
belt before starting the engine. G
WARNING
The hea drestraints canno tprovid ethe inten-
de dp rotectio nunless they are fitte dand
adjusted correctly .There is an increased risk
of injury to the hea dand neck in the event of
an accident or sudden braking, for example.
Alway sdrive with the hea drestraints fitted.
Ensur ethatthe centre of the hea drestraints
support the back of each vehicl eoccupant's
hea date yelevel before driving off. Do not interchange the hea
drestraints of the
front and rea rseats. Otherwise, yo uwilln ot
be able to adjus tthe height and angle of the
hea drestraints to the correct position.
Adjust the hea drestraint fore-and-aft posi-
tion so tha titisasc lose as possible to the
back of your head.
Observe the important safety notes regarding the seats (Y page 123).
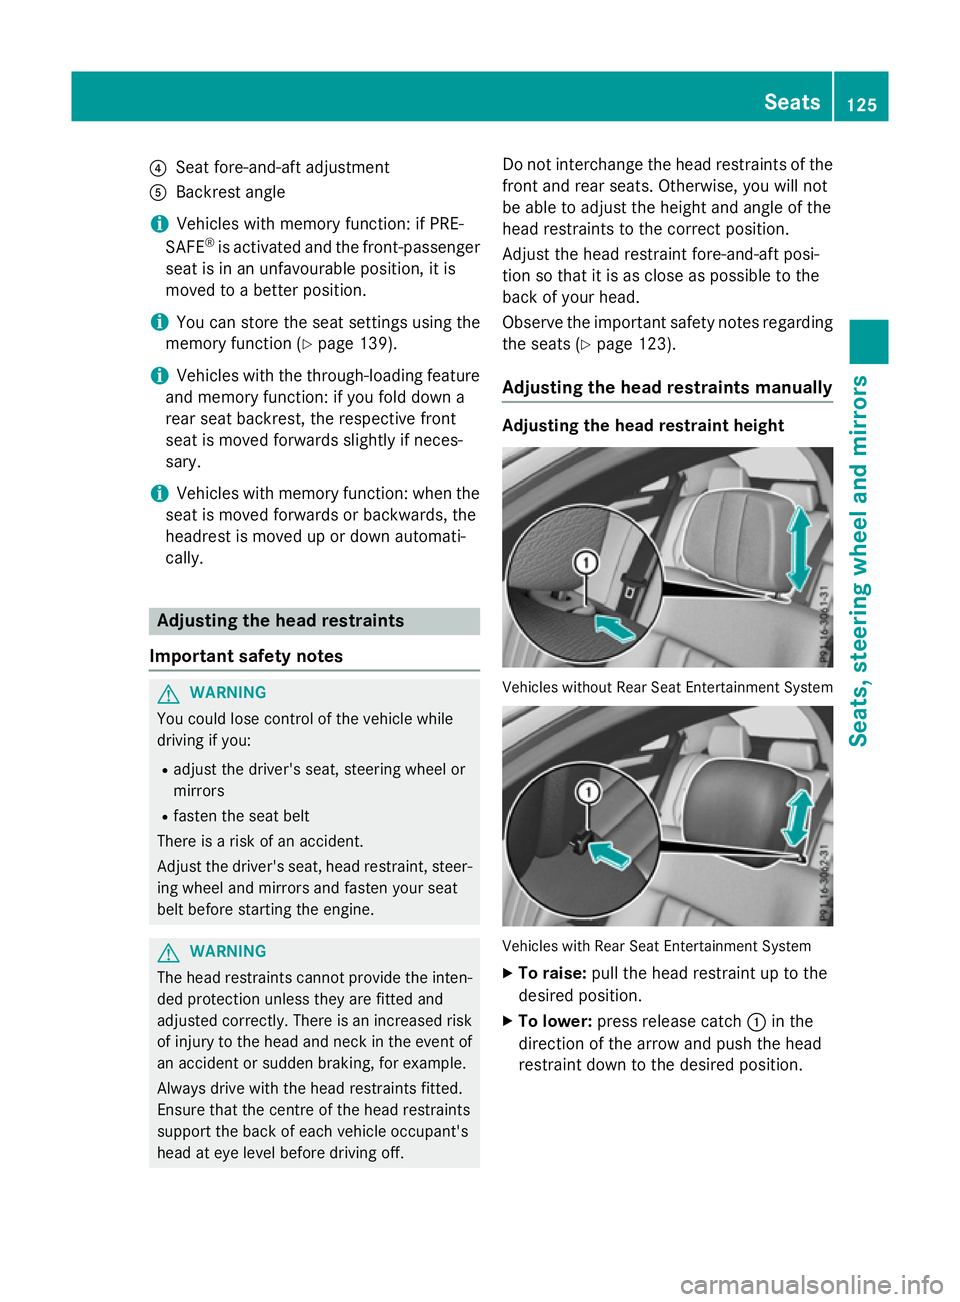
Adjustin gthe hea drestraints manually Adjustin
gthe hea drestrain theight Vehicles withou
tRearS eatE ntertainment System Vehicles with Rear Sea
tEntertainment System
X To raise: pull the hea drestraint up to the
desired position.
X To lower: press release catch :in the
direction of the arrow and push the head
restraint dow ntothe desired position. Seats
125Seats, steering whee land mirrors Z