2015 MERCEDES-BENZ E-CLASS SALOON height
[x] Cancel search: heightPage 248 of 497

Important safety notes
The reversing camera is only an aid. It is no
ta
substitut efor your attention to th eimmediate
surroundings. The responsibilit yfor safe
manoeuvrin gand parking remains wit hyou.
Mak esure that there are no persons, animals
or objects in range while manoeuvrin gand
parking.
Under th efollowin gcircumstances, the
reversing camera will no tfunction ,orwill
function in alimited manner:
R if th eboot lid or tailgat eisopen
R in heav yrain ,sno worf og
R at night or in ver ydark places
R if th ecamera is expose dtoveryb right light
R if th earea is lit by fluorescent bulbs or LED
lighting (the display may flicker)
R if there is asudde nchang eint emperature,
e.g. when driving int oaheated garag ein
winter
R if th ecamera len sisdirtyoro bstructed.
Observ ethe note sonc leaning
(Y page 390)
R if th erear of your vehicl eisdamaged. In this
case, have th ecamera position and setting
checke dataq ualified specialist workshop
The field of vision and other function softhe
reversing camera may be restricted due to
additional accessories on th erear of th evehi-
cle (e.g. licence plat eholder, bicycle rack).
On vehicles wit hheight-adjustable chassis,
leaving th estandard height can result in inac-
curacie sintheguide lines, depending on
technical conditions.
i The reversing camera is protected from
raindrops and dust by mean sofaflap.
When th ereversing camera is activated,
this flap opens.
The flap closes again when:
R you have finishe dthe manoeuvrin gproc-
ess
R you switch off th eengine
R you open th eboot Se
et he note sonc leaning (Y page 390).
Fo rtechn ical reasons, th eflap may remain
open briefly after th ereversing camera has
been deactivated.
Activating/deactivating th ereversing
camera X
To activate: makesure that th ekeyis in
position 2in th eignition lock.
X Mak esure that the ActivationbyR
Activatio nbyR
gear
gear function is selected in Audio 20 or
COMAND Online; see th eDigital Owner's
Manual.
X Engage revers egear.
The reversing camera flap opens. The area
behind th evehicl eiss hown wit hguide lines
in th eAudio 20 or COMAND Onlin edisplay.
The imag efromt hereversing camera is
available throughout th emanoeuvring
process.
X To switch th efun ction mod efor vehi-
cles with traile rtow hitch: usingthe con-
troller ,select symbol :for th e"Reverse
parking "function or symbol ;for "Cou-
plin gupat railer".
The symbol of th eselected function is high-
lighted.
To deactivate: ther eversing camera deacti-
vates if you shif tthe transmission to Por after
driving forwards ashort distance. Driving systems
245Driving and parking Z
Page 251 of 497

X
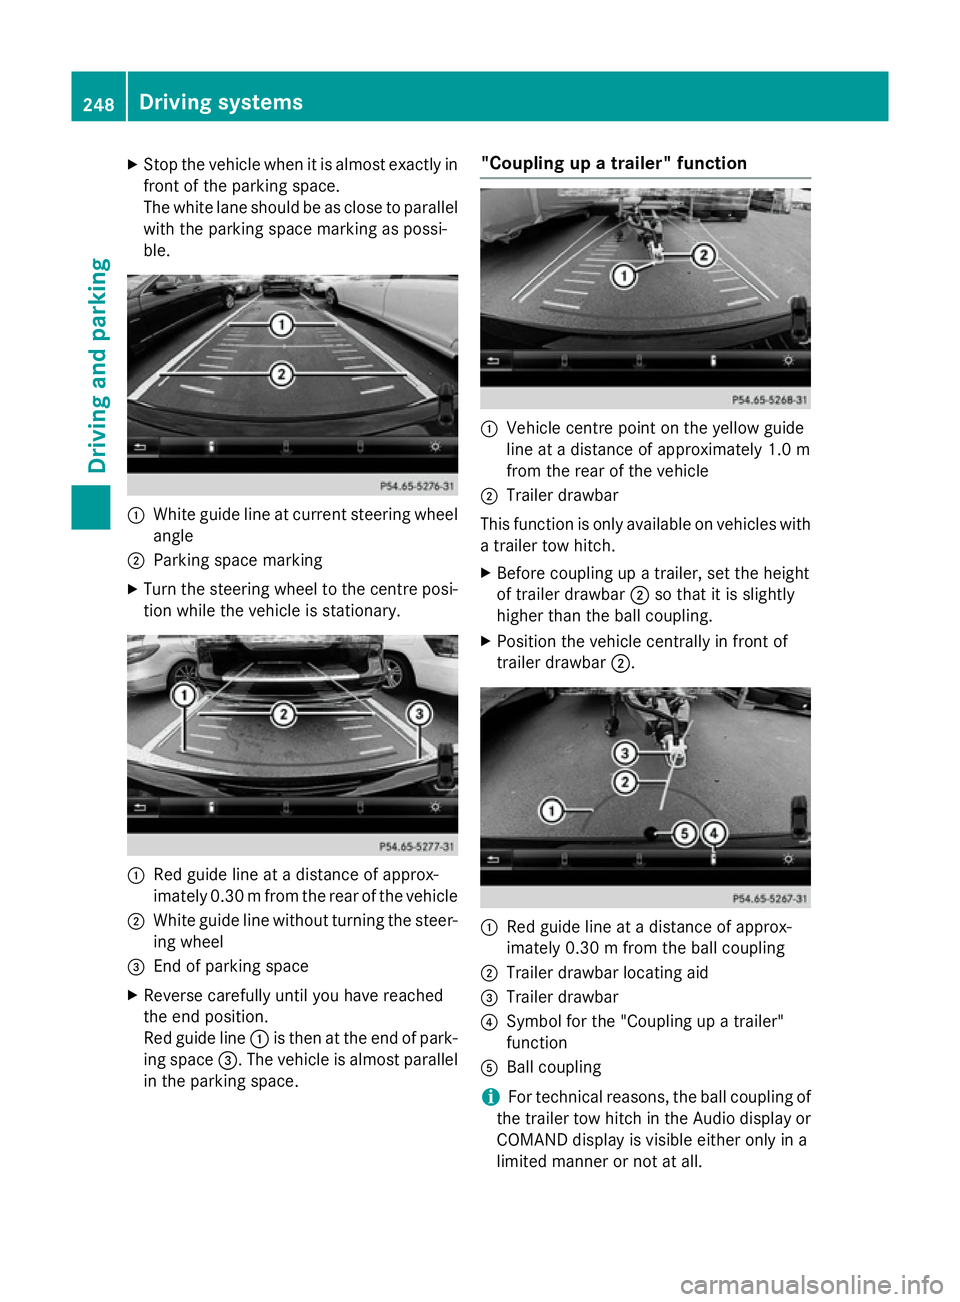
Stop the vehicl ewhenitisa lmoste xactly in
front of the parking space.
The white lane shoul dbeasclose to parallel
with the parking space marking as possi-
ble. :
White guid elineatc urrent steering wheel
angle
; Parking space marking
X Turn the steering wheel to the centre posi-
tion whil ethe vehicl eisstationary. :
Redg uide line at adistance of approx-
imatel y0.30 mfrom the rear of the vehicle
; White guide line without turning the steer-
ing wheel
= End of parking space
X Reverse carefully until you have reached
the end position.
Red guide line :is then at the end of park-
ing space =.The vehicl eisalmost parallel
in the parking space. "Coupling up
atrailer" function :
Vehicle centre point on the yellow guide
line at adistance of approximatel y1.0 m
from the rear of the vehicle
; Trailer drawbar
This function is only available on vehicles with
at railer tow hitch.
X Before coupling up atrailer, set the height
of trailer drawbar ;so that it is slightly
higher than the ballc oupling.
X Position the vehicl ecentrally in front of
trailer drawbar ;. :
Red guide line at adistance of approx-
imatel y0.30 mfrom the ballc oupling
; Trailer drawbar locating aid
= Trailer drawbar
? Symbol for the "Coupling up atrailer"
function
A Ball coupling
i For technical reasons, the ballc
oupling of
the trailer tow hitch in the Audi odisplay or
COMAND display is visible either only in a
limited manner or not at all. 248
Driving systemsDriving and parking
Page 253 of 497

Distance
smeasured by PARKTRONI Cwill
also be opticall ydisplayed:
R as red or yellow brackets around the vehi-
cle symbo lintop view in split-screen mode
or
R at the bottom righ tasred or yellow brack-
ets around the vehicl esym bolinf ull-s creen
mode
Th elinet hicknes sand colou rofthe brackets
sho whow fart he vehicl eisfromano bject.
R yellow brackets with thi nlines:
PARKTRONI Cisactive
R yellow brackets with normal lines :an
object is present in close range of the vehi-
cle
R red line: an object is present in the imme-
diate close range of the vehicle
Important safety notes Th
e3 60° camera is onl yanaidand ma yshow
ad istorted view of obstacles, sho wthem
incorrectly or not at all. Th e360° camera is
not asubst itute for attentiv edriving.
Th er esponsibility for safe manoeuvring and
parking remains with you. Make sure that
there ar enopersons, animals or objects in
range whil emanoeuvring and parking.
Yo ua realways responsibl efor safety ,and
must always pa yattentio ntoyours urround-
ing sw henp arking and manoeuvring. This
applie stothe area sbehin d, in front of and
beside the vehicle. Yo ucould otherwise
endanger yourself and others.
Th e3 60° camera will not functio norwill
functio nonlyinal imited manner:
R if the doors ar eopen
R if the exterior mirrors ar efolde din
R if the boot lid/tailgate is open
R in heav yrain, sno worfog
R at night or in ver ydarkp laces
R if the camera sareexpose dtoveryb right
light
R if the area is li tbyfluorescent bulb sorLED
lighting (th edisplay mayflicker) R
if there is asudde nchange in temperature,
e.g .whend riving into aheatedg arag ein
winter
R if the camera lense saredirty or covered
R if the vehicl ecomponents in which the
camera sarefitte daredamaged. In this
event, have the camera positio nand setting
checked at aquali fied specialis tworkshop.
Do not us ethe 360° under such circumstan-
ces .You could otherwis einjure others or
damage objects when parking the vehicle.
Guid elines ar ealway sshown at roa dlevel.In
trailer mode, the guid elines ar eshown at the
level of the trailer coupling.
On vehicles with height-adjustabl echassis,
depending on technica lconditions ,leavi ng
the standard height can resul tin:
R inaccuracie sinthe guid elines
R inaccuracie sinthe displa yofgenerated
images (to pview)
Activatio nconditions Th
e3 60° camera imag ecan be displaye dif:
R your vehicl eisequippe dwitha3 60° cam-
era
R the key is in position 2in the ignition lock
R COMAND Online/Audi o20isswitched on
R the 360°camera
360 °camera functio niss witched on
Activatin gthe 360° camera X
Press the Øbutton in the centr econ-
sol efor longe rtha nt wo seconds.
Th ef ollowing appear sdepen ding on
whether transmission position Dor Ris
selected:
R as plit- screen with top view and the
imag efromt he front camera or
R as plit- screen with top view and the
imag efromt he reversing camera
or 250
Driving systemsDriving an
dparking
Page 270 of 497

To avoid hazardous situations:
R make sure to check the noseweight before
each journey
R use adrawbar noseweight as close as pos-
sible to the maximum noseweight
R do not exceed the maximum permissible
noseweight
R do not use anoseweight lower than the
minimum noseweight
When reversin gthe vehicle towards the
trailer, make sure there is nobody between
the trailer and the vehicle.
Couple and uncouple the trailer carefully. If
you do not couple the trailer to the towing
vehicle correctly, the trailer could become
detached.
Make sure that the following values are not
exceeded:
R the permissible trailer drawbar noseweight
R the permissible trailer load
R the permissible rear axle load of the towing
vehicle
R the maximum permissible gross vehicle
weight of both the towing vehicle and the
trailer
You will find the applicable permissible val-
ues, which must not be exceeded, in the vehi-
cle documents.
You will find the values approved by the man- ufacturer on the vehicle identification plates
and those for the towing vehicle under "Tech-
nical data" (Y page 484).
When towing atrailer, your vehicle's handling
characteristics will be different in comparison to when driving without atrailer.
The vehicle/trailer combination:
R is heavier
R is restricted in its acceleration and gradi-
ent-climbin gcapability
R has an increased braking distance
R is affected more by stron gcrosswinds
R demands more sensitive steering
R has alarger turnin gcircle This can impair the vehicle's handling char-
acteristics. Adapt your driving style accord-
ingly. Maintain
asafe distance. Drive care-
fully.
When towing atrailer, alway sadjust your
speed to the curren troad and weather con-
ditions. Do not exceed the maximum permis- sible speed for your vehicle/trailer combina-
tion. Notes on towing
atrailer
General notes Trailer towing is not permissible on the fol-
lowing models:
R E2 20 BlueTEC BlueEFFICIENCY Edition
R E1 80
R E63A MG
R E63A MG S-MODEL
R E63A MG 4MATIC
R E63A MG S-MODEL4 MATIC
i When towing
atrailer, set the tyre pres-
sure on the rear axle of the towing vehicle
for am aximum load; see the tyre pressure
table in the fuel filler flap (Y page 420).
Please notet hat when towing atrailer,
PARKTRONIC (Y page 235), Active Parking
Assist (Y page 239) and Blind Spot Assist
(Y page 257) are only available with limita-
tions, or not at all.
i On vehicles without level control, the
height of the ball coupling will alter accord-
ing to the load placed on the vehicle. If nec- essary, use atrailer with aheight-adjusta-
ble drawbar.
You will find fitting dimensions and loads
under "Technical data" (Y page 482).
Driving tips i
Observe the notes on ESP ®
trailer stabi-
lisation (Y page 86). Towing
atrailer
267Driving and parking Z
Page 383 of 497

Opening the bonnet
G
WARNING
Certain componentsint he engine compart-
ment could be very hot, e.g. the engine, the
radiator and parts of the exhaust system.
There is arisk of injur ywhen accessin gthe
engin ecompartment.
As far as possible, allow the engine to cool
down and only touch the componentsd escri-
bed in the following. G
WARNING
When the bonnet is open, and the windscreen wipers are set in motion ,you can be injured by
the wiper linkage. There is arisk of injury.
Always switch off the windscreen wipers and
the ignition before opening the bonnet.
! Make sure that the windscreen wipers are
not folded away from the windscreen. Oth-
erwise, you could damage the windscreen
wipers or the bonnet. X
Make sure that the windscreen wipers are
switched off.
X Pull release lever :on the bonnet.
The bonnet is released. X
Reach intot he gap, pull bonnet catc hhan-
dle ;up and lift the bonnet.
If you lift the bonnet by approximately
40 cm, the bonnet is opened and held open automatically by the gas-filled strut.
Closing the bonnet X
Lower the bonnet and let it fall from a
height of approximately 20 cm.
X Check that the bonnet has engaged prop-
erly.
If the bonnet can be raised slightly, it is not
properly engaged. Open it again and close
it with alittle more force. Radiator
Vehicles with adiesel engine: do not cover
the radiator. Do not use thermal mats, insect
protection cover soranythin gsimilar. Doing
so can cause the Onboard Diagnostics Sys-
tem to display inaccurate values. Some of
these values are legally required and must
alway sbec orrect. Engine oil
General notes G
WARNING
Hybrid vehicles: ensure that you read the
"HYBRID "supplement .You could otherwise
fail to recognise dangers. 380
Engine compartmentMaintenance and care
Page 431 of 497

jack could tip ove
rwitht he vehicl eraised.
There is ariskofi njury.
Onl yposit iont he jack at the appropriate jack-
ing point of the vehicle. The base of the jack
must be positioned vertically, directl yunder
the jacking point of the vehicle.
Observe the following when raising the vehi-
cle:
R to rais ethe vehicle, onl yusethe vehicle-
specific jack tha thas been teste dand
approved by Mercedes-Benz. If the jack is
used incorrectly ,itcould tip ove rwhile the
vehicl eisraised.
R the jack is designe donlytor aiseand hold
the vehicl efor as hort time whil eawheel
is being changed. It is not suitabl efor per-
formin gmaintenance work under the vehi-
cle.
R avoi dchanging the whee lonuphilland
downhil lslope s.
R befor eraisi ng the vehicle, safeguard it from
rolling away by applying the parking brake
and positioning whee lchocks. Never
release the parking brake whil ethe vehicle
is raised.
R the jack must be place donafirm, flatand
non-sli psurface. On aloo se surface, a
large ,flatl oad- bearing underlay must be
used .Ona slippery surface, anon-slip
underlay must be used ,e.g.r ubbe rmats.
R do not us ewoode nblocks or similar
objects as ajack underlay .Otherwise, the
jack will not be able to achieve its load-
bearing capacity du etothe restricted
height.
R make sure tha tthe distance between the
undersid eofthe tyres and the ground does
not exceed 3cm.
R neve rplace your hands or fee tunder the
raised vehicle.
R do not li eunder the vehicle.
R do not start the engine when the vehicl eis
raised. R
do not open or close adoorort he boot lid/
tailgate when the vehicl eisraised.
R make sure tha tnopersons ar epresent in
the vehicl ewhent he vehicl eisraised.
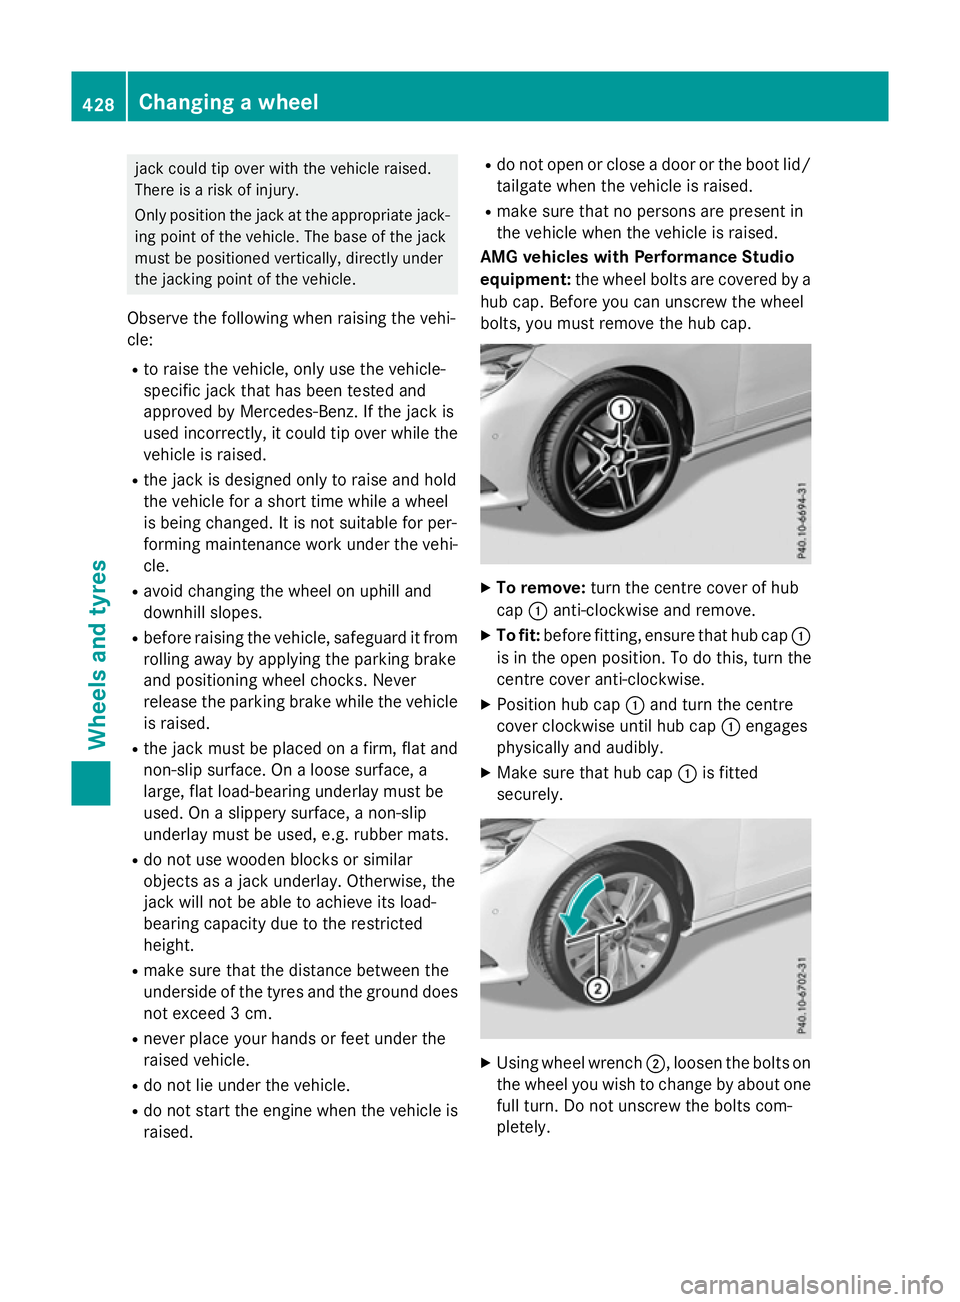
AM Gvehicle swithP erformanc eStudio
equipment: the wheelbolts ar ecovered by a
hu bc ap.B efore yo ucan unscrew the wheel
bolts ,you must remove the hu bcap. X
To remove: turnthe centre cove rofhub
cap :anti-clockwise and remove.
X To fit: beforefitting, ensur etha thub cap :
is in the open position. To do this, tur nthe
centre cove ranti-clockwise.
X Positio nhub cap :and tur nthe centre
cove rclockwise unti lhub cap :engages
physicall yand audibly.
X Make sure tha thub cap :is fitted
securely. X
Using whee lwrench ;,l oosent he bolts on
the whee lyou wish to change by abou tone
full turn. Do not unscrew the bolts com-
pletely. 428
Changin
gawheelWheels an dtyres
Page 484 of 497

Vehicl
edata General notes
Please note tha tfor the specified vehicle
data:
R the heights specified ma yvaryasar esult
of:
- tyres
- load
- condition of the suspension
- optional equipment
R optional equipment reduce sthe maximum
payload.
R vehicle-specific weight informatio ncan be
found on the vehicl eide ntificatio nplate
(Y page 472).
R onl yfor certain countries: yo ucan find vehi-
cle-specifi cvehicl edataint he CO Cdocu-
ments (CERTIFICATE OF CONFORMITY).
These documents ar edelive redw ithy our
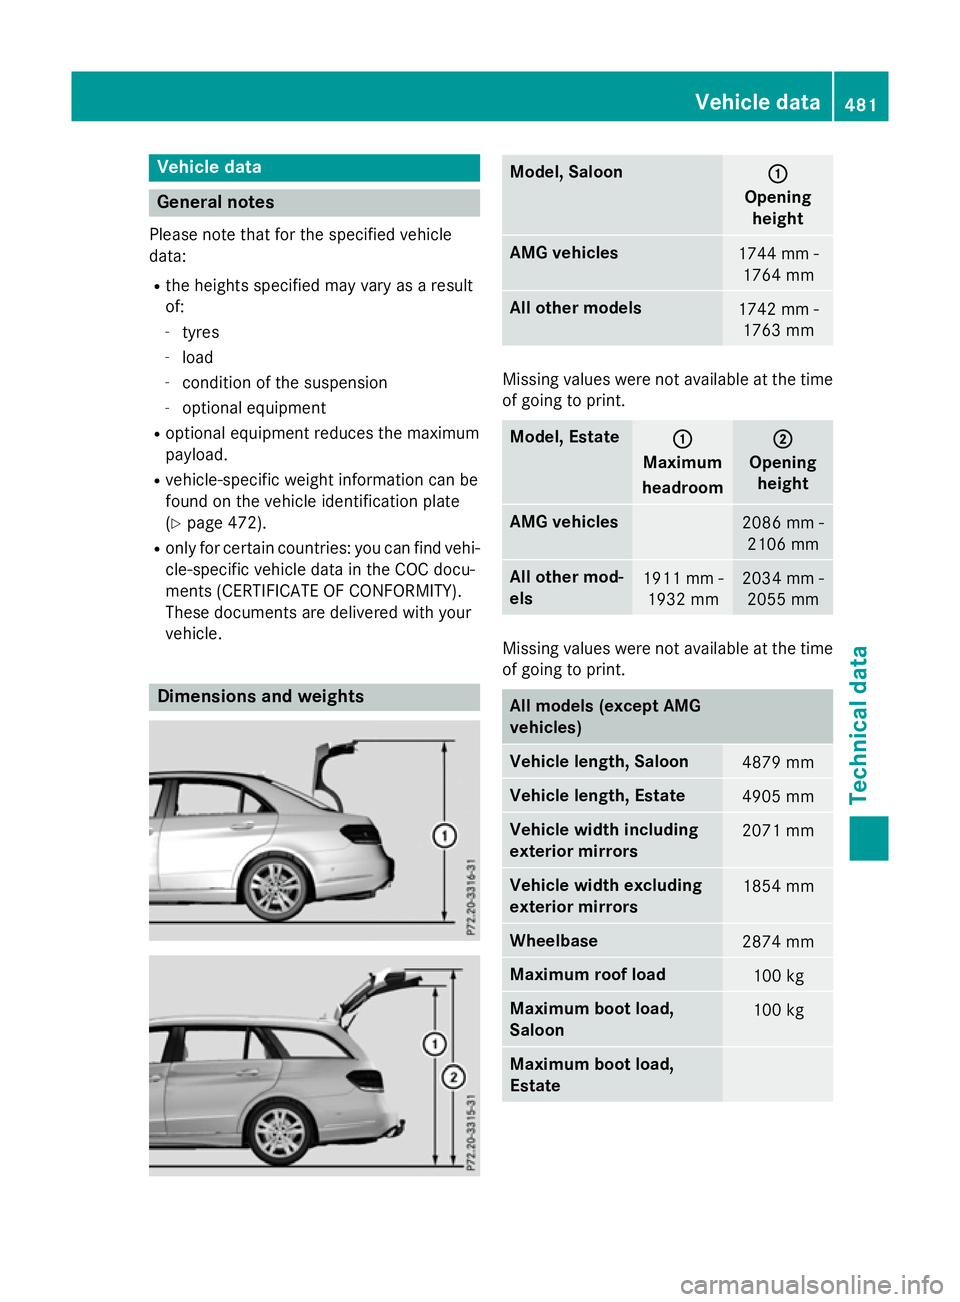
vehicle. Dimension
sand weights Model, Saloon
:
:
Opening height AM
Gvehicles 1744 mm -
1764 mm Al
lo the rm odels 1742 mm -
1763 mm Missing values were not availabl
eatthe time
of going to print. Model, Estate
:
:
Maximum
headroom ;
;
Opening height AM
Gvehicles 2086 mm -
2106 mm Al
lo the rm od-
els 1911 mm -
1932 mm 2034 mm -
2055 mm Missing values were not availabl
eatthe time
of going to print. Al
lm odels (except AMG
vehicles) Vehicl
elengt h, Saloon 4879 mm
Vehicl
elengt h, Estate 4905 mm
Vehicl
ewidth including
exterior mirrors 2071 mm
Vehicl
ewidth excluding
exterior mirrors 1854 mm
Wheelbase
2874 mm
Maximum roo
fload 100 kg
Maximum boot load,
Saloon
100 kg
Maximum boot load,
Estate Vehicl
edata
481Technica ldata Z
Page 485 of 497

Model
,Saloon (except
AMG vehicles) Vehicle
height E1
80
E2 00
E2 20 CDI 1474 mm
E2
20 BlueTEC BlueEFFI-
CIENCY Edition 1457 mm
E3
00 4MATIC
E4 00
E400 4MATIC
E2 50 BlueTEC 4MATIC
E3 50 BlueTEC 4MATIC 1477 mm
E5
00
E5 00 4MATIC 1458 mm
All other models
1475 mm
Model
,Estate (except
AMG vehicles) Vehicle
height E2
20 BlueTEC BlueEFFI-
CIENCY Edition 1494 mm
E2
50 BlueTEC 4MATIC
E3 50 BlueTEC 4MATIC 1509 mm
E5
00
E5 00 4MATIC 1511 mm
All other models
1507 mm
Missing values were not available at the time
of going to print. AMG vehicles
Vehicle width including
exterio rmirrors 2071 mm
Vehicle width excluding
exterio rmirrors 1873 mm
Wheelbase
2874 mm AMG vehicles
Maximum roof load
100 kg
Maximum bootl
oad,
Saloon Maximum bootl
oad,
Estate AMG vehicles Vehicle
length Saloon
4892 mm
Estate
4904 mm
E63A
MG
E63A MG S-MODEL Vehicle
height Saloon
1450 mm
Estate
1502 mm
E63A
MG 4MATIC
E63A MG S-MODEL
4MATIC Vehicle
height Saloon
1466 mm
Estate
1522 mm
Trailer tow hitch
Mountin
gdimensions
! If you have
atrailer tow hitch retrofitted,
changes to the engine cooling system may
be necessary, depending on the vehicle
type.
If you have atrailer tow hitch retrofitted,
observe the anchorage points on the chas- sis. 482
Trailer tow hitchTechnical data E2
20 BlueTEC 4MATIC/
E4 00
E400 4MATIC
/
E2 20 BlueTEC 4MATIC