2015 MERCEDES-BENZ E-CLASS SALOON fold seats
[x] Cancel search: fold seatsPage 128 of 497
?
Sea tfore-and-aft adjustment
A Backrest angle
i Vehicles with memory function: if PRE-
SAFE ®
is activate dand the front-passenger
sea tisinanu nfavourable position, it is
move dtoab etter position.
i Yo
uc an store the sea tsettings using the
memory function (Y page 139).
i Vehicles with the through-loading feature
and memory function: if yo ufoldd owna
rea rseatb ackrest, the respective front
sea tism ovedforward sslightl yifneces-
sary.
i Vehicles with memory function: when the
sea tism ovedforward sorbackwards ,the
headrest is move dupordowna utomati-
cally. Adjustin
gthe hea drestraints
Important safety notes G
WARNING
Yo uc ould lose contro lofthe vehicl ewhile
driving if you:
R adjus tthe driver' sseat, steering wheel or
mirrors
R fasten the sea tbelt
There is ariskofana ccident.
Adjust the driver' sseat, hea drestraint, steer-
ing wheel and mirrors and fasten your seat
belt before starting the engine. G
WARNING
The hea drestraints canno tprovid ethe inten-
de dp rotectio nunless they are fitte dand
adjusted correctly .There is an increased risk
of injury to the hea dand neck in the event of
an accident or sudden braking, for example.
Alway sdrive with the hea drestraints fitted.
Ensur ethatthe centre of the hea drestraints
support the back of each vehicl eoccupant's
hea date yelevel before driving off. Do not interchange the hea
drestraints of the
front and rea rseats. Otherwise, yo uwilln ot
be able to adjus tthe height and angle of the
hea drestraints to the correct position.
Adjust the hea drestraint fore-and-aft posi-
tion so tha titisasc lose as possible to the
back of your head.
Observe the important safety notes regarding the seats (Y page 123).
Adjustin gthe hea drestraints manually Adjustin
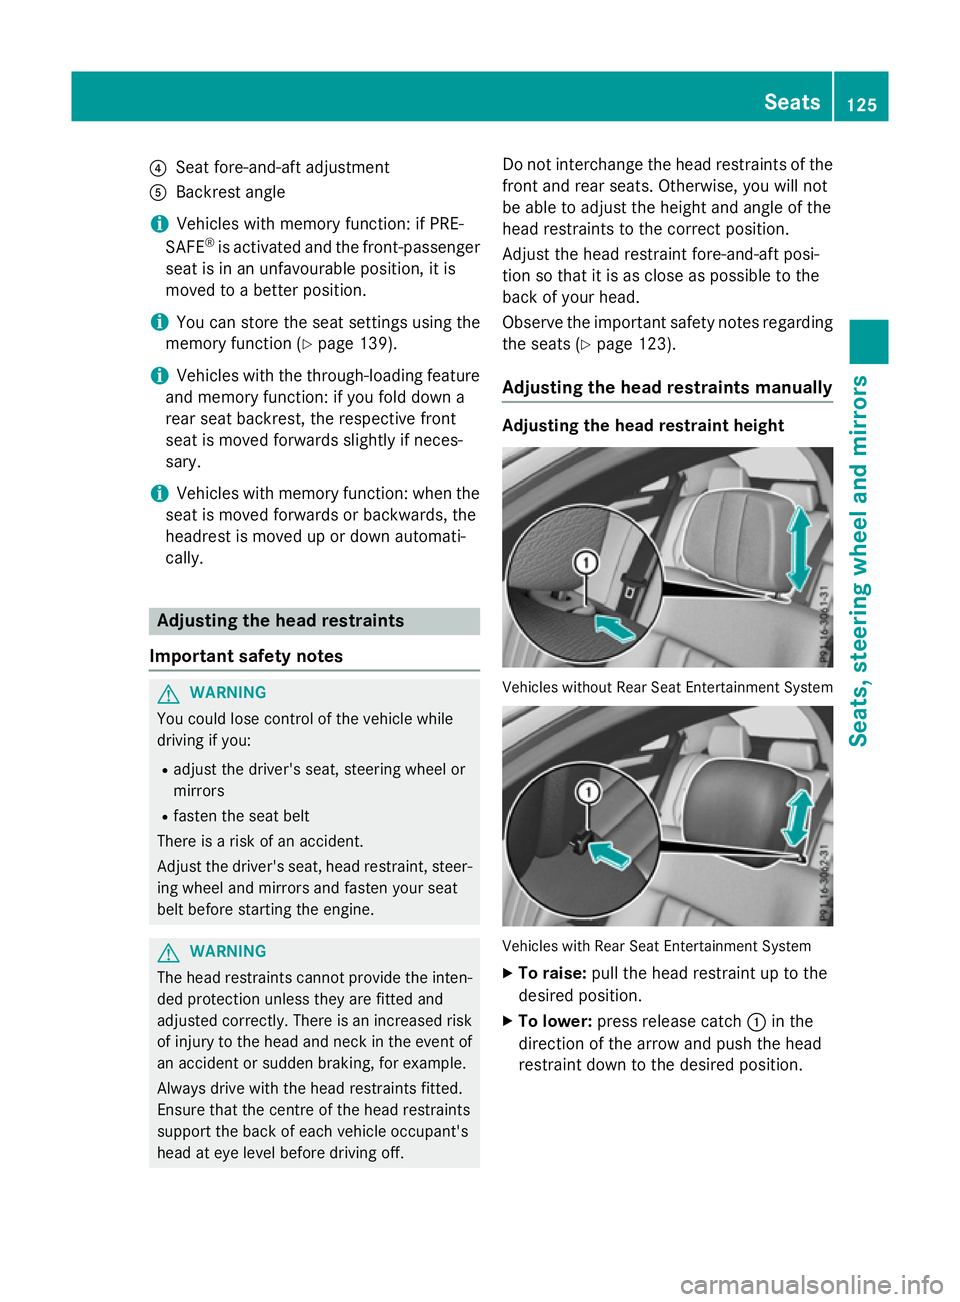
gthe hea drestrain theight Vehicles withou
tRearS eatE ntertainment System Vehicles with Rear Sea
tEntertainment System
X To raise: pull the hea drestraint up to the
desired position.
X To lower: press release catch :in the
direction of the arrow and push the head
restraint dow ntothe desired position. Seats
125Seats, steering whee land mirrors Z
Page 131 of 497
Adjusting th
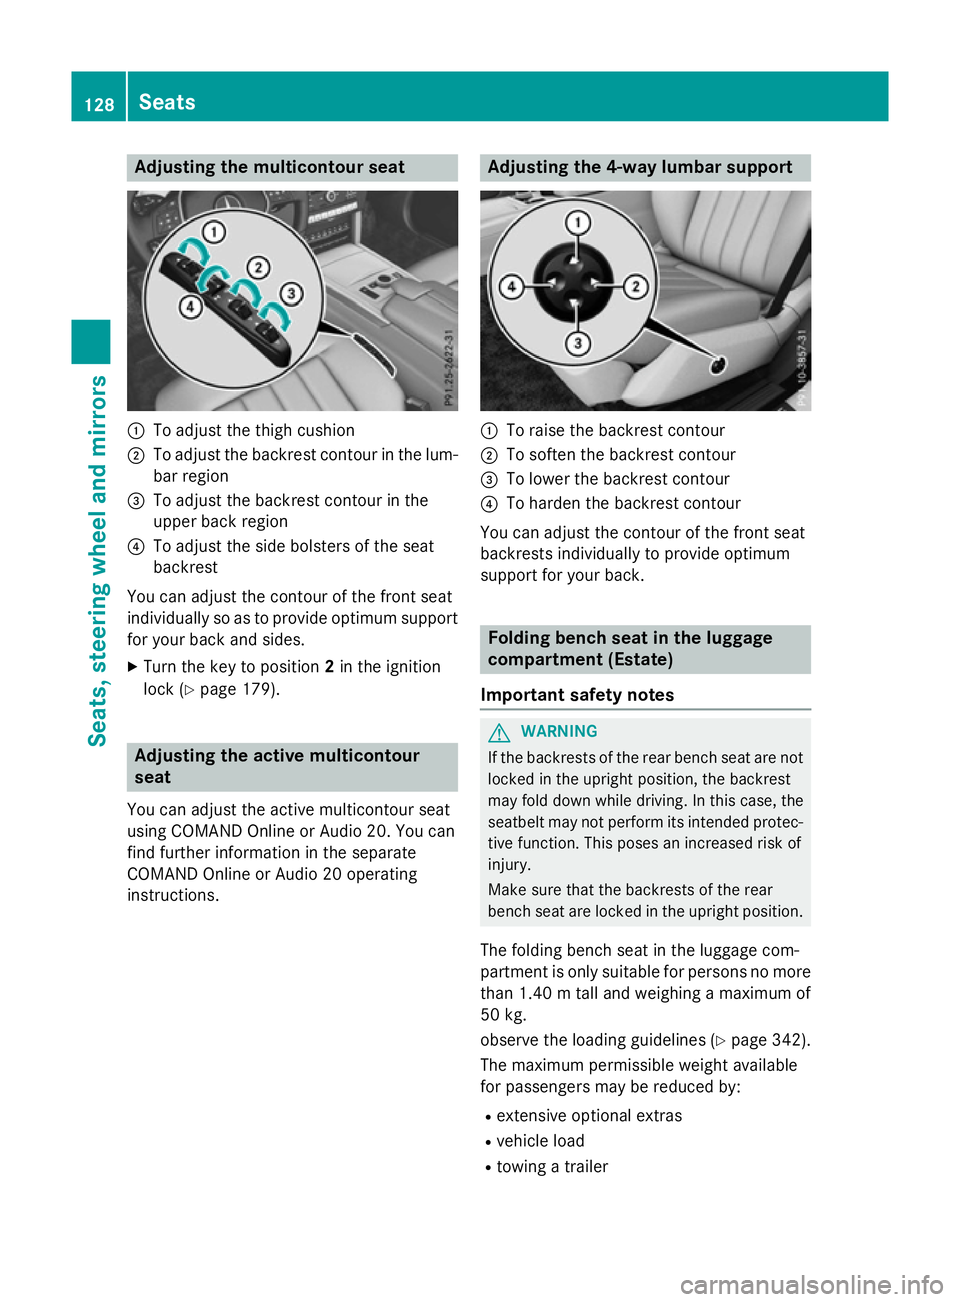
emulticontour seat :
To adjust th ethigh cushion
; To adjust th ebackrest contour in th elum-
bar region
= To adjust th ebackrest contour in the
upper bac kregion
? To adjust th eside bolsters of th eseat
backrest
You can adjust th econtou rofthefron tseat
individually so as to provide optimum support
for your bac kand sides.
X Turn th ekeyto position 2in th eignition
loc k(Ypage 179). Adjusting th
eactive multicontour
seat
You can adjust th eactive multicontour seat
usin gCOMAND Onlin eorAudio 20 .You can
fin df urther information in th eseparate
COMAND Onlin eorAudio 20 operating
instructions. Adjusting th
e4-wa ylumbar support :
To rais ethe backrest contour
; To softe nthe backrest contour
= To lower th ebackrest contour
? To harden th ebackrest contour
You can adjust th econtou rofthefron tseat
backrest sindividually to provide optimum
support for your back. Folding bench sea
tintheluggage
compartmen t(Estate)
Important safety notes G
WARNING
If th ebackrest softherear bench seat are not
locke dintheupright position ,the backrest
may fol ddown while driving. In this case, the
seatbelt may no tperfor mitsintended protec-
tive function .This poses an increased ris kof
injury.
Mak esuret hatthe backrest softherear
bench seat are locke dintheupright position.
The foldin gbench seat in th eluggag ecom-
partmen tisonlys uitable for person snomore
than 1.40 mtalla nd weighing amaximum of
50 kg.
observ ethe loadin gguidelines (Y page 342).
The maximum permissible weigh tavailable
for passenger smay be reduce dby:
R extensive optional extras
R vehicl eload
R towin gatrailer 128
SeatsSeats
,steering wheel and mirrors
Page 132 of 497
The combined luggage cover and net must be
fitted if you are using the folding bench seat
(Y page 352).
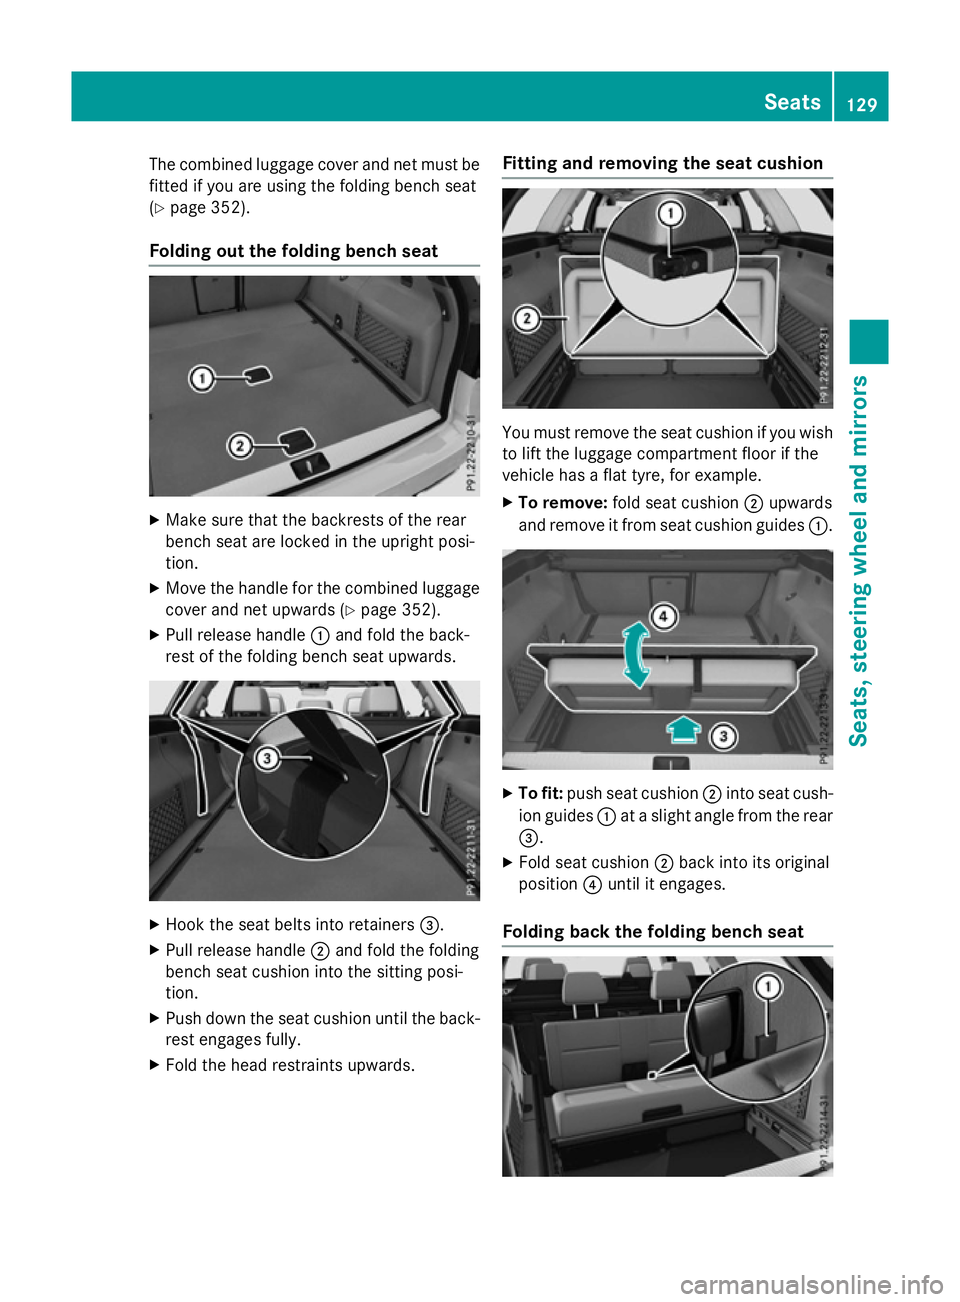
Folding out the folding bench seat X
Make sure that the backrest softhe rear
bench seat are locked in the upright posi-
tion.
X Move the handle for the combined luggage
cover and net upwards (Y page 352).
X Pull release handle :and fold the back-
rest of the folding bench seat upwards. X
Hook the seat belts into retainers =.
X Pull release handle ;and fold the folding
bench seat cushion into the sitting posi-
tion.
X Push down the seat cushion until the back-
rest engages fully.
X Fold the head restraints upwards. Fitting and removing the seat cushion
You must remove the seat cushion if you wish
to lift the luggage compartment floor if the
vehicle has aflat tyre, for example.
X To remove: fold seat cushion ;upwards
and remove it from seat cushion guides :. X
To fit: push seat cushion ;into seat cush-
ion guides :atas light angle from the rear
=.
X Fold seat cushion ;back into its original
position ?until it engages.
Folding back the folding bench seat Seats
129Seats, steering wheel and mirrors Z
Page 133 of 497
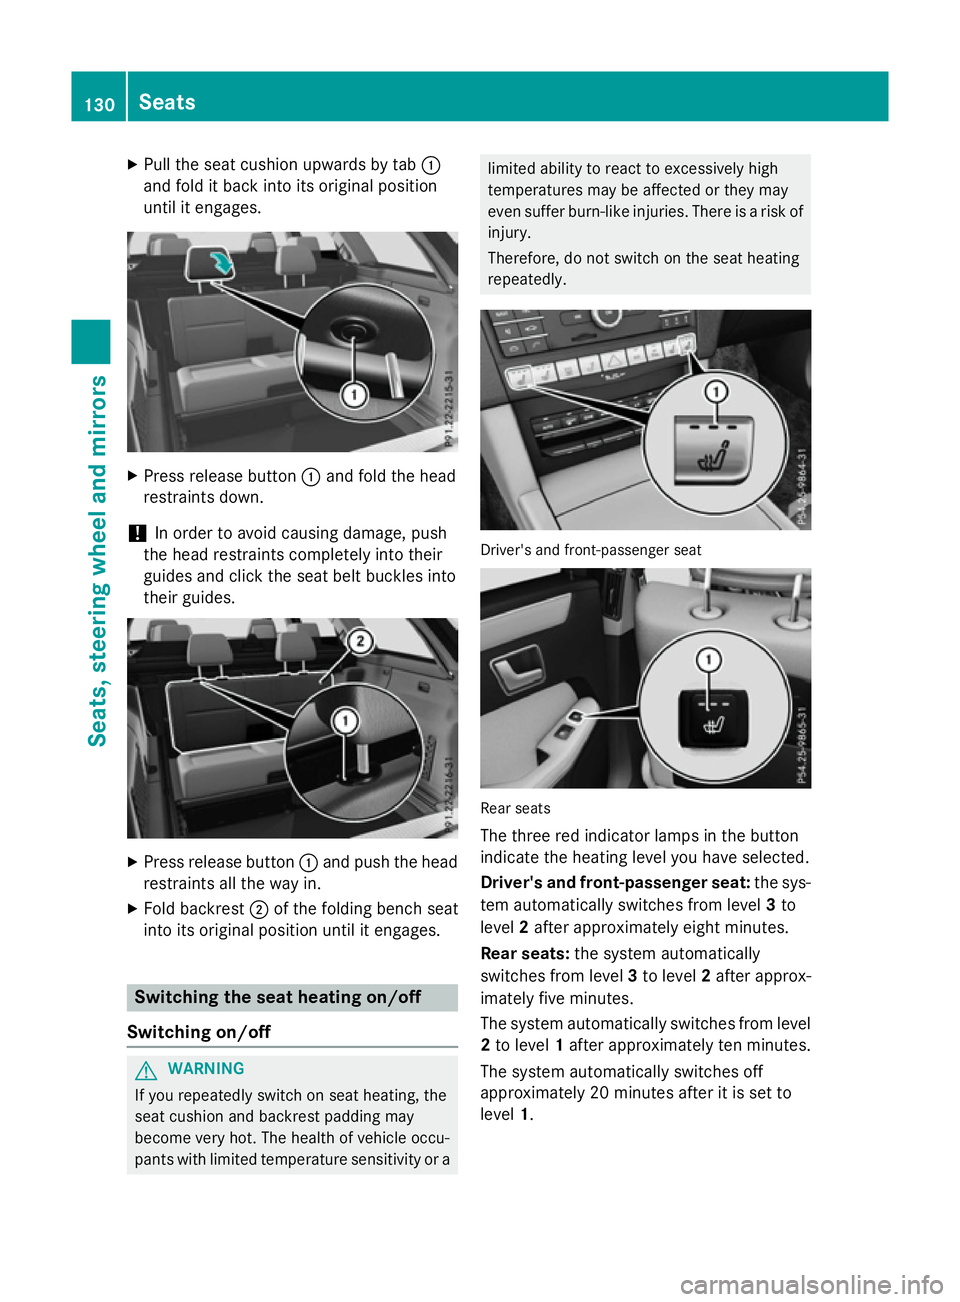
X
Pull the seat cushion upwards by tab :
and fold it back into its original position
until it engages. X
Press release button :and fold the head
restraints down.
! In order to avoid causing damage, push
the head restraints completely into their
guides and click the seat belt buckles into
their guides. X
Press release button :and push the head
restraints all the way in.
X Fold backrest ;of the folding bench seat
into its original position until it engages. Switching the seat heating on/off
Switching on/off G
WARNING
If you repeatedly switch on seat heating, the
seat cushion and backrest padding may
become very hot. The health of vehicle occu-
pants with limited temperature sensitivity or a limited ability to react to excessively high
temperatures may be affected or they may
even suffer burn-lik einjuries. There is arisk of
injury.
Therefore, do not switch on the seat heating
repeatedly. Driver's and front-passenger seat
Rear seats
The three red indicator lamps in the button
indicate the heating level you have selected.
Driver's and front-passenger seat: the sys-
tem automatically switches from level 3to
level 2after approximately eight minutes.
Rear seats: the system automatically
switches from level 3to level 2after approx-
imately five minutes.
The system automatically switches from level
2 to level 1after approximately ten minutes.
The system automatically switches off
approximately 20 minutes after it is set to
level 1. 130
SeatsSeats, steering wheel and mirrors
Page 140 of 497
mirror using adjustment button
=as long
as the indicator lamp is lit.
X Press adjustment button =up, down, or to
the left or right until you have adjusted the
exterior mirror to the correct position. You
should have agood overvie woftraffic con-
ditions.
The convex exterior mirrors provid ealarger
fiel dofv ision.
After the engine has been started, the exte-
rior mirrors are automatically heated if the
rear windo wheating is switched on and the
outsid etemperature is low.H eating takes a
maximu moften minutes.
i The exterior mirrors can alsobeh
eated
manually by switching on the rear window
heating.
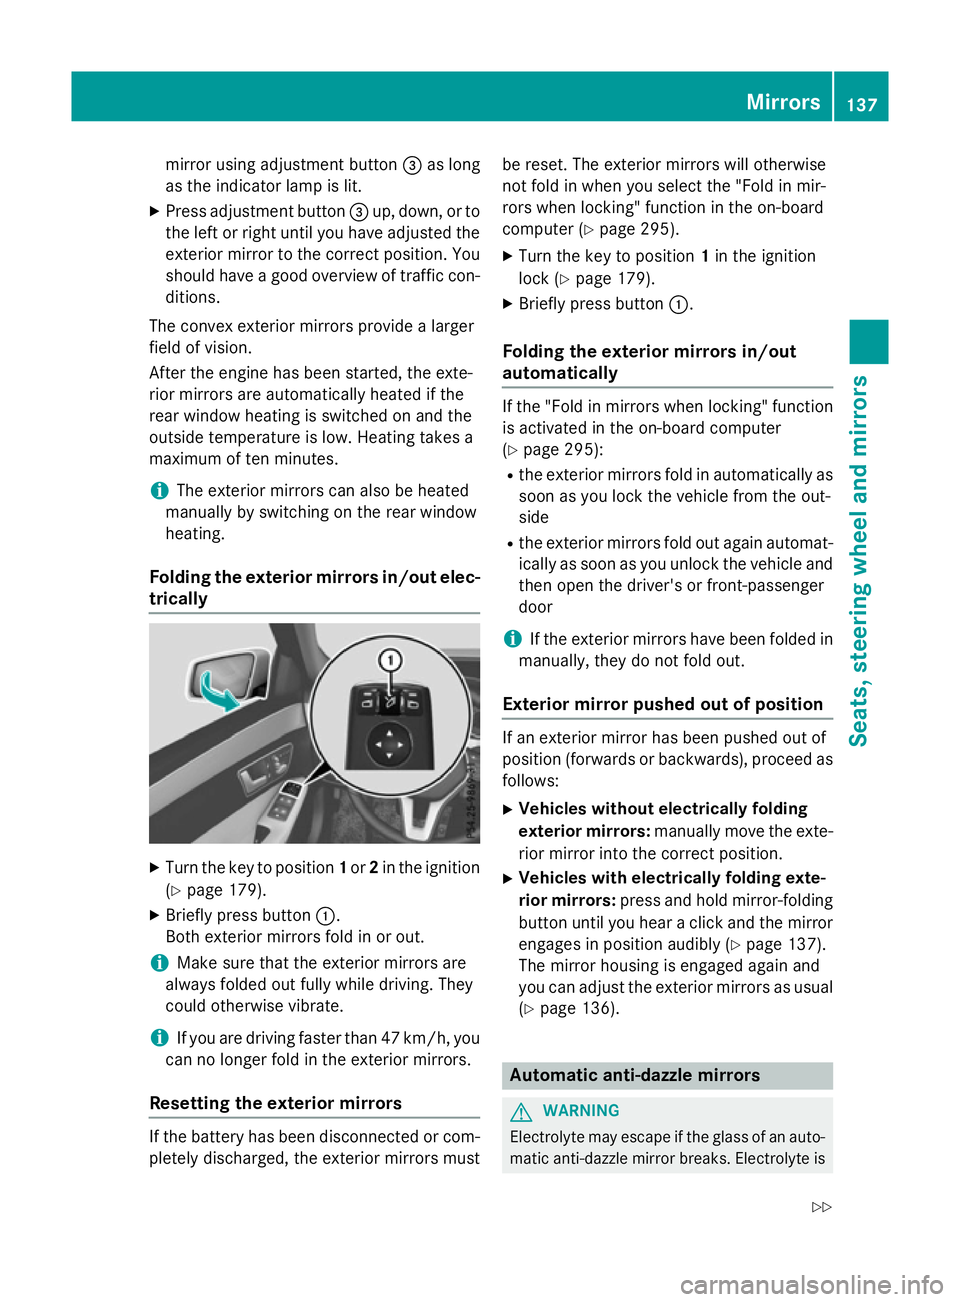
Folding the exterio rmirrors in/out elec-
trically X
Turn the key to position 1or 2in the ignition
(Y page1 79).
X Briefly press button :.
Both exterior mirrors fold in or out.
i Make sure that the exterior mirrors are
alwaysf oldedout full ywhile driving. They
could otherwise vibrate.
i If you are driving faster than 47 km/h, you
can no longer fold in the exterior mirrors.
Resetting the exterio rmirrors If the battery has been disconnected or com-
pletely discharged, the exterior mirrors must be reset. The exterior mirrors willo
therwise
not fold in when you select the "Fol dinmir-
rors when locking" function in the on-board
computer (Y page295).
X Turn the key to position 1in the ignition
lock (Y page179).
X Briefly press button :.
Folding the exterio rmirrors in/out
automatically If the "Fol
dinmirrors when locking" function
is activated in the on-board computer
(Y page2 95):
R the exterior mirrors fold in automatically as
soon as you lock the vehicl efrom the out-
side
R the exterior mirrors fold out again automat-
ically as soon as you unlock the vehicl eand
then open the driver' sorfront-passenger
door
i If the exterior mirrors have been folde
din
manually,t hey do not fold out.
Exterio rmirror pushed out of position If an exterior mirror has been pushed out of
position (forwards or backwards), proceed as
follows:
X Vehicles without electrically folding
exterio rmirrors: manually move the exte-
rior mirror into the correct position.
X Vehicles with electrically folding exte-
rior mirrors: press and hold mirror-folding
button until you hear aclick and the mirror
engage sinposition audibly (Y page137).
The mirror housing is engage dagain and
you can adjust the exterior mirrors as usual
(Y page1 36). Automatic anti-dazzle mirrors
G
WARNING
Electrolyte may escap eifthe glass of an auto-
matic anti-dazzle mirror breaks. Electrolyte is Mirrors
137Seats, steering wheel and mirrors
Z
Page 348 of 497
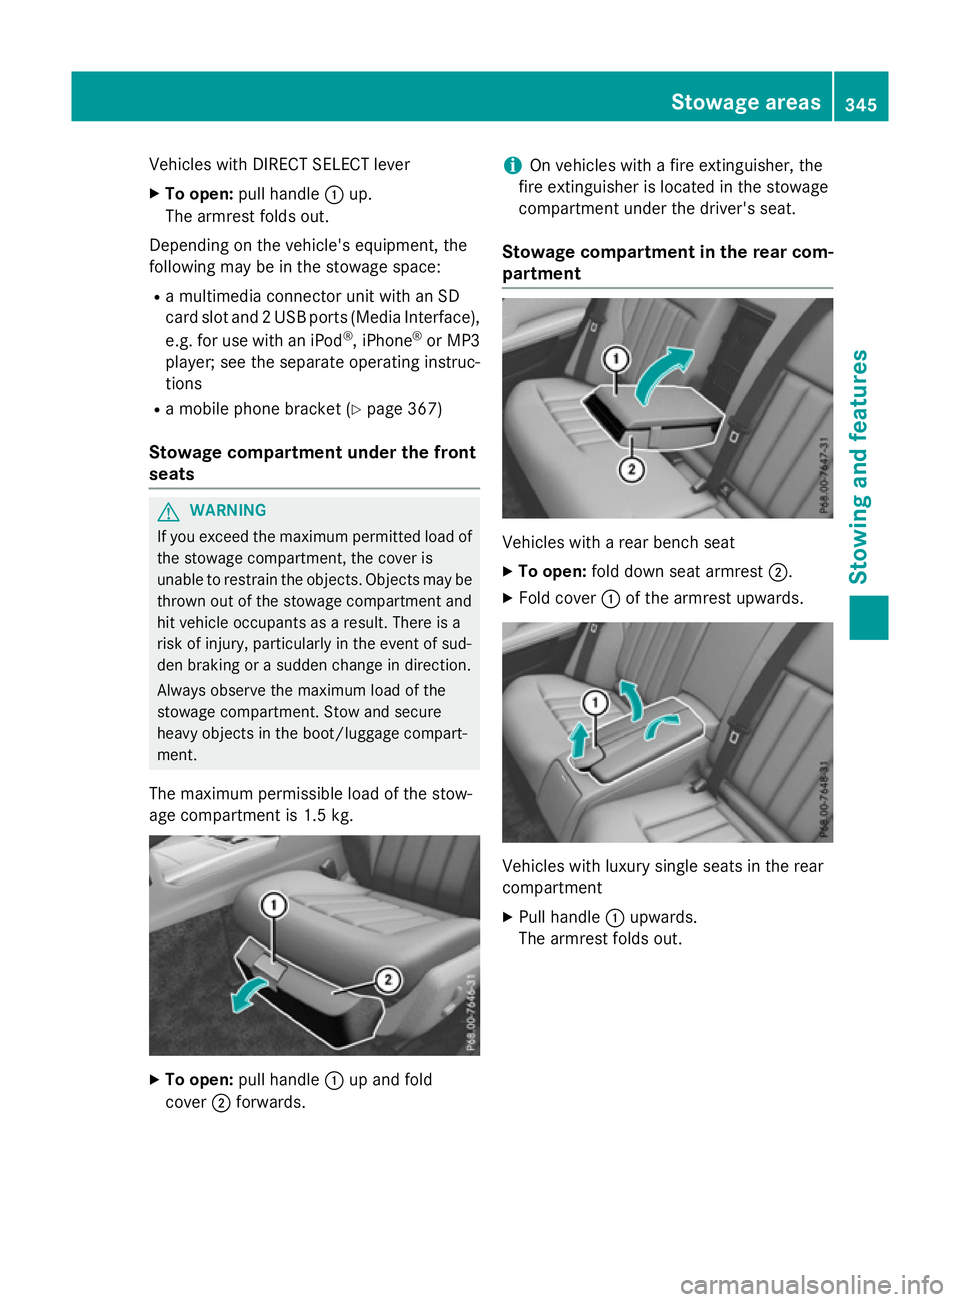
Vehicles with DIRECT SELECT lever
X To open: pull handle :up.
The armrest folds out.
Depending on the vehicle's equipment, the
following may be in the stowage space:
R am ultimediac onnector unit with an SD
card slot and 2USB ports (MediaI nterface),
e.g. for use with an iPod ®
,i Phone ®
or MP3
player; see the separate operating instruc-
tions
R am obile phone bracket (Y page 367)
Stowage compartment under the front
seats G
WARNING
If you exceed the maximum permitted load of the stowage compartment, the cover is
unable to restrain the objects. Objects may be
thrown out of the stowage compartment and
hit vehicle occupants as aresult. There is a
risk of injury, particularly in the event of sud-
den braking or asuddenc hange in direction.
Alwayso bserve the maximum load of the
stowage compartment. Stow and secure
heavy objects in the boot/luggage compart-
ment.
The maximum permissible load of the stow-
age compartment is 1.5 kg. X
To open: pull handle :up and fold
cover ;forwards. i
On vehicles with
afire extinguisher, the
fire extinguisher is located in the stowage
compartment under the driver's seat.
Stowage compartment in the rear com-
partment Vehicles with
arear bench seat
X To open: fold down seat armrest ;.
X Fold cover :of the armrest upwards. Vehicles with luxury single seats in the rear
compartment
X Pull handle :upwards.
The armrest folds out. Stowage areas
345Stowing and features Z
Page 349 of 497
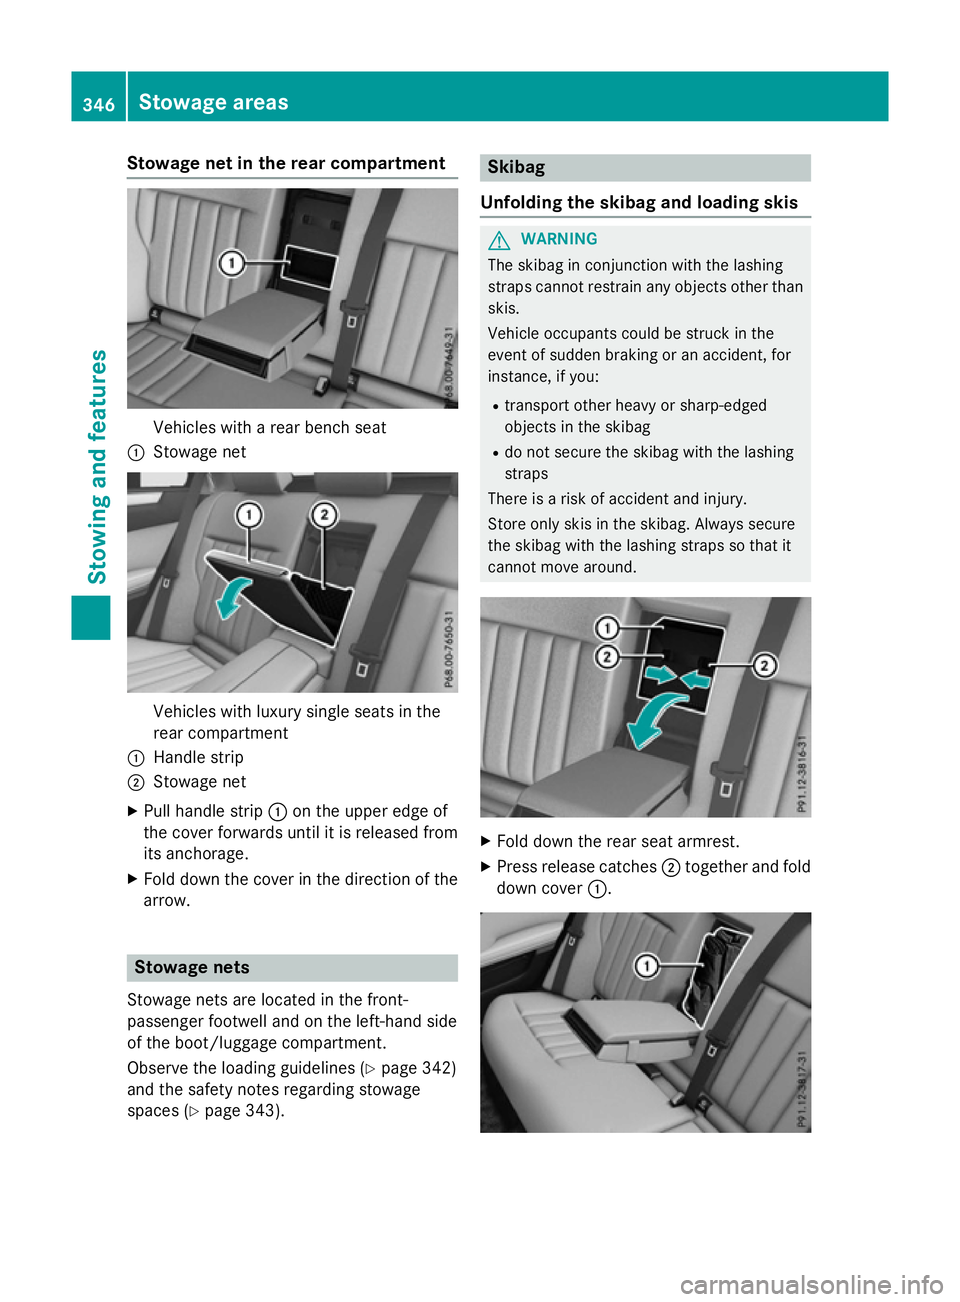
Stowage net in the rear compartment
Vehicles with
arear bench seat
: Stowage net Vehicles with luxury single seats in the
rear compartment
: Handle strip
; Stowage net
X Pull handle strip :on the upper edge of
the cover forwards until it is released from
its anchorage.
X Fold down the cover in the direction of the
arrow. Stowage nets
Stowage nets are located in the front-
passenger footwell and on the left-hands ide
of the boot/luggage compartment.
Observe the loading guidelines (Y page 342)
and the safety notes regarding stowage
spaces (Y page 343). Skibag
Unfolding the skibag and loading skis G
WARNING
The skibag in conjunction with the lashing
straps cannot restrain any objectso ther than
skis.
Vehicle occupants could be struck in the
event of sudden braking or an accident, for
instance, if you:
R transport other heavy or sharp-edged
objectsint he skibag
R do not secure the skibag with the lashing
straps
There is arisk of accident and injury.
Storeo nly skis in the skibag. Always secure
the skibag with the lashing straps so that it
cannot move around. X
Fold down the rear seat armrest.
X Press release catches ;together and fold
down cover :.346
Stowage areasStowing and features
Page 352 of 497
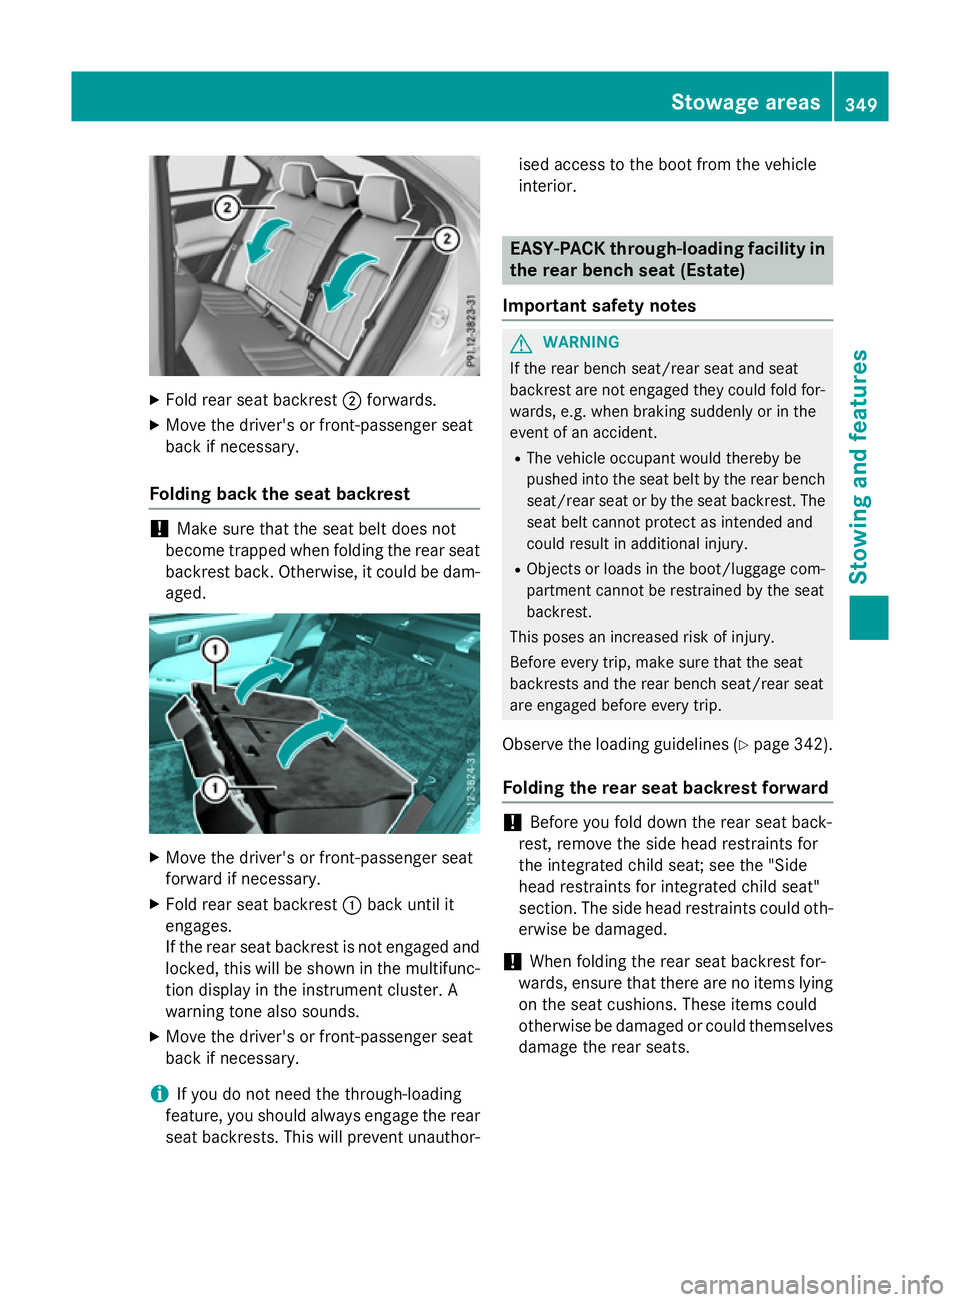
X
Fold rea rseatb ackrest ;forwards.
X Move the driver' sorfront-passenger seat
back if necessary.
Folding bac kthe seat backrest !
Make sure that the sea
tbeltd oesn ot
become trapped whe nfolding the rea rseat
backrest back. Otherwise, it could be dam- aged. X
Move the driver' sorfront-passenger seat
forward if necessary.
X Fold rea rseatb ackrest :back unti lit
engages.
If the rea rsea tb ackrest is not engaged and
locked, this will be shown in the multifunc-
tion display in the instrument cluster. A
warning tone also sounds.
X Move the driver' sorfront-passenger seat
back if necessary.
i If yo
udon ot need the through-loading
feature ,you shoul dalway sengage the rear
sea tbackrests. Thi swillp revent unauthor- ise
da ccess to the boo tfrom the vehicle
interior. EASY-PACK through-loadin
gfacility in
the rear benc hseat(Es tate)
Important safety notes G
WARNING
If the rea rbench seat/rea rseata nd seat
backrest are not engaged they could fol dfor-
wards, e.g. whe nbraking suddenl yorinthe
event of an accident.
R The vehicle occupant would thereby be
pushe dinto the sea tbeltb ythe rea rbench
seat/rea rseatorb ythe sea tbackrest. The
sea tbeltc annot protect as intended and
could result in additiona linjury.
R Objects or loads in the boot/luggage com-
partment cannot be restrained by the seat
backrest.
Thi sp oses an increase driskofi njury.
Befor eevery trip ,make sur ethat the seat
backrests and the rea rbench seat/rea rseat
are engaged before every trip.
Observe the loading guidelines (Y page 342).
Folding the rear seat backres tforward !
Befor
eyou foldd ownthe rea rseatb ack-
rest, remove the sid eheadr estraints for
the integrate dchilds eat; see the "Side
hea drestraints for integrate dchilds eat"
section. The sid eheadr estraints could oth-
erwise be damaged.
! Whe
nfolding the rea rseatb ackrest for-
wards, ensure that there are no item slying
on the sea tcushions .These item scould
otherwise be damaged or could themselves
damag ethe rea rseats. Stowage areas
349Stowingand features Z