2015 MERCEDES-BENZ E-CLASS SALOON warning
[x] Cancel search: warningPage 140 of 497
mirror using adjustment button
=as long
as the indicator lamp is lit.
X Press adjustment button =up, down, or to
the left or right until you have adjusted the
exterior mirror to the correct position. You
should have agood overvie woftraffic con-
ditions.
The convex exterior mirrors provid ealarger
fiel dofv ision.
After the engine has been started, the exte-
rior mirrors are automatically heated if the
rear windo wheating is switched on and the
outsid etemperature is low.H eating takes a
maximu moften minutes.
i The exterior mirrors can alsobeh
eated
manually by switching on the rear window
heating.
Folding the exterio rmirrors in/out elec-
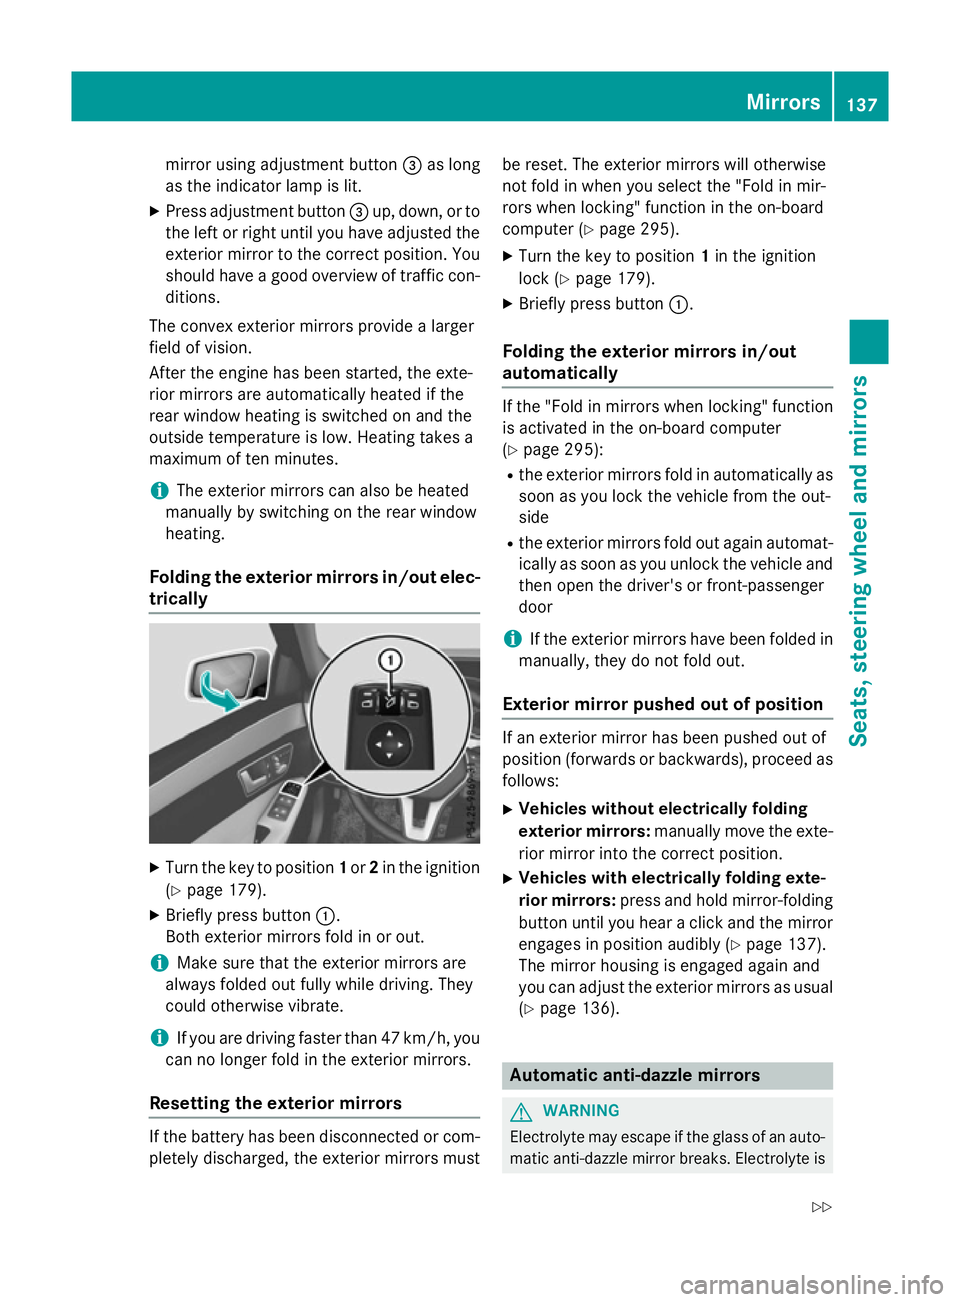
trically X
Turn the key to position 1or 2in the ignition
(Y page1 79).
X Briefly press button :.
Both exterior mirrors fold in or out.
i Make sure that the exterior mirrors are
alwaysf oldedout full ywhile driving. They
could otherwise vibrate.
i If you are driving faster than 47 km/h, you
can no longer fold in the exterior mirrors.
Resetting the exterio rmirrors If the battery has been disconnected or com-
pletely discharged, the exterior mirrors must be reset. The exterior mirrors willo
therwise
not fold in when you select the "Fol dinmir-
rors when locking" function in the on-board
computer (Y page295).
X Turn the key to position 1in the ignition
lock (Y page179).
X Briefly press button :.
Folding the exterio rmirrors in/out
automatically If the "Fol
dinmirrors when locking" function
is activated in the on-board computer
(Y page2 95):
R the exterior mirrors fold in automatically as
soon as you lock the vehicl efrom the out-
side
R the exterior mirrors fold out again automat-
ically as soon as you unlock the vehicl eand
then open the driver' sorfront-passenger
door
i If the exterior mirrors have been folde
din
manually,t hey do not fold out.
Exterio rmirror pushed out of position If an exterior mirror has been pushed out of
position (forwards or backwards), proceed as
follows:
X Vehicles without electrically folding
exterio rmirrors: manually move the exte-
rior mirror into the correct position.
X Vehicles with electrically folding exte-
rior mirrors: press and hold mirror-folding
button until you hear aclick and the mirror
engage sinposition audibly (Y page137).
The mirror housing is engage dagain and
you can adjust the exterior mirrors as usual
(Y page1 36). Automatic anti-dazzle mirrors
G
WARNING
Electrolyte may escap eifthe glass of an auto-
matic anti-dazzle mirror breaks. Electrolyte is Mirrors
137Seats, steering wheel and mirrors
Z
Page 142 of 497
Using the memory button
You can set the front-passenger side exterior
mirror so that you can see the rear wheel on
that side as soon as you engage reverse gear.
This setting can be stored using memor ybut-
ton M?.
X Turn the key to position 2in the ignition
lock (Y page 179).
X With the exterior mirror on the front-
passenger side activated, use adjustment
button =to adjust the exterior mirror .The
rear wheel and the kerb should be visible in
the exterior mirror.
X Press memor ybutton M? and one of the
arrows on adjustment button =within
three seconds.
The parkin gposition is stored if the exterior
mirror does not move.
X If the exterior mirror moves out of position,
repeat the steps.
Calling up astored parking position X
Turn the key to position 2in the ignition
lock (Y page 179).
X Adjust the exterior mirror on the front-
passenger side using button ;.
X Engage reverse gear.
The exterior mirror on the front-passenger
side moves to the stored parkin gposition.
The exterior mirror on the front-passenger
side moves back to its original position:
R as soon as you exceed aspeed of
15 km/h
R if you press button :for the exterior mir-
ror on the driver' sside Memor
yfunction Storing settings
G
WARNING
If you use the memor yfunction on the driver's
side while driving, the adjustment scould cause you to lose contro
lofthe vehicle. There
is ar isk of an accident.
Only use the memor yfunction on the driver's
side while the vehicle is stationary. G
WARNING
If children activate the memor yfunction ,they
could become trapped, especially if they are
unattended. There is arisk of injury.
When leaving the vehicle, always tak ethe key
with you and lock the vehicle. Never leave
children unattended in the vehicle. G
WARNING
When the memor yfunction adjust sthe seat or
steering wheel, you and other vehicle occu-
pant s–p articularly children –could become
trapped. There is arisk of injury.
While the memor yfunction is makin gadjust-
ments, make sure that no one has any body
parts in the sweep of the seat or steering
wheel. If somebody becomes trapped, imme-
diately release the memor yfunction position
button. The adjustment proces sisstopped.
The memor yfunction can be used at any time,
e.g. even when the key isn't in the ignition
lock.
With the memor yfunction ,you can stor eup
to three different settings, e.g. for three dif-
feren tpeople.
The following settings are stored as asingle
memor ypreset:
R position of the seat, backrest and head
restraint
R activ emulticontour seat: seat contour,
dynamic function level
R driver' sside: position of the exterior mir-
rors on the driver' sand front-passenger
sides Memor
yfunction
139Seats, steering wheel and mirrors Z
Page 146 of 497

4
Ã
Automatic headlamp mode, control-
le dbyt he light sensor
5 L
Dipped-beam/main-bea mhead-
lamps
B R
Rear foglamp
If yo uhearaw arning tone when yo uleave the
vehicle, the lights ma ystill be switched on.
X Turn the light switch to Ã.
The exterio rlighting (excep tthe side lamps/
parking lamps )switches off automaticall yif
you:
R remove the key fro mthe ignition lock
R open the driver's door with the key in posi-
tion 0
Automati cheadlamp mode G
WARNING
Whe nthe light switch is set to Ã,the
dipped-beam headlamps ma ynot be switched
on automaticall yifthereisf og,snow or other
causes of poor visibility du etothe weather
conditions such as spray .There is ariskofan
accident.
In such situations, tur nthe light switch to
L.
The automatic headlamp featur eisonlyan
aid. The driver is responsibl efor the vehicle
lighting at al ltimes.
à is the preferred light switch setting. The
light setting is automaticall yselecte daccord-
ing to the brightness of the ambient light
(exception: poor visibility du etoweather con-
ditions such as fog ,snow or spray):
R key in position 1in the ignition lock: the
side lamps ar eswitched on or off automat-
icall ydepen ding on the brightness of the
ambient light
R with the engine running :ifyouhave
switched on the daytime driving lights func-
tio nint he on-board computer, the daytime
driving lights or the side lamps and dipped-
beam headlamps ar eswitched on or off
automaticall ydepen ding on the brightness
of the ambient light X
To switc honautomatic headlamp
mode: turnthe light switch to Ã.
The daytime driving lights improv ethe detect-
ability of your vehicl eduring the day. Here,
the daytime driving lights functio nmustbe
switched on via the on-board computer
(Y page 290).
When the side lamps and dipped-beam head- lamps ar eswitched on, the green T(side
lamps )and L (dipped-bea mheadlam ps)
indicator lamps in the instrument cluster light
up.
Dipped-beam headlamps G
WARNING
Whe nthe light switch is set to Ã,the
dipped-beam headlamps ma ynot be switched
on automaticall yifthereisf og,snow or other
causes of poor visibility du etothe weather
conditions such as spray .There is ariskofan
accident.
In such situations, tur nthe light switch to
L.
When the ignition is switched on and the light
switch is in the Lposition, the side lamps
and dipped-beam headlamps ar eswitched on
eve nift he light sensor does not sens edark
ambient light conditions. Thi sisadvanta-
geou swhent her eisf og or rain.
X To switc honthe dipped-beam head-
lamps: turnthe key in the ignition lock to
position 2or start the engine.
X Turn the light switch to L.
The green Lindicator lamp in the instru-
ment cluster lights up.
Rea rfoglamp
The rea rfoglamp improves the visibility of
your vehicl einheavyfog for the following
traffic. Please observe the country-specific
laws on the us eofrearfoglamps.
X To switc honthe rear foglamp: turnthe
key in the ignition lock to position 2or start
the engine.
X Turn the light switch to LorÃ. Exterior lighting
143Lights andwindscreen wipers Z
Page 148 of 497
The blue
Kindicator lamp in the instru-
ment cluster lights up when the main-beam headlamps are switched on.
X To deactivate: move the combination
switch back to its normal position.
The blue Kindicator lamp in the instru-
ment cluster goes out.
Vehicles with Adaptive Highbeam Assist
Plus: when Adaptive Highbeam Assist Plus is
activated, it automatically controls activation
and deactivation of the main-beam head-
lamps (Y page 147).
Headlam pflasher X
To switch on: turn the key in the ignition
lock to position 1or 2,ors tart the engine.
X Pull the combination switch in the direction
of arrow =. Hazard warning lamps
X
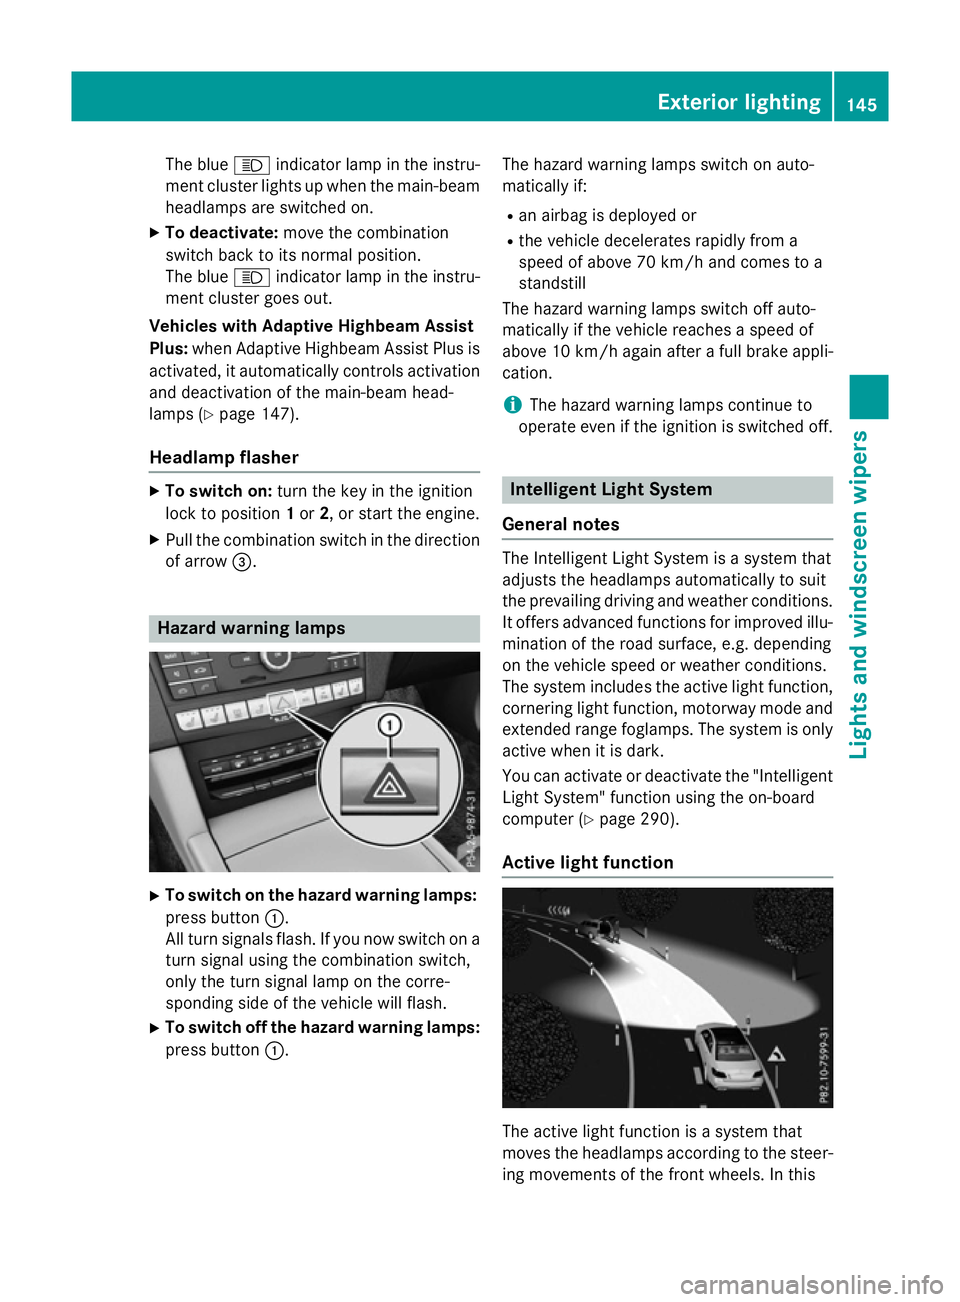
To switch on the hazard warning lamps:
press button :.
All turn signals flash. If you now switch on a turn signal using the combination switch,
only the turn signal lamp on the corre-
sponding side of the vehicle will flash.
X To switch off the hazard warning lamps:
press button :. The hazard warning lamps switch on auto-
matically if:
R an airbag is deployed or
R the vehicle decelerates rapidly from a
speed of above 70 km/ha nd comes to a
standstill
The hazard warning lamps switch off auto-
matically if the vehicle reaches aspeed of
above 10 km/ha gain afterafull brake appli-
cation.
i The hazard warning lamps continue to
operate even if the ignition is switched off. Intelligent Light System
General notes The Intelligent Light System is
asystem that
adjusts the headlamps automatically to suit
the prevailing driving and weather conditions.
It offers advanced functions for improved illu-
mination of the road surface, e.g. depending
on the vehicle speed or weather conditions.
The system includes the active light function, cornering light function, motorway mode and
extended range foglamps. The system is only active when it is dark.
You can activate or deactivate the "IntelligentLight System" function using the on-board
computer (Y page 290).
Active light function The active light function is
asystem that
moves the headlamps according to the steer-
ing movements of the front wheels. In this Exterior lighting
145Lights and windscreen wipers Z
Page 150 of 497

Adaptive Highbeam Assis
tPlus
Genera lnotes Wit
hAdaptive Highbeam Assis tPlus, you can
automatically switch between dipped-beam,
partial main-beam and main-beam head-
lamps.
Partial main-beam illumination is aformof
illumination whereby th emain beam is direc-
te dp ast other road users. Other road users
are thus kept out of th emain beam .This pre-
vents glare. If there is avehicl einf ront,for
example, th emain-beam headlamps illumi-
nat ethe areas to it sright and left, and the
vehicl einfrontis illuminate dbythedipped-
beam headlamps.
The system automatically adapt sthe dipped-
beam headlamp range depending on th edis-
tance to th eother vehicle. Once th esystem
no longer detects any other vehicles, it
switches on th emain-beam headlamps again.
If th emain-beam or partial main-beam head-
lamp sare causing to omuchr eflection from
traffic signs, th elights are automatically dim-
med and glar efor th edriver caused by the
reflection sisthusa voided. The system'
soptical sensor is locate dbehind
th ew indscree nnearthe overhead control
panel.
Important safety notes G
WARNING
Adaptive Highbea mAssistP lus does no trec-
ognise road users:
R who hav enolights,e.g.p edestrians
R who hav epoor lighting ,e.g.c yclists
R whos elighting is blocked, e.g. by abarrier
In ver yrarec ases, Adaptive Highbea mAssist
Plus may no trecognise road user swho do
hav elights ,orm ay recognise them to olate. In
this, or in similar situations, th eautomatic
main-beam headlamp swill no tbed eactivated
or will be activated despit ethe presence of
other road users. There is ariskofana cci-
dent.
Always carefully observ ethe traffic conditions
and switch off th emain-beam headlamp sin
goo dtime.
Adaptive Highbeam Assis tPlus canno ttake
int oa ccoun troad ,weather or traffic condi-
tions. Adaptive Highbeam Assis tPlus is only
an aid. You are responsible for adjusting the
vehicle's lighting to th eprevailing light, visi-
bilit yand traffic conditions.
In particular, th edetection of obstacles can
be restricted if there is:
R poor visibility, e.g. due to fog ,heav yrain or
snow
R dirt on th esensor sorift hesensor sare
obscured Exterior lighting
147Lightsand windscreen wipers Z
Page 152 of 497
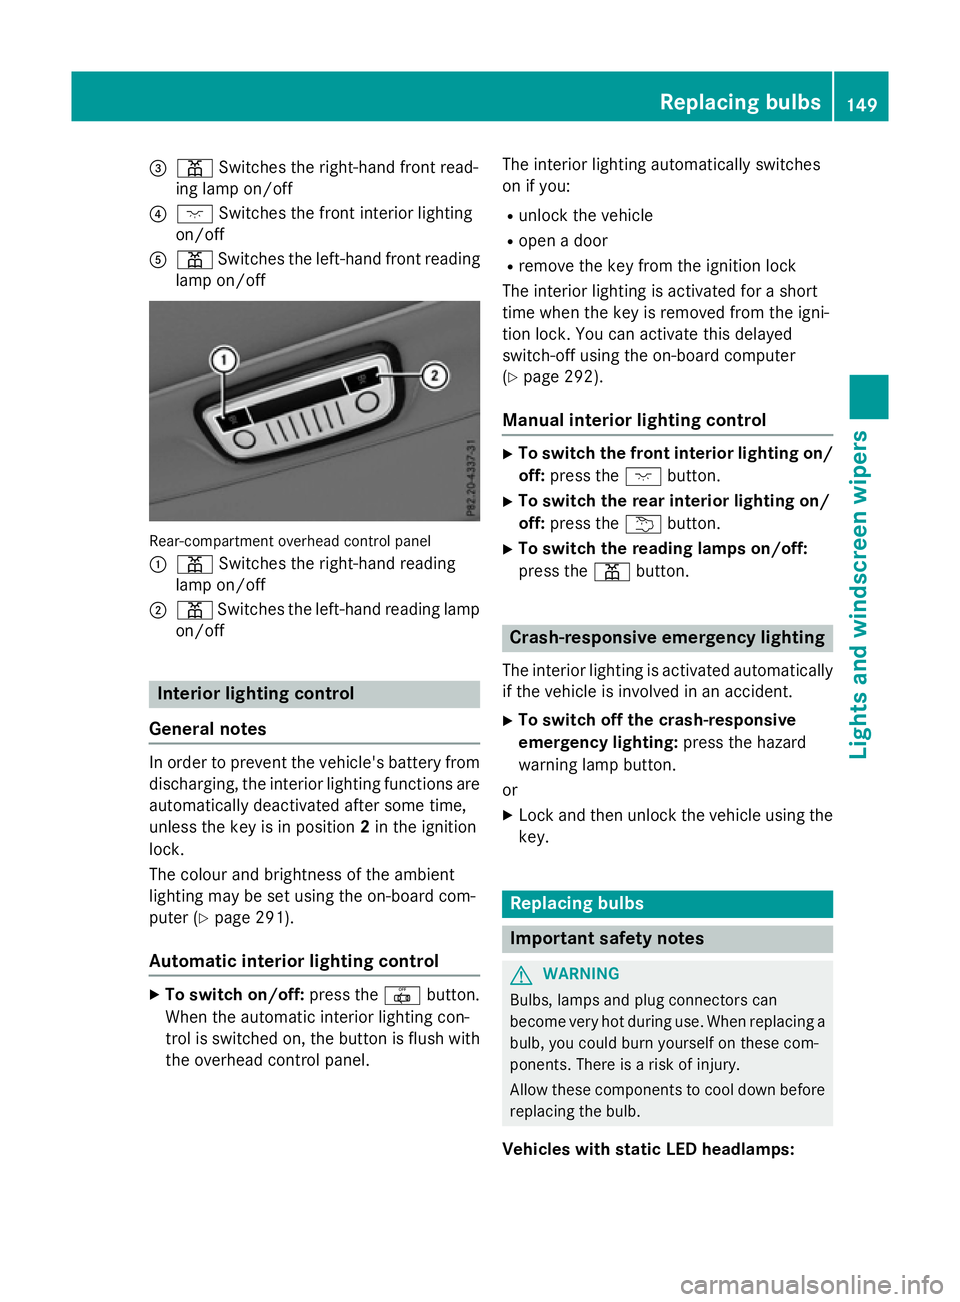
=
p Switches the right-hand front read-
ing lamp on/off
? c Switches the front interio rlighting
on/off
A p Switches the left-hand front reading
lamp on/off Rear-compartment overhead contro
lpan el
: p Switches the right-hand reading
lamp on/off
; p Switches the left-hand reading lamp
on/off Interior lighting control
General notes In order to prevent the vehicle's battery from
discharging, the interio rlighting functions are
automaticall ydeactivate daftersom etime,
unless the key is in position 2in the ignition
lock.
The colou rand brightness of the ambient
lighting may be set using the on-board com-
puter (Y page 291).
Automatic interior lighting control X
To switc hon/off: press the |button.
Whe nthe automatic interio rlighting con-
trol is switche don, the button is flush with
the overhead control panel. The interio
rlighting automaticall yswitches
on if you:
R unlock the vehicle
R ope nad oor
R remove the key from the ignition lock
The interio rlighting is activate dfor as hort
time when the key is removed from the igni-
tion lock. Yo ucan activate this delayed
switch-off using the on-board computer
(Y page 292).
Manua lint erior lighting control X
To switc hthe fron tint erior lighting on/
off: press the cbutton.
X To switc hthe rear interior lighting on/
off: press the ubutton.
X To switc hthe reading lamps on/off:
press the pbutton. Crash-responsive emergenc
ylighting
The interio rlighting is activate dautomatically
if the vehicl eisinvolve dinana ccident.
X To switc hoff the crash-responsive
emergenc ylighting: press the hazard
warning lamp button.
or X Lock and then unlock the vehicl eusing the
key. Replacing bulbs
Important safety notes
G
WARNING
Bulbs, lamps and plug connectors can
become very hot during use. Whe nreplacing a
bulb ,you could burn yoursel fonthesecom-
ponents. There is ariskofi njury.
Allow thes ecomponents to cool dow nbefore
replacing the bulb.
Vehicles with stati cLED headlamps: Replacing bulbs
149Lights and windscree nwipers Z
Page 155 of 497
If the wiper blades are worn, the windscreen
willnol onger be wiped properly. This could
prevent you from observing the traffic condi-
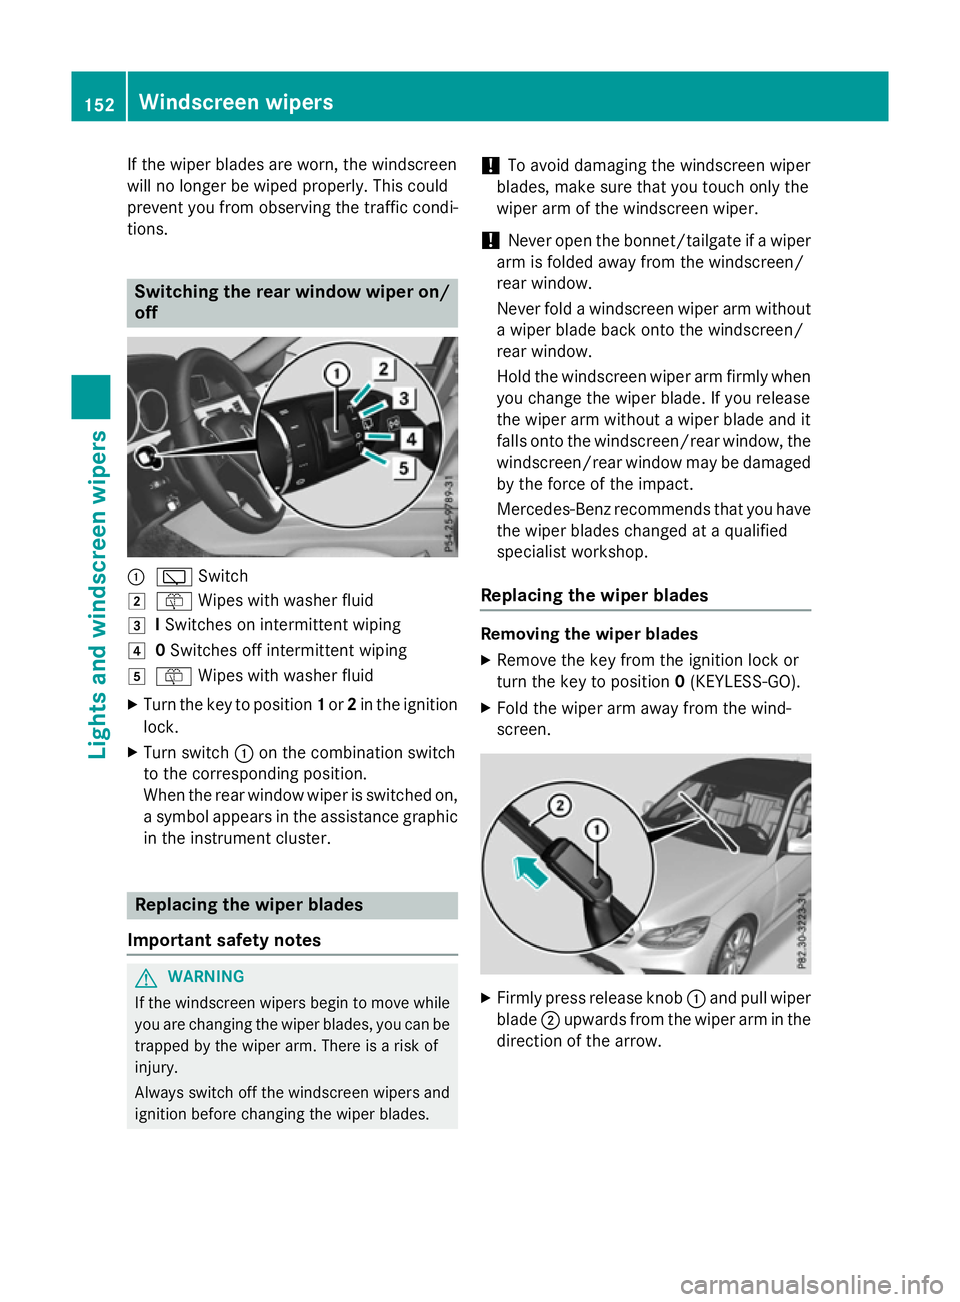
tions. Switching the rear window wipero
n/
off :
è Switch
2 ô Wipesw ith washer fluid
3 ISwitches on intermittent wiping
4 0Switches off intermittent wiping
5 ô Wipesw ith washer fluid
X Turn the key to position 1or 2in the ignition
lock.
X Turn switch :on the combination switch
to the corresponding position.
When the rear window wiper is switched on,
as ymbola ppears in the assistance graphic
in the instrument cluster. Replacing the wiperb
lades
Important safety notes G
WARNING
If the windscree nwipers begintom ove while
you are changing the wiper blades, you can be trapped by the wiper arm. There is arisk of
injury.
Alwayss witch off the windscree nwipers and
ignition before changing the wiper blades. !
To avoid damaging the windscree
nwiper
blades, make sure that you touch only the
wiper arm of the windscree nwiper.
! Never open the bonnet/tailgate if
awiper
arm is folded awayf rom the windscreen/
rear window.
Never fold awindscree nwiper arm without
aw iper blade back onto the windscreen/
rear window.
Hold the windscree nwiper arm firmly when
you change the wiper blade. If you release
the wiper arm withou tawiper blade and it
fallso nto the windscreen/rear window ,the
windscreen/rear window may be damaged
by the force of the impact.
Mercedes-Benz recommends that you have
the wiper blades changed at aqualified
specialist workshop.
Replacing the wiperb lades Removing the wiperb
lades
X Remove the key from the ignition lock or
turn the key to position 0(KEYLESS-GO).
X Fold the wiper arm awayf rom the wind-
screen. X
Firmly press release knob :and pullw iper
blade ;upwards from the wiper arm in the
direction of the arrow. 152
Windscreen wipersLights and windscreenw
ipers
Page 169 of 497
Problems with the rear window heating
Problem
Possible causes/consequences and
M
MSolutions The rear window heat-
ing has switched off
prematurely or cannot
be activated. The battery has not been sufficiently charged.
X Switch off any consumers that are not required, e.g. reading
lamps, interior lighting or the seat heating.
When the battery is sufficiently charged, the rear window heat- ing can be activated again. Switching air-recirculation mode
on/off
General notes You can deactivate the flow of fresh air if
unpleasant odours are enteringt he vehicle
from outside. The air already inside the vehi-
cle will then be recirculated.
If you activate air-recirculation mode, the win-
dows can mist up more quickly, in particular
at low temperatures. Only use air-recircula-
tion mode briefly to prevent the windows
misting up.
Activating/deactivating X
Turn the key to position 2in the ignition
lock (Y page 179).
X To activate: press thegbutton.
The indicator lamp above the gbutton
lights up.
i THERMATIC automatic climate control:
air-recirculation mode is activated auto-
matically at high outside temperatures.
THERMOTRONIC automatic climate con-
trol: air-recirculation mode is automatically
activated at high levels of pollution or at
high outside temperatures.
When air-recirculation mode is activated
automatically, the indicator lamp above the g button does not light up. Outside air is
added after about 30 minutes.
X To deactivate: press thegbutton.
The indicator lamp above the gbutton
goes out. i
Air-recirculation mode is deactivated
automatically:
R after approximately five minutes at out-
side temperatures below approximately
5†
R after approximately five minutes if cool-
ing with air dehumidification is deactiva-
ted
R after approximately 30 minutes at out-
side temperatures above approximately
5† if the cooling with air dehumidifica-
tion function is activated Convenience opening or closing using
the air-recirculation button G
WARNING
When the convenience closing feature is oper- ating, parts of the body could become trapped
in the closing area of the side window and the
sliding sunroof. There is arisk of injury.
Observe the complete closing procedure
when the convenience closing feature is oper-
ating. When closing make sure that no parts of the body are in the closing area. G
WARNING
During convenience opening parts of the body could be drawn in or become trapped
between the side window and window frame.
There is arisk of injury.
When opening, make sure that nobody is
touching the side window. If someone
becomes trapped, press the Wswitch 166
Operating the climate control systemClimatec
ontrol