2015 MERCEDES-BENZ E-CLASS SALOON change wheel
[x] Cancel search: change wheelPage 28 of 497
Do not instal
laccessorie ssuchasa udio
systems in these areas. Do not carry out
repairs or welding .You could impair the
operating efficiency of the restraint sys-
tems.
Have accessorie sretrofitted at aquali fied
specialis tworkshop.
Yo uc ould jeopardise the operating safety of
your vehicl eifyouusep arts, tyres and wheels
as well as accessorie srelevant to safety
which have not been approved by Mercedes. This could lead to malfunctions in safety-rel-
evant systems, e.g .the brake system. Only
us eg enuine Mercedes-Benz parts or parts of
equa lquali ty.O nlyu setyres ,wheel sand
accessorie sthath aveb eens pecifically
approved for your vehicle.
Mercedes-Benz tests genuine parts and con-
version parts and accessorie stha th aveb een
specifically approved for your vehicl efor their
reliability, safety and suitability. Despite
ongoing market research, Mercedes-Benz is
unabl etoassessother parts. Mercedes-Benz
therefore accepts no responsibility for the
us eofs uchp arts in Mercedes-Benz vehicles,
eve nift heyh aveb eeno fficially approved or
independentl yapproved by atesting centre.
In Germany, certai nparts ar eonlyo fficially
approved for installatio normodification if
the ycomply with lega lrequirements .This
also applie stosomeother countries .All gen-
uine Mercedes-Benz parts mee tthe approval
requirements .The useofn on-approved parts
ma yinvalidate the vehicle' sgenera lope rating
permit.
This is the case:
R if the ycause achange of the vehicl etype
fro mt hatfor which the vehicle' sgeneral
operating permi twasgranted
R if other roa dusers could be endangered
R if the emission or noise level sareadversely
affected
Alway sspecify the vehicl eide ntification num-
be r(VIN) when ordering genuine Mercedes-
Benz parts (Y page 472). Owner's Manual
Vehicle equipment
This Owner' sManuald escribe sallmodels
and al lstandard and optional equipment
availabl efor your vehicl eatthe tim eofpub-
lication of the Owner' sManual. Country-spe-
cific differences ar epossible. Note tha tyour
vehicl emaynot be fitte dwitha llfeatures
described. This is also the cas efor systems
and functions relevant to safety .The refore,
the equipment on your vehicl emaydiffe rfrom
tha tint he descriptions and illustrations.
Th eo riginal purchase contract documenta-
tio nfor your vehicl econtains alistofa llof the
systems in your vehicle.
Shoul dyou have any questions concerning
equipment and operation, please consul ta
Mercedes-Benz Service Centre.
Th eO wner'sM anualand Service Bookle tare
important documents and shoul dkeptint he
vehicle. Operatin
gsafety Important safety notes
G
WARNING
If yo udon ot have the prescribe dservice/
maintenanc eworkorn ecessary repairs car-
ried out, thi scould resul tinmalfunctions or
syste mfailures. There is ariskofana ccident.
Alway shavet he prescribe dservice/mainte-
nanc eworkasw ellasn ecessary repairs car-
ried ou tataqualified specialis tworkshop. G
WARNING
Flammabl ematerial such as leaves ,grass or
twigs ma yign ite if the ycome into contact with
ho tparts of the exhaust system. There is arisk
of fire.
When driving off roa doronunpaved roads,
check the vehicle' sundersid eregularly .In
particular ,remove parts of plants or other
flammabl ematerial swhich have become Introduction
25 Z
Page 29 of 497
trapped
.Inthe cas eofdamage, contact a
qualified specialis tworkshop. G
WARNING
Modifications to electronic components, their software as well as wirin gcould affect their
functio nand/or the operatio nofothernet-
worked components. Thi scould in particular
also be the cas efor systems relevant to
safety .The ym ight not functio nproperly any-
mor eand/or jeopardise the operational
safety of the vehicle. There is an increased
ris kofana ccident and injury.
Do not attempt to modify the wirin gaswellas
electronic components or their software.
Alway shavew orkone lectrical and electronic
components carrie doutataq uali fied special-
is tw orkshop.
If yo umakea ny change stothe vehicl eelec-
tronics, the genera lope rating permi tisr en-
dered invalid.
! There is
ariskofd amag etothe vehicl eif:
R the vehicl ebecome sstuck, e.g .onahigh
kerb or an unpaved road
R yo ud rive too fast ove ranobstacle ,e.g.a
kerb or apothol eint he road
R ah eavy object strikes the underbod yor
parts of the chassis
In situations like this, the body ,the under-
body ,chassi sparts, wheels or tyres could
be damage dwithou tthe damage being visi-
ble. Components damage dinthisw aycan
unexpectedly fail or, in the cas eofanacci-
dent, no longe rwithstand the strain they
ar ed esig nedf or.
If the underbod ypanelling is damaged,
combustible material ssuchasl eaves,
grass or twigs can gathe rbetween the
underbod yand the underbod ypanelling. If
these material scome in contact with hot
parts of the exhaust system ,the yc an catch
fire.
In such situations, have the vehicle
checked and repaired immediatel yata
qualified specialis tworkshop .If, upon con- tinuing your journey
,you notice tha tdriving
safety is impaired ,pullo vera nd stop the
vehicl eimm ediately, paying attentio nto
roa dand traffi cconditions. In such cases,
consul taqualified specialis tworkshop. Declaration
sofconformity
Wireless vehicle components Th
ef ollowing information applie stoallcom-
ponents of the vehicl eand the information
systems and communication devices integra-
ted into the vehicl ewhich receive and/or
transmi tradio waves:
Th ec omponents of thi svehicl ethatreceive
and/or transmi tradio waves ar ecompliant
with the basi crequirements and al lothe rrel-
evant conditions of Directiv e1999/5/EC.
Yo uc an obtai nfurthe rinformation fro many
Mercedes-Benz Service Centre.
Electromagnetic compatibility Th
ee lectromagnetic compatibility of the vehi-
cle components ha sbeenc hecked and certi-
fie da ccording to the currentl yvalid version of
Regulatio nECE-R 10. Diagnostic
sconnect ion
Th ed iagn ostics connectio niso nlyi ntended
for the connectio nofdiagnosticequipment at
aq uali fied specialis tworkshop. G
WARNING
If yo uconnect equipment to adiagn ostics
connectio ninthe vehicle, it can affect the
operatio nofthe vehicl esystems. This may
affect the operating safety of the vehicle.
There is ariskofana ccident.
Do not connect any equipment to adiagn os-
tics connectio ninthe vehicle. G
WARNING
Objects in the driver's footwell ma yrestrict
the clearance around the pedals or block a 26
Introduction
Page 80 of 497
atio
nisp ossible usin gthe switches in the
rear compartment. Pet
sint hevehicle G
WARNING
If you leave animals unsupervised or unse-
cured in th evehicle ,the ym ay push abutton
or as witch ,for example.
They could:
R activat evehicle equipmen tand become
trapped, for example
R switch vehicle systems on or off ,thus
endangering other road users
In th eevent of an accident, sudde nbraking or
abrupt changes of direction ,unsecured ani-
mals could be flun garoun dthe vehicle ,injur-
ing th evehicle occupants .Ther eisar iskofan
acciden tand injury.
Never leave animals unattende dinthevehi-
cle .Always secure animals correctly durin ga
journey, e.g .inananimal transpor tbox. Driving safety systems
Driving safety systems overview
In this section, you will fin dinformatio nabout
th ef ollowin gdriving safety systems:
R AB S(Anti-lock Braking System)
(Y page 77)
R BA S(Brake AssistSystem) (Y page 78)
R BA SP LUS(Brake AssistSystem PLUS) with
Cross-Traffic Assist (Y page 78)
R COLLISION PREVENTION ASSIST PLUS
(distanc ewarning function and Adaptive
Brake Assist )(Y page 80)
R Adaptive brak elamps (Y page 83)
R ESP ®
(E lectronic Stability Program)
(Y page 83)
R EB D( electronic brakeforce distribution)
(Y page 86)
R ADAPTIV EBRAKE (Y page 86) R
PRE-SAFE ®
Brake (Y page 87)
R STEE RCONTROL (Y page 89) Important safety notes
If you fail to adapt your driving style or if you
are inattentive, th edriving safety systems can
neither reduc ethe riskofana ccidentnor
override th elaws of physics. Drivin gsafety
systems are merely aids designe dtoassist
driving .You are responsible for maintaining
th ed istanc etothevehicle in front, for vehicle
speed, for braking in good time, and for stay- ing in lane .Always adapt your driving style to
suit th eprevailin groad and weather condi-
tions and maintain asafe distanc efromt he
vehicle in front. Drive carefully.
The driving safety systems describe donly
work as effectivel yaspossible when there is
adequat econtac tbetween th etyres and the
road surface. Pleas epay special attentio nto
th en otes on tyres, recommended minimum
tyr etread depths etc. (Y page 416).
In wintry driving conditions, always use winter
tyres (M+ Styres) and ,ifnecessary, snow
chains .Onlyint hisw ay will th edriving safety
systems describe dinthiss ectio nwork as
effectivel yaspossible. ABS (Anti-lock Braking System)
General notes AB
Sr egulate sbrak epressure in suc haway
that th ewheels do no tloc kw hen you brake.
This allows you to continue steering th evehi-
cle when braking.
The yellow !ABSw arning lamp in the
instrumen tcluste rlight supw hen th eignition
is switched on .Itgoes out when th eengineis
running.
Important safety notes i
Observ
ethe "Important safety notes" sec-
tio n(Ypage 77). Driving safety systems
77Safety Z
Page 128 of 497
?
Sea tfore-and-aft adjustment
A Backrest angle
i Vehicles with memory function: if PRE-
SAFE ®
is activate dand the front-passenger
sea tisinanu nfavourable position, it is
move dtoab etter position.
i Yo
uc an store the sea tsettings using the
memory function (Y page 139).
i Vehicles with the through-loading feature
and memory function: if yo ufoldd owna
rea rseatb ackrest, the respective front
sea tism ovedforward sslightl yifneces-
sary.
i Vehicles with memory function: when the
sea tism ovedforward sorbackwards ,the
headrest is move dupordowna utomati-
cally. Adjustin
gthe hea drestraints
Important safety notes G
WARNING
Yo uc ould lose contro lofthe vehicl ewhile
driving if you:
R adjus tthe driver' sseat, steering wheel or
mirrors
R fasten the sea tbelt
There is ariskofana ccident.
Adjust the driver' sseat, hea drestraint, steer-
ing wheel and mirrors and fasten your seat
belt before starting the engine. G
WARNING
The hea drestraints canno tprovid ethe inten-
de dp rotectio nunless they are fitte dand
adjusted correctly .There is an increased risk
of injury to the hea dand neck in the event of
an accident or sudden braking, for example.
Alway sdrive with the hea drestraints fitted.
Ensur ethatthe centre of the hea drestraints
support the back of each vehicl eoccupant's
hea date yelevel before driving off. Do not interchange the hea
drestraints of the
front and rea rseats. Otherwise, yo uwilln ot
be able to adjus tthe height and angle of the
hea drestraints to the correct position.
Adjust the hea drestraint fore-and-aft posi-
tion so tha titisasc lose as possible to the
back of your head.
Observe the important safety notes regarding the seats (Y page 123).
Adjustin gthe hea drestraints manually Adjustin
gthe hea drestrain theight Vehicles withou
tRearS eatE ntertainment System Vehicles with Rear Sea
tEntertainment System
X To raise: pull the hea drestraint up to the
desired position.
X To lower: press release catch :in the
direction of the arrow and push the head
restraint dow ntothe desired position. Seats
125Seats, steering whee land mirrors Z
Page 141 of 497

harmful and causes irritation. It must not
come into contact with your skin, eyes, res-
piratory organs or clothing or be swallowed.
There is arisk of injury.
If you come into contact with electrolyte,
observe the following:
R immediately rinse off electrolyte from your
skin with water.
R immediately and thoroughly rinse electro-
lyte out of eyes using clean water.
R if electrolyte is swallowed, immediately
rinse out your mouth thoroughly. Do not
induce vomiting.
R if electrolyte comes into contact with skin
or eyes or is swallowed, seek medical atten-
tion immediately.
R immediately change out of clothing that has
been in contact with electrolyte.
R if an allergic reaction occurs, seek medical
attention immediately.
The rear-view mirror and the exterior mirror
on the driver's side automatically go into anti- dazzle mode if the following conditionsa re
met simultaneously:
R the ignition is switched on and
R incident light from headlamps strikes the
sensor in the rear-view mirror
The mirrors do not dip if reverse gear is
engaged or if the interior lighting is switched
on. Parking position of the exterior mirror
on the front-passenger side
Setting and storing the parking position Using reverse gear
:
Button for the exterior mirror on the driv-
er's side
; Button for the exterior mirror on the front-
passenger side
= Adjustment button
? Memory button M
You can set the front-passenger side exterior
mirror so that you can see the rear wheel on
that side as soon as you engage reverse gear.
You can store this position.
X Stop the vehicle and turn the key to posi-
tion 2in the ignition lock (Y page 179).
X Press button ;for the exterior mirror on
the front-passenger side.
X Engage reverse gear.
The exterior mirror on the front-passenger
side moves to the preset parking position.
X Use adjustment button =to adjust the
exterior mirror to aposition that allowsy ou
to see the rear wheel and the kerb.
The parking position is stored.
i If you shift the transmission to another
position, the exterior mirror on the front-
passenger side returns to the driving posi-
tion. 138
MirrorsSeats, steering wheela
nd mirrors
Page 185 of 497
Manual transmission
X
Depress the brake peda land keep it
depressed.
X Full ydepress the clutch pedal.
X Shift to neutral N.
Automatic transmission X
Shift the transmission to position P.
The transmission position indicator in the
multifunction display shows P.
i You can start the engine in transmission
position Pand N.
Starting procedure with the key i
To start the engine using the key instead
of KEYLESS-GO, pullt he Start/Stop button
out of the ignitio nlock.
X Vehicles with diese lengine: turn the key
to position 2in the ignitio nlock
(Y page1 79).
The % preglow indicator lampint he
instrument cluster lights up.
X Turn the key to position 3in the ignition
lock and release it as soon as the engine is running (Y page179).
i Vehicles with
adiesele ngine: you can
start the engine without preglow if the
engine is warm.
Using KEYLESS-GO to start the engine i
The Start/Stop button can be usedto
start the vehicl emanually without inserting
the key into the ignitio nlock. The key must
be in the vehicl eand the Start/Stop button
must be inserted in the ignitio nlock. This
mode for starting the engine operates inde- pendently of the ECO start/stop automatic engine start function. X
Depress the brake peda land keep it
depressed.
X Press the Start/Stop button once
(Y page1 79).
Vehicles with apetrol engine: the engine
starts.
Vehicles with adiesele ngine: preglow is
activated and the engine starts. Pulling away
General notes G
WARNING
Vehicles with automatic transmission:
If the engine spee disabove the engine idling
spee dand you then engag etransmission
position Dor R,t he vehicl emay accelerate
suddenly .There is arisk of an accident.
When engaging transmission position Dor R,
alwaysk eep the brake peda lfirmly depressed
and do not depress the accelerator peda lat
the same time.
! Vehicles with manual transmission:
change gearing ood time and avoi dspin-
ning the wheels. You coul dotherwise dam-
age the vehicle.
! If
aw arning tone sound sand the
Release park. brake Release park. brake message appears
in the multifunction display,t he parking
brake is still applied. Releaset he parking
brake.
Depress the accelerator carefully when pull-
ing away.
The vehicl elocks centrall yonce you have
pulled away.T he locking knobs in the doors
drop down.
You can open the doors from the insid eatany
time.
You can alsod eactivate the automatic locking
feature (Y page293).
Vehicles with automatic transmission: it
is only possible to shift the transmission from 182
DrivingDriving and parking
Page 196 of 497
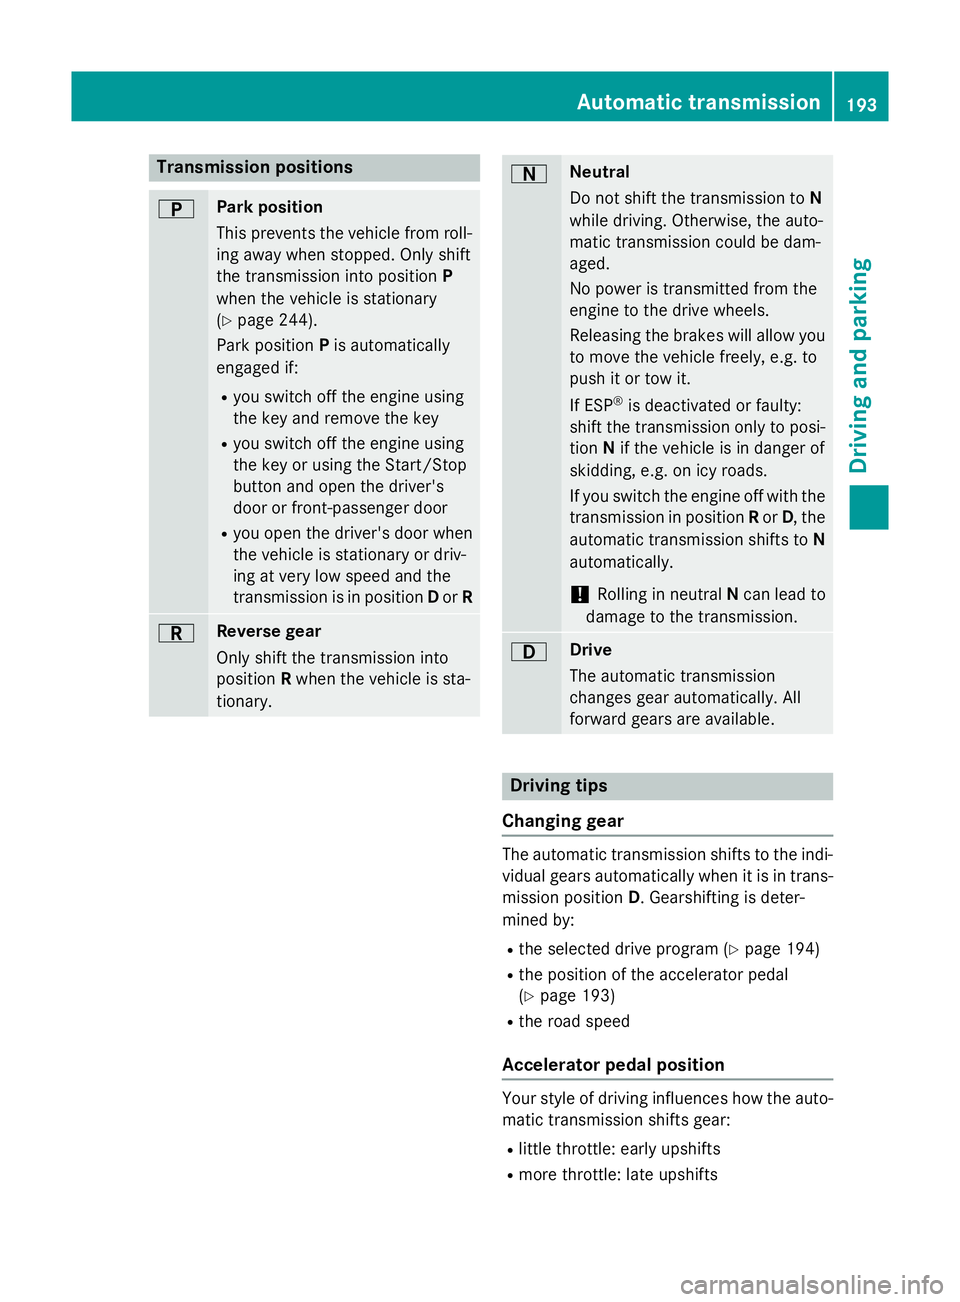
Transmission positions
B Park position
Thi
sprevents the vehicl efromr oll-
ing away when stopped. Onl yshift
the transmission into position P
when the vehicl eisstationary
(Y page 244).
Park position Pis automatically
engaged if:
R yo us witch off the engine using
the key and remove the key
R yo us witch off the engine using
the key or using the Start/Stop
button and open the driver's
door or front-passenge rdoor
R yo uo pent he driver's door when
the vehicl eisstationar yordriv-
ing at ver ylow spee dand the
transmission is in position Dor R C Revers
egear
Onl yshift the transmission into
position Rwhen the vehicl eissta-
tionary. A Neutral
Do not shift the transmission to
N
whil edriving .Otherwise, the auto-
matic transmission could be dam-
aged.
No powe ristransmitted fro mthe
engine to the drive wheels.
Releasing the brakes will allo wyou
to mov ethe vehicl efreely, e.g .to
push it or tow it.
If ESP ®
is deactivated or faulty:
shift the transmission onl ytoposi-
tion Nif the vehicl eisindangerof
skidding ,e.g.oni cy roads.
If yo uswitch the engine off with the
transmission in position Ror D,t he
automatic transmission shifts to N
automatically.
! Rolling in neutral
Ncan lead to
damage to the transmission. 7 Drive
The automatic transmission
change sgeara utomatically. All
forward gear sareavailable. Driving tips
Changin ggear The automatic transmission shifts to the indi-
vidua lgears automaticall ywhenitisint rans-
mission position D.Gearshifting is deter-
mined by:
R the selected drive progra m(Ypage 194)
R the positio nofthe accelerator pedal
(Y page 193)
R the roa dspeed
Accelerator peda lposition Your style of driving influences how the auto-
matic transmission shifts gear:
R little throttle :early upshifts
R mor ethrottle :lat eu pshifts Automati
ctransmission
193Driving andparking Z
Page 198 of 497
Vehicles with the AMG sports package
X Press program selector button :.
The selected drive program appears in the
multifunction display.
i Further information aboutp
ermanent
drive program M(Y page 198).
As well as this permanent drive program M,
you can also activate temporary drive pro-
gram M(Y page 197). E
Economy Comfortable,e
conomical
driving E+
Economy
Plus Comfortable,p
articularly
economical driving S
Sport Sporty driving style
M
Manual Manualg
earshifting i
Further information on the automatic
drive program (Y page 196).
i The automatic transmission switches to
automatic drive program Eeach time the
engine is started.
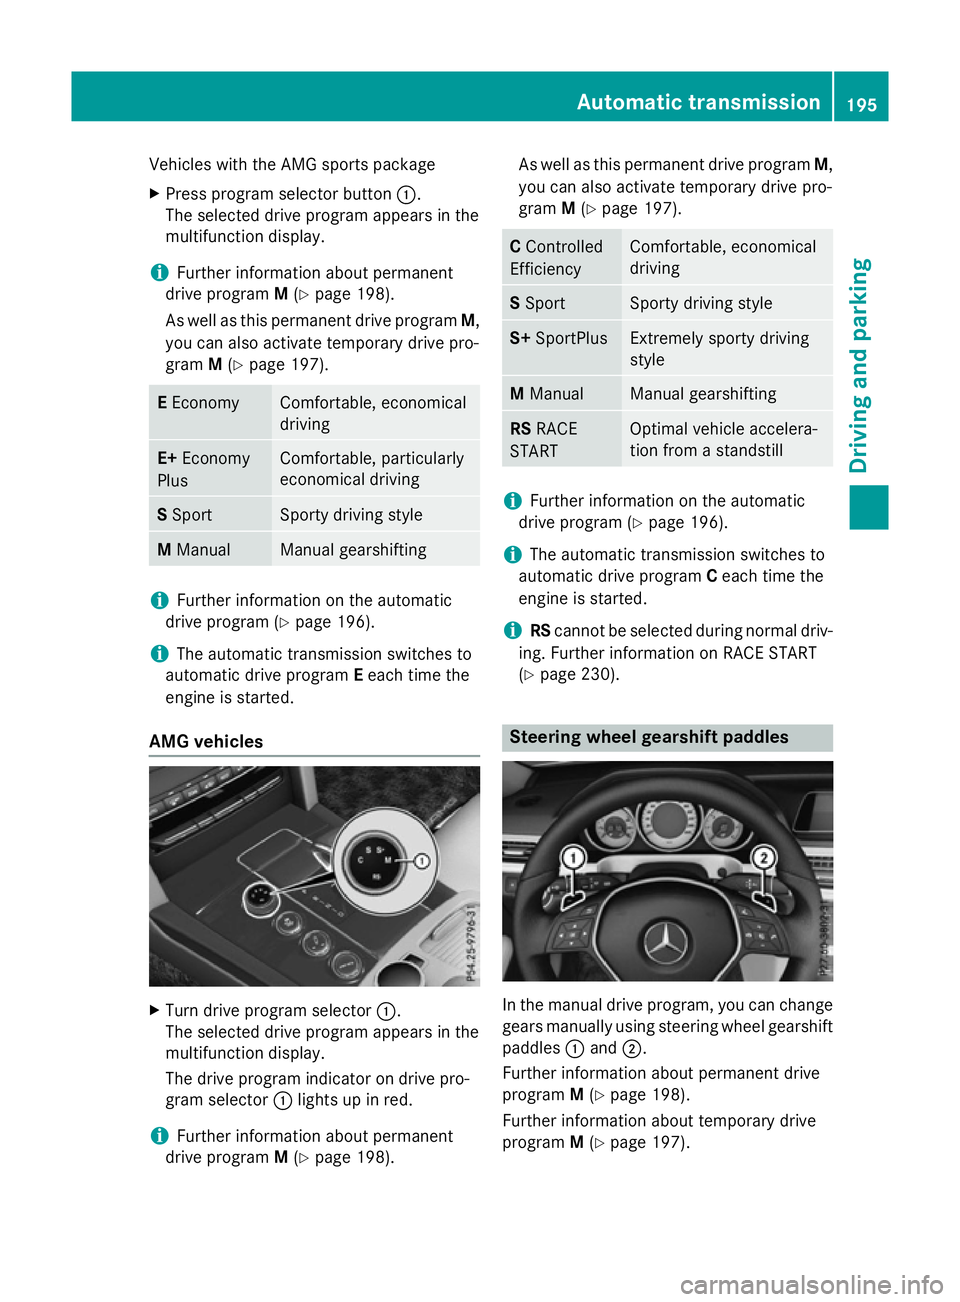
AMG vehicles X
Turn drive program selector :.
The selected drive program appears in the
multifunction display.
The drive program indicator on drive pro-
gram selector :lights up in red.
i Further information aboutp
ermanent
drive program M(Y page 198). As well as this permanent drive program
M,
you can also activate temporary drive pro-
gram M(Y page 197). C
Controlled
Efficiency Comfortable,e
conomical
driving S
Sport Sporty driving style
S+
SportPlus Extremely sporty driving
style
M
Manual Manualg
earshifting RS
RACE
START Optimal vehicle accelera-
tion from
astandstill i
Further information on the automatic
drive program (Y page 196).
i The automatic transmission switches to
automatic drive program Ceach time the
engine is started.
i RS
cannot be selected during normal driv-
ing. Further information on RACE START
(Y page 230). Steering wheelg
earshift paddles In the manual drive program, you can change
gears manually using steering wheel gearshift
paddles :and ;.
Further information aboutp ermanent drive
program M(Y page 198).
Further information aboutt emporary drive
program M(Y page 197). Automatic transmission
195Drivingand parking Z