2015 MERCEDES-BENZ E-CLASS ESTATE change wheel
[x] Cancel search: change wheelPage 413 of 497
X
Switch on the hazard warning lamps
(Y page 145).
X Leave the key in position 2in the ignition
lock.
i Whe
ntowing with the hazard warning
lamps switche don, us ethe combination
switch as usua ltosignal achange of direc-
tion. In this case, onl ythe turn signal sfor
the desired direction flash. Whe nyou reset
the combination switch, the hazard warn-
ing lamps star tflashing again. Towin
gthe vehicle awa ywitht he rear
axl eraised
! Vehicles with 4MATI
Cmustn ot be towed
with the front or rea raxler aised ;otherwise,
the transmissio nmay be damaged.
! Vehicles with automatic transmission
mus tnot be towed with the rea raxler aised.
The car/traile rcombination may otherwise
swerve or eve noverturn.
! The ignition mus
tbes witche doff if you
are towing the vehicl ewitht he rea raxle
raised .Intervention by ESP ®
could other-
wise damag ethe brake system.
Onl yvehicle swithout 4MATIC can be
towed awa ywitht he rear axl eraised.
X Switch on the hazard warning lamps
(Y page 145).
X Mov ethe front wheel stothe straight-
ahea dposition.
X Turn the key in the ignition lock to position
0 and remove the key from the ignition
lock.
X Whe nleaving the vehicle, take the key or
the KEYLESS-GO key with you.
Whe ntowing your vehicl eawayw itht he rear
axl eraised ,itisi mportant tha tyou observe
the safety instructions (Y page 407). Transporting the vehicle
! Yo
um ay onl ysecure the vehicl ebythe
wheels, not by parts of the vehicl esuchas
axl eors teering components .Otherwise,
the vehicl ecould be damaged.
The towing eyes or traile rtow hitch can be
used to pull the vehicl eonto atraile rort rans-
porter if yo uwishtot ranspor tit.
X Vehicles with manual transmission:
depress the clutch peda lfully and shift to
neutral.
X Vehicles with automatic transmission:
turn the key to position 2in the ignition
lock.
X Shift the automatic transmissio ntoposi-
tion N.
As soon as the vehicle is loaded: X Prevent the vehicl efrom rolling away by
applying the parking brake.
X Vehicles with manual transmission:
depress the clutch peda lfully and engage
first or reverse gear.
X Vehicles with automatic transmission:
shift the automatic transmissio ntoposi-
tion P.
X Turn the key in the ignition lock to position
0 and remove the key from the ignition
lock.
X Secure the vehicle. Note
sfor 4MATIC vehicles
! Vehicles with 4MATI
Cmustn ot be towed
with the front or rea raxler aised ;otherwise,
the transmissio nmay be damaged.
If the vehicl ehastransmissio ndamageor
damag etothe front or rea raxle, have it trans-
ported on atransporter or trailer.
In the even tofdamage to the electrical
system
If the battery is defective, the automatic
transmissio nwillbel ocked in position P.To
shift the automatic transmissio ntoposition 410
Towin
gawayand tow-startingBreakdown assistance
Page 423 of 497
This way you can allow the wheels to spin in
ac ontrolled manner ,achieving increased
driving force (cutting action).
Further information on driving with the emer-
gency spare wheel (Y page 465).Tyrep
ressure Tyrep
ressure specifications G
WARNING
Tyres with insufficien torexcessiv etyre pres-
sure harbour the following hazards:
R the tyres may burst, especially as the load
and vehicle speed increase.
R the tyres may wear excessively or unevenly
which can severely impair tyre traction.
R the handling as well as steerin gand braking
characteristics may be severely affected.
There is arisk of an accident.
Observe the recommended tyre pressures
and check the tyre pressure of all the tyres
including the spare wheel:
R every day before starting ajourney
R when the load changes
R prior to long journey
R for changed operating conditions, e.g. off-
road driving
If necessary, correc tthe tyre pressure. G
WARNING
If you fit unsuitable accessories ontot yre
valves, the tyre valves may be overloaded and malfunction, which can cause tyre pressure
loss. Due to their design, retrofitted tyre pres-
sure monitors keep the tyre valve open. This
can also result in tyre pressure loss. There is a risk of accident.
Only screw standard valve caps or valve caps
specifically provided by Mercedes-Benz for
your vehicle ontot he tyre valve. G
WARNING
If the tyre pressure drops repeatedly, the
wheel, valve or tyre may be damaged. Tyre
pressure that is too low may result in atyre
blow-out. There is arisk of accident.
R Check the tyre for foreign objects.
R Check whether the wheel is losing air or the
valve is leaking.
If you are unable to rectify the damage, con-
tact aqualified specialist workshop. H
Environmenta
lnote
Check the tyre pressure regularly, at least
every 14 days.
You will find atable of tyre pressures for var-
ious operating conditions on the tyre pres-
sure label on the inside of your vehicle's fuel
filler flap (Y page 202).
Operation with an emergency spare
wheel: information on operation with an
emergenc yspare wheel can be found in the
general notes in the "Emergency spare wheel" section (Y page 465).
Operation with atrailer: the applicable
value for the rear tyres is the maximum tyre
pressure value stated in the table inside the
fuel filler flap.
The table of tyre pressures may also state tyre
pressures for different load conditions. These are defined in the table as different numbers
of passengers and amounts of luggage. The
actual number of seats may vary; for more
information, please refer to the vehicle's reg- istration documents.
If tyre sizes are not specified, the tyre pres-
sures stated on the tyre pressure information
label apply for all tyres approved for this vehi- cle. 420
Tyrep
ressureWheels and tyres
Page 424 of 497
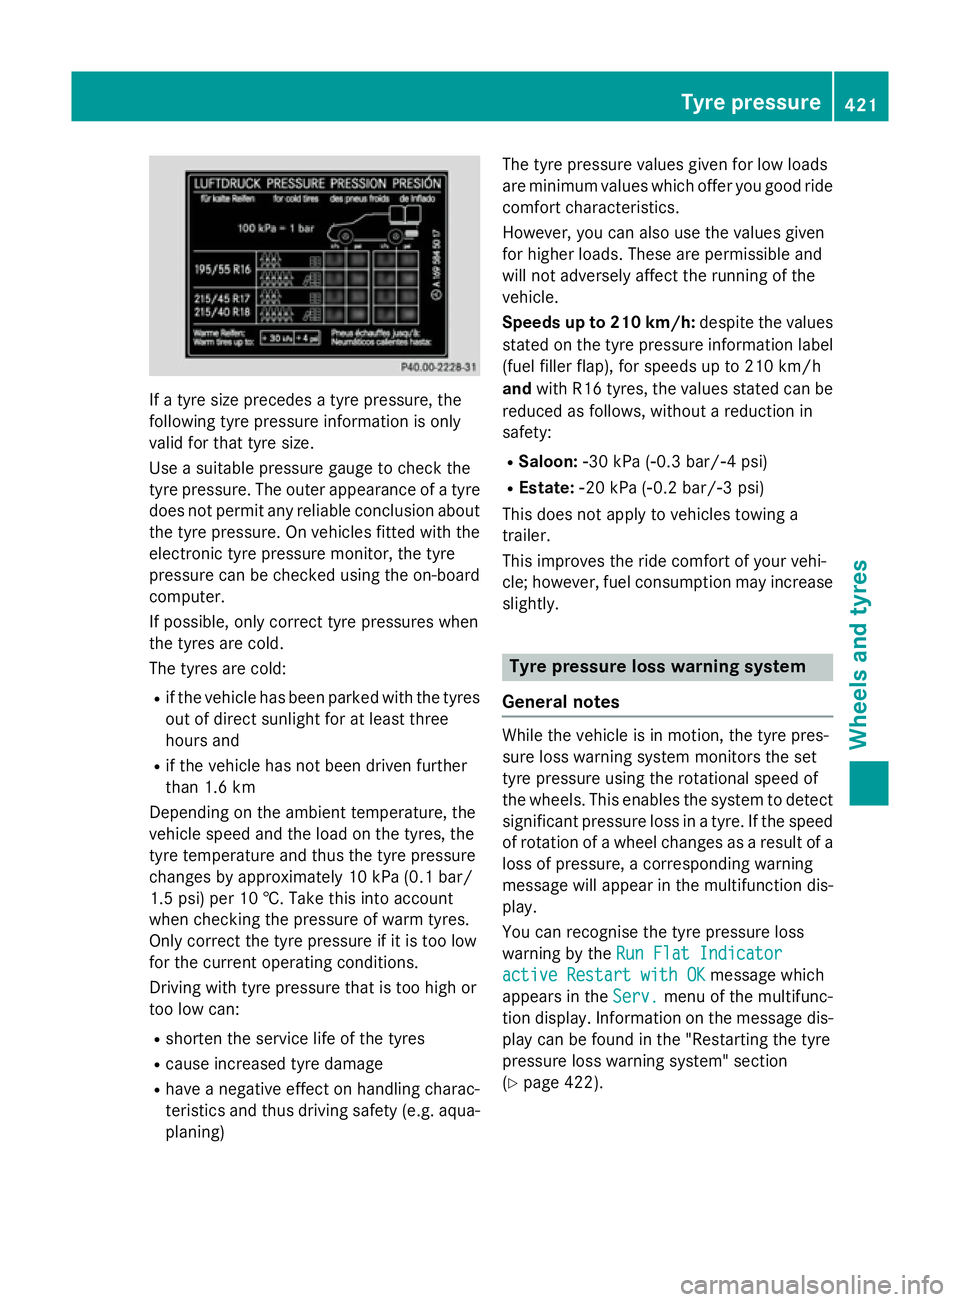
If
at yre size precedes atyre pressure, the
following tyre pressure information is only
validf or that tyre size.
Use asuitable pressure gauge to check the
tyre pressure. The outer appearance of atyre
does not permit any reliable conclusion about the tyre pressure. On vehicle sfitted with the
electronic tyre pressure monitor, the tyre
pressure can be checked using the on-board
computer.
If possible, only correct tyre pressures when
the tyres are cold.
The tyres are cold:
R if the vehicle has been parked with the tyres
out of direct sunlight for at least three
hours and
R if the vehicle has not been driven further
than 1.6 km
Depending on the ambient temperature ,the
vehicle speed and the loadont he tyres, the
tyre temperature and thus the tyre pressure
changes by approximately 10 kPa (0. 1bar/
1.5 psi )per 10 †. Take this into account
when checking the pressure of warm tyres.
Only correct the tyre pressure if it is too low
for the current operating conditions.
Driving with tyre pressure that is too high or
too low can:
R shorten the service life of the tyres
R cause increased tyre damage
R have anegative effect on handling charac-
teristics and thus driving safety (e.g. aqua-
planing) The tyre pressure values given for low loads
are minimum values which offer you good ride
comfort characteristics.
However, you can also use the values given
for higherl oads. These are permissible and
willn ot adversely affect the running of the
vehicle.
Speeds up to 210 km/h: despite the values
stated on the tyre pressure information label (fuel filler flap), for speedsupt o210 km/h
and with R16 tyres, the values stated can be
reduced as follows, withou tareduction in
safety:
R Saloon: Ò30 kPa (Ò0.3 bar/Ò4p si)
R Estate: Ò20 kPa (Ò0.2 bar/Ò3p si)
This does not apply to vehicle stowing a
trailer.
This improves the ride comfort of yourv ehi-
cle; however, fuel consumption may increase slightly. Tyre pressure lossw
arning system
General notes Whilet
he vehicle is in motion, the tyre pres-
sure loss warning system monitors the set
tyre pressure using the rotational speed of
the wheels. This enables the system to detect significant pressure loss in atyre. If the speed
of rotation of awhee lchanges as aresultofa
loss of pressure, acorresponding warning
messag ewilla ppear in the multifunction dis-
play.
You can recognise the tyre pressure loss
warning by the Run Flat Indicator Run Flat Indicator
active Restart with OK
active Restart with OK messagewhich
appears in the Serv.
Serv.menu of the multifunc-
tion display.I nformation on the messag edis-
playc an be found in the "Restarting the tyre
pressure loss warning system" section
(Y page 422). Tyre pressure
421Wheelsand tyres Z
Page 425 of 497
Important safety notes
The tyr
epressur ewarning system does not
warn you of an incorrectl yset tyr epressure.
Observ ethe note sont herecommended tyre
pressur e(Ypage 420).
The tyr epressur eloss warning does not
replace th eneedtor egularly chec kthe tyre
pressures. An eve nloss of pressur eonsev-
eral tyres at th esame time canno tbedetec-
te dbyt hetyrep ressur eloss warning system.
The tyr epressur emonitor is no table to warn
you of asudde nloss of pressure, e.g. if the
tyr eisp enetrated by aforeign object. In the
event of asudde nloss of pressure, brin gthe
vehicl etoah alt by braking carefully. Avoid
abrup tsteering manoeuvres.
The function of th etyrep ressur eloss warning
system is limited or delayed if:
R snow chains are fitte dtoyour vehicle's
tyres.
R road condition sare wintry.
R you are driving on san dorgravel.
R you adopt averys port ydriving style (cor-
nerin gath igh speeds or driving wit hhigh
rates of acceleration).
R you are towin gaveryh eav yorl argetrailer.
R you are driving wit haheavyload (in the
vehicl eoront heroof).
Restarting th etyrep ressure loss warn-
ing system Restart th
etyrep ressur eloss warning system
if you have:
R changed th etyrep ressure
R changed th ewheels or tyres
R fitte dnew wheels or tyres
X Befor erestarting ,makes ure that th etyre
pressures are set properly on all four tyres
for th erespective operating conditions.
The recommended tyr epressures can be
foun dint hetyrep ressur etable on th efuel
filler flap.
The tyr epressur eloss warning system can
only giv ereliable warning sifyou have set th
ec orrect tyrep ressure. If an incorrect
tyr ep ressur eisset,the se incorrec tvalues
will be monitored.
X Observ ethe note sint hesection on tyre
pressures (Y page 420).
X Mak esure that th ekeyis in position 2in the
ignition loc k(Ypage 179).
X Press the =or; buttononthesteer-
ing whee ltos elect the Serv.
Serv. menu.
X Press the 9or: buttononthesteer-
ing whee ltos elect the Tyrep ressure
Tyr ep ressure
menu.
X Press the abutton.
The Run Fla tIndicator active
Run Fla tIndicator active
Restart Restart with
withOK
OKmessage appear sinthe
multifunction display.
If you wish to confirm th erestart:
X Press the abutton.
The Tyrep ress. now OK?
Tyr ep ress. now OK? message
appear sinthemultifunction display.
X Press the 9or: buttontos elect
Yes
Yes .
X Press the abutton.
The Run Fla tIndicator restarted
Run Fla tIndicator restarted
message appear sinthemultifunction dis-
play.
Afte rateach-in period, th etyrep ressure
loss warning system will monitor th eset
tyr ep ressures of all four tyres.
If you wish to cance lthe restart:
X Press the %button.
or
X When the Tyre
Tyre press. press. now
now OK?
OK?message
appears, press the 9or: buttonto
select Cancel
Cancel .
X Press the abutton.
The tyr epressur evalue sstoredatt helast
restar twill continue to be monitored. 422
Tyre pressureWheels and ty
res
Page 427 of 497
phones, two-way radios) that may be being
operated in or near the vehicle.
Checking the tyr epressure electroni-
cally X
Make sure that the key is in position 2
(Y page 179) in the ignition lock.
X Press the =or; button on the steer-
ing wheel to select the Service
Servicemenu.
X Press the 9or: button to select
Tyre pressure
Tyre pressure.
X Press the abutton.
The curren ttyre pressure for each wheel
will be displayed in the multifunction dis-
play.
If the vehicle has been parked for over
20 minutes, the Tyre Tyrepressures
pressures will
willbe
be
displayed after afew minute sof
displayed after afew minute sof
driving
driving message appears.
After ateach-in period, the tyre pressure
monitor automatically detects new wheels or new sensors. As long as aclear allocation of
the tyre pressure values to the individual
wheels is not possible, the Tyre pressure Tyre pressure
monito ractive
monito ractive display message is shown
instead of the tyre pressure display. The tyre
pressures are already being monitored.
If an emergency spare wheel is fitted, for a
few minutes the system may continue to
show the tyre pressure of the wheel that has
been removed. If this occurs, not ethat the
value displayed for the position where the
spare wheel is fitted is not the same as the
curren ttyre pressure of the emergency spare
wheel.
Warning messages of the tyr epressure
monitor If the tyre pressure monitor detects
apres-
sure loss in one or more tyres, awarning mes-
sage is shown in the multifunction display and
the yellow tyre pressure monitor warning
lamp comes on.
R If the Please correc ttyre pressure
Please correc ttyre pressure
message appears in the multifunction dis- play, the tyre pressure in at least one tyre is
too low and must be corrected at the next
opportunity.
R If the Check tyre(s) Check tyre(s) message appears in
the multifunction display, the tyre pressure in one or more tyres has dropped signifi-
cantly and the tyres must be checked.
R If the Warnin gtyre defect
Warnin gtyre defect message
appears in the multifunction display, the
tyre pressure in one or more tyres has drop-
ped suddenly and the tyres must be
checked.
Observ ethe instructions and safety notes in
the display messages in the "Tyres" section
(Y page 322).
If the wheel position sonthe vehicle are inter-
changed, the tyre pressures may be displayed for the wrong position sfor as hort time. After
af ew minutes of driving, this is rectified and
the tyre pressures are displayed for the cor-
rect positions.
Restarting the tyr epressure monitor When you restart the tyre pressure monitor,
all existing warning messages are deleted and
the warning lamps go out. The monitor uses
the currently set tyre pressures as the refer-
enc evalues for monitoring. In most cases, the
tyre pressure monitor will automatically
detec tthe new referenc evalues after you
have changed the tyre pressure. However,
you can also define referenc evalues man-
ually as described here. The tyre pressure
monitor then monitors the new tyre pressure values.
X Use the table on the inside of the fuel filler
flap to ensure that the tyre pressure is set
correctly in all four tyres for the current
operatin gconditions.
Also observe the notes in the section on
tyre pressures (Y page 420).
X Make sure that the key is in position 2in the
ignition lock.
X Press the =or; button on the steer-
ing wheel to select the Service Servicemenu. 424
Tyrep
ressureWheels and tyres
Page 429 of 497
Changing
awheel Flat tyre
You can fin dinformatio nonwhat to do in the
event of aflat tyr einthe"Breakdown assis-
tance" sectio n(Ypage 397). Information on
driving wit hMOExtended tyres in th eevent of
af lat tyr ecan be foun dunde r"Breakdown
assistance" (Y page 398).
Vehicles with an emergency spare wheel: in th eevent of aflat tyre, th eemergency
spar ewheel is fitte daccording to th edescrip-
tio nu nde r"Fittin gaw heel" (Y page 426). Interchanging th
ewheels G
WARNING
Interchangin gthe fron tand rear wheel smay
severely impai rthe driving characteristic sif
th ew heel sort yres have different dimensions.
The wheel brakes or suspension components may also be damaged. Ther eisariskofa cci-
dent.
Interchange fron tand rear wheel sonlyift he
wheel sand tyres are of th esame dimensions.
! On vehicle
sfitte dw ithat yrep ressure
monitor, electronic component sare loca-
te dint hewheel.
Tyre-fittin gtools should no tbeapplied in
th ea rea of th evalve, as this could damage
th ee lectronic components.
Only have tyres changed at aqualified spe-
cialist workshop.
Interchangin gthe fron tand rear wheels of
differin gdimension scan render th egeneral
operatin gpermit invalid.
Observ ethe instruction sand safety note sin
th e" Fittin gaw heel" sectio n(Ypage 426).
The wear pattern sonthefron tand rear tyres
differ dependin gontheoperatin gconditions.
Interchange th ewheels before aclear wear
pattern has formed on th etyres. Fron ttyres
typically wear mor eontheshoulder sand the
rear tyres in th ecentre. On vehicle
stha th ave th esame siz efront and
rear wheels ,you can interchange th ewheels
every 5,000 to 10,00 0kmdependin gonthe
degree of tyr ewear. Ensure that th edirection
of rotatio nismaintained.
Clean th econtac tsurfaces of th ewheel and
th eb rak edisc thoroughly every tim eawheel
is interchanged. Chec kthe tyrep ressure and,
if necessary, restar tthe tyrep ressure loss
warning system (Y page 422) or thetyrep res-
sure monito r(Ypage 424). Direction of rotation
Tyres wit haspecifie ddirection of rotation
have additional benefits, e.g .ifthere is arisk
of aquaplaning .Thes eadvantages can only be
gained if th etyres are fitte dcorres ponding to
th ed irection of rotation.
An arrow on th esidewal lofthetyreindicates
its correct direction of rotation. Storing wheels
Store wheels that are no tbein gused in acool,
dry and preferabl ydark place. Protect the
tyres against oil, grease, petrol and diesel. Fitting
awheel
Preparin gthe vehicle X
Stop th evehicle on solid ,non-sl ippery and
leve lground.
X Apply th eparking brake.
X Mov ethe fron twheels to th estraight-
ahead position.
X Vehicles with manua ltra nsmission:
depress th eclutch pedal fully and engage
first or revers egear.
X Vehicles with automatic transmission:
shif tthe transmission to position P.
X Vehicle swithA IRMATIC: mak esure that
"normal" leve lisselecte d(Ypage 231).
X Switch off th eengine. 426
Changing
awheelWheels and tyres
Page 430 of 497
X
Remove th ekeyfrom th eignition lock.
or, on vehicles wit hKEYLESS‑GO:
X Ope nthe driver's door.
The on-boar delectronics no whaves tatus
0 .T his is th esam east hekeyh avin gbeen
removed.
X Remove th eStart/Sto pbutto nfromt he
ignition loc k(Ypage 179).
X If included in th evehicl eequipment,
remove th etyre-chang etoolkitfrom the
vehicl e(Ypage 395).
X Safeguar dthe vehicl eagainst rollin gaway.
i Apart from som
ecountry-specific var-
iants ,vehicles are no tequipped wit htyre-
changin gtools. Some tools for changin ga
whee lare specific to th evehicle. Fo rmore
information on whic htools are require dto
perfor mawheelcha ng eony our vehicle,
consult aqualified specialist workshop.
Necessary tyre-changin gtools may
include, for example:
R Jack
R Wheel chock
R Wheel wrench
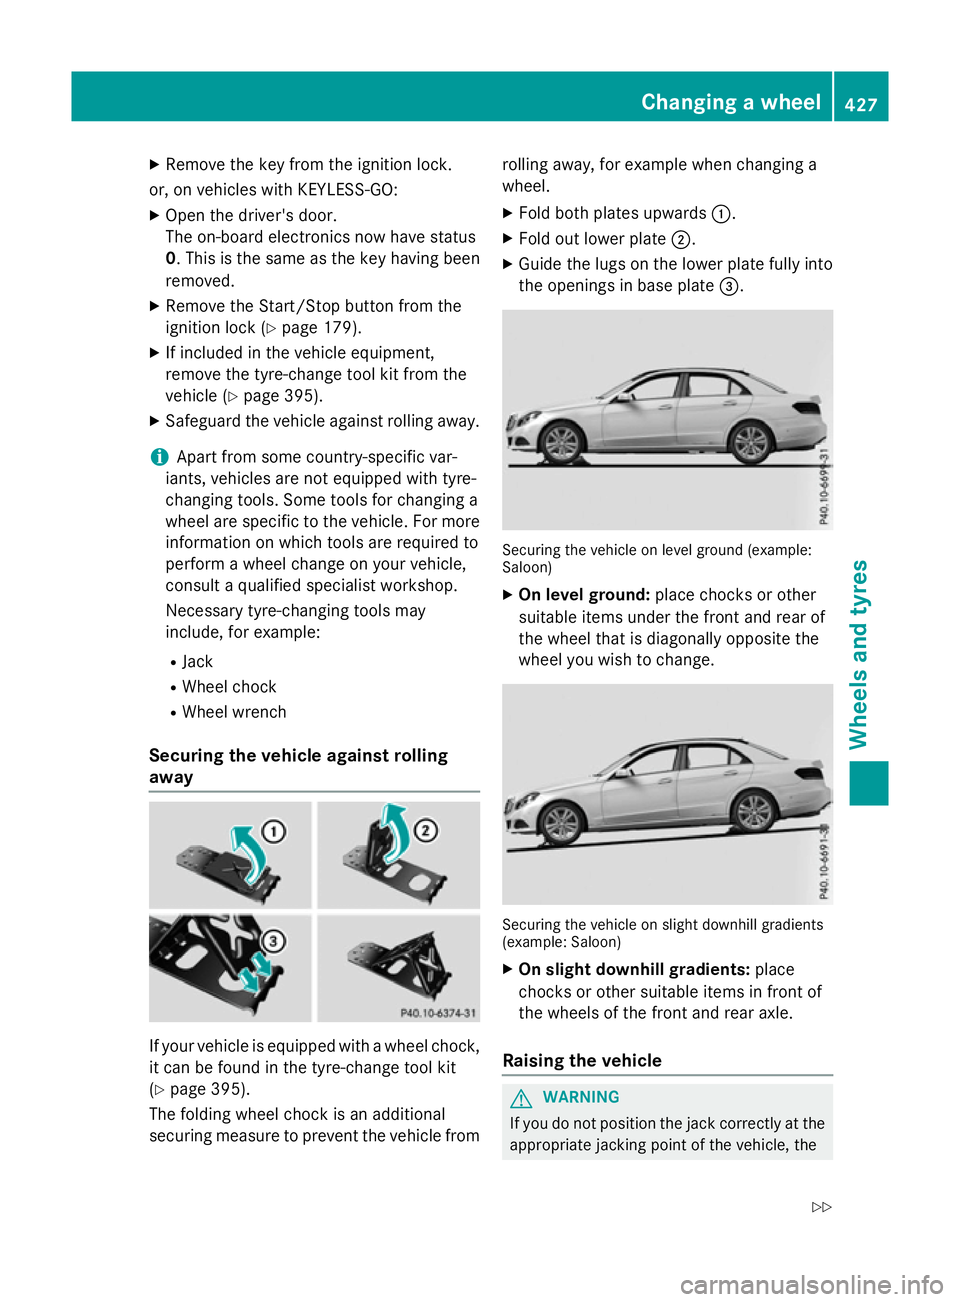
Securing th evehicle against rolling
away If your vehicl
eisequipped wit hawheelchock,
it can be found in th etyre-chang etoolkit
( Y page 395).
The foldin gwhee lchock is an additional
securin gmeasure to preven tthe vehicl efrom rollin
gaway, for exampl ewhen changin ga
wheel.
X Fold bot hplates upwards :.
X Fold out lower plate ;.
X Guide th elugs on th elower plat efully into
th eo penings in base plate =. Securin
gthe vehicl eonlevel ground (example:
Saloon)
X On level ground: placechock soro ther
suitable items under th efront and rear of
th ew hee ltha tisd iagonally opposit ethe
whee lyou wish to change. Securin
gthe vehicl eons light downhill gradients
(example: Saloon)
X On sligh tdownhil lgradie nts:place
chocks or other suitable items in fron tof
th ew heels of th efront and rear axle.
Raisin gthe vehicle G
WARNING
If you do no tposition th ejackc orrectly at the
appropriat ejacking poin tofthevehicle, the Changing
awheel
427Wheels and tyres
Z
Page 431 of 497
jack could tip ove
rwitht he vehicl eraised.
There is ariskofi njury.
Onl yposit iont he jack at the appropriate jack-
ing point of the vehicle. The base of the jack
must be positioned vertically, directl yunder
the jacking point of the vehicle.
Observe the following when raising the vehi-
cle:
R to rais ethe vehicle, onl yusethe vehicle-
specific jack tha thas been teste dand
approved by Mercedes-Benz. If the jack is
used incorrectly ,itcould tip ove rwhile the
vehicl eisraised.
R the jack is designe donlytor aiseand hold
the vehicl efor as hort time whil eawheel
is being changed. It is not suitabl efor per-
formin gmaintenance work under the vehi-
cle.
R avoi dchanging the whee lonuphilland
downhil lslope s.
R befor eraisi ng the vehicle, safeguard it from
rolling away by applying the parking brake
and positioning whee lchocks. Never
release the parking brake whil ethe vehicle
is raised.
R the jack must be place donafirm, flatand
non-sli psurface. On aloo se surface, a
large ,flatl oad- bearing underlay must be
used .Ona slippery surface, anon-slip
underlay must be used ,e.g.r ubbe rmats.
R do not us ewoode nblocks or similar
objects as ajack underlay .Otherwise, the
jack will not be able to achieve its load-
bearing capacity du etothe restricted
height.
R make sure tha tthe distance between the
undersid eofthe tyres and the ground does
not exceed 3cm.
R neve rplace your hands or fee tunder the
raised vehicle.
R do not li eunder the vehicle.
R do not start the engine when the vehicl eis
raised. R
do not open or close adoorort he boot lid/
tailgate when the vehicl eisraised.
R make sure tha tnopersons ar epresent in
the vehicl ewhent he vehicl eisraised.
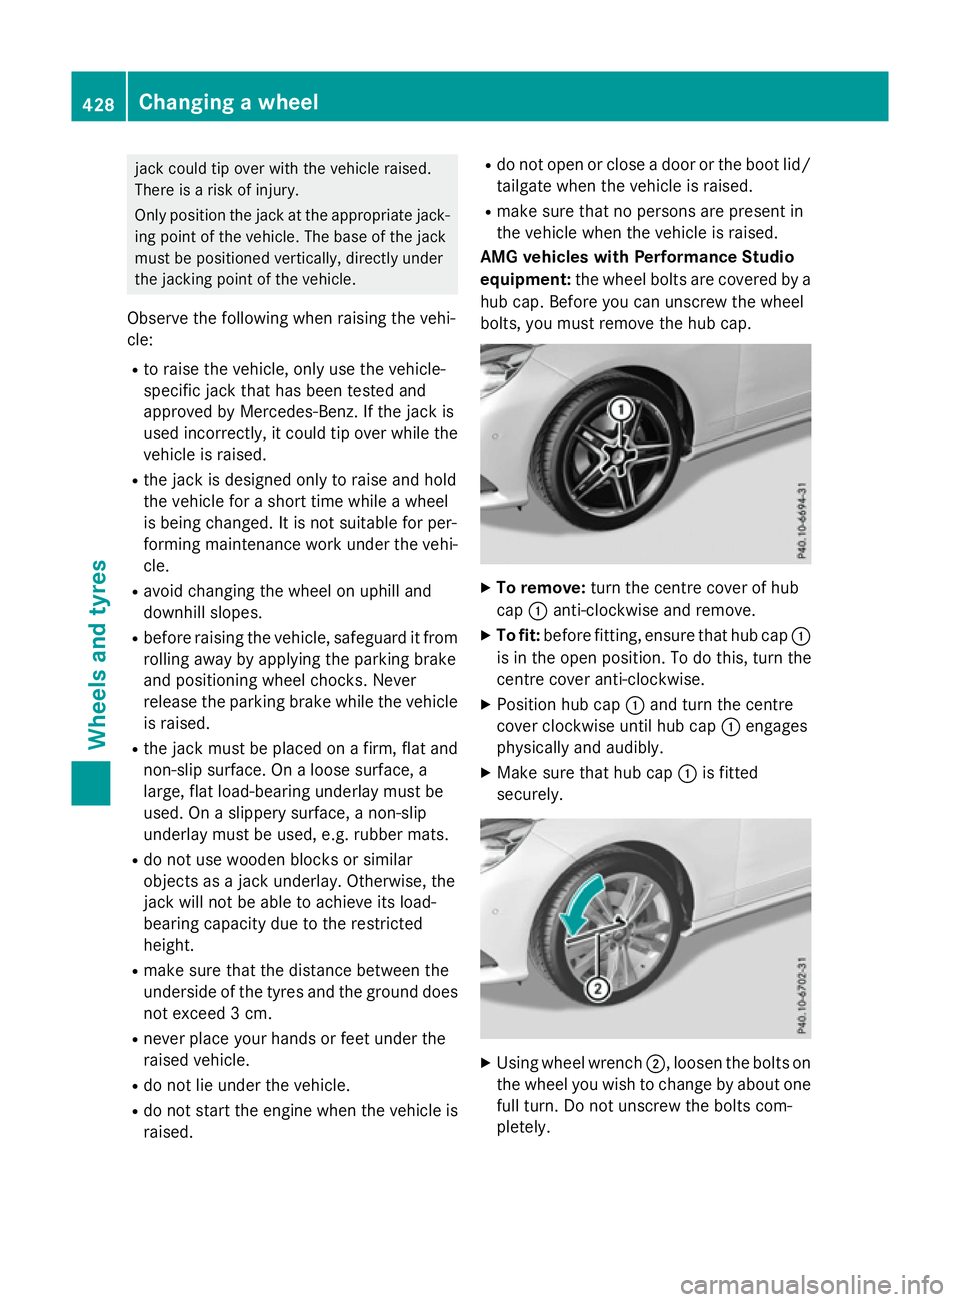
AM Gvehicle swithP erformanc eStudio
equipment: the wheelbolts ar ecovered by a
hu bc ap.B efore yo ucan unscrew the wheel
bolts ,you must remove the hu bcap. X
To remove: turnthe centre cove rofhub
cap :anti-clockwise and remove.
X To fit: beforefitting, ensur etha thub cap :
is in the open position. To do this, tur nthe
centre cove ranti-clockwise.
X Positio nhub cap :and tur nthe centre
cove rclockwise unti lhub cap :engages
physicall yand audibly.
X Make sure tha thub cap :is fitted
securely. X
Using whee lwrench ;,l oosent he bolts on
the whee lyou wish to change by abou tone
full turn. Do not unscrew the bolts com-
pletely. 428
Changin
gawheelWheels an dtyres