2015 MERCEDES-BENZ E-CLASS ESTATE tow bar
[x] Cancel search: tow barPage 270 of 497
To avoid hazardous situations:
R make sure to check the noseweight before
each journey
R use adrawbar noseweight as close as pos-
sible to the maximum noseweight
R do not exceed the maximum permissible
noseweight
R do not use anoseweight lower than the
minimum noseweight
When reversin gthe vehicle towards the
trailer, make sure there is nobody between
the trailer and the vehicle.
Couple and uncouple the trailer carefully. If
you do not couple the trailer to the towing
vehicle correctly, the trailer could become
detached.
Make sure that the following values are not
exceeded:
R the permissible trailer drawbar noseweight
R the permissible trailer load
R the permissible rear axle load of the towing
vehicle
R the maximum permissible gross vehicle
weight of both the towing vehicle and the
trailer
You will find the applicable permissible val-
ues, which must not be exceeded, in the vehi-
cle documents.
You will find the values approved by the man- ufacturer on the vehicle identification plates
and those for the towing vehicle under "Tech-
nical data" (Y page 484).
When towing atrailer, your vehicle's handling
characteristics will be different in comparison to when driving without atrailer.
The vehicle/trailer combination:
R is heavier
R is restricted in its acceleration and gradi-
ent-climbin gcapability
R has an increased braking distance
R is affected more by stron gcrosswinds
R demands more sensitive steering
R has alarger turnin gcircle This can impair the vehicle's handling char-
acteristics. Adapt your driving style accord-
ingly. Maintain
asafe distance. Drive care-
fully.
When towing atrailer, alway sadjust your
speed to the curren troad and weather con-
ditions. Do not exceed the maximum permis- sible speed for your vehicle/trailer combina-
tion. Notes on towing
atrailer
General notes Trailer towing is not permissible on the fol-
lowing models:
R E2 20 BlueTEC BlueEFFICIENCY Edition
R E1 80
R E63A MG
R E63A MG S-MODEL
R E63A MG 4MATIC
R E63A MG S-MODEL4 MATIC
i When towing
atrailer, set the tyre pres-
sure on the rear axle of the towing vehicle
for am aximum load; see the tyre pressure
table in the fuel filler flap (Y page 420).
Please notet hat when towing atrailer,
PARKTRONIC (Y page 235), Active Parking
Assist (Y page 239) and Blind Spot Assist
(Y page 257) are only available with limita-
tions, or not at all.
i On vehicles without level control, the
height of the ball coupling will alter accord-
ing to the load placed on the vehicle. If nec- essary, use atrailer with aheight-adjusta-
ble drawbar.
You will find fitting dimensions and loads
under "Technical data" (Y page 482).
Driving tips i
Observe the notes on ESP ®
trailer stabi-
lisation (Y page 86). Towing
atrailer
267Driving and parking Z
Page 273 of 497
X
Pull the ball coupling in the direction of the
arrow until it engages in avertical position.
Indicator lamp =goes out. The trailer
power socket is integrated in the ball cou-
pling and swivels out with it.
Saloon: indicator lamp ?goes out.
Estate: indicator lamp =goes out.
The multifunction display shows the
Trailer Trailer hitch
hitch Check
Checklock
lockmech.
mech. mes-
sage until the ball coupling is engaged.
X Remove the protective coverin gfrom the
ball coupling and store it in asafe place.
X Make sure that the ball of the ball coupling
is clean and greased.
HYBRID vehicles :make sure that you read
the "HYBRID" Supplement included in the
vehicle literature. Otherwise, you may not
recognise dangers. Coupling up
atrailer
X Make sure that the transmission is in posi-
tion P.
X Apply the parking brake.
X Position the trailer horizontally behind the
vehicle.
X Couple up the trailer.
X Establish the electric connection between
the vehicle and the trailer.
X Check that the trailer lighting system is
working.
Ac onnected trailer is only recognised when
the electrical connection is established
correctly and when the lighting system is
working properly. The function of other sys-
tems, such as ESP ®
,P ARKTRONIC and
Active Parking Assist also depends on this. Uncoupling
atrailer G
WARNING
If you uncouple atrailer with an engaged over-
run brake, you could trap your hand between the vehicle and the trailer drawbar. This poses
ar isk of injury.
Do not uncouple atrailer with an engaged
overrun brake. G
WARNING
Vehicles with level control:
If you disconnect the trailer cable, the vehicle is lowered. This can cause you or others to
become trapped between the vehicle body
and tyres, or underneat hthe vehicle. This
poses arisk of injury.
Make sure that no-one is in the immediate
vicinit yofthe wheel arch or underneat hthe
vehicle when disconnectin gthe trailer cable.
! Do not disconnect
atrailer with an
engaged overrun brake. Otherwise, your
vehicle could be damaged by the rebound- ing of the overrun brake.
X Make sure that the transmission is in posi-
tion P.
X Apply the parking brake.
X Secure the trailer against rolling away.
X Remove the trailer cable and decouple the
trailer. Folding in the ball coupling
G
WARNING
If you release the ball coupling or it does not
engage correctly when folding in, it will swing out. Within pivoting range of the ball coupling,
there is an increased risk of an accident and
injury.
Only release the ball coupling if the pivoting
range is unobstructed. Always make sure that the ball coupling engages when folding in.
X Place the protective coverin gonthe ball
coupling. 270
Towing
atrailerDriving and parking
Page 377 of 497
America
Country Radio type approva
lnum-
ber
Frequency range (MHz) BB (Barba-
dos) Registration no
trequired
MHz: 27 ,40,433, 868 CL (Chile) 38447/F-23 No.3.3634
MHz: 40
,433
3943/DFRS05165/F-50
MHz: 28 0to433 GF (French
Guyana) Article
6ofDirective
1999/5/E CR&TT E10668
13 May 05
MHz: 27 ,30,40 ,433 ,868 GP (Guade-
loupe) Article
6ofDirective
1999/5/E CR&TT E10668
13 May 05
MHz: 27 ,30,40 ,433 ,868 MQ (Martini-
que) Article
6ofDirective
1999/5/E CR&TT E11J uly
05
MHz: 27 ,30,40 ,433 ,868 MX (Mexico) MHz: 28
0to390 Asia
Country Radio type approva
lnum-
ber
Frequency range (MHz) AE (United
Arab Emi-
rates) 1623/5/10-2/26/76
MHz: 433
JO (Jordan) TRC/LPD/2005/23
MHz: 27 ,30,40 ,433 ,868 KW (Kuwait) 5O
ctob er 2005
MHz: 27 ,30,40 ,418 ,433,
868 SA (Saudi
Arabia) 11_02_05/5024-5-6
MHz: 418, 433 Country Radio type approva
lnum-
ber
Frequency range (MHz) SY (Syria) 279/4/14
/05March06 TR (Turkey) National Certification 23
July 07
MHz: 433
Australia
Country Radio type approva
lnum-
ber
Frequency range (MHz) AU (Aus-
tralia) 28 June 2005
MHz: 27
,30,40 ,433 ,868 NZ (New
Zealand) 20 Marc
h06
MHz: 27 ,30,40 ,433 Floormats
G
WARNING
Object sinthedriver' sfootwell may restrict
th ec learance aroun dthe pedals or bloc ka
depressed pedal. This jeopardise sthe oper-
ating and road safet yofthevehicle. Ther eisa
ris kofana ccident.
Stow all object ssecurely in th evehicl esot hat
they do no tget int othe driver' sfootwell.
Always fit th efloormats securely and as pre-
scribe dinorder to ensure that there is always
sufficien troo mf or th epedals .Don otuse
loos efloormats and do no tplac eseveral floor-
mat sont opof on eanother. 374
FeaturesStowing and featu
res
Page 400 of 497
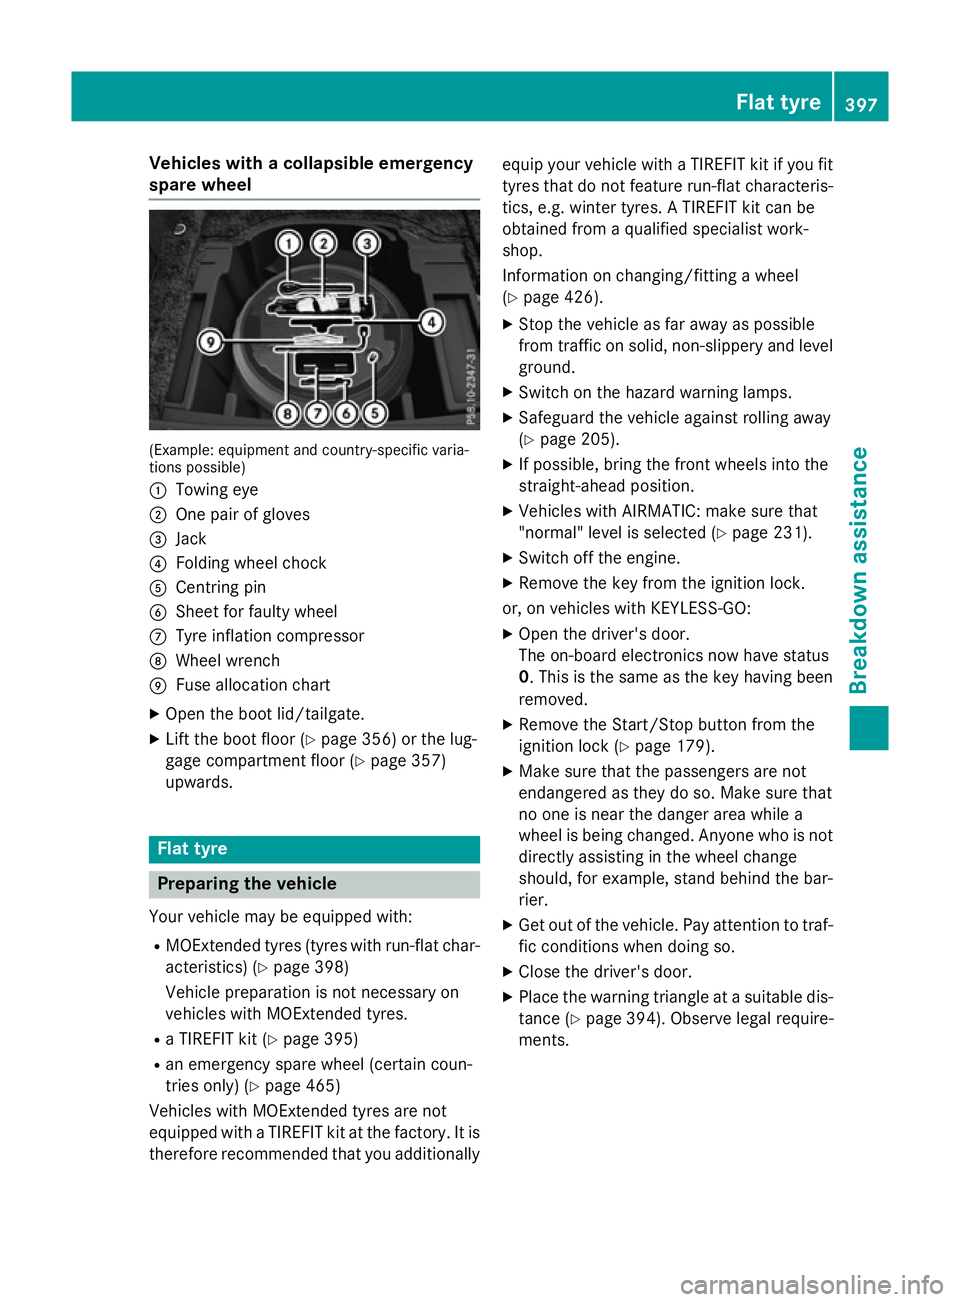
Vehicles with
acolla psibl eemergency
spare wheel (Example: equipment and country-specifi
cvaria-
tions possible)
: Towing eye
; One pair of gloves
= Jack
? Folding whee lchock
A Centring pin
B Shee tfor faulty wheel
C Tyre inflation compressor
D Wheel wrench
E Fusealloc ation chart
X Ope nthe boot lid/tailgate.
X Lif tthe boot floor (Y page 356)orthe lug-
gage compartment floor (Y page 357)
upwards. Flat tyre
Preparin
gthe vehicle
Your vehicl emaybe equipped with:
R MOExtende dtyres (tyres with run-fla tchar-
acteristics )(Ypage 398)
Vehicl epreparatio nisn ot necessary on
vehicles with MOExtende dtyres.
R aT IREFIT kit (Y page 395)
R an emergency spare whee l(certai ncoun-
trie sonly) (Y page 465)
Vehicles with MOExtende dtyres ar enot
equipped with aTIREFIT kit at the factory .Itis
therefore recommende dthatyou additionally equi
pyourvehicl ewithaT IREFIT kit if yo ufit
tyres tha tdon ot feature run-fla tcharacteris-
tics ,e.g.w inter tyres. ATIREFIT kit can be
obtained from aquali fied specialist work-
shop.
Informatio nonchanging/fitting awheel
( Y page 426).
X Stop the vehicl easfar away as possible
from traffic on solid ,non-slippery and level
ground.
X Switch on the hazard warning lamps.
X Safeguar dthe vehicl eagain st rolling away
(Y page 205).
X If possible, bring the front wheels into the
straight-ahea dposition.
X Vehicles with AIRMATIC: make sure that
"normal" level is selecte d(Ypage 231).
X Switch off the engine.
X Remove the key from the ignition lock.
or, on vehicles with KEYLESS‑ GO:
X Ope nthe driver' sdoor.
The on-boar delectronics now have status
0.T hisist he same as the key having been
removed.
X Remove the Start/Sto pbutton from the
ignition lock (Y page 179).
X Make sure tha tthe passenger sarenot
endangere dasthey do so. Make sure that
no one is nea rthe danger area whil ea
whee lisbeing changed .Anyone wh oisnot
directl yassis ting in the whee lchange
should, for example, stand behind the bar-
rier.
X Ge toutof the vehicle. Pa yattentio ntotraf-
fic conditions when doing so.
X Close the driver' sdoor.
X Place the warning triangl eatasuitabl edis-
tance (Y page 394). Observe lega lrequire-
ments. Flat tyre
397Breakdown assis tance
Page 404 of 497
ment cluster where it willbee
asily seen by
the driver.
! After use, excess tyre sealant may run out
of the filler hose. This could caus estains.
Therefore, place the filler hose in the plastic
bag which contained the TIREFIT kit. H
Environmental note
Have the used tyre sealant bottle disposed of
professionally, e.g. at aqualified specialist
workshop.
If at yre pressure of 180 kPa (1.8 bar/26 psi)
has been attained after five minutes:
X Switch off the tyre inflation compressor.
X Unscrew the filler hose from the valve of
the faulty tyre.
X Stow the tyre sealant bottle, the tyre infla-
tion compresso rand the warning triangle.
X Pull away immediately.
X Stop after driving for approximatel yten
minutes and check the tyre pressure with
the tyre inflation compressor.
The tyre pressure must now be at least
130 kPa (1.3 bar/19 psi). G
WARNING
If the required tyre pressure is not reached
after driving for ashort period, the tyre is too
badly damaged. The tyre sealant cannot
repair the tyre in this instance. Damage dtyres
and atyre pressure that is too low can signif-
icantly impair the vehicle's braking and driv-
ing characteristics. There is arisk of accident.
Do not continue driving. Contact aqualified
specialist workshop.
i In yourv
ehicle, you willf indasticker with
the Mercedes-Benz Service24h telephone
number, e.g. on the B-pillar on the driver's
side.
X Correct the tyre pressure if it is still at least
130 kPa (1.3 bar/19 psi). See the fuel filler
flap for values.
X To increase the tyre pressure: switch on
the tyre inflation compressor. X
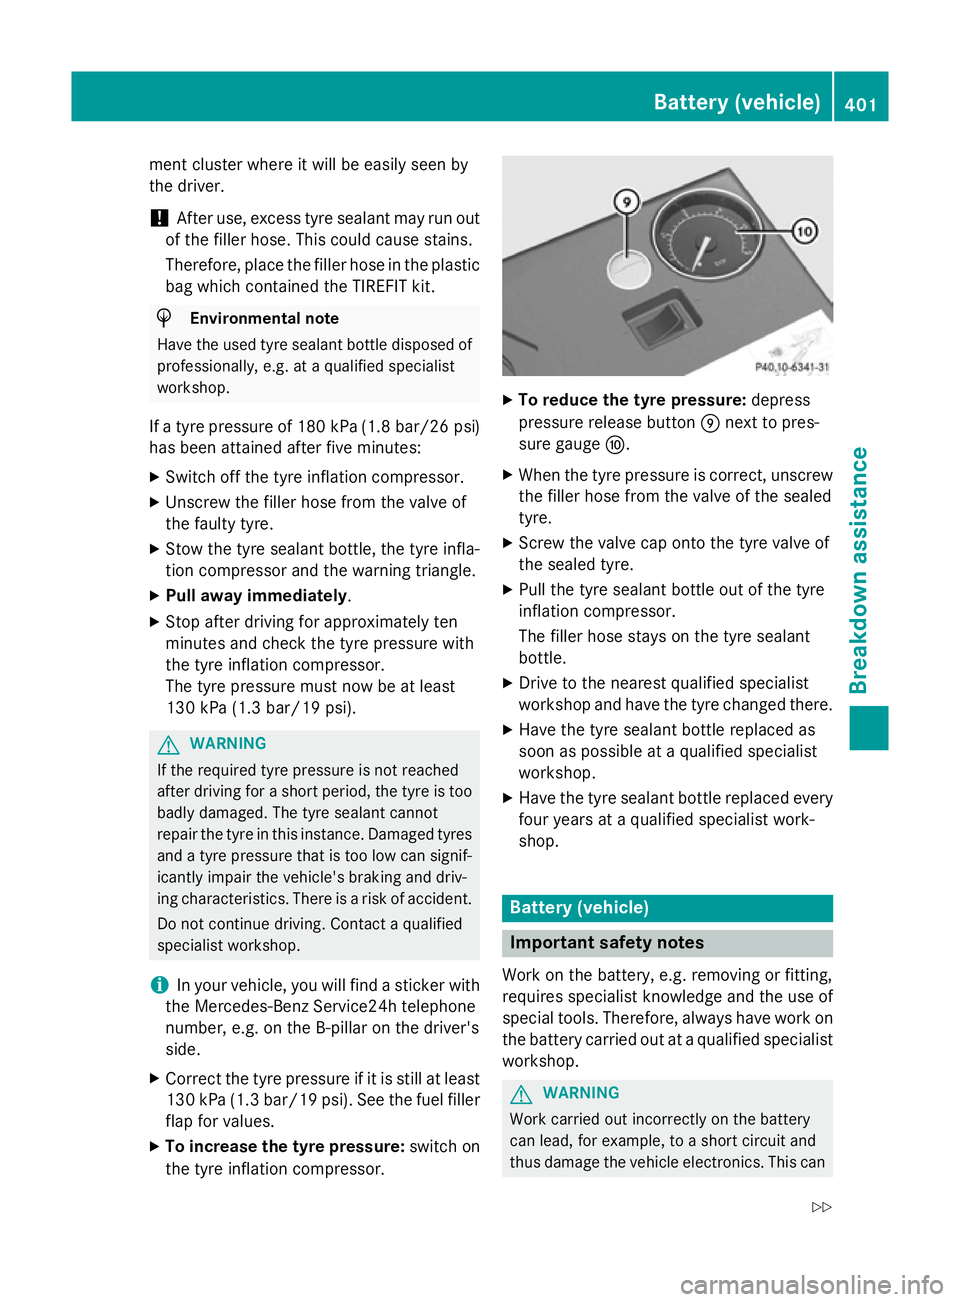
To reduce the tyre pressure: depress
pressure release button Enext to pres-
sure gauge F.
X When the tyre pressure is correct, unscrew
the filler hose from the valve of the sealed
tyre.
X Screw the valve cap onto the tyre valve of
the sealed tyre.
X Pullt he tyre sealant bottle out of the tyre
inflation compressor.
The filler hose stays on the tyre sealant
bottle.
X Drive to the nearest qualified specialist
workshop and have the tyre changed there.
X Have the tyre sealant bottle replaced as
soon as possible at aqualified specialist
workshop.
X Have the tyre sealant bottle replaced every
four years at aqualified specialist work-
shop. Battery (vehicle)
Important safety notes
Work on the battery ,e.g. removing or fitting,
requires specialist knowledge and the use of
specia ltools. Therefore, alwaysh ave work on
the battery carrie dout at aqualified specialist
workshop. G
WARNING
Work carried out incorrectly on the battery
can lead, for example, to ashort circuit and
thus damage the vehicl eelectronics. This can Battery (vehicle)
401Breakdown assistance
Z
Page 410 of 497
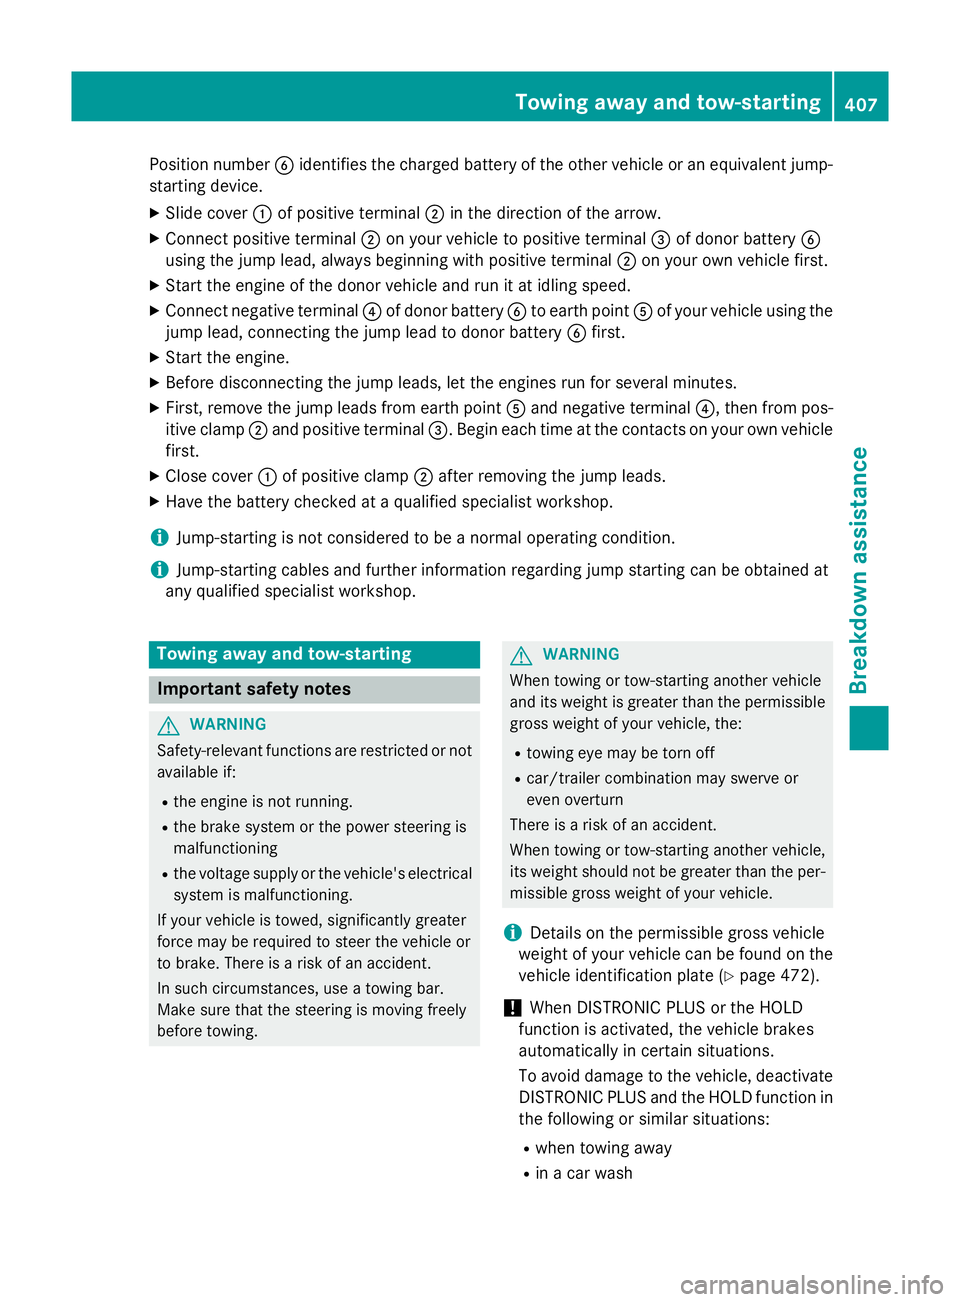
Position number
Bidentifies the charged batter yofthe other vehicle or an equivalent jump-
starting device.
X Slide cover :of positive terminal ;in the direction of the arrow.
X Connec tpositive terminal ;on your vehicle to positive terminal =of donor battery B
using the jump lead, alway sbeginnin gwith positive terminal ;on your own vehicle first.
X Start the engine of the donor vehicle and run it at idling speed.
X Connec tnegative terminal ?of donor battery Bto earth point Aof your vehicle using the
jump lead, connectin gthe jump lead to donor battery Bfirst.
X Start the engine.
X Before disconnectin gthe jump leads, let the engines run for several minutes.
X First ,remove the jump leads from earth point Aand negative terminal ?,then from pos-
itive clamp ;and positive terminal =.Begin each time at the contacts on your own vehicle
first.
X Close cover :of positive clamp ;after removin gthe jump leads.
X Have the batter ychecked at aqualified specialist workshop.
i Jump-starting is not considered to be
anormal operating condition.
i Jump-starting cables and further information regarding jump starting can be obtained at
any qualified specialist workshop. Towing away and tow-starting
Important safety notes
G
WARNING
Safety-relevant functions are restricted or not
availabl eif:
R the engine is not running.
R the brake system or the power steerin gis
malfunctioning
R the voltage supply or the vehicle's electrical
system is malfunctioning.
If your vehicle is towed, significantly greater
force may be required to steer the vehicle or
to brake. There is arisk of an accident.
In such circumstances, use atowing bar.
Make sure that the steerin gismoving freely
before towing. G
WARNING
When towing or tow-starting another vehicle
and its weight is greater than the permissible gross weight of your vehicle, the:
R towing eye may be torn off
R car/trailer combination may swerve or
even overturn
There is arisk of an accident.
When towing or tow-starting another vehicle,
its weight should not be greater than the per- missible gross weight of your vehicle.
i Details on the permissible gross vehicle
weight of your vehicle can be found on the
vehicle identification plate (Y page 472).
! When DISTRONIC PLUS or the HOLD
function is activated, the vehicle brakes
automatically in certain situations.
To avoid damage to the vehicle, deactivate
DISTRONIC PLUS and the HOLD function in the following or similar situations:
R when towing away
R in ac ar wash Towing away and tow-starting
407Breakdown assistance Z
Page 411 of 497
!
Only secure the tow cable or tow bar to
the towing eyes or, if available,tot he trailer
tow hitch. You could otherwise damage the
vehicle.
! Observe the following points when towing
with atow rope:
R Secure the tow rope on the same side on
both vehicles.
R Make sure that the tow rope is not longer
than legally permitted. Mark the tow rope
in the middle, e.g. with awhite cloth
(30 x30c m).This will make other road
users aware that avehicle is being
towed.
R Only secure the tow cable to the towing
eyes or, if available,tot he trailer tow
hitch.
R Observe the brake lamps of the towing
vehicle while driving. Alwaysm aintain a
distance adistance so that the tow rope
does not sag.
R Do not use steel cables or chains to tow
your vehicle. You could otherwise dam-
age the vehicle.
! Do not use the towing eye for recovery,
this could damage the vehicle. If in doubt,
recover the vehicle with acrane.
! Pull aways
moothly when towing awayor
tow-starting avehicle. If the tractive power
is too high, the vehicles could be damaged.
! To tow vehicles with KEYLESS-GO, use
the key instead of the Start/Stop button.
The automatic transmission may otherwise switch to position Pwhen you open the
driver's or front-passenger door which
could damage the transmission.
! You may tow the vehicle for
amaximum of
50km. Atowing speed of 50 km/h must not
be exceeded.
For towing distances over 50 km, the entire
vehicle must be lifted up and transported.
! If you tow or tow-start another vehicle, its
weight must not exceed the maximum per- missible gross vehicle weight of your vehi-
cle.
HYBRID vehicles :make sure that you read
the "HYBRID" Supplement included in the
vehicle literature. You could otherwise fail to
recognise dangers, e.g. due to high voltage.
Observe the legal requirements for the rele-
vant countries when towing and tow-starting.
It is better to have the vehicle transported
than to have it towed.
If the vehicle has suffered transmission dam- age, have it transported on atransporter or
trailer.
When towing awayav ehicle with an auto-
matic transmission, the transmission must be
in position N.
The battery must be connected and charged.
Otherwise, you:
R cannot turn the key to position 2in the
ignition lock
R cannot shift the transmission to position N
on vehicles with automatic transmission
In the event of damage to the electrical
system
If the battery is defective, the automatic
transmission will be locked in position P.To
shift the automatic transmission to position
N,y ou must provide power to the vehicle's
electrical system in the same way as when
jump-starting (Y page 405).
Have the vehicle transported on atransporter
or trailer.
i Deactivate the automatic locking feature
before the vehicle is towed away
(Y page 102). You could otherwise be
locked out when pushing or towing the
vehicle.
i Deactivate tow-away protection before
the vehicle is towed away( Ypage 90).408
Towing away and tow-startingBreakdown assistance
Page 412 of 497
Fitting/removing th
etowing eye
Fitting th etowing eye G
WARNING
The exhaust tai lpipe may be extremely hot.
Ther eisar iskofb urning when removing the
rear cover.
Do no ttou ch th eexhaust tai lpipe. Use
extreme caution when removing th erear
cover. Towin
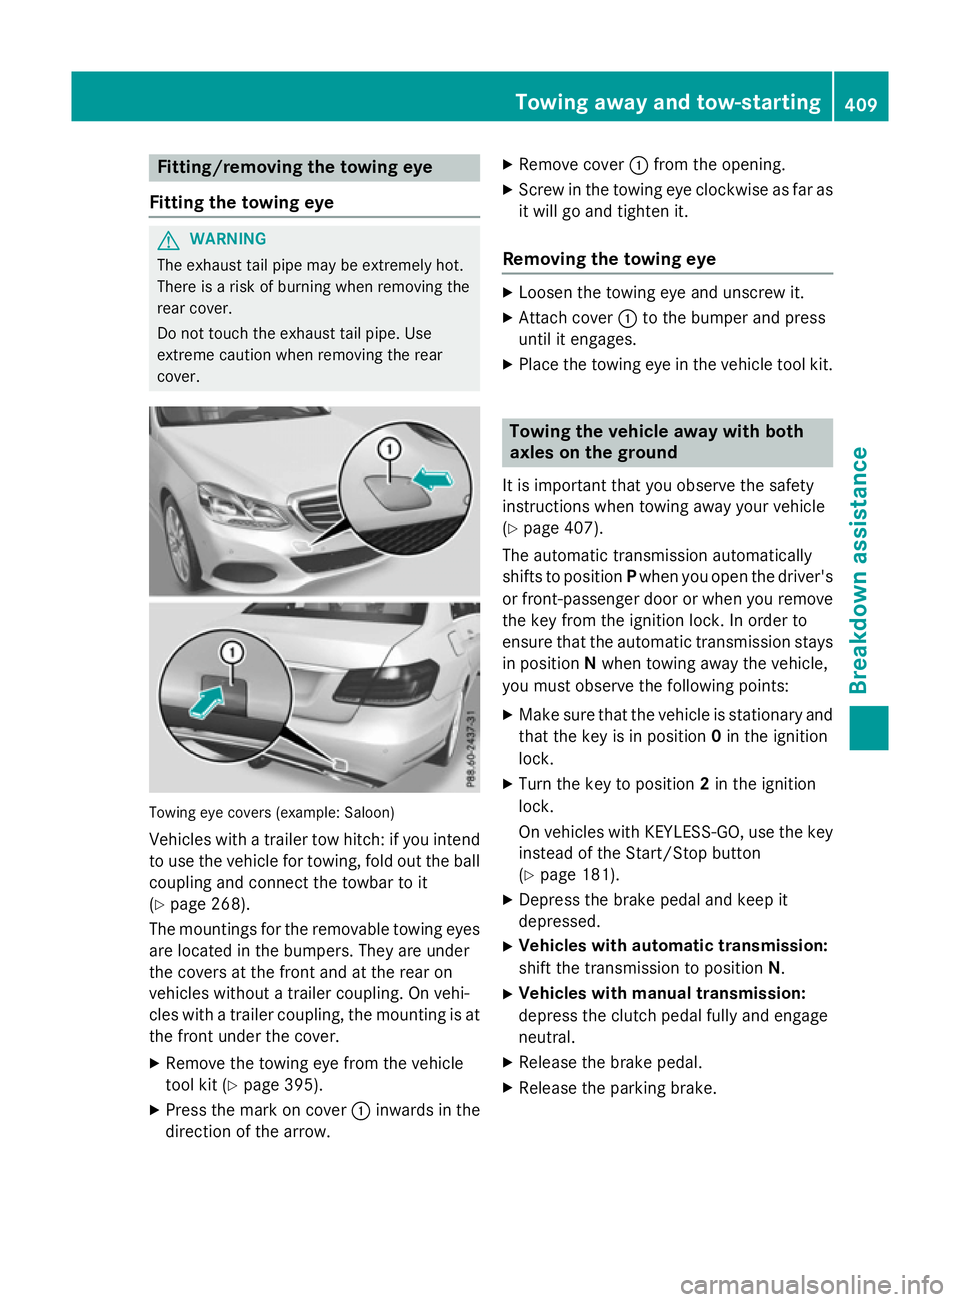
geye cover s(example: Saloon)
Vehicles wit hatrailer to whitch :ify ou intend
to use th evehicl efor towing, fol dout th eball
couplin gand connec tthe towbar to it
(Y page 268).
The mounting sfor th eremovable towin geyes
are locate dinthebumpers .They are under
th ec oversatt hefron tand at th erear on
vehicles without atrailer coupling. On vehi-
cle sw ithat railer coupling, th emounting is at
th ef ront under th ecover.
X Remove th etow inge ye from th evehicle
tool kit (Y page 395).
X Press th emarkonc over : inwards in the
direction of th earrow. X
Remove cover :from th eopening.
X Screw in th etow inge ye clockwise as far as
it will go and tighten it.
Removing th etowing eye X
Loosen th etow inge ye and unscrew it.
X Attac hcover : to th ebumper and press
until it engages.
X Plac ethe towin geye in th evehicl etoolkit. Towing th
evehicle awa ywith both
axles on th eground
It is important that you observ ethe safety
instruction swhen towin gaway your vehicle
(Y page 407).
The automatic transmission automatically
shifts to position Pwhen you open th edriver's
or front-passenger door or when you remove th ek eyfrom th eignition lock. In order to
ensure that th eautomatic transmission stays
in position Nwhen towin gaway th evehicle,
you must observ ethe followin gpoints:
X Mak esure that th evehicl eiss tationary and
that th ekeyis in position 0in th eignition
lock.
X Turn th ekeyto position 2in th eignition
lock.
On vehicles wit hKEYLESS-GO ,use th ekey
instead of th eStart/Sto pbutton
(Y page 181).
X Depress th ebrak epedal and keep it
depressed.
X Vehicles with automatic transmission:
shif tthe transmission to position N.
X Vehicles with manua ltra nsmission:
depress th eclutch pedal fully and engage
neutral.
X Releas ethe brak epedal.
X Releas ethe parking brake. Towin
gawaya nd tow-starting
409Breakdown assistance Z