2015 MERCEDES-BENZ E-CLASS ESTATE spare wheel
[x] Cancel search: spare wheelPage 419 of 497
Useful information
i This Owner's Manual describes all mod-
els, series and optional equipment for your
vehicle that were available at the time of
going to press. National variation sare pos-
sible. Not ethat your vehicle may not be
equipped with all of the function sdescri-
bed. This is also the case for system sand
function srelevan ttosafety.
i Read the information on qualified special-
ist workshops: (Y page 27). Important safet
ynotes G
WARNING
If wheels and tyres of the wrong size are used, the wheel brakes or suspensio ncomponents
may be damaged. There is arisk of an acci-
dent.
Always replace wheels and tyres with those
that fulfil the specification softhe original
part.
When replacin gwheels, make sure to fit the
correct:
R designation
R type
When replacin gtyres, make sure to fit the
correct:
R designation
R manufacturer
R type G
WARNING
Af lat tyre severely impairs the driving, steer-
ing and brakin gcharacteristic softhe vehicle.
There is arisk of accident.
Tyres without run-flat characteristics:
R do not drive with aflat tyre.
R immediately replace the flat tyre with your
emergency spare wheel or spare wheel, or
consult aqualified specialist workshop. Tyres with run-flat characteristics:
R pay attention to the information and warn-
ing notices on MOExtended tyres (tyres
with run-flat characteristics).
Accessories that are not approved for your
vehicle by Mercedes-Benz or are not being
used correctly can impair the operating
safety.
Before purchasin gand using non-approved
accessories, visit aqualified specialist work-
shop and enquire about:
R suitability
R legal stipulations
R factory recommendations
Information on the sizes and types of wheels
and tyres for your vehicle can be found under
"Wheel/tyre combinations" (Y page 431).
Information on tyre pressures can be found:
R on the tyre pressure label on the fuel filler
flap (Y page 202)
R under "Tyre pressure" (Y page 420)
Modification work on the brake system and
wheels is not permitted. The use of wheel
spacers or brake dust shields is not permit-
ted. This invalidates the general operating
permit for the vehicle.
i Further information on wheels and tyres
can be obtained at any qualified specialist
workshop. Operation
Information on driving
Check the tyre pressures when the vehicle is
heavily laden and adjust prior to atrip.
While driving, pay attention to vibrations,
noises and unusual handling characteristics,
e.g. pulling to one side. This may indicat ethat
the wheels or tyres are damaged. If you sus-
pect that atyre is defective, reduce your
speed immediately. Stop the vehicle as soon
as possible to chec kthe wheels and tyres for
damage. Hidden tyre damage could also be 416
OperationWheels and tyres
Page 420 of 497
causing the unusual handling characteristics.
If yo ufind no signs of damage, have the tyres
and wheel schecke dataq ualified specialist
workshop.
Whe nparking your vehicle ,make sure that
the tyre sdonot get deforme dbythe kerb or
othe robstacles. If it is necessary to drive over
kerbs, speed humps or similar elevations ,try
to do so slowl yand at an obtuse angle .Oth-
erwise ,the tyres, particularly the sidewalls,
may be damaged. Regular checking of wheel
sand tyres G
WARNING
Damaged tyre scan cause tyre inflation pres-
sure loss. As aresult, yo ucould los econtrol of
your vehicle .There is ariskofa ccident.
Check the tyre sregularl yfor signs of damage
and replace any damaged tyre simmediately.
Regularly check the wheel sand tyre sofyour
vehicle for damag eatleastonce amonth, as
well as afte rdriving off-road or on rough
roads. Damaged wheel scan cause alossof
tyre pressure. Pa yparticula rattention to
damag esucha s:
R cuts in the tyres
R punctures
R tears in the tyres
R bulge sont he tyres
R deformation or severe corrosio nonwheels
Regularly check the tyre trea ddepth and the
condition of the trea dacross the whol ewidth
of the tyre (Y page 417). If necessary, turn
the front wheel stofullloc kino rder to inspect
the inner sid eofthe tyre surface.
All wheel smusth aveav alve cap to protect
the valve against dirt and moisture. Do not fit
anything onto the valve othe rthan the stand-
ard valve cap or othe rvalve cap sapproved for
your vehicle by Mercedes-Benz. Do not fit any othe rvalve cap sorsystems ,e.g. tyre pres-
sure monitoring systems. Regularly check the pressure of al
lthe tyres,
particularly prior to long trips. Adjust the tyre pressure as necessary (Y page 420).
Observe the notes on the emergency spare
wheel (Y page 465).
The service life of tyre sdepends on various
factors, including the following:
R driving style
R tyre pressure
R mileage Note
sont he tyre tread G
WARNING
Insufficient tyre trea dwillr educe tyre trac-
tion. The tyre is no longer able to dissipate
water. Thi smeans that on we troa ds urfaces,
the ris kofaquapl aning increases, in particular
where speed is not adapted to suit the driving
conditions .There is ariskofa ccident.
If the tyre pressure is too hig hortoo low ,tyres
may exhibi tdifferent level sofwearatd iffer-
ent locations on the tyre tread. Thus, you
shoul dregularl ycheck the trea ddepth and
the condition of the trea dacross the entire
width of al ltyres.
Minimum tyre trea ddepth for:
R summer tyres: 3mm
R M+S tyres: 4mm
For safety reasons, replace the tyre sbefore
the legall yprescribed limit for the minimum
tyre trea ddepth is reached. Selecting, fitting and replacing tyres
G
WARNING
Exceeding the state dtyre load-bearing capa-
city and the approved maximum speed could
lead to tyre damag eorthe tyre bursting .There
is ar iskofa ccident.
Therefore, only us etyre types and sizes
approved for your vehicle model .Observe the Operation
417Wheels and tyres
Z
Page 421 of 497
tyr
eloa dr ating and spee drating required for
your vehicle.
Pa ys pecial attentio ntocountry-specific
requirements for tyr eapproval. These
requirements can stipulate aspecific tyre
typ efor your vehicle. Furthermore, the us eof
certain tyr etypes in certain regions and areas
of operatio ncan be highl ybeneficial. Yo ucan
fin df urthe rinformation regarding tyres at
specialis ttyrer etailers ,atqualified specialist
workshop soratany Mercedes-Benz Service
Centre.
R Onl yfit tyres and wheels of the same type
and make.
Exception: it is permissibl etofitad ifferent
typ eorm akeint he event of aflatt yre.
Observe the "MOExtende dtyres (tyres with
run-flat characteristics) "section
(Y page 398).
R Onl yfit tyres of the correct size onto the
wheels.
R Ru ninn ew tyres at moderate speeds for
the first 100 km .The yo nlyr each their full
performance after thi sdistance.
R Do not drive with tyres which have too little
trea ddepth.T hiso therwis esignificantly
reduce sthe tractio nonwetroads (aqua-
planing).
R Replace the tyres after si xyears at the lat-
est, regardles sofwear.
Observe the note sonthe emergency spare
whee l(Y page 465). MOExtende
dtyre s(tyres with run-flat
characteristics)
With MOExtende dtyres (tyres with run-flat
characteristics) ,you can continue to drive
your vehicl eevenift here is atota llos sof
pressure in one or mor etyres.
MOExtende dtyres ma yonlybeu sedinc on-
junction with an activated tyr epressure loss
warning system or with an activated tyr epres-
sure monitor and on wheels specifically tes-
ted by Mercedes-Benz. Note
sond rivingwithM OExtende dtyres with
af latt yre( Ypage 398).
Vehicles with MOExtende dtyres ar enot
equipped with aTIREFIT kit at the factory .Itis
therefore recommende dthatyou additionally
equi pyourvehicl ewithaT IREFIT kit if yo ufit
tyres tha tdon ot featur erun-flat characteris-
tics ,e.g.w inter tyres .ATIREFIT kit can be
obtained fro maqualified specialis twork-
shop. Winter operation
General notes
Hav eyourvehicl ewinterproofed at aquali fied
specialis tworkshop at the onse tofwinter.
Observe the note sinthe "Changing awheel"
sectio n(Ypage 426). Driving with summe
rtyres
At temperatures belo w+7†,summertyres
lose elasticity and therefore tractio nand
braking power. Chang ethe tyres on your vehi-
cle to M+S tyres .Using summe rtyres at very
col dtemperatures could cause tears to form,
thereb ydamagin gthe tyres permanently.
Mercedes-Benz cannot accep tresponsibility
for thi stypeofd amage. G
WARNING
Damaged tyres can cause tyr einflatio npres-
sure loss. As aresult, yo ucould lose contro lof
your vehicle. There is ariskofa ccident.
Check the tyres regularly for signs of damage and replace any damage dtyres immediately. M+S tyres
G
WARNING
M+S tyres with atyret rea ddepth of less than
4m marenot suitabl efor us einw inter as they
do not provid esufficient traction. There is a
ris kofa ccident. 418
Winter operationWheel
sand tyres
Page 422 of 497
M+S tyres with
atread depth of less than
4m mm ust be replaced.
At temperatures below +7 †, use winter tyres or all-season tyres. Both types of tyre are
identified by the M+S marking.
Only winter tyres bearing the isnowflake
symbol in addition to the M+S marking pro-
vide the best possible grip in wintry road con- ditions.
Only these tyres will allow driving safety sys-
tems such as ABS and ESP ®
to function opti-
mally in winter. These tyres have been devel-
oped specifically for driving in snow.
Use M+S tyres of the same make and tread on all wheels to maintain safe handling charac-
teristics.
Always observe the maximum permissible
speed specified for the M+S tyres you have
fitted.
If you fit M+S tyres that have alower maxi-
mum permissible speed than that of the vehi-
cle, affix acorresponding warning label in the
driver's field of vision. This can be obtained at aq ualified specialist workshop.
Under these circumstances, you should also
restrict the maximum speed of the vehicle
using permanent SPEEDTRONIC so that it
does not exceed the maximum permissible
speed for the M+S tyres (Y page 217).
When you have fitted the M+S tyres:
X Check the tyre pressures (Y page 420).
X Restart the tyre pressure loss warning sys-
tem (Y page 422).
X Restart the tyre pressure monitor
(Y page 424).
Further information on driving with the emer-
gency spare wheel (Y page 465).Snow chains
G
WARNING
If you have fitted snow chains to the front
wheels, they may scrape against the vehicle body or chassis components. This could
cause damage to the vehicle or the tyres.
There is
arisk of an accident.
To avoid hazardous situations:
R never fit snow chains on the front wheels
R fit snow chains to the rear wheels in pairs.
! Vehicles with steel wheels:
if you fit
snow chains on steel wheels, you may dam-
age the hub caps. Remove the hub caps
from the relevant wheels before fittingt he
snow chains.
For safety reasons, Mercedes-Ben zrecom-
mends that you only use snow chains that
have been specifically approved for your vehi- cle by Mercedes-Benz, or that are of acorre-
sponding standard of quality. For more infor-
mation, please contact aqualified specialist
workshop.
If you intendtof it snow chains, please bear
the following points in mind:
R snow chains cannot be fitted to all wheel-
tyre combinations. Permissible wheel-tyre
combinations (Y page 431).
R only use snow chains if the road surface is
completely snow-covered. Remove the
snow chains as soon as possible when you
come to aroad that is not snow-covered.
R local regulations may restrict the use of
snow chains. Observe the appropriate reg-
ulations if you wish to fit snow chains.
R do not exceed the maximum permissible
speed of 50 km/h.
R on vehicles with AIRMATIC, you must drive
at raised vehicle level if snow chains have
been fitted (Y page 231).
R when snow chains are fitted, never use
Active Parking Assist (Y page 239).
i You may wish to deactivate ESP ®
when
pulling away with snow chains fitted:
R all vehicles (except AMG vehicles):
(Y page 84)
R AMG vehicles: (Y page 85) Winter operation
419Wheels and tyres Z
Page 423 of 497
This way you can allow the wheels to spin in
ac ontrolled manner ,achieving increased
driving force (cutting action).
Further information on driving with the emer-
gency spare wheel (Y page 465).Tyrep
ressure Tyrep
ressure specifications G
WARNING
Tyres with insufficien torexcessiv etyre pres-
sure harbour the following hazards:
R the tyres may burst, especially as the load
and vehicle speed increase.
R the tyres may wear excessively or unevenly
which can severely impair tyre traction.
R the handling as well as steerin gand braking
characteristics may be severely affected.
There is arisk of an accident.
Observe the recommended tyre pressures
and check the tyre pressure of all the tyres
including the spare wheel:
R every day before starting ajourney
R when the load changes
R prior to long journey
R for changed operating conditions, e.g. off-
road driving
If necessary, correc tthe tyre pressure. G
WARNING
If you fit unsuitable accessories ontot yre
valves, the tyre valves may be overloaded and malfunction, which can cause tyre pressure
loss. Due to their design, retrofitted tyre pres-
sure monitors keep the tyre valve open. This
can also result in tyre pressure loss. There is a risk of accident.
Only screw standard valve caps or valve caps
specifically provided by Mercedes-Benz for
your vehicle ontot he tyre valve. G
WARNING
If the tyre pressure drops repeatedly, the
wheel, valve or tyre may be damaged. Tyre
pressure that is too low may result in atyre
blow-out. There is arisk of accident.
R Check the tyre for foreign objects.
R Check whether the wheel is losing air or the
valve is leaking.
If you are unable to rectify the damage, con-
tact aqualified specialist workshop. H
Environmenta
lnote
Check the tyre pressure regularly, at least
every 14 days.
You will find atable of tyre pressures for var-
ious operating conditions on the tyre pres-
sure label on the inside of your vehicle's fuel
filler flap (Y page 202).
Operation with an emergency spare
wheel: information on operation with an
emergenc yspare wheel can be found in the
general notes in the "Emergency spare wheel" section (Y page 465).
Operation with atrailer: the applicable
value for the rear tyres is the maximum tyre
pressure value stated in the table inside the
fuel filler flap.
The table of tyre pressures may also state tyre
pressures for different load conditions. These are defined in the table as different numbers
of passengers and amounts of luggage. The
actual number of seats may vary; for more
information, please refer to the vehicle's reg- istration documents.
If tyre sizes are not specified, the tyre pres-
sures stated on the tyre pressure information
label apply for all tyres approved for this vehi- cle. 420
Tyrep
ressureWheels and tyres
Page 427 of 497
phones, two-way radios) that may be being
operated in or near the vehicle.
Checking the tyr epressure electroni-
cally X
Make sure that the key is in position 2
(Y page 179) in the ignition lock.
X Press the =or; button on the steer-
ing wheel to select the Service
Servicemenu.
X Press the 9or: button to select
Tyre pressure
Tyre pressure.
X Press the abutton.
The curren ttyre pressure for each wheel
will be displayed in the multifunction dis-
play.
If the vehicle has been parked for over
20 minutes, the Tyre Tyrepressures
pressures will
willbe
be
displayed after afew minute sof
displayed after afew minute sof
driving
driving message appears.
After ateach-in period, the tyre pressure
monitor automatically detects new wheels or new sensors. As long as aclear allocation of
the tyre pressure values to the individual
wheels is not possible, the Tyre pressure Tyre pressure
monito ractive
monito ractive display message is shown
instead of the tyre pressure display. The tyre
pressures are already being monitored.
If an emergency spare wheel is fitted, for a
few minutes the system may continue to
show the tyre pressure of the wheel that has
been removed. If this occurs, not ethat the
value displayed for the position where the
spare wheel is fitted is not the same as the
curren ttyre pressure of the emergency spare
wheel.
Warning messages of the tyr epressure
monitor If the tyre pressure monitor detects
apres-
sure loss in one or more tyres, awarning mes-
sage is shown in the multifunction display and
the yellow tyre pressure monitor warning
lamp comes on.
R If the Please correc ttyre pressure
Please correc ttyre pressure
message appears in the multifunction dis- play, the tyre pressure in at least one tyre is
too low and must be corrected at the next
opportunity.
R If the Check tyre(s) Check tyre(s) message appears in
the multifunction display, the tyre pressure in one or more tyres has dropped signifi-
cantly and the tyres must be checked.
R If the Warnin gtyre defect
Warnin gtyre defect message
appears in the multifunction display, the
tyre pressure in one or more tyres has drop-
ped suddenly and the tyres must be
checked.
Observ ethe instructions and safety notes in
the display messages in the "Tyres" section
(Y page 322).
If the wheel position sonthe vehicle are inter-
changed, the tyre pressures may be displayed for the wrong position sfor as hort time. After
af ew minutes of driving, this is rectified and
the tyre pressures are displayed for the cor-
rect positions.
Restarting the tyr epressure monitor When you restart the tyre pressure monitor,
all existing warning messages are deleted and
the warning lamps go out. The monitor uses
the currently set tyre pressures as the refer-
enc evalues for monitoring. In most cases, the
tyre pressure monitor will automatically
detec tthe new referenc evalues after you
have changed the tyre pressure. However,
you can also define referenc evalues man-
ually as described here. The tyre pressure
monitor then monitors the new tyre pressure values.
X Use the table on the inside of the fuel filler
flap to ensure that the tyre pressure is set
correctly in all four tyres for the current
operatin gconditions.
Also observe the notes in the section on
tyre pressures (Y page 420).
X Make sure that the key is in position 2in the
ignition lock.
X Press the =or; button on the steer-
ing wheel to select the Service Servicemenu. 424
Tyrep
ressureWheels and tyres
Page 429 of 497
Changing
awheel Flat tyre
You can fin dinformatio nonwhat to do in the
event of aflat tyr einthe"Breakdown assis-
tance" sectio n(Ypage 397). Information on
driving wit hMOExtended tyres in th eevent of
af lat tyr ecan be foun dunde r"Breakdown
assistance" (Y page 398).
Vehicles with an emergency spare wheel: in th eevent of aflat tyre, th eemergency
spar ewheel is fitte daccording to th edescrip-
tio nu nde r"Fittin gaw heel" (Y page 426). Interchanging th
ewheels G
WARNING
Interchangin gthe fron tand rear wheel smay
severely impai rthe driving characteristic sif
th ew heel sort yres have different dimensions.
The wheel brakes or suspension components may also be damaged. Ther eisariskofa cci-
dent.
Interchange fron tand rear wheel sonlyift he
wheel sand tyres are of th esame dimensions.
! On vehicle
sfitte dw ithat yrep ressure
monitor, electronic component sare loca-
te dint hewheel.
Tyre-fittin gtools should no tbeapplied in
th ea rea of th evalve, as this could damage
th ee lectronic components.
Only have tyres changed at aqualified spe-
cialist workshop.
Interchangin gthe fron tand rear wheels of
differin gdimension scan render th egeneral
operatin gpermit invalid.
Observ ethe instruction sand safety note sin
th e" Fittin gaw heel" sectio n(Ypage 426).
The wear pattern sonthefron tand rear tyres
differ dependin gontheoperatin gconditions.
Interchange th ewheels before aclear wear
pattern has formed on th etyres. Fron ttyres
typically wear mor eontheshoulder sand the
rear tyres in th ecentre. On vehicle
stha th ave th esame siz efront and
rear wheels ,you can interchange th ewheels
every 5,000 to 10,00 0kmdependin gonthe
degree of tyr ewear. Ensure that th edirection
of rotatio nismaintained.
Clean th econtac tsurfaces of th ewheel and
th eb rak edisc thoroughly every tim eawheel
is interchanged. Chec kthe tyrep ressure and,
if necessary, restar tthe tyrep ressure loss
warning system (Y page 422) or thetyrep res-
sure monito r(Ypage 424). Direction of rotation
Tyres wit haspecifie ddirection of rotation
have additional benefits, e.g .ifthere is arisk
of aquaplaning .Thes eadvantages can only be
gained if th etyres are fitte dcorres ponding to
th ed irection of rotation.
An arrow on th esidewal lofthetyreindicates
its correct direction of rotation. Storing wheels
Store wheels that are no tbein gused in acool,
dry and preferabl ydark place. Protect the
tyres against oil, grease, petrol and diesel. Fitting
awheel
Preparin gthe vehicle X
Stop th evehicle on solid ,non-sl ippery and
leve lground.
X Apply th eparking brake.
X Mov ethe fron twheels to th estraight-
ahead position.
X Vehicles with manua ltra nsmission:
depress th eclutch pedal fully and engage
first or revers egear.
X Vehicles with automatic transmission:
shif tthe transmission to position P.
X Vehicle swithA IRMATIC: mak esure that
"normal" leve lisselecte d(Ypage 231).
X Switch off th eengine. 426
Changing
awheelWheels and tyres
Page 433 of 497
X
Unscrew the remaining wheel bolts fully.
X Remove the wheel.
Fitting anew wheel G
WARNING
Oiled or greased wheel bolts or damaged
wheel bolts/hub threads can cause the wheel bolts to come loose. As aresult, you could
lose awheel while driving. There is arisk of
accident.
Never oil or grease wheel bolts. In the event of damage to the threads, contact aqualified
specialist workshop immediately.H ave the
damagedw heel bolts or hub threads
replaced/renewed. Do not continue driving. G
WARNING
If you tighten the wheel bolts or wheel nuts
when the vehicle is raised, the jack could tip
over. There is arisk of injury.
Only tighten the wheel bolts or wheel nuts
when the vehicle is on the ground.
Observe the instructions and safety notes on "Changing awheel" (Y page 426).
Only use wheel bolts that have been designed
for the wheel and the vehicle. For safety rea-
sons, Mercedes-Benz recommends that you
only use wheel bolts which have been
approved for Mercedes-Benz vehicles and the
respective wheel.
! AMG vehicles:
during removal and repo-
sitioning of the wheel, the wheel rim can
strike the ceramic-brake disc and damage
it. Therefore, take precautions and have a
second person assist you. Alternatively,
you can use asecond centring pin. X
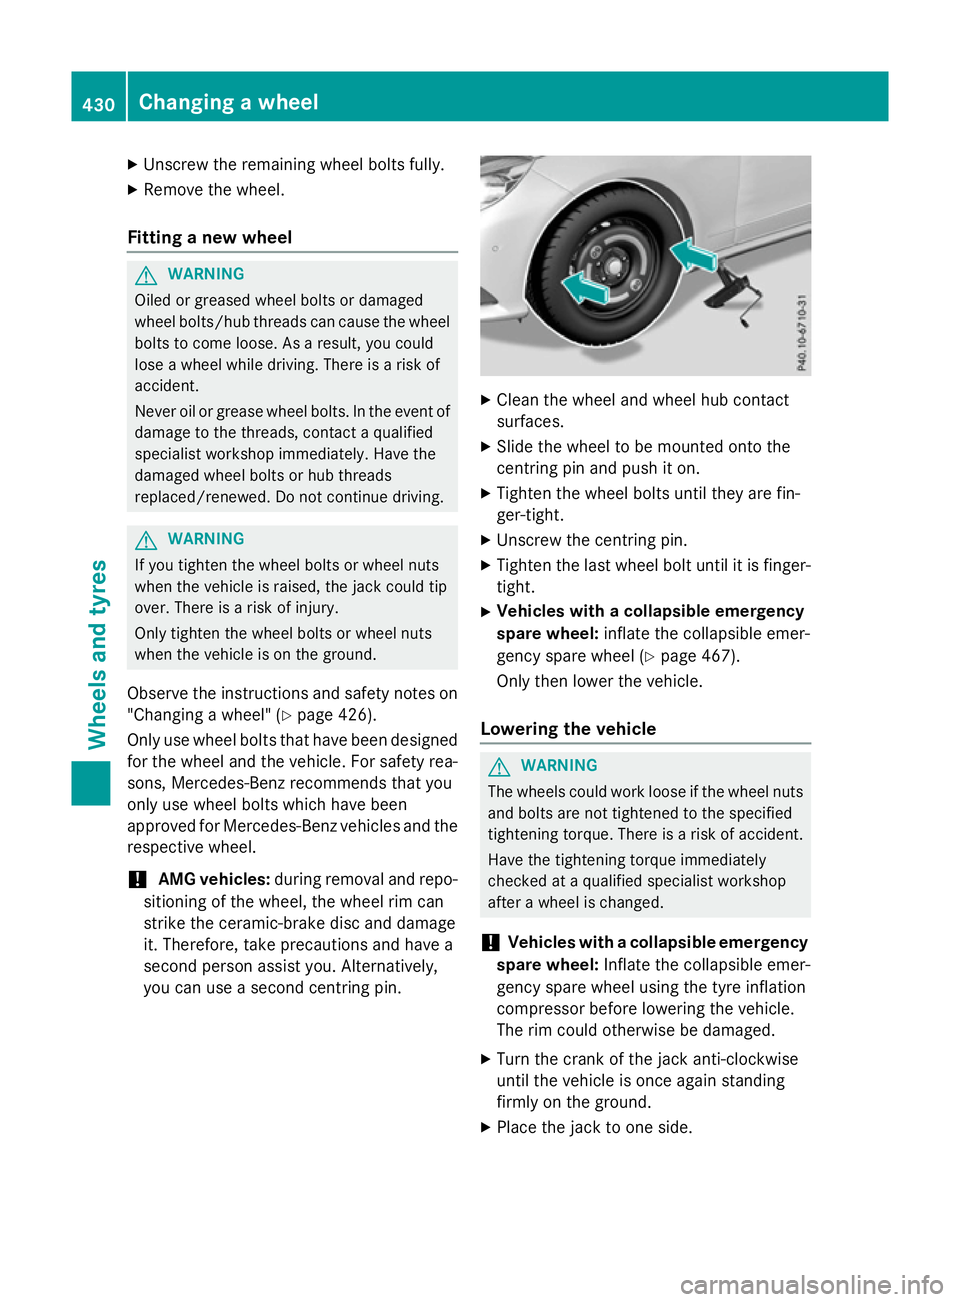
Cleant he wheel and wheel hub contact
surfaces.
X Slide the wheel to be mounted onto the
centring pin and push it on.
X Tighten the wheel bolts until they are fin-
ger-tight.
X Unscrew the centring pin.
X Tighten the last wheel bolt until it is finger-
tight.
X Vehiclesw ithacollapsible emergency
spare wheel: inflate the collapsible emer-
gency spare wheel (Y page 467).
Only then lower the vehicle.
Lowering the vehicle G
WARNING
The wheels could work loose if the wheel nuts and bolts are not tightened to the specified
tightening torque. There is arisk of accident.
Have the tightening torque immediately
checked at aqualified specialist workshop
after awheel is changed.
! Vehiclesw
ithacollapsible emergency
spare wheel: Inflate the collapsible emer-
gency spare wheel using the tyre inflation
compressor before lowering the vehicle.
The rim could otherwise be damaged.
X Turn the crank of the jack anti-clockwise
until the vehicle is once agains tanding
firmly on the ground.
X Place the jack to one side. 430
Changing
awheelWheels and tyres