2015 MERCEDES-BENZ E-CLASS COUPE ESP
[x] Cancel search: ESPPage 259 of 345
General notes
The multimedia system section in this manual
describes the basic principles for operation.
More information can be found in the Digital
Owner's Manual. Important safety notes
G
WARNING
Operating the integrated information systems and communications equipment in the vehicle
while driving will distract you from traffic con-
ditions. You could then lose control of the
vehicle. There is a risk of an accident.
Only operate these devices if road traffic con-
ditions permit. If you are unsure about the
surrounding conditions, pull over to a safe
location and make entries only while the vehi-
cle is stationary.
You must observe the legal requirements for the country in which you are currently driving whenoperating the multimedia system.
The multimedia system calculates the route to
the destination without taking the following into
account, for example:
R traffic lights
R stop and give way signs
R parking or stopping restrictions
R road narrowing
R other road and traffic rules and regulations
The multimedia system may give incorrect nav-
igation recommendations if the actual street/
traffic situation does not correspond with the
digital map's data.
For example:
R a diverted route
R the road layout or the direction of a one-way
street has been changed
For this reason, you must always observe road
and traffic rules and regulations during your
journey. Road and traffic rules and regulations
always have priority over multimedia system
driving recommendations. Function restrictions
For safety reasons, some functions are restric-
ted or unavailable while the vehicle is in motion.
You will notice this, for example, because either
you will not be able to select certain menu items or a message will appear to this effect. Operating system
Overview
General notes !
Do not use the space in front of the display
for storage. Objects placed here could dam-
age the display or impair its function. Avoid
any direct contact with the display surface.
Pressure on the display surface may result in
impairments to the display, which could be
irreversible.
Wearing polarised sunglasses may impair your
ability to read the display.
The display has an automatic temperature-con- trolled switch-off feature. The brightness is
automatically reduced if the temperature is too
high. If necessary, the display may temporarily
switch off completely.
Cleaning instructions !
Do not touch the display. The display has a
very sensitive high-gloss surface; there is a
risk of scratching. If you have to clean the
screen, however, use a mild cleaning agent
and a soft, lint-free cloth.
The display must be switched off and have
cooled down before you start cleaning. Do not
apply pressure to the display surface when
cleaning it, as this could cause irreversible dam- age to the display.
Switching the multimedia system
on/off X
Press the qcontrol knob. 256
Operating systemMultimedia system
Page 262 of 345
X
Enter the town.
The Gsymbol: the location is contained on
the digital map multiple times.
X To switch to the list: slide5the control-
ler.
X Select the location.
If available, the postcode is shown. If there
are different postcodes available for the loca- tion, the corresponding digits are displayed
with an X
X.
X Enter the street and house number.
The address is in the menu.
Further options for destination entry:
R search for a keyword
The keyword search finds destinations using
fragments of words.
R select the last destination
R select a contact
R select a POI
You can search for a POI by location, name or
telephone number.
R select destination on the map
R enter intermediate destination
You can map the route to the destination
yourself with up to four intermediate destina- tions.
R select travel guide destination (only available
for selected European countries)
R select destinations from Mercedes-Benz
Apps
R select geo-coordinates
Calculating the route Prerequisite: the address has been entered and
is in the menu.
X Select Start StartorContinue
Continue.
The route is calculated with the selected route
type and the selected route options.
If route guidance has already been activated,
a prompt will appear asking whether you wish to end the current route guidance.
X Select Yes
Yes orSet as intermediate des‐ Set as intermediate des‐
tination
tination.
Yes Yes cancels the current route guidance and
starts route calculation to the new destina-
tion.
Set as intermediate destination
Set as intermediate destination adds
the new destination in addition to the existing destination and opens the intermediate des-
tinations list. Connecting the mobile phone
Requirements For telephony via the Bluetooth
®
interface, you
require a Bluetooth ®
-capable mobile phone. The
mobile phone must support Hands-Free Profile
1.0 or above.
Multimedia system:
X Select Vehicle VehicleQSystem set‐ System set‐
tings
tingsQ Activate Bluetooth
Activate Bluetooth .
X Activate Bluetooth ®
O.
Mobile phone:
X Activate Bluetooth ®
and, if necessary, Blue-
tooth ®
visibility for other devices (see the
manufacturer's operating instructions).
The Bluetooth ®
device names for all of one man-
ufacturer's products might be identical. To
make it possible to clearly identify your mobile
phone, change the device name (see the man-
ufacturer's operating instructions).
If the mobile phone supports the PBAP (P hone
Book Access Profile) and MAP (Message
Access Profile) Bluetooth ®
profiles, the follow-
ing information will be transmitted after you
connect:
R Phone book
R Call lists
R Text messages and e-mails
i Further information on suitable mobile
phones can be obtained on the Internet at:
http://www.mercedes-benz.com/
connect
Searching for and authorising a mobile
phone Before using your mobile phone with the multi-
media system for the first time, you will need to
search for the phone and then authorise (con-
nect) it. Depending on the mobile phone, author- isation takes place by means of Secure Simple
Pairing or by entering a passkey. The multimedia
system automatically makes the procedure that is relevant for your mobile phone available. The
mobile phone is always connected automati- Operating system
259Multimedia system Z
Page 268 of 345
Stowage areas
Loading guidelines
G
WARNING
If objects, luggage or loads are not secured or not secured sufficiently, they could slip, tip
over or be flung around and thereby hit vehicle
occupants. There is a risk of injury, especially when braking or abruptly changing directions.
Always store objects so that they cannot be
flung around. Secure objects, luggage or
loads against slipping or tipping before the
journey. G
WARNING
Combustion engines emit poisonous exhaust
gases such as carbon monoxide. Exhaust
gases can enter the vehicle interior if the boot
lid is open when the engine is running, espe-
cially if the vehicle is in motion. There is a risk of poisoning.
Always switch off the engine before opening
the boot lid. Never drive with the boot lid
open. G
WARNING
The exhaust tail pipe and tail pipe trim can
become very hot. If you come into contact
with these parts of the vehicle, you could burn
yourself. There is a risk of injury.
Always be particularly careful around the
exhaust tail pipe and the tail pipe trim. Allow
these components to cool down before touch-
ing them.
The handling characteristics of a laden vehicle
are dependent on the distribution of the load
within the vehicle. For this reason, you should
observe the following notes when transporting a
load:
R never exceed the maximum permissible gross
vehicle weight or the permissible axle loads
for the vehicle (including occupants).
R the boot is the preferred place to store
objects.
R position heavy loads as far forwards as pos-
sible and as low down in the boot as possible. R
the load must not protrude above the upper
edge of the seat backrests.
R always place the load against the rear or front
seat backrests. Make sure that the seat
backrests are securely locked into place.
R always place the load behind unoccupied
seats if possible.
R use the lashing eyelets and the luggage nets
to transport loads and luggage.
R only use lashing eyelets and fastening com-
ponents that are suitable for the weight and
size of the load.
R secure the load with sufficiently strong and
wear-resistant lashing material. Pad sharp
edges for protection.
i Load restraints are available at any qualified
specialist workshop, e.g. a Mercedes-Benz
Service Centre. Stowage compartments
Important safety notes G
WARNING
If objects in the passenger compartment are
stowed incorrectly, they can slide or be
thrown around and hit vehicle occupants. In
addition, cupholders, open stowage spaces
and mobile phone brackets cannot always
retain all objects they contain. There is a risk of injury, particularly in the event of sudden
braking or a sudden change in direction.
R Always stow objects so that they cannot be
thrown around in such situations.
R Always make sure that objects do not pro-
trude from stowage spaces, parcel nets or
stowage nets.
R Close the lockable stowage spaces before
starting a journey.
R Always stow and secure heavy, hard, poin-
ted, sharp-edged, fragile or bulky objects in
the boot.
Observe the loading guidelines (Y page 265). Stowage areas
265Stowing and features Z
Page 271 of 345

Through-loading facility in the rear
bench seat
Important safety notes G
WARNING
If the rear bench seat/rear seat and seat
backrest are not engaged they could fold for- wards, e.g. when braking suddenly or in the
event of an accident.
R The vehicle occupant would thereby be
pushed into the seat belt by the rear bench
seat/rear seat or by the seat backrest. The
seat belt cannot protect as intended and
could result in additional injury.
R Objects or loads in the boot cannot be
restrained by the seat backrest.
This poses an increased risk of injury.
Before every trip, make sure that the seat
backrests and the rear bench seat/rear seat
are engaged before every trip.
Observe the loading guidelines (Y page 265).
The left-hand and right-hand rear seat backrests can be folded down separately to increase the
boot capacity.
Folding the seat backrest forwards i
Vehicles with memory function: when you
fold one or both parts of the rear seat back-
rest forwards, the respective front seat
moves forward slightly, when necessary, in
order to avoid contact. X
Vehicles without memory function: if neces-
sary, move the driver's or front-passenger
seat forwards.
X Open the boot.
X Pull right-hand or left-hand rear seat backrest
release handle :.
The corresponding rear seat backrest is
released. X
Fold rear seat backrest ;forwards.
X Move the driver's or front-passenger seat
back if necessary.
Folding back the seat backrest !
Make sure that the seat belt does not
become trapped when folding the rear seat
backrest back. Otherwise, it could be dam-
aged. X
Move the driver's or front-passenger seat
forward if necessary.
X Fold rear seat backrest :back until it
engages.
If the rear seat backrest is not engaged and
locked, this will be shown in the multifunction 268
Sto
wage areasStowing an d features
Page 280 of 345
The garage door opener is only available for cer-
tain countries. Observe the legal requirements
for each individual country.
The HomeLink ®
garage door opener is compat-
ible with most European garage and gate opener
drives. More information on HomeLink ®
and/or
compatible products is available:
R at a qualified specialist workshop
R via the HomeLink ®
Hotline
(0) 08000 466 354 65 or alternatively
+49 (0) 6838 907-277
R on the Internet at http://www.homelink.com
Important safety notes G
WARNING
When you operate or program the garage door with the integrated garage door opener, per-
sons in the range of movement of the garage
door can become trapped or struck by the
garage door. There is a risk of injury.
When using the integrated garage door
opener, always make sure that nobody is
within the range of movement of the garage
door. G
WARNING
Combustion engines emit poisonous exhaust
gases such as carbon monoxide. Inhaling
these exhaust gases leads to poisoning. There is a risk of fatal injury. Therefore never leave
the engine running in enclosed spaces with-
out sufficient ventilation.
Programming Programming buttons
Pay attention to the "Important safety notes"
(Y page 277). Garage door remote control
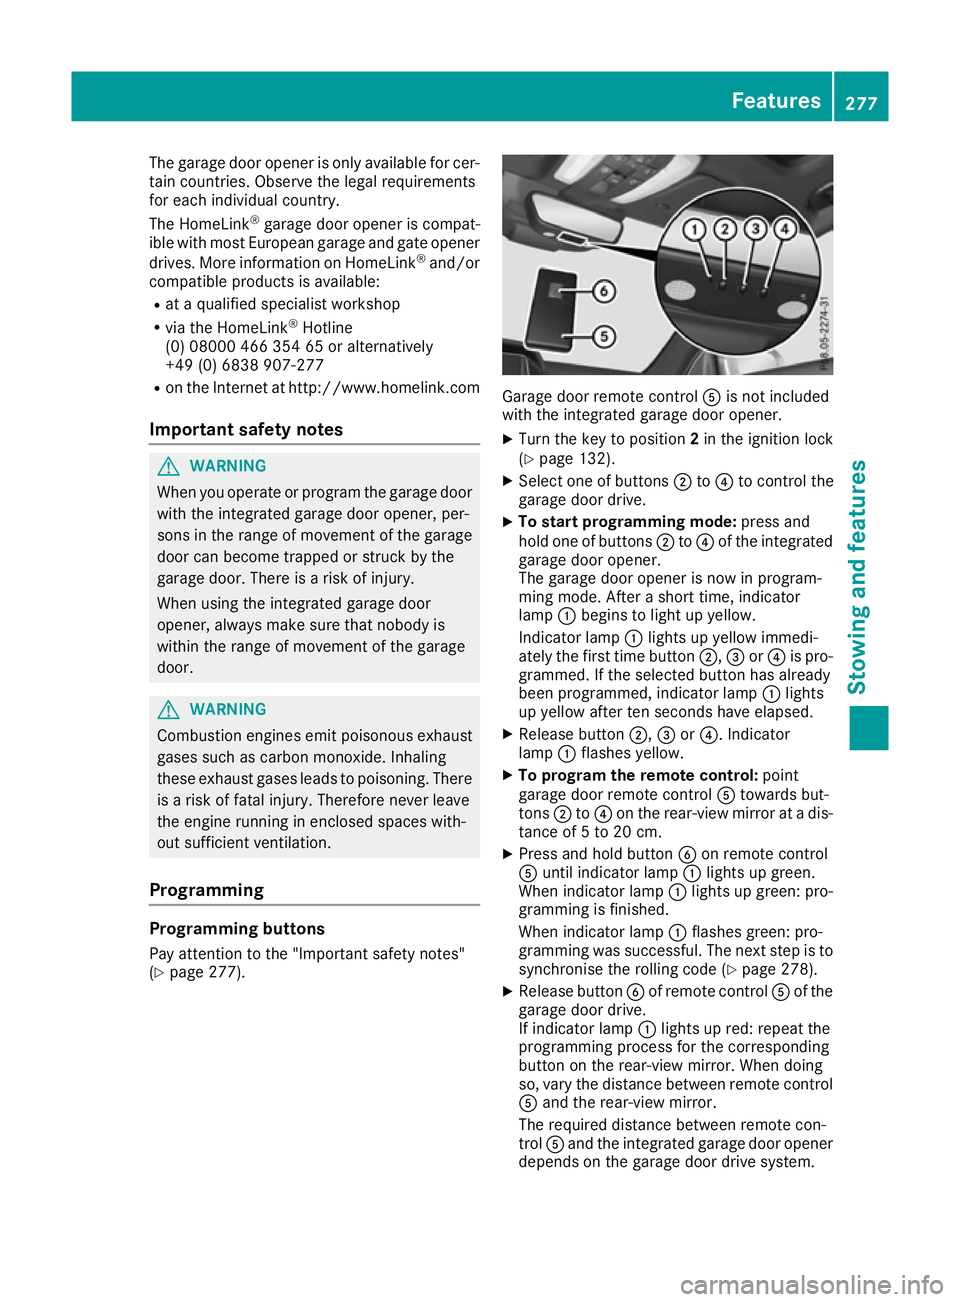
Ais not included
with the integrated garage door opener.
X Turn the key to position 2in the ignition lock
(Y page 132).
X Select one of buttons ;to? to control the
garage door drive.
X To start programming mode: press and
hold one of buttons ;to? of the integrated
garage door opener.
The garage door opener is now in program-
ming mode. After a short time, indicator
lamp :begins to light up yellow.
Indicator lamp :lights up yellow immedi-
ately the first time button ;,=or? is pro-
grammed. If the selected button has already
been programmed, indicator lamp :lights
up yellow after ten seconds have elapsed.
X Release button ;,=or?. Indicator
lamp :flashes yellow.
X To program the remote control: point
garage door remote control Atowards but-
tons ;to? on the rear-view mirror at a dis-
tance of 5 to 20 cm.
X Press and hold button Bon remote control
A until indicator lamp :lights up green.
When indicator lamp :lights up green: pro-
gramming is finished.
When indicator lamp :flashes green: pro-
gramming was successful. The next step is to
synchronise the rolling code (Y page 278).
X Release button Bof remote control Aof the
garage door drive.
If indicator lamp :lights up red: repeat the
programming process for the corresponding
button on the rear-view mirror. When doing
so, vary the distance between remote control A and the rear-view mirror.
The required distance between remote con-
trol Aand the integrated garage door opener
depends on the garage door drive system. Features
277Stowing and features Z
Page 287 of 345

Even if the active bonnet has been triggered, you
can still continue driving and have it reset at a
qualified specialist workshop. If you pull the
bonnet release lever, you must reset the bonnet
before driving on.
Resetting G
WARNING
Certain components in the engine compart-
ment could be very hot, e.g. the engine, the
radiator and parts of the exhaust system.
There is a risk of injury when accessing the
engine compartment.
As far as possible, allow the engine to cool
down and only touch the components descri- bed in the following. X
Open the bonnet (Y page 284).
X With both hands, lift the bonnet up in the
centre A. The bonnet is open wide enough
when both lids of bonnet lifter ;no longer
move.
If you push the lids back, you will notice resist-
ance.
X Release bonnet :.
X Check whether the lids of bonnet lifter ;are
resting on housings =(arrow).
X The lids of bonnet lifter ;
; are resting on
the housings: close bonnet:
(Y page 285).
or X The lids of bonnet lifter ; ;are not resting
on the housings: first, lift up bonnet :on
left-hand side ?and then on right-hand side B. Lift up bonnet
:until the respective lid of
bonnet lifter ;no longer moves.
The lids of bonnet lifter ;must rest on hous-
ings =(arrow).
X Close bonnet :(Ypage 285).
If you cannot close bonnet :or if the L
symbol appears in the multifunction display,
repeat the steps.
If the bonnet still does not engage correctly or
the L symbol appears in the multifunction
display, do not drive any further. Contact a quali- fied specialist workshop.
If active bonnet :has been triggered, it will be
raised at the back by about 50 mm. Lids ;will
then no longer rest on housings =. The active
bonnet is triggered by pyrotechnics.
Opening the bonnet G
WARNING
Certain components in the engine compart-
ment could be very hot, e.g. the engine, the
radiator and parts of the exhaust system.
There is a risk of injury when accessing the
engine compartment.
As far as possible, allow the engine to cool
down and only touch the components descri- bed in the following. G
WARNING
When the bonnet is open, and the windscreen wipers are set in motion, you can be injured by
the wiper linkage. There is a risk of injury.
Always switch off the windscreen wipers and
the ignition before opening the bonnet.
! Make sure that the windscreen wipers are
not folded away from the windscreen. Other-
wise, you could damage the windscreen wip-
ers or the bonnet. 284
Engine compartmentMaintenance and care
Page 292 of 345

ated under increased loads. Further information
can be obtained at a qualified specialist work-
shop, e.g. a Mercedes-Benz Service Centre.
Driving abroad An extensive Mercedes-Benz Service network is
also available in other countries. You can obtain
further information from any Mercedes-Benz
Service Centre. AdBlue
®
service indicator
i For BlueTEC vehicles only.
To function properly, BlueTEC exhaust gas after-
treatment must be operated with the reducing
agent AdBlue ®
. AdBlue ®
is topped up as part of
the service. Under normal operating conditions,
a full tank of AdBlue ®
should last until the next
service due date.
Depending on how and where the vehicle is
used, there may be an increase in the AdBlue ®
consumption, resulting in the next service due
date being brought forward.
Certain display messages show that AdBlue ®
must be topped up, e.g.:
Refill Refill AdBlue
AdBlue at
atworkshop
workshop See
SeeOwner's
Owner's
Manual
Manual
Refill AdBlue at workshop No start Refill AdBlue at workshop No start
in .. km
in .. km
A warning signal also sounds.
You can no longer start the vehicle when the
AdBlue ®
supply has been used up (Y page 233).
! Have the AdBlue ®
tank topped up at a quali-
fied specialist workshop only. The vehicle
may otherwise be damaged or soiled.
Before driving your vehicle outside Europe, have the AdBlue ®
supply checked at a qualified spe-
cialist workshop. If necessary, have AdBlue ®
topped up. Before a prolonged stay outside of
Europe, consult a qualified specialist workshop.
Observe the notes on AdBlue ®
(Y page 332).
Further information about BlueTEC exhaust gas
aftertreatment and AdBlue ®
can be obtained at
a qualified specialist workshop, e.g. a
Mercedes-Benz Service Centre. Care
General notes
H
Environmental note
Dispose of empty packaging and cleaning
cloths in an environmentally responsible man- ner.
! For cleaning your vehicle, do not use any of
the following:
R dry, rough or hard cloths
R abrasive cleaning agents
R solvents
R cleaning agents containing solvents
Do not scrub.
Do not touch the surfaces or protective films
with hard objects, e.g. a ring or ice scraper.
You could otherwise scratch or damage the
surfaces and protective film.
! Do not park up the vehicle for an extended
period straight after cleaning it, particularly
after having cleaned the wheels with wheel
cleaner. Wheel cleaners could cause
increased corrosion of the brake discs and
brake pads/linings. For this reason, you
should drive for a few minutes after cleaning. Braking heats the brake discs and the brake
pads/linings, thus drying them. The vehicle
can then be parked up.
Regular care of your vehicle is a condition for
retaining the quality in the long term.
Use care products and cleaning agents recom-
mended and approved by Mercedes-Benz. Washing the vehicle and cleaning the
paintwork
Automatic car wash G
WARNING
Braking efficiency is reduced after the vehicle has been washed. There is a risk of an acci-
dent.
After washing the vehicle, brake carefully
while paying attention to the traffic conditions in order to restore full braking efficiency. Care
289Maintenance and care Z
Page 293 of 345
!
When DISTRONIC PLUS or the HOLD func-
tion is activated, the vehicle brakes automat- ically in certain situations.
To avoid damage to the vehicle, deactivate
DISTRONIC PLUS and the HOLD function in
the following or similar situations:
R when towing away
R in a car wash
! Preferably use car washes with adjustable
high-pressure jets for pre-washing. This cor-
responds with the specifications for cabriolet
programmes. In car washes that use high
water pressures, there is a risk that a small
amount of water may leak into the vehicle.
! Make sure that:
R the side windows and sliding sunroof or
soft top are closed completely.
R the blower for the ventilation/heating is
switched off (OFF button is depressed).
R the windscreen wiper switch is at position
0.
The vehicle could otherwise be damaged.
! In car washes with a towing mechanism,
make sure that the automatic transmission is
in transmission position N; otherwise, the
vehicle could be damaged.
R Vehicles with DIRECT SELECT lever and
key:
do not remove the key from the ignition
lock. Do not open the driver's door or front-
passenger door when the engine is
switched off. Otherwise, the automatic
transmission selects park position Pauto-
matically and locks the wheels. You can
prevent this by shifting the automatic trans-
mission to Nbeforehand.
R Vehicles with DIRECT SELECT lever and
KEYLESS-GO:
do not open the driver's door or front-
passenger door when the engine is
switched off. Otherwise, the automatic
transmission selects park position Pauto-
matically and locks the wheels.
Observe the following to make sure that the
automatic transmission on vehicles with DIRECT
SELECT stays in position N:X
Make sure the vehicle is stationary and the
ignition is switched off.
X Turn the key to position 2in the ignition lock
(Y page 132).
Use the key instead of the Start/Stop button on vehicles with KEYLESS-GO.
X Depress the brake pedal and keep it
depressed.
X Shift the automatic transmission to position
N.
X Release the brake pedal.
X Release the parking brake.
X Switch off the ignition and leave the key in the
ignition lock.
You can wash the vehicle in an automatic car
wash from the very start.
Wash off excess dirt before cleaning the vehicle
in an automatic car wash.
After using an automatic car wash, wipe off wax
from the windscreen and the wiper blades. This
will prevent smears and reduce wiping noises
caused by residue on the windscreen.
Washing by hand In some countries, washing by hand is only
allowed at specially equipped washing bays.
Observe the legal requirements for each indi-
vidual country.
X Do not use hot water and do not wash the
vehicle in direct sunlight.
X Use a soft sponge to clean.
X Use a mild cleaning agent, such as a car
shampoo approved by Mercedes-Benz.
X Thoroughly hose down the vehicle with a gen-
tle jet of water.
X Do not point the water jet directly towards the
air inlet.
X Use plenty of water and rinse out the sponge
frequently.
X Rinse the vehicle with clean water and dry
thoroughly with a chamois.
X Do not let the cleaning agent dry on the paint-
work.
When using the vehicle in winter, remove all
traces of road salt deposits carefully and as
soon as possible. 290
CareMaintenance and care