2015 MERCEDES-BENZ E-CLASS CABRIOLET ignition
[x] Cancel search: ignitionPage 98 of 349
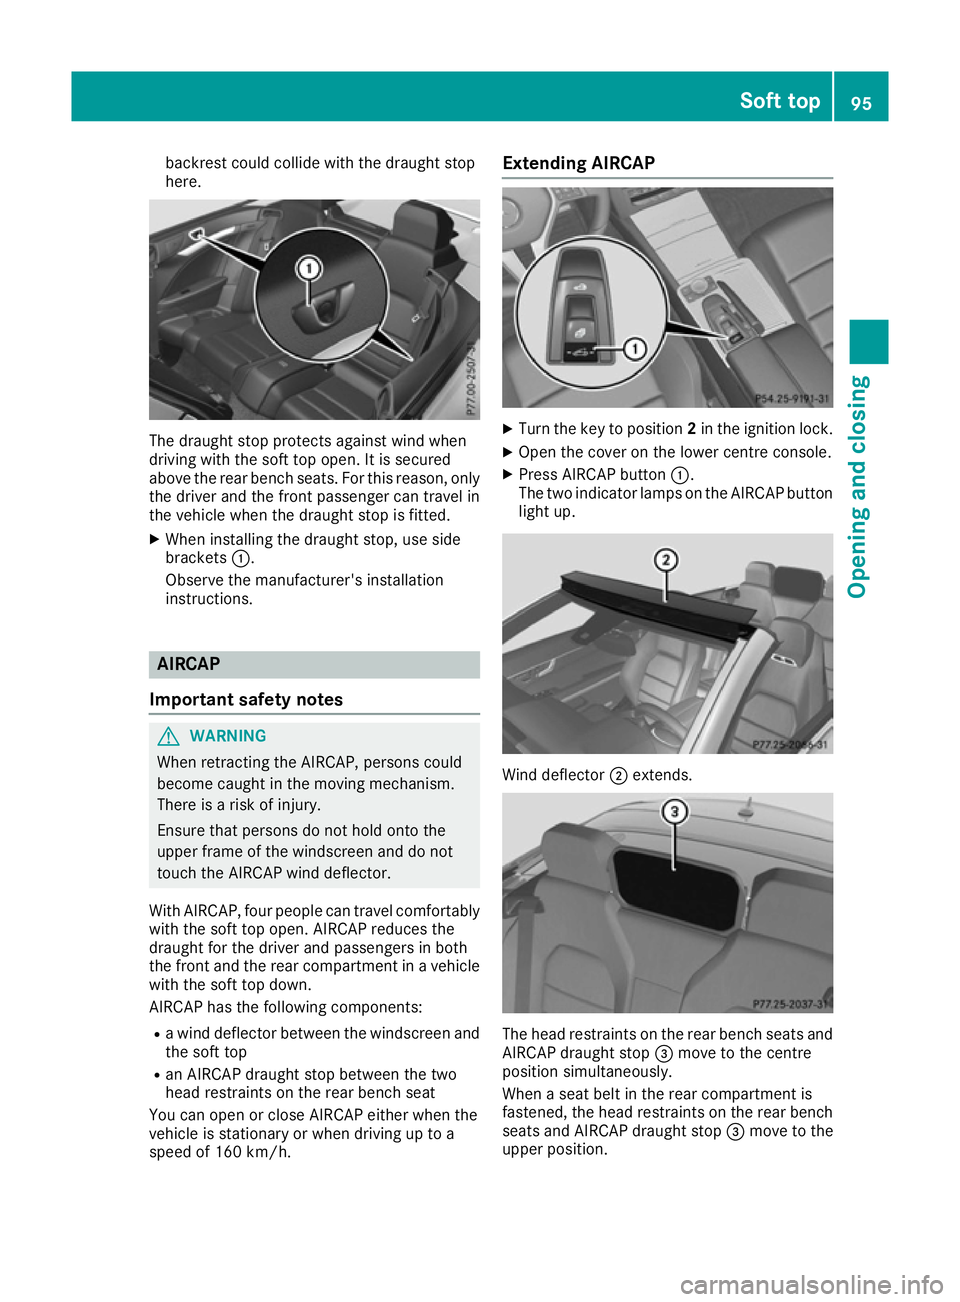
backrest could collide with the draught stop
here. The draught stop protects against wind when
driving with the soft top open. It is secured
above the rear bench seats. For this reason, only the driver and the front passenger can travel in
the vehicle when the draught stop is fitted.
X When installing the draught stop, use side
brackets :.
Observe the manufacturer's installation
instructions. AIRCAP
Important safety notes G
WARNING
When retracting the AIRCAP, persons could
become caught in the moving mechanism.
There is a risk of injury.
Ensure that persons do not hold onto the
upper frame of the windscreen and do not
touch the AIRCAP wind deflector.
With AIRCAP, four people can travel comfortably with the soft top open. AIRCAP reduces the
draught for the driver and passengers in both
the front and the rear compartment in a vehicle
with the soft top down.
AIRCAP has the following components:
R a wind deflector between the windscreen and
the soft top
R an AIRCAP draught stop between the two
head restraints on the rear bench seat
You can open or close AIRCAP either when the
vehicle is stationary or when driving up to a
speed of 160 km/h. Extending AIRCAP
X
Turn the key to position 2in the ignition lock.
X Open the cover on the lower centre console.
X Press AIRCAP button :.
The two indicator lamps on the AIRCAP button light up. Wind deflector
;extends. The head restraints on the rear bench seats and
AIRCAP draught stop =move to the centre
position simultaneously.
When a seat belt in the rear compartment is
fastened, the head restraints on the rear bench seats and AIRCAP draught stop =move to the
upper position. Soft top
95Opening and closing Z
Page 99 of 349
If you park your vehicle with the soft top down
and remove the key, the wind deflector and the
head restraints in the rear compartment retract automatically. When you restart your engine
after having been parked, the wind deflector and
the head restraints in the rear compartment
extend again automatically.
AIRCAP cannot be extended or retracted if the
vehicle speed exceeds approximately
160 km/h.
Retracting AIRCAP X
Turn the key to position 2in the ignition lock.
X Open the cover on the lower centre console.
X Press AIRCAP button :.
The two indicator lamps on the AIRCAP button
go out. Wind deflector ;retracts.
The head restraints on the rear bench seats and
AIRCAP draught stop =move to the lowest
position simultaneously.
If there are passengers wearing seat belts in the rear compartment, the head restraints on the
rear bench seats and the AIRCAP draught stop
remain in the upper position.
Retracting the head restraints on the
rear bench seats from the driver's seat To improve the rear view, you can retract the
head restraints on the rear bench seats individ- ually (Y page 102). The wind deflector remains
in its current position. Fitting/removing the AIRCAP draught
stop
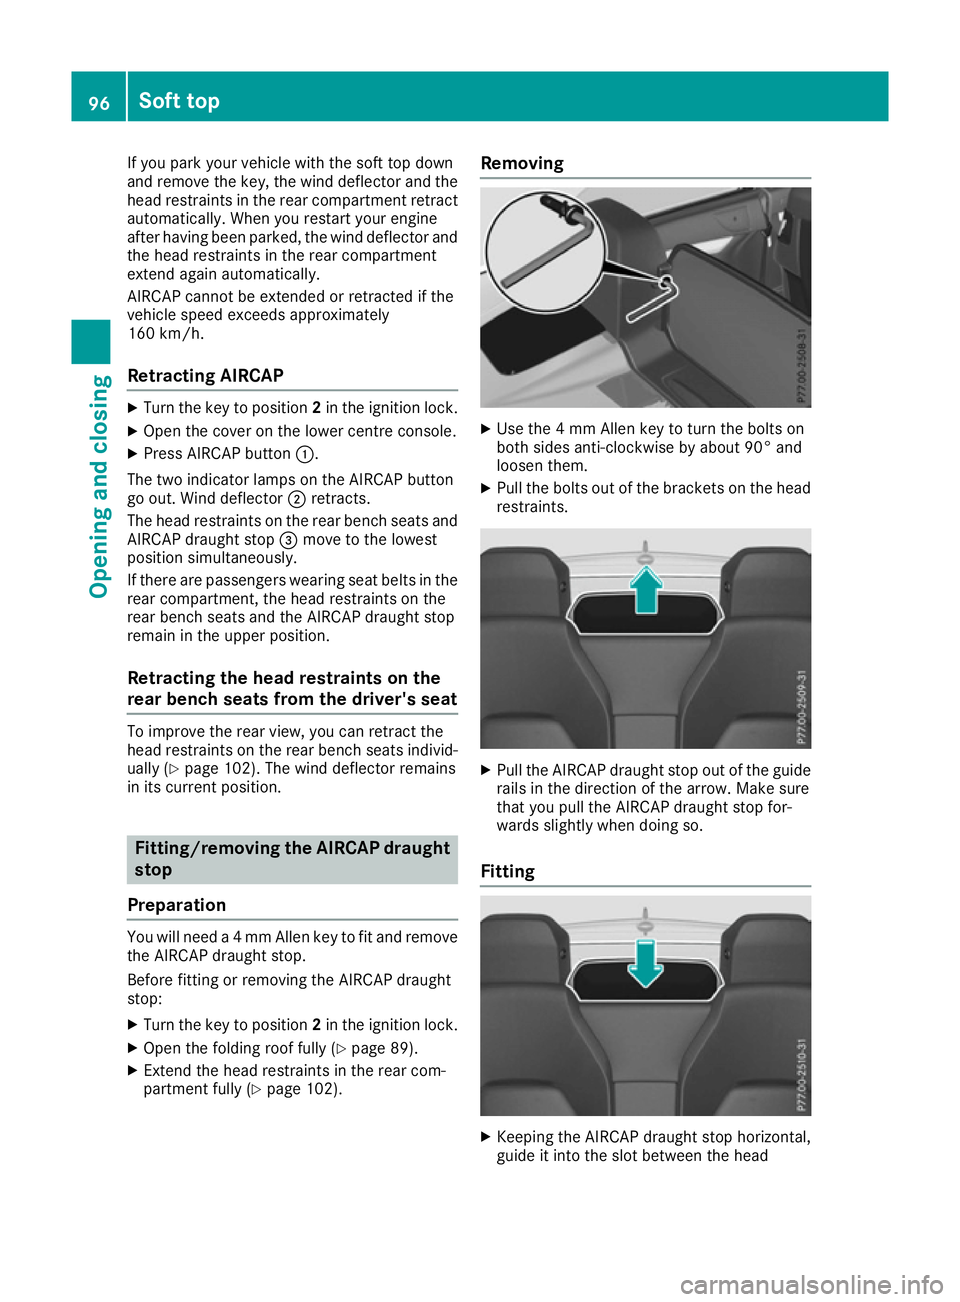
Preparation You will need a 4 mm Allen key to fit and remove
the AIRCAP draught stop.
Before fitting or removing the AIRCAP draught
stop:
X Turn the key to position 2in the ignition lock.
X Open the folding roof fully (Y page 89).
X Extend the head restraints in the rear com-
partment fully (Y page 102). Removing
X
Use the 4 mm Allen key to turn the bolts on
both sides anti-clockwise by about 90° and
loosen them.
X Pull the bolts out of the brackets on the head
restraints. X
Pull the AIRCAP draught stop out of the guide
rails in the direction of the arrow. Make sure
that you pull the AIRCAP draught stop for-
wards slightly when doing so.
Fitting X
Keeping the AIRCAP draught stop horizontal,
guide it into the slot between the head 96
Soft topOpening and closing
Page 101 of 349
Problems with the soft top
Problem
Possible causes/consequences and
M
MSolutions The soft top will not open
or close. The ignition is not switched on.
X Make sure that the key is in position 2in the ignition lock. The boot lid is open.
X Close the boot lid (Y page 83). The boot separator is not closed.
X Close the boot separator (Y page 94). The roll bars have been deployed.
X Consult a qualified specialist workshop. The head restraints in the rear compartment do not retract automat-
ically.
X Lower the head restraints in the rear compartment manually
(Y page 102). The soft-top mechanism or control system is defective.
X Close the soft top manually if necessary (Y page 90).
X Consult a qualified specialist workshop. The soft top has been opened and closed several times in a row. The
soft-top drive has been deactivated automatically for safety reasons.
You can open and close the soft top again after approximately ten
minutes.
X Switch off the ignition and turn it back on.
X Repeat the opening or closing procedure. 98
Soft topOpening and closing
Page 102 of 349
Correct driver's seat position
G
WARNING
You could lose control of the vehicle while
driving if you:
R adjust the driver's seat, steering wheel or
mirrors
R fasten the seat belt
There is a risk of an accident.
Adjust the driver's seat, head restraint, steer-
ing wheel and mirrors and fasten your seat
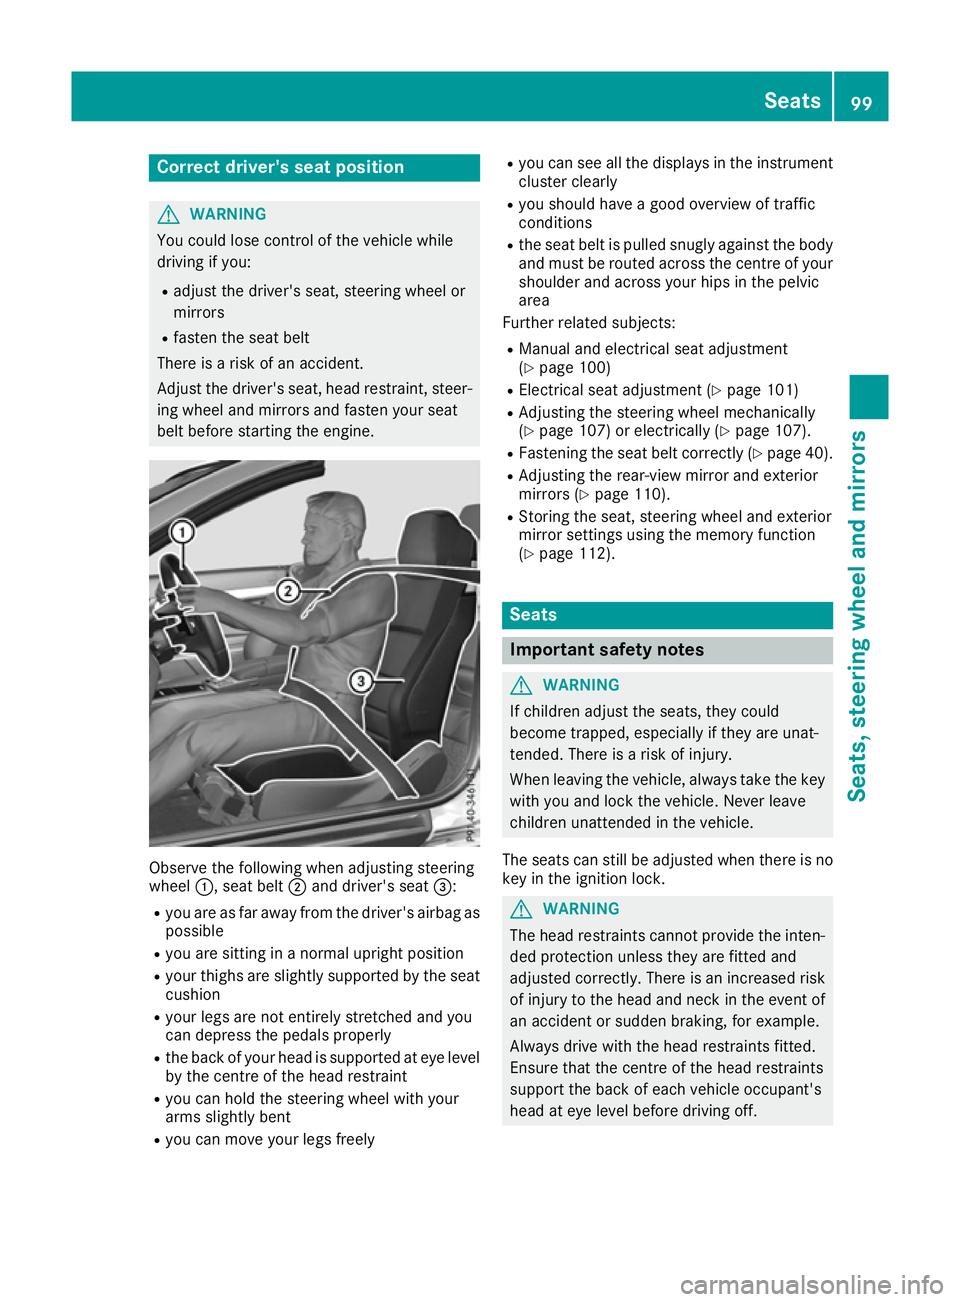
belt before starting the engine. Observe the following when adjusting steering
wheel
:, seat belt ;and driver's seat =:
R you are as far away from the driver's airbag as
possible
R you are sitting in a normal upright position
R your thighs are slightly supported by the seat
cushion
R your legs are not entirely stretched and you
can depress the pedals properly
R the back of your head is supported at eye level
by the centre of the head restraint
R you can hold the steering wheel with your
arms slightly bent
R you can move your legs freely R
you can see all the displays in the instrument
cluster clearly
R you should have a good overview of traffic
conditions
R the seat belt is pulled snugly against the body
and must be routed across the centre of your
shoulder and across your hips in the pelvic
area
Further related subjects:
R Manual and electrical seat adjustment
(Y page 100)
R Electrical seat adjustment (Y page 101)
R Adjusting the steering wheel mechanically
(Y page 107) or electrically (Y page 107).
R Fastening the seat belt correctly (Y page 40).
R Adjusting the rear-view mirror and exterior
mirrors (Y page 110).
R Storing the seat, steering wheel and exterior
mirror settings using the memory function
(Y page 112). Seats
Important safety notes
G
WARNING
If children adjust the seats, they could
become trapped, especially if they are unat-
tended. There is a risk of injury.
When leaving the vehicle, always take the key with you and lock the vehicle. Never leave
children unattended in the vehicle.
The seats can still be adjusted when there is no
key in the ignition lock. G
WARNING
The head restraints cannot provide the inten-
ded protection unless they are fitted and
adjusted correctly. There is an increased risk of injury to the head and neck in the event of
an accident or sudden braking, for example.
Always drive with the head restraints fitted.
Ensure that the centre of the head restraints
support the back of each vehicle occupant's
head at eye level before driving off. Seats
99Seats, steering wheel and mirrors Z
Page 105 of 349
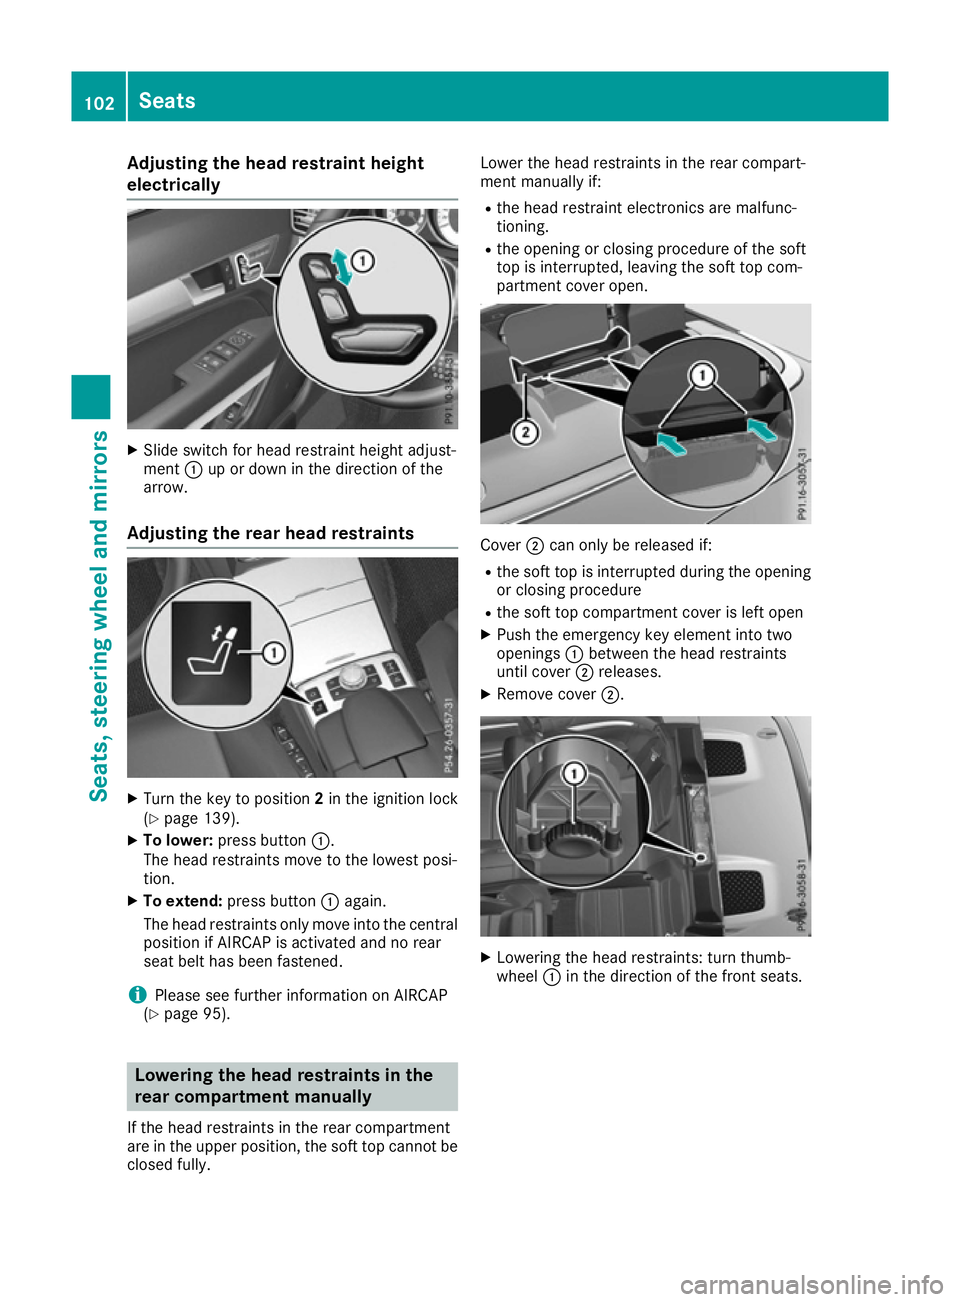
Adjusting the head restraint height
electrically X
Slide switch for head restraint height adjust-
ment :up or down in the direction of the
arrow.
Adjusting the rear head restraints X
Turn the key to position 2in the ignition lock
(Y page 139).
X To lower: press button :.
The head restraints move to the lowest posi-
tion.
X To extend: press button :again.
The head restraints only move into the central
position if AIRCAP is activated and no rear
seat belt has been fastened.
i Please see further information on AIRCAP
(Y page 95). Lowering the head restraints in the
rear compartment manually
If the head restraints in the rear compartment
are in the upper position, the soft top cannot be
closed fully. Lower the head restraints in the rear compart-
ment manually if:
R the head restraint electronics are malfunc-
tioning.
R the opening or closing procedure of the soft
top is interrupted, leaving the soft top com-
partment cover open. Cover
;can only be released if:
R the soft top is interrupted during the opening
or closing procedure
R the soft top compartment cover is left open
X Push the emergency key element into two
openings :between the head restraints
until cover ;releases.
X Remove cover ;. X
Lowering the head restraints: turn thumb-
wheel :in the direction of the front seats. 102
SeatsSeats
, steering wheel and mirrors
Page 107 of 349
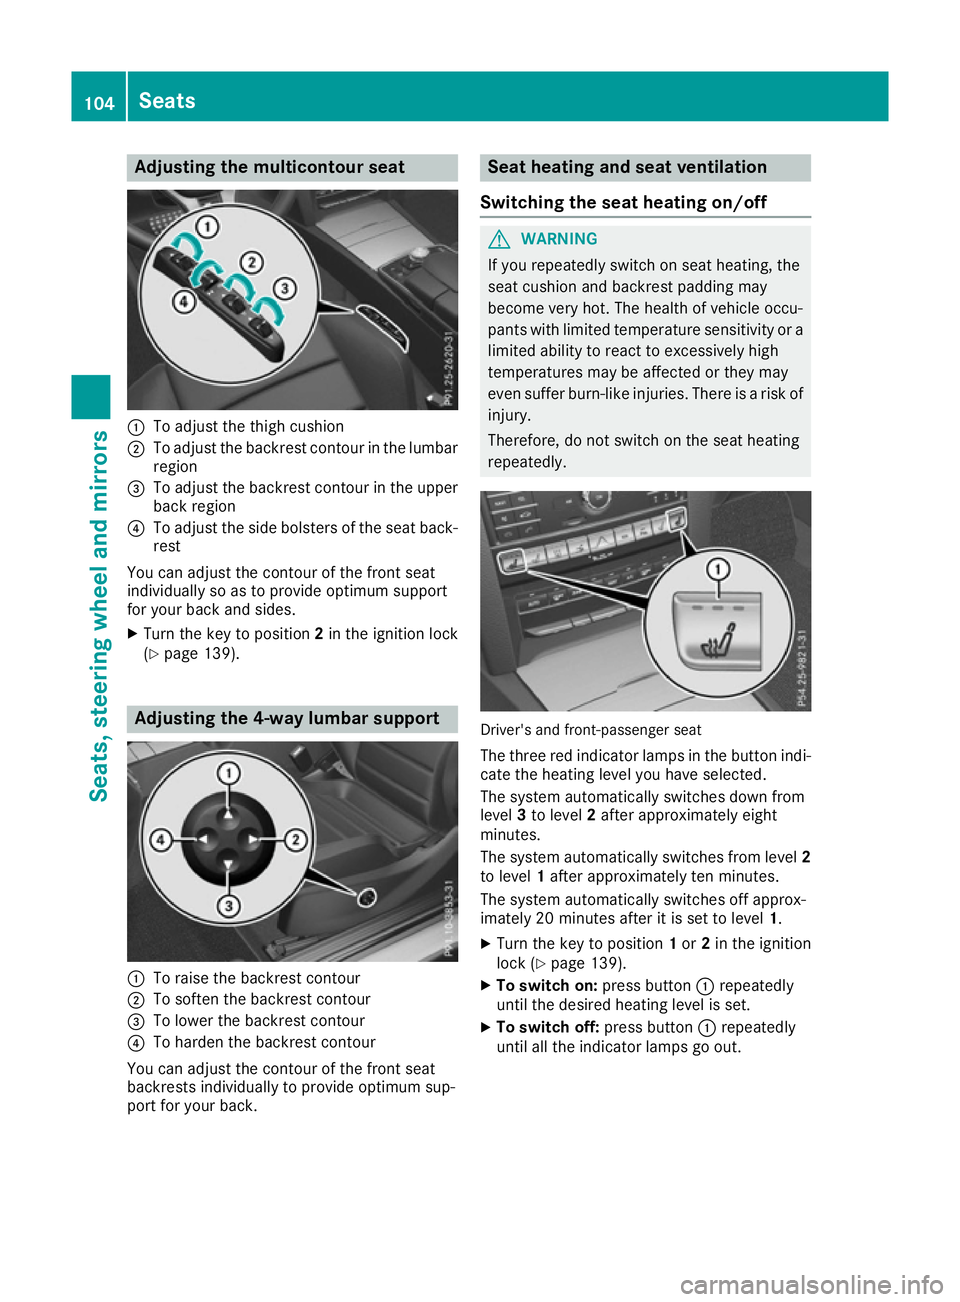
Adjusting the multicontour seat
:
To adjust the thigh cushion
; To adjust the backrest contour in the lumbar
region
= To adjust the backrest contour in the upper
back region
? To adjust the side bolsters of the seat back-
rest
You can adjust the contour of the front seat
individually so as to provide optimum support
for your back and sides.
X Turn the key to position 2in the ignition lock
(Y page 139). Adjusting the 4-way lumbar support
:
To raise the backrest contour
; To soften the backrest contour
= To lower the backrest contour
? To harden the backrest contour
You can adjust the contour of the front seat
backrests individually to provide optimum sup-
port for your back. Seat heating and seat ventilation
Switching the seat heating on/off G
WARNING
If you repeatedly switch on seat heating, the
seat cushion and backrest padding may
become very hot. The health of vehicle occu-
pants with limited temperature sensitivity or a limited ability to react to excessively high
temperatures may be affected or they may
even suffer burn-like injuries. There is a risk of
injury.
Therefore, do not switch on the seat heating
repeatedly. Driver's and front-passenger seat
The three red indicator lamps in the button indi-
cate the heating level you have selected.
The system automatically switches down from
level 3to level 2after approximately eight
minutes.
The system automatically switches from level 2
to level 1after approximately ten minutes.
The system automatically switches off approx-
imately 20 minutes after it is set to level 1.
X Turn the key to position 1or 2in the ignition
lock (Y page 139).
X To switch on: press button:repeatedly
until the desired heating level is set.
X To switch off: press button:repeatedly
until all the indicator lamps go out. 104
SeatsSeats
, steering wheel and mirrors
Page 108 of 349
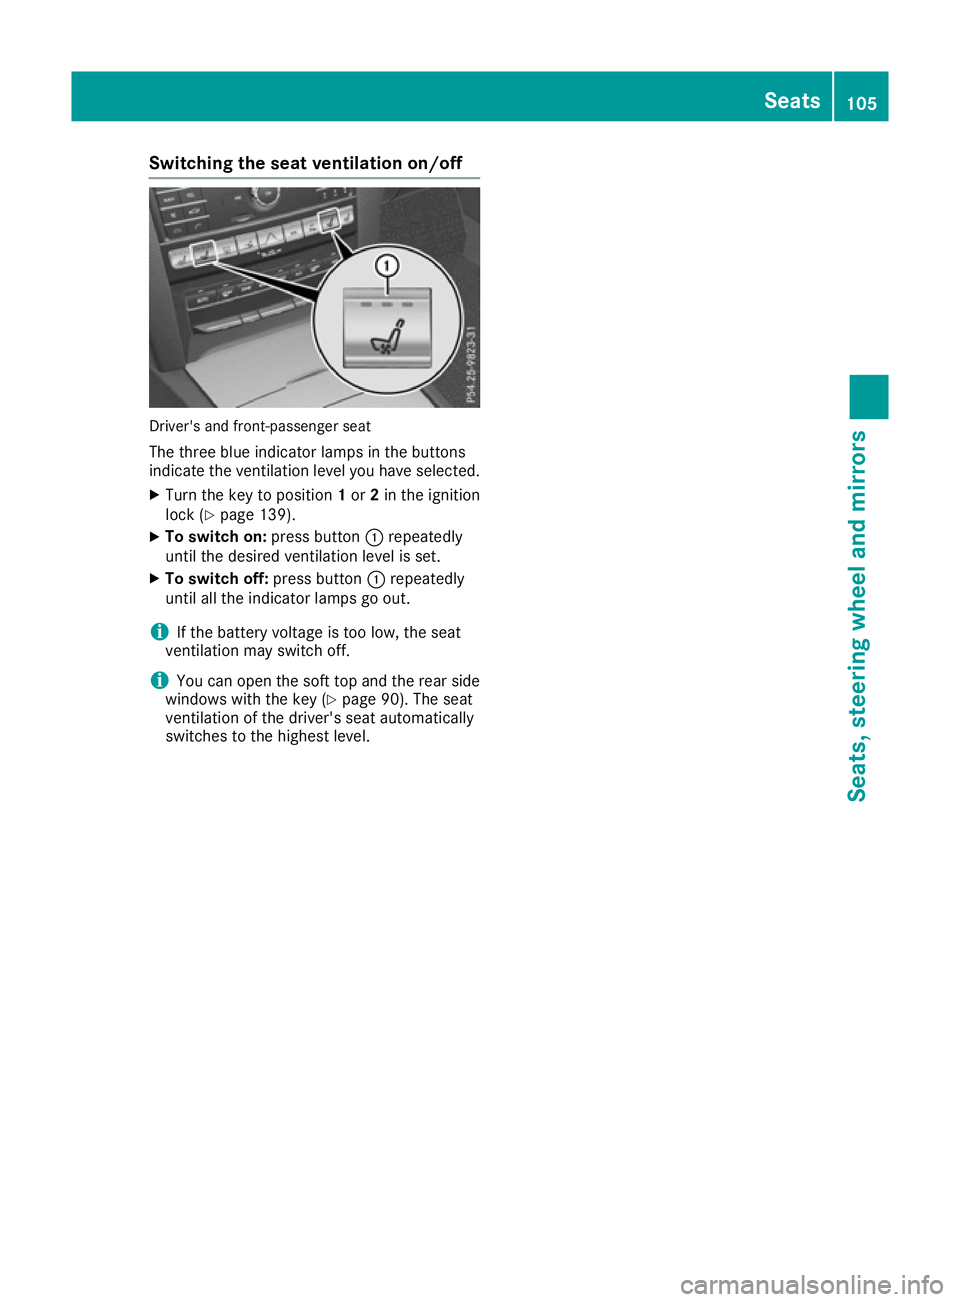
Switching the seat ventilation on/off
Driver's and front-passenger seat
The three blue indicator lamps in the buttons
indicate the ventilation level you have selected.
X Turn the key to position 1or 2in the ignition
lock (Y page 139).
X To switch on: press button:repeatedly
until the desired ventilation level is set.
X To switch off: press button:repeatedly
until all the indicator lamps go out.
i If the battery voltage is too low, the seat
ventilation may switch off.
i You can open the soft top and the rear side
windows with the key (Y page 90). The seat
ventilation of the driver's seat automatically
switches to the highest level. Seats
105Seats, steering wheel and mirrors Z
Page 109 of 349
Problems with the seat heating or seat ventilation
Problem
Possible causes/consequences and
M
MSolutions The seat heating or seat
ventilation has switched
off prematurely or can-
not be switched on. The on-board voltage is too low because too many electrical consum-
ers are switched on.
X Switch off electrical consumers that you do not need, such as the
rear window heating or interior lighting.
Once the battery is sufficiently charged, the seat heating or seat
ventilation can be switched back on manually. AIRSCARF
G
WARNING
When AIRSCARF is switched on, very hot air
can flow from the vents in the head restraints. This could result in burns in the immediate
vicinity of the air vents. There is a risk of injury.
Reduce the heater output before it becomes
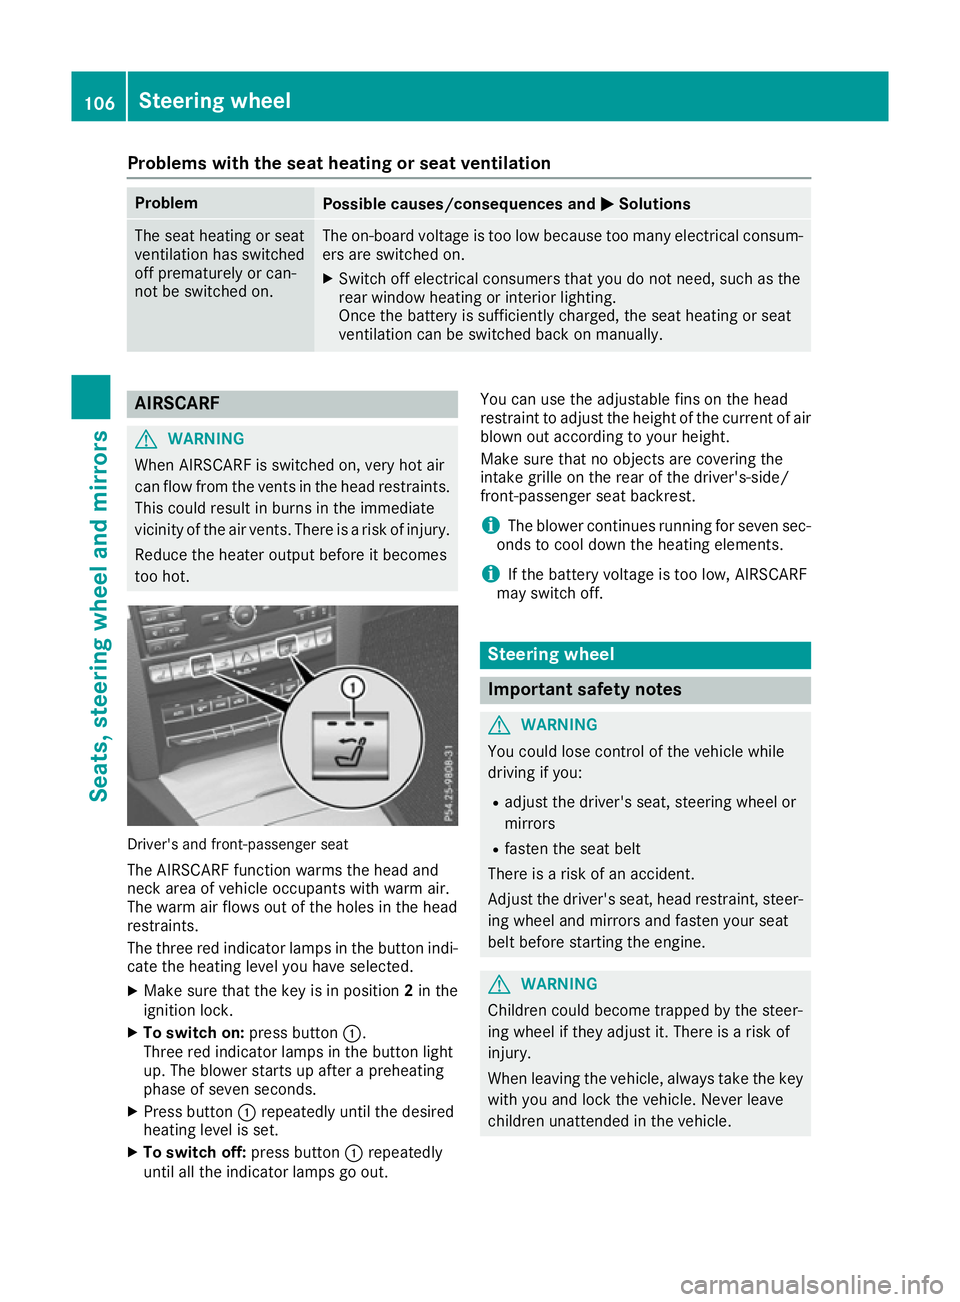
too hot. Driver's and front-passenger seat
The AIRSCARF function warms the head and
neck area of vehicle occupants with warm air.
The warm air flows out of the holes in the head
restraints.
The three red indicator lamps in the button indi-
cate the heating level you have selected.
X Make sure that the key is in position 2in the
ignition lock.
X To switch on: press button:.
Three red indicator lamps in the button light
up. The blower starts up after a preheating
phase of seven seconds.
X Press button :repeatedly until the desired
heating level is set.
X To switch off: press button:repeatedly
until all the indicator lamps go out. You can use the adjustable fins on the head
restraint to adjust the height of the current of air
blown out according to your height.
Make sure that no objects are covering the
intake grille on the rear of the driver's-side/
front-passenger seat backrest.
i The blower continues running for seven sec-
onds to cool down the heating elements.
i If the battery voltage is too low, AIRSCARF
may switch off. Steering wheel
Important safety notes
G
WARNING
You could lose control of the vehicle while
driving if you:
R adjust the driver's seat, steering wheel or
mirrors
R fasten the seat belt
There is a risk of an accident.
Adjust the driver's seat, head restraint, steer-
ing wheel and mirrors and fasten your seat
belt before starting the engine. G
WARNING
Children could become trapped by the steer-
ing wheel if they adjust it. There is a risk of
injury.
When leaving the vehicle, always take the key with you and lock the vehicle. Never leave
children unattended in the vehicle. 106
Steering wheelSeats, steering wheel and mirrors