2015 MERCEDES-BENZ E-CLASS CABRIOLET cruise control
[x] Cancel search: cruise controlPage 174 of 349
Driving with DISTRONIC PLUS
Pulling away and driving
X
If you want to pull away with DISTRONIC
PLUS:
remove your foot from the brake pedal.
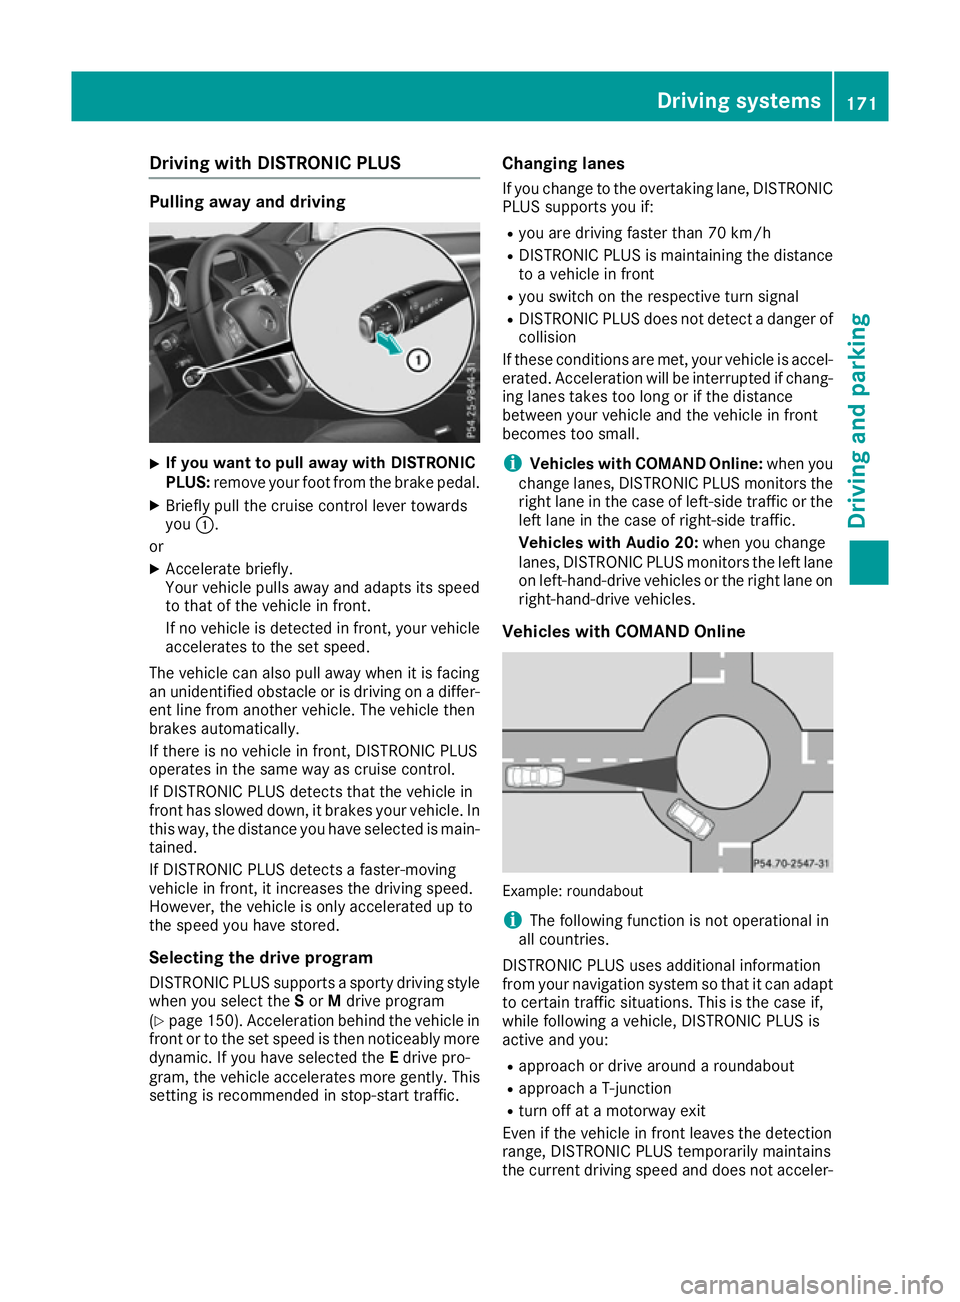
X Briefly pull the cruise control lever towards
you :.
or X Accelerate briefly.
Your vehicle pulls away and adapts its speed
to that of the vehicle in front.
If no vehicle is detected in front, your vehicle accelerates to the set speed.
The vehicle can also pull away when it is facing
an unidentified obstacle or is driving on a differ- ent line from another vehicle. The vehicle then
brakes automatically.
If there is no vehicle in front, DISTRONIC PLUS
operates in the same way as cruise control.
If DISTRONIC PLUS detects that the vehicle in
front has slowed down, it brakes your vehicle. In
this way, the distance you have selected is main-
tained.
If DISTRONIC PLUS detects a faster-moving
vehicle in front, it increases the driving speed.
However, the vehicle is only accelerated up to
the speed you have stored.
Selecting the drive program
DISTRONIC PLUS supports a sporty driving style when you select the Sor Mdrive program
(Y page 150). Acceleration behind the vehicle in
front or to the set speed is then noticeably more dynamic. If you have selected the Edrive pro-
gram, the vehicle accelerates more gently. This
setting is recommended in stop-start traffic. Changing lanes
If you change to the overtaking lane, DISTRONIC
PLUS supports you if:
R you are driving faster than 70 km/h
R DISTRONIC PLUS is maintaining the distance
to a vehicle in front
R you switch on the respective turn signal
R DISTRONIC PLUS does not detect a danger of
collision
If these conditions are met, your vehicle is accel- erated. Acceleration will be interrupted if chang-
ing lanes takes too long or if the distance
between your vehicle and the vehicle in front
becomes too small.
i Vehicles with COMAND Online:
when you
change lanes, DISTRONIC PLUS monitors the right lane in the case of left-side traffic or the
left lane in the case of right-side traffic.
Vehicles with Audio 20: when you change
lanes, DISTRONIC PLUS monitors the left lane
on left-hand-drive vehicles or the right lane on right-hand-drive vehicles.
Vehicles with COMAND Online Example: roundabout
i
The following function is not operational in
all countries.
DISTRONIC PLUS uses additional information
from your navigation system so that it can adapt to certain traffic situations. This is the case if,
while following a vehicle, DISTRONIC PLUS is
active and you:
R approach or drive around a roundabout
R approach a T-junction
R turn off at a motorway exit
Even if the vehicle in front leaves the detection
range, DISTRONIC PLUS temporarily maintains
the current driving speed and does not acceler- Driving syste
ms
171Driving an d parking Z
Page 175 of 349
ate. This is based on the current map data in the
navigation system.
Afterwards, the vehicle accelerates back to the
speed you set.
The system takes into account the fact that
overtaking on the right is not permitted on
motorways or high-speed major roads at speeds
above 80 km/h. The driving speed is adjusted to
the speed of the queue of vehicles in the adja-
cent lane to the left.
i Prevention of overtaking on the right applies
to countries where traffic drives on the right.
In countries where traffic drives on the left,
overtaking on the left is prevented accord-
ingly.
Stopping G
WARNING
When leaving the vehicle, even if it is braked
only by DISTRONIC PLUS, it could roll away if:
R there is a malfunction in the system or in
the voltage supply.
R DISTRONIC PLUS has been deactivated
with the cruise control lever, e.g. by a vehi-
cle occupant or from outside the vehicle.
R the electrical system in the engine com-
partment, the battery or the fuses have
been tampered with.
R the battery is disconnected.
R the accelerator pedal has been depressed,
e.g. by a vehicle occupant.
There is a risk of an accident.
If you wish to exit the vehicle, always turn off
DISTRONIC PLUS and secure the vehicle
against rolling away.
Further information on deactivating DISTRONIC PLUS (Y page 174).
If DISTRONIC PLUS detects that the vehicle in
front is stopping, it brakes your vehicle until it is stationary.
Once your vehicle is stationary, it remains sta-
tionary and you do not need to depress the
brake.
Depending on the specified minimum distance,
your vehicle will come to a standstill at a suffi-
cient distance behind the vehicle in front. The
specified minimum distance is set using the
control on the cruise control lever. When DISTRONIC PLUS is activated, the trans-
mission is shifted automatically to position
Pif:
R the driver's door is open and the driver's seat
belt is unfastened
R the engine is switched off, unless it is auto-
matically switched off by the ECO start/stop
function
R a system fault occurs
R the power supply is insufficient
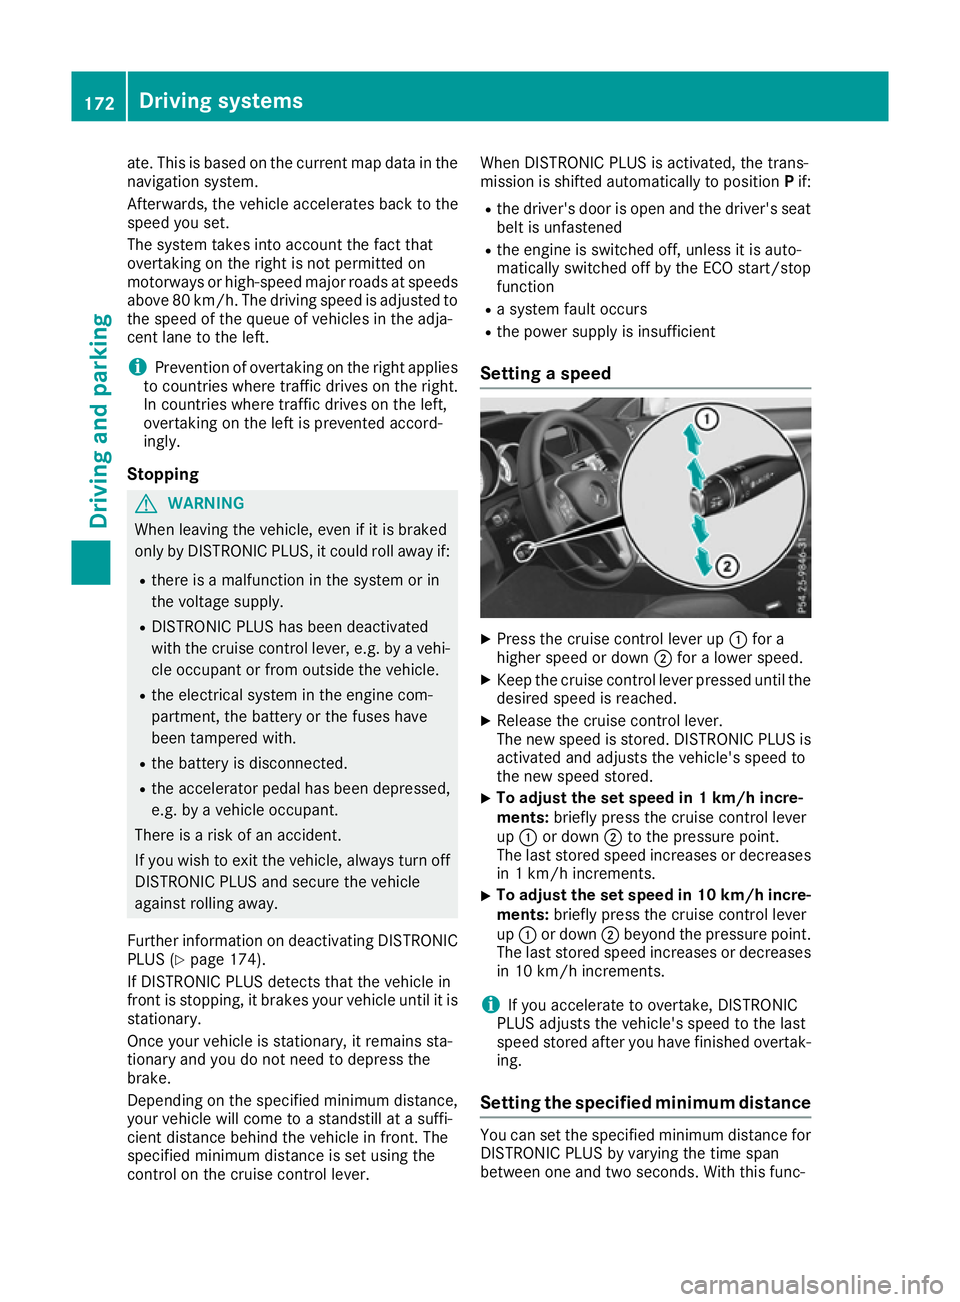
Setting a speed X
Press the cruise control lever up :for a
higher speed or down ;for a lower speed.
X Keep the cruise control lever pressed until the
desired speed is reached.
X Release the cruise control lever.
The new speed is stored. DISTRONIC PLUS is
activated and adjusts the vehicle's speed to
the new speed stored.
X To adjust the set speed in 1 km/h incre-
ments:
briefly press the cruise control lever
up : or down ;to the pressure point.
The last stored speed increases or decreases in 1 km/h increments.
X To adjust the set speed in 10 km/h incre-
ments: briefly press the cruise control lever
up : or down ;beyond the pressure point.
The last stored speed increases or decreases in 10 km/h increments.
i If you accelerate to overtake, DISTRONIC
PLUS adjusts the vehicle's speed to the last
speed stored after you have finished overtak-
ing.
Setting the specified minimum distance You can set the specified minimum distance for
DISTRONIC PLUS by varying the time span
between one and two seconds. With this func- 172
Driving systemsDriving and parking
Page 176 of 349
tion, you can set the minimum distance that
DISTRONIC PLUS maintains to the vehicle in
front, dependent on vehicle speed. You can see
this distance in the multifunction display
(Y page 173).
i Make sure that you maintain a sufficient
distance to the vehicle in front and comply
with the minimum distance as required by
law. Adjust the distance to the vehicle in front
if necessary. X
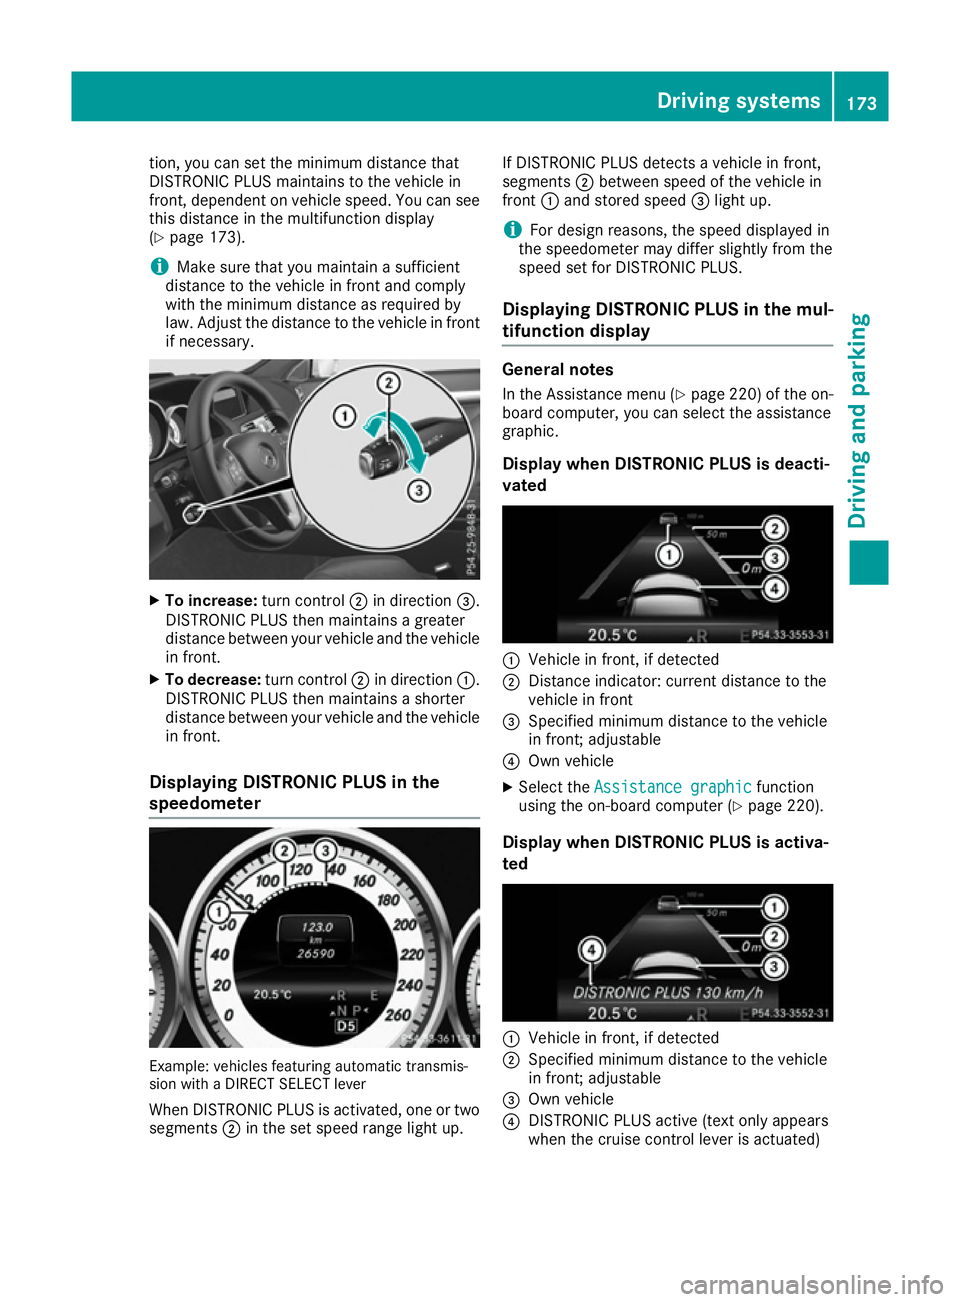
To increase: turn control;in direction =.
DISTRONIC PLUS then maintains a greater
distance between your vehicle and the vehicle in front.
X To decrease: turn control;in direction :.
DISTRONIC PLUS then maintains a shorter
distance between your vehicle and the vehicle
in front.
Displaying DISTRONIC PLUS in the
speedometer Example: vehicles featuring automatic transmis-
sion with a DIRECT SELECT lever
When DISTRONIC PLUS is activated, one or two segments ;in the set speed range light up. If DISTRONIC PLUS detects a vehicle in front,
segments
;between speed of the vehicle in
front :and stored speed =light up.
i For design reasons, the speed displayed in
the speedometer may differ slightly from the
speed set for DISTRONIC PLUS.
Displaying DISTRONIC PLUS in the mul-
tifunction display General notes
In the Assistance menu (Y page 220) of the on-
board computer, you can select the assistance
graphic.
Display when DISTRONIC PLUS is deacti-
vated :
Vehicle in front, if detected
; Distance indicator: current distance to the
vehicle in front
= Specified minimum distance to the vehicle
in front; adjustable
? Own vehicle
X Select the Assistance graphic Assistance graphic function
using the on-board computer (Y page 220).
Display when DISTRONIC PLUS is activa-
ted :
Vehicle in front, if detected
; Specified minimum distance to the vehicle
in front; adjustable
= Own vehicle
? DISTRONIC PLUS active (text only appears
when the cruise control lever is actuated) Driving systems
173Driving and parking Z
Page 177 of 349
X
Select the Assistance graphic Assistance graphic function
using the on-board computer (Y page 220).
i You will see the stored speed for approx-
imately five seconds when you activate
DISTRONIC PLUS.
Deactivating DISTRONIC PLUS There are several ways to deactivate
DISTRONIC PLUS:
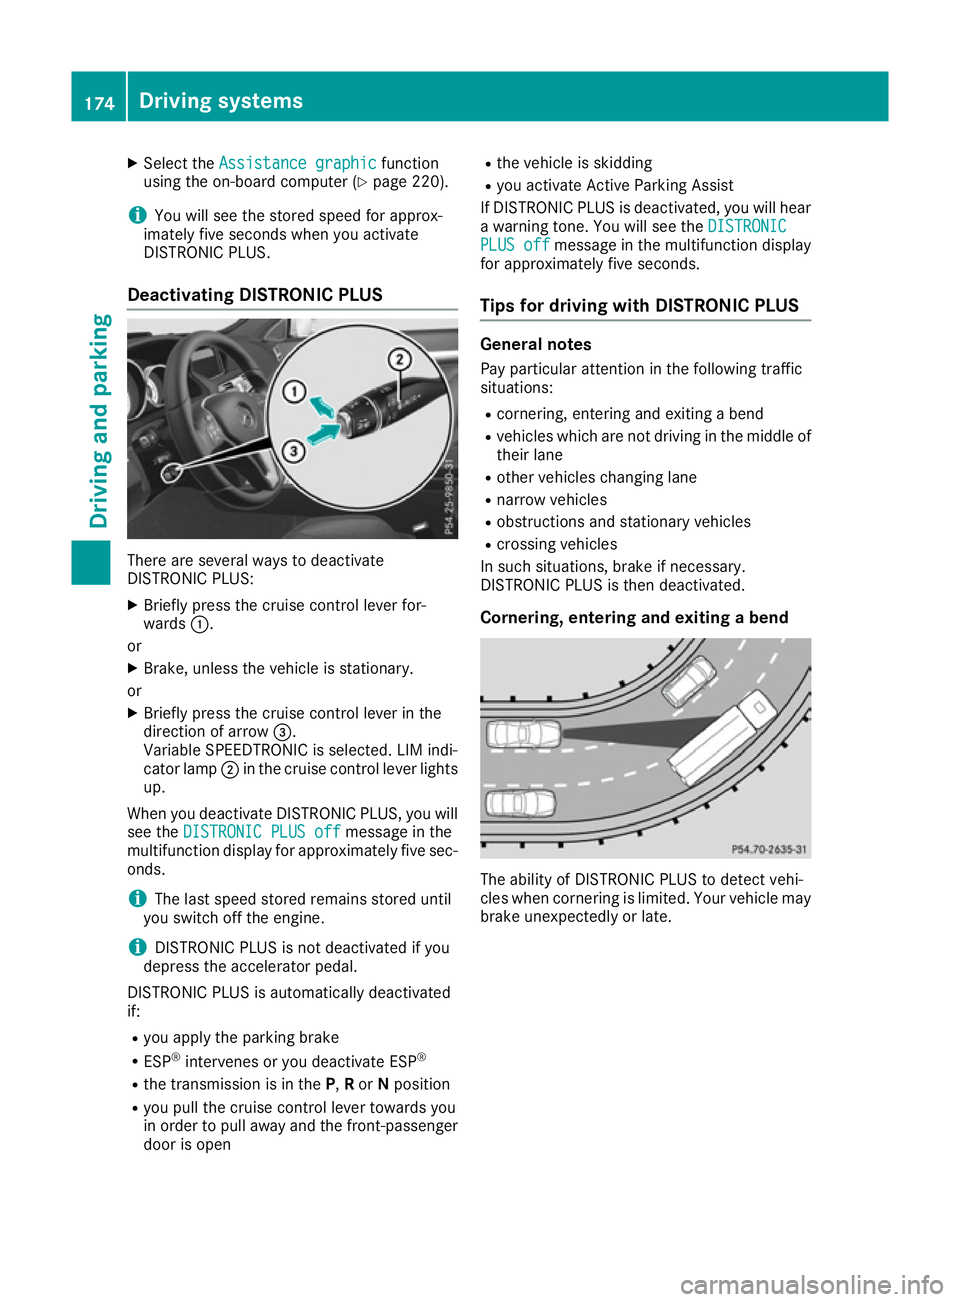
X Briefly press the cruise control lever for-
wards :.
or X Brake, unless the vehicle is stationary.
or X Briefly press the cruise control lever in the
direction of arrow =.
Variable SPEEDTRONIC is selected. LIM indi-
cator lamp ;in the cruise control lever lights
up.
When you deactivate DISTRONIC PLUS, you will
see the DISTRONIC PLUS off DISTRONIC PLUS off message in the
multifunction display for approximately five sec- onds.
i The last speed stored remains stored until
you switch off the engine.
i DISTRONIC PLUS is not deactivated if you
depress the accelerator pedal.
DISTRONIC PLUS is automatically deactivated
if:
R you apply the parking brake
R ESP ®
intervenes or you deactivate ESP ®
R the transmission is in the P,Ror Nposition
R you pull the cruise control lever towards you
in order to pull away and the front-passenger
door is open R
the vehicle is skidding
R you activate Active Parking Assist
If DISTRONIC PLUS is deactivated, you will hear
a warning tone. You will see the DISTRONIC
DISTRONIC
PLUS off PLUS off message in the multifunction display
for approximately five seconds.
Tips for driving with DISTRONIC PLUS General notes
Pay particular attention in the following traffic
situations:
R cornering, entering and exiting a bend
R vehicles which are not driving in the middle of
their lane
R other vehicles changing lane
R narrow vehicles
R obstructions and stationary vehicles
R crossing vehicles
In such situations, brake if necessary.
DISTRONIC PLUS is then deactivated.
Cornering, entering and exiting a bend The ability of DISTRONIC PLUS to detect vehi-
cles when cornering is limited. Your vehicle may
brake unexpectedly or late. 174
Driving systemsDriving and parking
Page 212 of 349

You will find the applicable permissible values,
which must not be exceeded, in the vehicle
documents.
You will find the values approved by the manu-
facturer on the vehicle identification plates and
those for the towing vehicle under "Technical
data" (Y page 344).
When towing a trailer, your vehicle's handling
characteristics will be different in comparison to
when driving without a trailer.
The vehicle/trailer combination:
R is heavier
R is restricted in its acceleration and gradient-
climbing capability
R has an increased braking distance
R is affected more by strong crosswinds
R demands more sensitive steering
R has a larger turning circle
This can impair the vehicle's handling charac-
teristics. Adapt your driving style accordingly.
Maintain a safe distance. Drive carefully.
When towing a trailer, always adjust your speed to the current road and weather conditions. Do
not exceed the maximum permissible speed for
your vehicle/trailer combination. Notes on towing a trailer
General notes The E 500 model cannot be used to tow a trailer.
i When towing a trailer, set the tyre pressure
on the rear axle of the towing vehicle for a
maximum load; see the tyre pressure table in
the fuel filler flap (Y page 324).
Please note that when towing a trailer, the fol-
lowing driving systems have limited availability
or are not available at all.
R PARKTRONIC (Y page 179)
R Active Parking Assist (Y page 183)
R Blind Spot Assist (Y page 200)
i The height of the ball coupling changes with
the load of the vehicle. If necessary, use a
trailer with a height-adjustable drawbar.
You will find fitting dimensions and loads under "Technical data" (Y page 343). Driving tips i
Observe the notes on ESP ®
trailer stabilisa-
tion (Y page 68).
The maximum permissible speed for vehicle/
trailer combinations depends on the type of
trailer. Before beginning the journey, check the
trailer's documents to see what the maximum
permitted speed is. Observe the legally prescri-
bed maximum speed in the relevant country.
For certain Mercedes-Benz vehicles, the maxi-
mum permissible rear axle load is increased
when towing a trailer. See the "Technical data"
section to find out whether this applies to your
vehicle (Y page 344). If you utilise any of the
added maximum rear axle load when towing a
trailer, the vehicle/trailer combination may not
exceed a maximum speed of 100 km/h for rea-
sons concerning the operating permit. This also applies in countries in which the permissible
maximum speed for vehicle/trailer combina-
tions is above 100 km/h.
When towing a trailer, your vehicle's handling
characteristics will be different in comparison to
when driving without a trailer and it will con-
sume more fuel.
Change into a lower gear in good time on long
and steep downhill gradients.
i This also applies if you have activated cruise
control, SPEEDTRONIC or DISTRONIC PLUS.
This will use the braking effect of the engine, so
less braking will be required to maintain vehicle speed. This relieves the load on the brake sys-
tem and prevents the brakes from overheating
and wearing too quickly. If you need additional
braking, depress the brake pedal repeatedly
rather than continuously.
Driving tips If the trailer swings from side to side:
X Do not accelerate.
X Do not countersteer.
X Brake if necessary.
R Maintain a greater distance to the vehicle in
front than when driving without a trailer.
R Avoid braking abruptly. If possible, brake gen-
tly at first to allow the trailer to run on. Then,
increase the braking force rapidly.
R The values given for gradient-climbing capa-
bilities from a standstill refer to sea level.
When driving in mountainous areas, note that Towing a trailer
209Driving and parking Z
Page 216 of 349

Important safety notes
G
WARNING
Operating the integrated information systems and communications equipment in the vehicle
while driving will distract you from traffic con-
ditions. You could then lose control of the
vehicle. There is a risk of an accident.
Only operate these devices if road traffic con-
ditions permit. If you are unsure about the
surrounding conditions, pull over to a safe
location and make entries only while the vehi-
cle is stationary.
You must observe the legal requirements for the country in which you are currently driving whenoperating the on-board computer. G
WARNING
If the instrument cluster has failed or mal-
functioned, you may not recognise function
restrictions relevant to safety. The operating
safety of your vehicle may be impaired. There is a risk of an accident.
Drive on carefully. Have the vehicle checked
at a qualified specialist workshop immedi-
ately.
The on-board computer only shows messages or warnings from certain systems in the multifunc-tion display. You should therefore make sure
your vehicle is operating safely at all times.
If the operating safety of your vehicle is
impaired, park the vehicle safely as soon as pos- sible. Contact a qualified specialist workshop.
For an overview; see the instrument cluster illus-
tration (Y page 31). Displays and operation
Speedometer with segments
The segments in the speedometer indicate
which speed range is available.
R Cruise control activated (Y page 163):
The segments light up from the stored speed to the type-tested maximum speed.
R Variable SPEEDTRONIC activated
(Y page 165): The segments light up from the start of the
scale to the selected limit speed.
R DISTRONIC PLUS activated (Y page 168):
One or two segments in the set speed range
light up.
R DISTRONIC PLUS detects a vehicle in front:
The segments between the speed of the vehi-
cle in front and the stored speed light up. Rev counter
! Do not drive in the overrevving range. Doing
so will damage the engine.
The red band in the rev counter indicates the
engine's overrevving range.
The fuel supply is interrupted to protect the
engine when the red band is reached. Outside temperature display
You should pay special attention to road condi-
tions when temperatures are around freezing
point.
Bear in mind that the outside temperature dis-
play indicates the measured air temperature
and not the road surface temperature.
The outside temperature display is in the multi-
function display (Y page 215).
The multifunction display shows changes in the
outside temperature with a delay. Coolant temperature gauge
G
WARNING
If you open the bonnet while the engine is
overheating or while there is a fire in the
engine compartment, you could come into
contact with hot gases or other leaking ser-
vice products. There is a danger of injury.
Allow an overheating engine to cool down
before opening the bonnet. If there is a fire in the engine compartment, leave the bonnet
closed and notify the fire brigade.
The coolant temperature gauge is in the instru-
ment cluster on the left-hand side (Y page 31). Displays and operation
213On-board computer and displays Z
Page 218 of 349
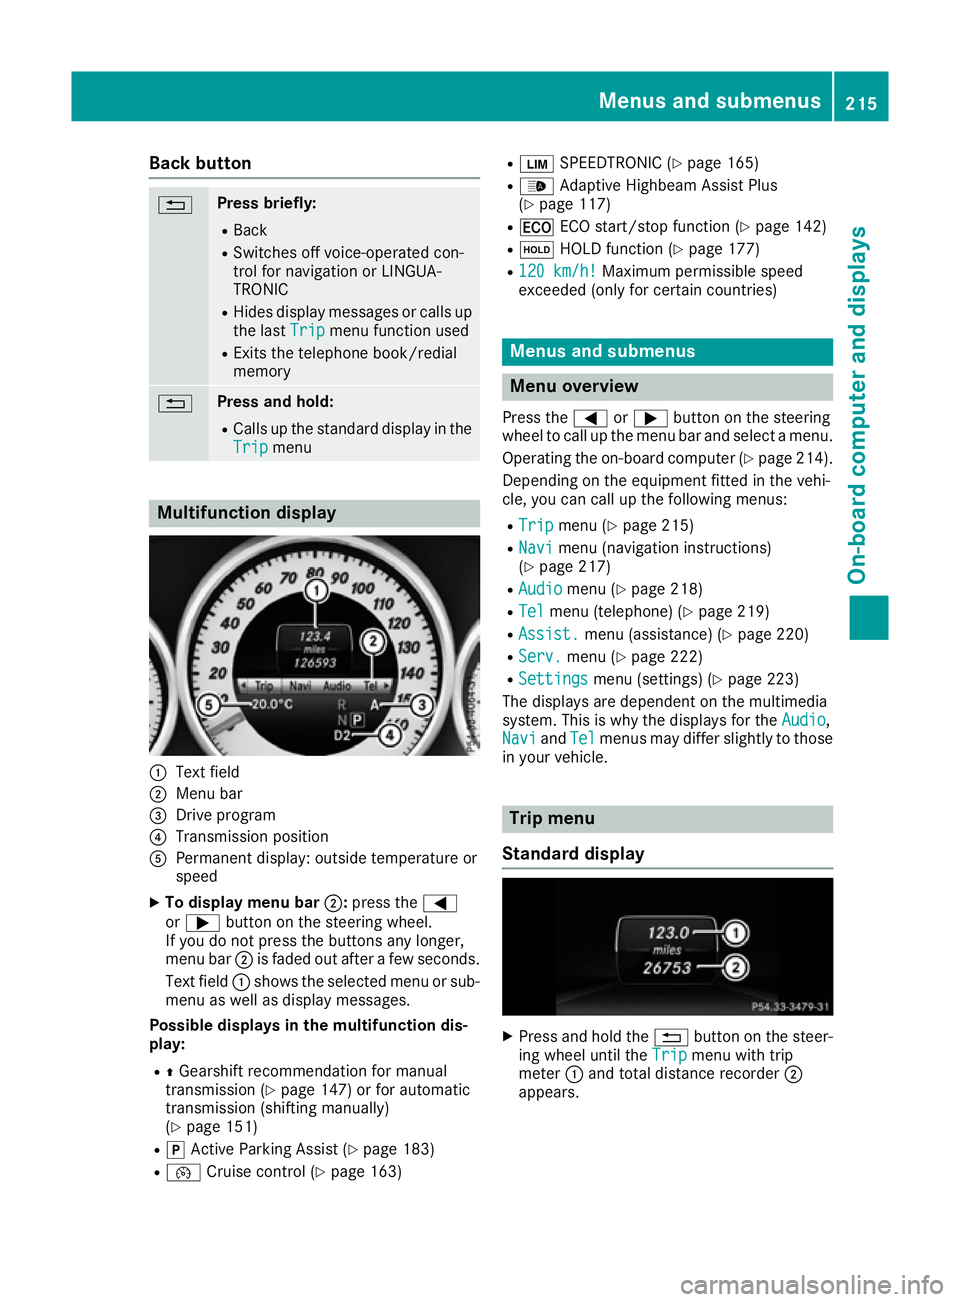
Back button
% Press briefly:
R Back
R Switches off voice-operated con-
trol for navigation or LINGUA-
TRONIC
R Hides display messages or calls up
the last Trip Tripmenu function used
R Exits the telephone book/redial
memory % Press and hold:
R
Calls up the standard display in the
Trip
Trip menu Multifunction display
:
Text field
; Menu bar
= Drive program
? Transmission position
A Permanent display: outside temperature or
speed
X To display menu bar ;:press the =
or ; button on the steering wheel.
If you do not press the buttons any longer,
menu bar ;is faded out after a few seconds.
Text field :shows the selected menu or sub-
menu as well as display messages.
Possible displays in the multifunction dis-
play:
R ZGearshift recommendation for manual
transmission (Y page 147) or for automatic
transmission (shifting manually)
(Y page 151)
R j Active Parking Assist (Y page 183)
R ¯ Cruise control (Y page 163) R
È SPEEDTRONIC (Y page 165)
R _ Adaptive Highbeam Assist Plus
(Y page 117)
R ¤ ECO start/stop function (Y page 142)
R ë HOLD function (Y page 177)
R 120 km/h! 120 km/h! Maximum permissible speed
exceeded (only for certain countries) Menus and submenus
Menu overview
Press the =or; button on the steering
wheel to call up the menu bar and select a menu.
Operating the on-board computer (Y page 214).
Depending on the equipment fitted in the vehi-
cle, you can call up the following menus:
R Trip Trip menu (Y page 215)
R Navi
Navi menu (navigation instructions)
(Y page 217)
R Audio
Audio menu (Y page 218)
R Tel
Tel menu (telephone) (Y page 219)
R Assist.
Assist. menu (assistance) (Y page 220)
R Serv.
Serv. menu (Y page 222)
R Settings
Settings menu (settings) (Y page 223)
The displays are dependent on the multimedia
system. This is why the displays for the Audio Audio,
Navi
Navi andTel
Tel menus may differ slightly to those
in your vehicle. Trip menu
Standard display X
Press and hold the %button on the steer-
ing wheel until the Trip
Tripmenu with trip
meter :and total distance recorder ;
appears. Menus and submenus
215On-board computer and displays Z
Page 226 of 349
R
Checking the tyre pressure electronically
(Y page 326)
R Calling up the service due date
(Y page 294) Settings menu
Introduction Depending on the equipment fitted in the vehi-
cle, In the
Settings Settings menu you have the follow-
ing options:
R Changing the instrument cluster settings
(Y page 223)
R Changing the light settings (Y page 223)
R Changing the vehicle settings (Y page 225)
R Changing the heating settings (Y page 226)
R Changing the convenience settings
(Y page 227)
R Restoring the factory settings (Y page 228)
Instrument cluster Selecting the distance unit
The Display unit Speed-/odometer:
Display unit Speed-/odometer: func-
tion allows you to choose whether certain dis-
plays appear in kilometres or miles in the mul-
tifunction display.
X Press the =or; button on the steering
wheel to select the Settings Settingsmenu.
X Press the :or9 button to select the
Instrument cluster
Instrument cluster submenu.
X Press ato confirm.
X Press the :or9 button to select the
Display unit Speed-/odometer
Display unit Speed-/odometer function.
You will see the selected setting: km
kmormiles
miles.
X Press the abutton to save the setting.
The selected unit of measurement for distance
applies to the: R the digital speedometer in the Trip
Trip menu
R the total distance recorder and trip meter
R the trip computer
R the current consumption and the range
R the navigation instructions in the Navi
Navi menu
R cruise control
R SPEEDTRONIC
R DISTRONIC PLUS
R ASSYST PLUS service interval display Switching the additional speedometer
on/off
Vehicles for the United Kingdom: this function is unavailable.
Only vehicles with manual transmission have
this function.
If the additional speedometer is switched on,
the speed is shown in the status bar of the mul-tifunction display instead of the outside tem-
perature.
The speed display is inverse to your speedome-
ter.
X Press the =or; button on the steering
wheel to select the Sett.
Sett. menu.
X Press the :or9 button to select the
Instrument cluster Instrument cluster submenu.
X Press ato confirm.
X Press the :or9 button to select the
Dig. speedo [mph]:
Dig. speedo [mph]: orDig. speedo
Dig. speedo
[km/h]:
[km/h]: function.
You will see the selected setting: on
on oroff
off .
X Press the abutton to save the setting.
Selecting permanent display
Vehicles for the United Kingdom: this function is unavailable.
The Permanent display: Permanent display: function allows you
to choose whether the multifunction display
always shows the outside temperature or the
speed.
The speed display is inverse to your speedome-
ter.
X Press the =or; button on the steering
wheel to select the Settings Settingsmenu.
X Press the :or9 button to select the
Instrument cluster
Instrument cluster submenu.
X Press ato confirm.
X Press the :or9 button to select the
Permanent display:
Permanent display: function.
The current setting, outside temperature
outside temperature
or Addit. speedo [mph]:
Addit. speedo [mph]: , appears.
X Press the abutton to save the setting.
Lights Setting the brightness for the instrument
cluster lighting and switches
The lighting in the instrument cluster, in the dis- plays and the controls in the vehicle interior can Menus and submenus
223On-board computer and displays Z