2015 MERCEDES-BENZ CLS-Class trunk
[x] Cancel search: trunkPage 291 of 398

X
To open: pull handle :up and fold
cover ;forwards.
i On vehicles with a fire extinguisher, the
fire extinguisher is located in the stowage
compartment under the driver's seat.
Stowage compartments in the rear cen- ter console X
To open: slide covers :and ;in the
direction of the arrow.
i There is a 12 V power socket in the front
stowage compartment.
Stowage compartment in the rear seat
armrest !
Do not sit on or support your body weight
on the rear seat armrest when it is folded
down, as you could otherwise damage it.
! Close the cover of the stowage compart-
ment before folding the rear seat armrest
back into the seat backrest. X
To open: fold down seat armrest ;.
X Fold cover :of the armrest upwards. Stowage nets
Stowage nets are located in the front-
passenger footwell and on the left-hand side
of the trunk.
Observe the loading guidelines (Y page 286)
and the safety notes regarding stowage
spaces (Y page 286). Rear bench seat through-loading fea-
ture
Important safety notes G
WARNING
If the rear bench seat/rear seat and seat
backrest are not engaged they could fold for- wards, e.g. when braking suddenly or in the
event of an accident.
R The vehicle occupant would thereby be
pushed into the seat belt by the rear bench
seat/rear seat or by the seat backrest. The
seat belt can no longer offer the intended
level of protection and could even cause
injuries.
R Objects or loads in the trunk cannot be
restrained by the seat backrest.
There is an increased risk of injury.
Before every trip, make sure that the seat
backrests and the rear bench seat/rear seat
are engaged. Stowage areas
289Stowage an d features Z
Page 292 of 398

Observe the loading guidelines (Y
page 286).
The left-hand and right-hand rear seat backr- ests can be folded down separately to
increase the trunk capacity.
Folding the seat backrest forward i
Vehicles with memory function: when you
fold one or both parts of the rear seat back- rest forwards, the respective front seat
moves forward slightly, when necessary, inorder to avoid contact.
X Vehicles without memory function: if nec-
essary, move the driver's or front-
passenger seat forward.
X Open the trunk.
X Pull right-hand or left-hand rear seat back-
rest release handle :.
The corresponding rear seat backrest is
released. X
Fold rear seat backrest ;forwards.
X Move the driver's or front-passenger seat
back if necessary. Folding the seat backrest back !
Make sure that the seat belt does not
become trapped when folding the rear seat backrest back. Otherwise, it could be dam- aged. X
Move the driver's or front-passenger seat
forward if necessary.
X Fold rear seat backrest :back until it
engages.
If the rear seat backrest is not engaged and
locked, this will be shown in the multifunc-
tion display in the instrument cluster. A
warning tone also sounds.
X Move the driver's or front-passenger seat
back if necessary.
i You should always engage the rear seat
backrests if you do not need the through-
loading feature. This will prevent unauthor-
ized access to the trunk from the vehicle
interior. Securing cargo
Cargo tie-down rings General notes
Observe the following notes on securing
loads:
R Observe the loading guidelines
(Y page 286).
R Secure the load using the cargo tie-down
rings. 290
Stowage areasStowage and features
Page 293 of 398

R
Distribute the load on the cargo tie-down
rings evenly.
R Do not use elastic straps or nets to secure
a load, as these are only intended as an
anti-slip protection for light loads.
R Do not route tie-downs across sharp edges
or corners.
R Pad sharp edges for protection.
Trunk :
Cargo tie-down rings EASY-PACK trunk box
Important safety notes G
WARNING
When the load surface moves up, your hands may become trapped on the frame of the
EASY-PACK trunk box. There is a risk of injury.
When the load surface moves up, make sure
that your hands are not within the sweep of
the load surface. If someone becomes trap-
ped, carefully push the center of the load sur-
face downward.
! When the EASY-PACK trunk box is pulled
out, no objects may be placed on the frame
of the box, nor should the frame be pushed from above. Otherwise, the box could be
damaged.
! Sharp-edged, pointed or fragile objects
can damage the EASY-PACK trunk box and
then be thrown out. There is a risk of injury. Do not transport sharp-edged, pointed or
fragile objects in the EASY-PACK trunk box. Always store and secure these or similar
objects in the trunk outside of the EASY-
PACK trunk box.
! If you exceed the maximum permitted
load of the EASY-PACK trunk box, objects
can be thrown out of the EASY-PACK trunk box and strike vehicle occupants. There is arisk of injury, particularly in the event of
sudden braking or a sudden change in
direction.
Always observe the maximum permitted
load of the EASY-PACK trunk box. Always
store and secure heavy objects in the trunk
outside of the EASY-PACK trunk box.
The maximum permitted load of the EASY-
PACK trunk box is 22 lb s(10 kg). With a load
of above approximately 11 lbs (5 kg), the bot-
tom of the box moves downward until it rests on the mat of the trunk floor. Thus, overload-
ing of the box is avoided.
Adjusting the height to any position X
Pull the box out by handle :in the direc-
tion of the arrow all the way to the stop.
X Lowering the load surface: push the cen-
ter of load surface ;down by hand in the
direction of the arrow until load surface ;
has reached the desired position and the
box is the desired size. Stowage areas
291Stowage and features Z
Page 294 of 398

X
To raise the load surface: press switch
=.
Load surface ;of the box moves up auto-
matically.
X To stow the box: push the box in by han-
dle :all the way to the stop.
Removing and installing X
To install: insert retainer ;of box :into
slots = X
Raise box :and press hooks Ainto
anchorage ?as far as they will go.
X Turn left-hand rotating catch Bclockwise
and right-hand rotating catch Bcounter-
clockwise by 90°.
X To remove: turn left-hand rotating catch
B counter-clockwise and right-hand rotat-
ing catch Bclockwise by 90°.
X Move box :downwards and pull it out
from anchorages ?.
i Store the EASY-PACK trunk box on a flat
surface after removal, e.g. on a suitable
shelf. Stowage well under the trunk floor
! Unhook the handle before again before
closing the trunk lid and clip it in securely to prevent the handle flap from protruding.
Otherwise, you could damage the handle. The TIREFIT kit, the vehicle tool kit, etc. are
located in the stowage compartment.
X To open: pull handle :up. X
Hook handle :into rain trough ;. Roof carrier
Important safety notes G
WARNING
When you load the roof, the center of gravity
of the vehicle rises and the driving character- istics change. If you exceed the maximum roof
load, the driving characteristics, as well as
steering and braking, will be greatly impaired.There is a risk of an accident.
Never exceed the maximum roof load and
adjust your driving style. 292
Stowage areasSto
wage an d features
Page 295 of 398
!
Mercedes-Benz recommends that you
only use roof carriers that have been tested and approved for Mercedes-Benz vehicles.
This helps to prevent damage to the vehi-
cle.
Position the load on the roof carrier in such
a way that the vehicle will not sustain dam-
age even when it is in motion.
Ensure that, depending on the vehicle's
equipment, you can raise the sliding sun-
roof fully and open the trunk lid fully when
the roof carrier is installed.
! To avoid damaging or scratching the cov-
ers, do not use metallic or hard objects to
open them.
You will find information on the maximum roof
load in the "Technical data" section
(Y page 392).
An incorrectly secured roof carrier or roof
load may become detached from the vehicle.
You must therefore ensure that you observe
the roof carrier manufacturer's installation
instructions.
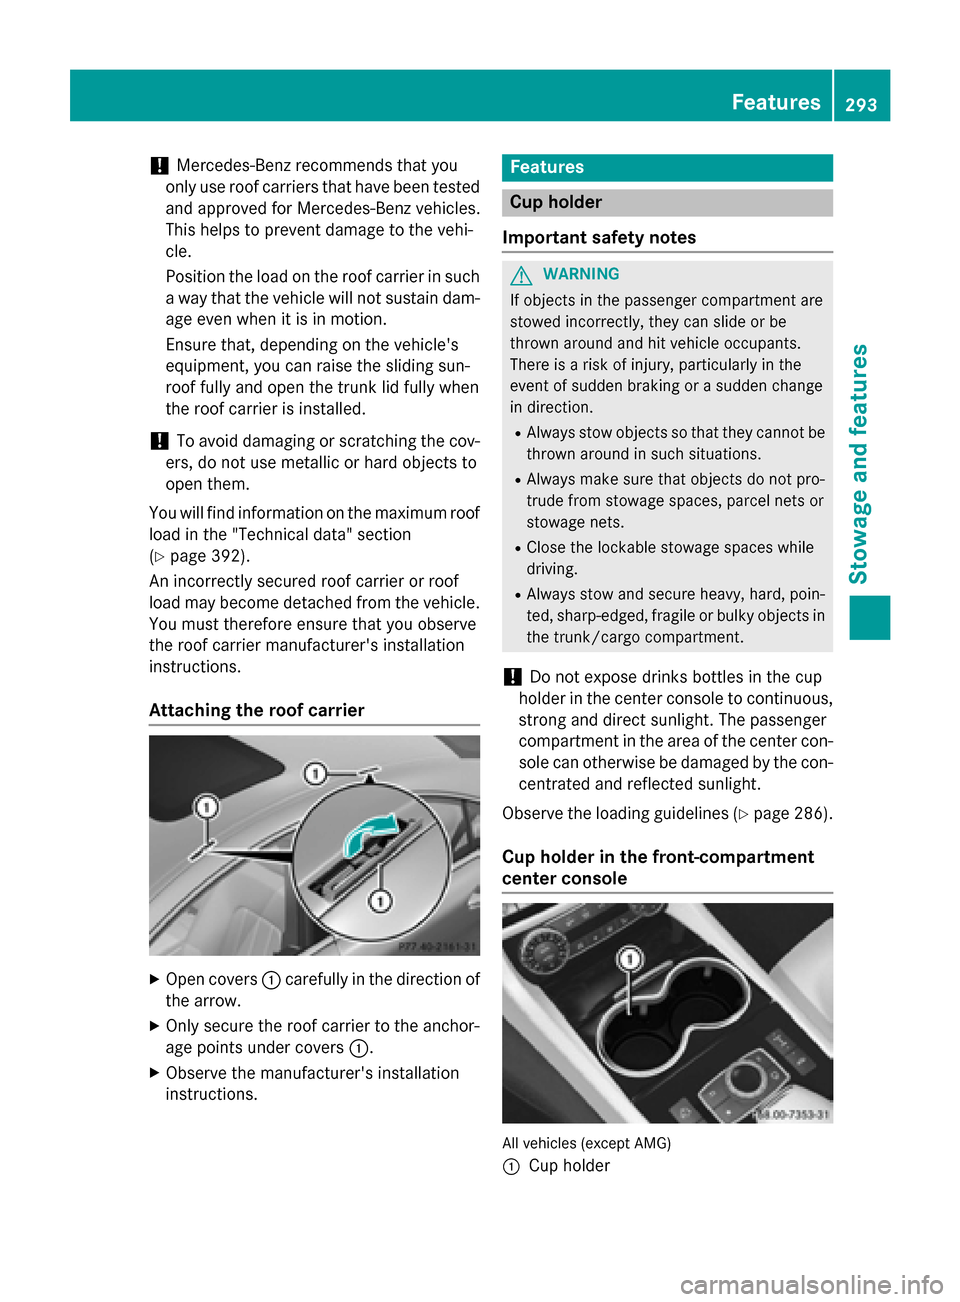
Attaching the roof carrier X
Open covers :carefully in the direction of
the arrow.
X Only secure the roof carrier to the anchor-
age points under covers :.
X Observe the manufacturer's installation
instructions. Features
Cup holder
Important safety notes G
WARNING
If objects in the passenger compartment are
stowed incorrectly, they can slide or be
thrown around and hit vehicle occupants.
There is a risk of injury, particularly in the
event of sudden braking or a sudden change
in direction. R Always stow objects so that they cannot be
thrown around in such situations.
R Always make sure that objects do not pro-
trude from stowage spaces, parcel nets or
stowage nets.
R Close the lockable stowage spaces while
driving.
R Always stow and secure heavy, hard, poin-
ted, sharp-edged, fragile or bulky objects in
the trunk/cargo compartment.
! Do not expose drinks bottles in the cup
holder in the center console to continuous,
strong and direct sunlight. The passenger
compartment in the area of the center con- sole can otherwise be damaged by the con-
centrated and reflected sunlight.
Observe the loading guidelines (Y page 286).
Cup holder in the front-compartment
center console All vehicles (except AMG)
: Cup holder Features
293Stowage and features Z
Page 297 of 398

R
Always stow objects so that they cannot be
thrown around in such situations.
R Always make sure that objects do not pro-
trude from stowage spaces, parcel nets or
stowage nets.
R Close the lockable stowage spaces while
driving.
R Always stow and secure heavy, hard, poin-
ted, sharp-edged, fragile or bulky objects in
the trunk/cargo compartment.
Observe the loading guidelines (Y page 286).
! Make sure that any bottles weighing more
than 1.1 lb(0.5 kg) that are stored in the
bottle holder, rest on the vehicle floor. The bottle holder could otherwise be damaged. X
Press the outer edge of button :and slide
in the direction of the arrow until the bottle
fits into the opening.
X Insert the bottle into the bottle holder.
The bottle holder is suitable for bottles with a
capacity of 25 fl. oz. (0.7 l) to 54 fl. oz. (1.5 l).
The bo ttle holder does not secure the bottles;
it merely prevents them from tipping over. Sun visors
Overview G
WARNING
If the mirror cover of the vanity mirror is folded up when the vehicle is in motion, you could be
blinded by incident light. There is a risk of an
accident. Always keep the mirror cover folded down
while driving.
:
Mirror light
; Bracket
= Retaining clip, e.g. for a car park ticket
? Vanity mirror
A Mirror cover
Vanity mirror in the sun visor Mirror light
:only functions if the sun visor
is clipped into bracket ;and mirror cover A
has been folded up.
Glare from the side X
Fold down sun visor :.
X Pull sun visor :out of retainer ;.
X Swing sun visor :to the side.
X Slide sun visor :horizontally as required. Features
295Stowage an d features Z
Page 328 of 398

Useful information
i This Operator's Manual describes all
models and all standard and optional equip- ment of your vehicle available at the time of
publication of the Operator's Manual.
Country-specific differences are possible.
Please note that your vehicle may not be
equipped with all features described. This
also applies to safety-related systems and
functions.
i Read the information on qualified special-
ist workshops (Y page 26). Where will I find...?
Vehicle tool kit
General notes The vehicle tool kit can be found in the stow-
age well under the trunk floor (Y page 292).
Vehicles with a "Minispare" emergency spare wheel (Example: equipment and country-specific varia-
tions possible)
: Vehicle tool kit tray
; Stowage well
= "Minispare" emergency spare wheel
X Open the trunk lid.
X Lift the trunk floor upwards (Y page 292).The vehicle tool kit contains:
R Folding wheel chock
R Fuse allocation chart
R Jack
R Alignment bolt
R One pair of gloves
R Lug wrench
R Towing eye
Vehicles with a collapsible spare wheel (AMG vehicles) (Example: equipment and country-specific varia-
tions possible)
: Towing eye
; One pair of gloves
= Jack
? Folding wheel chock
A Alignment bolt
B Sheet for faulty wheel
C Tire inflation compressor
D Lug wrench
E Fuse allocation chart
X Open the trunk lid.
X Lift the trunk floor upwards (Y page 292).
Vehicles with alloy wheels and hub caps On vehicles with alloy wheels and hub caps, a
socket is also provided. 326
Where will I find...?Roadside Assistance
Page 331 of 398

R
If tire sealant is swallowed, immediately
rinse your mouth out thoroughly and drink
plenty of water. Do not induce vomiting,
and seek medical attention immediately.
R Immediately change out of clothing which
has come into contact with tire sealant.
R If an allergic reaction occurs, seek medical
attention immediately.
! Do not operate the tire inflation compres-
sor for longer than eight minutes at a time
without a break. It may otherwise overheat.
The tire inflation compressor can be oper-
ated again once it has cooled down.
Comply with the manufacturer’s safety
instructions on the sticker on the tire inflation
compressor.
Using the TIREFIT kit X
Do not remove any foreign objects which
have penetrated the tire, e.g. screws or
nails.
X Remove the tire sealant bottle, the accom-
panying TIREFIT sticker and the tire infla-
tion compressor from the stowage well
underneath the trunk floor (Y page 326).
X Affix part :of the TIREFIT sticker to the
instrument cluster within the driver's field
of vision.
X Affix part ;of the TIREFIT sticker near the
valve on the wheel with the defective tire. X
Pull plug ?with the cable and hose Aout
of the housing.
X Screw hose Aonto flange Bof tire seal-
ant bottle :.
X Place tire sealant bottle :head down-
wards into recess ;of the tire inflation
compressor. X
Remove the cap from valve Con the faulty
tire.
X Screw filler hose Donto valve C.
X Insert connector ?into a 12 V socket
(Y page 298) in your vehicle.
X Turn the SmartKey to position 1in the igni-
tion lock (Y page 149).
X Press on/off switch =on the tire inflation
compressor to I.
The tire inflation compressor is switched
on. The tire is inflated.
First, tire sealant is pumped into the tire.
The pressure can briefly rise to approx-
imately 500 kPa (5 bar/73 psi). Flat tire
329Roadside Assistance Z