2015 MERCEDES-BENZ CLA SHOOTING BRAKE ECU
[x] Cancel search: ECUPage 14 of 421
Anti-dazzle mode (automatic) ........ 120
Folding in when locking (on-board
computer) ...................................... 261
Folding in/out (automatically) ....... 120
Folding in/out (electrically )........... 120
Out of position (troubleshooting) ... 120
Parking position ............................. 121
Resetting ....................................... 120
Storing settings (memory func-
tion) ............................................... 122 F
Fault message see Display messages
Filler cap
see Fuel filler flap
Fire extinguisher ............................... 351
First-aid kit ......................................... 350
Fitting a wheel
Fitting a wheel ............................... 383
Lowering the vehicle ...................... 383
Preparing the vehicle ..................... 380
Raising the vehicle ......................... 381
Removing a wheel .......................... 383
Securing the vehicle against roll-
ing away ........................................ 381
Flat tyre
Changing a wheel/fitting the
spare wheel ................................... 379
MOExtended tyre s......................... 352
Preparing the vehicle ..................... 352
TIREFIT kit ...................................... 353
see Emergency spare wheel
Floormat ............................................. 331
Foglamps
Switching on/of f........................... 127
Foglamps (extended range) .............. 131
Frequencies
Mobile phone ................................. 400
Two-way radio ................................ 400
Front foglamps
Display message ............................ 281
Front-passenger front airbag deac-
tivation
Display message ............................ 278 Front-passenger front airbag deac-
tivation system
Operation ......................................... 52
Problems ......................................... 56
System self-test ............................... 54
Fuel
Additives ........................................ 405
Consumption information .............. 406
Consumption statistics .................. 250
Displaying the current consump-
tion ................................................ 250
Displaying the range ...................... 250
Driving tip s.................................... 196
E10 ................................................ 404
Fuel gaug e....................................... 32
Grade (petrol) ................................ 404
Important safety notes .................. 403
Low outside temperatures ............. 406
Notes for CLA 250 ......................... 405
Notes for Mercedes‑ AMG vehi-
cles ................................................ 404
Problem (malfunction) ................... 191
Quality (diesel )............................... 405
Refuelling ....................................... 188
Tank content/reserve fue l............. 403
Fuel filler flap
Opening ......................................... 189
Fuel filter (white display message) .. 286
Fuel level
Calling up the range (on-board
computer) ...................................... 250
Gauge .............................................. 32
Fuel reserve
see Fuel
Fuel tank
Capacity ........................................ 403
Problem (malfunction) ................... 191
Fuses
Allocation chart ............................. 368
Before changing ............................. 367
Fuse box in the engine compart-
ment .............................................. 367
Fuse box in the front-passenger
footwell .......................................... 368
Important safety notes .................. 367 Index
11
Page 15 of 421
G
Gear indicator (on-board com-
puter, Mercedes-AMG vehicles) ....... 262
Gearshift program
SETUP (on-board computer) .......... 262
Genuine Mercedes-Benz parts ...........22
Glove compartment ..........................317 H
Hazard warning lamps Display message ............................ 300
Switching on/off ........................... 129
Head restraints
Adjusting ....................................... 115
Adjusting (manually) ..................... .115
Adjusting (rear) .............................. 116
Fitting/removing (rear) .................. 116
Headlamp
Cleaning system (function) ............ 129
Cleaning system (notes) ................ 409
Headlamp flasher .............................. 129
Headlamps
Misting up ...................................... 132
Topping up the cleaning system .... 339
see Automatic headlamp mode
Heating
see Climate control
High-pressure cleaners .................... 342
Hill start assist .................................. 169
HOLD function
Activating ....................................... 212
Deactivating ................................... 212
Display message ............................ 287
Function/notes ............................ .211
Horn ...................................................... 30 I
Ignition lock see Key positions
Immobiliser .......................................... 80
Indicator and warning lamp
Restraint system ............................ 309
Indicator and warning lamps
COLLISION PREVENTION ASSIST
PLUS .............................................. 312
Coolant .......................................... 310 Engine diagnostics ......................... 310
SPORT handling mode ................... 307
Indicator lamps
Display message ............................ 280
see Warning and indicator lamps
Indicators
see Turn signals
Instrument cluster
Overview .......................................... 32
Settings ......................................... 258
Warning and indicator lamps ........... 33
Instrument cluster lighting .............. 246
Intelligent Light System
Activating/deactivating ................. 259
Display message ............................ 282
Overview ........................................ 130
Setting the dipped-beam head-
lamps for driving on the right/left .. 259
Interior lighting
Control .......................................... .133
Emergency lighting ........................ 133
Overview ........................................ 132
Reading lamp ................................. 132
Interior motion sensor
Deactivating ..................................... 83
Function .......................................... .82
Priming ............................................ 82
Switching off .................................... 83
ISOFIX child seat securing system ....61 J
Jack Storage location ............................3 51
Using ............................................. 381
Jump starting (engine) ......................360 K
Key Changing the battery ....................... 90
Checking the battery ....................... 90
Convenience closing feature .......... 103
Convenience opening feature ....... .102
Display message ............................ 300
Door central locking/unlocking ....... 87
Emergency key element ................... 89
Important safety notes .................... 86 12
Index
Page 23 of 421
see Manual transmission
Transmission position display
(DIRECT SELECT lever) ......................178
Transporting the vehicle .................. 365
Trim pieces (cleaning instruc-
tions) ................................................. .346
Trip computer (on-board com-
puter) ................................................. .250
Trip meter
Calling up ....................................... 250
Resetting (on-board computer) ...... 251
Turn signals
Changing bulbs (front) ................... 136
Changing bulbs (rear) .................... 137
Switching on/off ........................... 129
Two-way radio
Frequencies ................................... 400
Installation ..................................... 400
Transmission output (maximum) .... 400
Type identification plate
see Vehicle identification plate
Tyre pressure
Calling up (on-board computer) ..... 376
Display message ............................ 292
Not reached (TIREFIT) .................... 355
Reached (TIREFIT) .......................... 355
Recommended ............................... 374
Tyre pressure loss warning
General notes ................................ 375
Important safety notes .................. 375
Restarting ...................................... 376
Tyre pressure monitor
Checking the tyre pressure elec-
tronically ........................................ 377
Function/notes ............................ .376
General notes ................................ 376
Important safety notes .................. 376
Radio type approval for the tyre
pressure monitor ........................... 379
Restarting ...................................... 378
Warning lamp ................................. 313
Warning message .......................... 378
Tyres
Changing a wheel .......................... 379
Checking ........................................ 371
Direction of rotatio n...................... 380
Display message ............................ 292
General notes ................................ 384 Important safety notes .................. 370
Information on driving .................... 370
M+S tyres ...................................... 372
MOExtended tyre
s......................... 372
Replacing ....................................... 379
Service life ..................................... 371
Storing ........................................... 380
Summer tyres ................................ 372
Tyre size (data ).............................. 384
Tyre tread ...................................... 371
Wheel and tyre combinations ........ 386
see Flat tyre U
Unlocking Emergency unlocking ....................... 95
From inside the vehicle (central
unlocking button) ............................. 94
Upshift indicator (on-board com-
puter, Mercedes-AMG vehicles) ....... 262 V
Vanity mirror (in sun visor) .............. 327
Variable SPEEDTRONIC
see SPEEDTRONIC
Vehicle
Correct use ...................................... 25
Data acquisition ............................... 26
Display message ............................ 294
Electronics ..................................... 400
Equipment ....................................... 23
Implied warranty .............................. 25
Individual settings .......................... 258
Leaving parked up ......................... 195
Locking (in an emergency) ............... 96
Locking (key) ................................... 87
Lowering ........................................ 383
Pulling away ................................... 168
Raising ........................................... 381
Registration ..................................... 25
Securing from rolling away ............ 381
Transporting .................................. 365
Unlocking (in an emergency) ........... 95
Unlocking (key) ................................ 87
Vehicle data ................................... 410
Vehicle data
Boot load (maximum) ..................... 410 20
Index
Page 28 of 421
depressed pedal. This jeopardises the oper-
ating and road safety of the vehicle. There is a risk of an accident.
Stow all objects securely in the vehicle so that
they do not get into the driver's footwell.
Always fit the floormats securely and as pre-
scribed in order to ensure that there is always sufficient room for the pedals. Do not use
loose floormats and do not place several floor-mats on top of one another.
! If the engine is switched off and equip-
ment on the diagnostics connection is
used, the starter battery may discharge.
Connecting equipment to the diagnostics
connection can lead to emissions monitoring information being reset, for example. This
may lead to the vehicle failing to meet the
requirements of the next emissions test dur-
ing the main inspection. Qualified specialist workshop
A qualified specialist workshop has the nec-
essary special skills, tools and qualifications
to correctly carry out any necessary work on
your vehicle. This particularly applies to work
relevant to safety.
Observe the notes in the Service Booklet.
Always have the following work carried out at a qualified specialist workshop:
R work relevant to safety
R service and maintenance work
R repair work
R modifications, installations and conver-
sions
R work on electronic components
Mercedes-Benz recommends that you use a
Mercedes-Benz Service Centre. Vehicle registration
Mercedes-Benz may ask its Service Centres
to carry out technical inspections on certain vehicles. The quality or safety of the vehicle is
improved as a result of the inspection.
Mercedes-Benz can only inform you about
vehicle checks if it has your registration data.
It is possible that your vehicle has not yet
been registered in your name in the following
cases:
R if your vehicle was not purchased at an
authorised specialist dealer.
R if your vehicle has not yet been examined at
a Mercedes-Benz Service Centre.
It is advisable to register your vehicle with a
Mercedes-Benz Service Centre.
Inform Mercedes-Benz as soon as possible
about any change in address or vehicle own-
ership. You can do this at a Mercedes-Benz
Service Centre, for example. Correct use
If you remove any warning stickers, you or
others could fail to recognise certain dangers.
Leave warning stickers in position.
Observe the following information when driv- ing your vehicle:
R the safety notes in this manual
R the vehicle technical data
R traffic rules and regulations
R laws and safety standards pertaining to
motor vehicles Implied warranty
! Follow the instructions in this manual
about the proper operation of your vehicle
as well as about possible vehicle damage.
Damage to your vehicle that arises from
culpable contraventions against these
instructions are not covered either by
Mercedes-Benz implied warranty or by the
New or Used-Vehicle Warranty. Introduction
25 Z
Page 29 of 421
QR code for rescue card
The QR code is secured in the fuel filler flap
and on the opposite side on the B-pillar. In the
event of an accident, rescue services can use
the QR code to quickly find the appropriate
rescue card for your vehicle. The current res- cue card contains, in a compact form, the
most important information about your vehi-
cle, e.g. the routing of the electric cables.
You can find more information under http:// portal.aftersales.i.daimler.com/public/
content/asportal/en/communication/
informationen_fuer/QRCode.html. Data stored in the vehicle
A wide range of electronic components in
your vehicle contain data memories.
These data memories temporarily or perma-
nently store technical information about:
R the vehicle's operating state
R events
R faults
In general, this technical information docu-
ments the state of a component, a module, a
system or the surroundings.
These include, for example:
R operating conditions of system compo-
nents, e.g. fluid levels
R the vehicle's status messages and those of
its individual components, e.g. number of
wheel revolutions/speed, deceleration in
movement, lateral acceleration, accelera-
tor pedal position
R malfunctions and defects in important sys-
tem components, e.g. lights, brakes
R vehicle reactions and operating conditions
in special driving situations, e.g. airbag
deployment, intervention of stability con-
trol systems
R ambient conditions, e.g. outside tempera-
ture This data is of an exclusively technical nature
and can be used to:
R assist in detecting and rectifying faults and
defects
R analyse vehicle functions, e.g. after an acci-
dent
R optimise vehicle functions
The data cannot be used to trace the vehicle's movements.
When your vehicle is serviced, technical infor-
mation can be read from the event data mem- ory and fault data memory.
Services include, for example:
R repair services
R service processes
R warranty events
R quality assurance
The vehicle is read out by employees of the
service network (including the manufacturer)
using special diagnostic testers. You can
obtain more information there, if required.
After a fault has been rectified, the informa-
tion is deleted from the fault memory or is
continually overwritten.
When operating the vehicle, situations are
conceivable in which this technical data, in
connection with other information (if neces-
sary, after consultation with an authorised
expert), could be traced to a person.
Examples include:
R accident reports
R damage to the vehicle
R witness statements
Further additional functions that have been
contractually agreed upon with the customer
allow certain vehicle data to be conveyed by
the vehicle as well. The additional functions
include, for example, vehicle location in case of an emergency. 26
Introduction
Page 45 of 421
Useful information
i This Owner's Manual describes all mod-
els, series and optional equipment for your
vehicle that were available at the time of
going to press. National variations are pos- sible. Note that your vehicle may not be
equipped with all of the functions descri-
bed. This is also the case for systems and
functions relevant to safety.
i Read the information on qualified special-
ist workshops: (Y page 25). Panic alarm
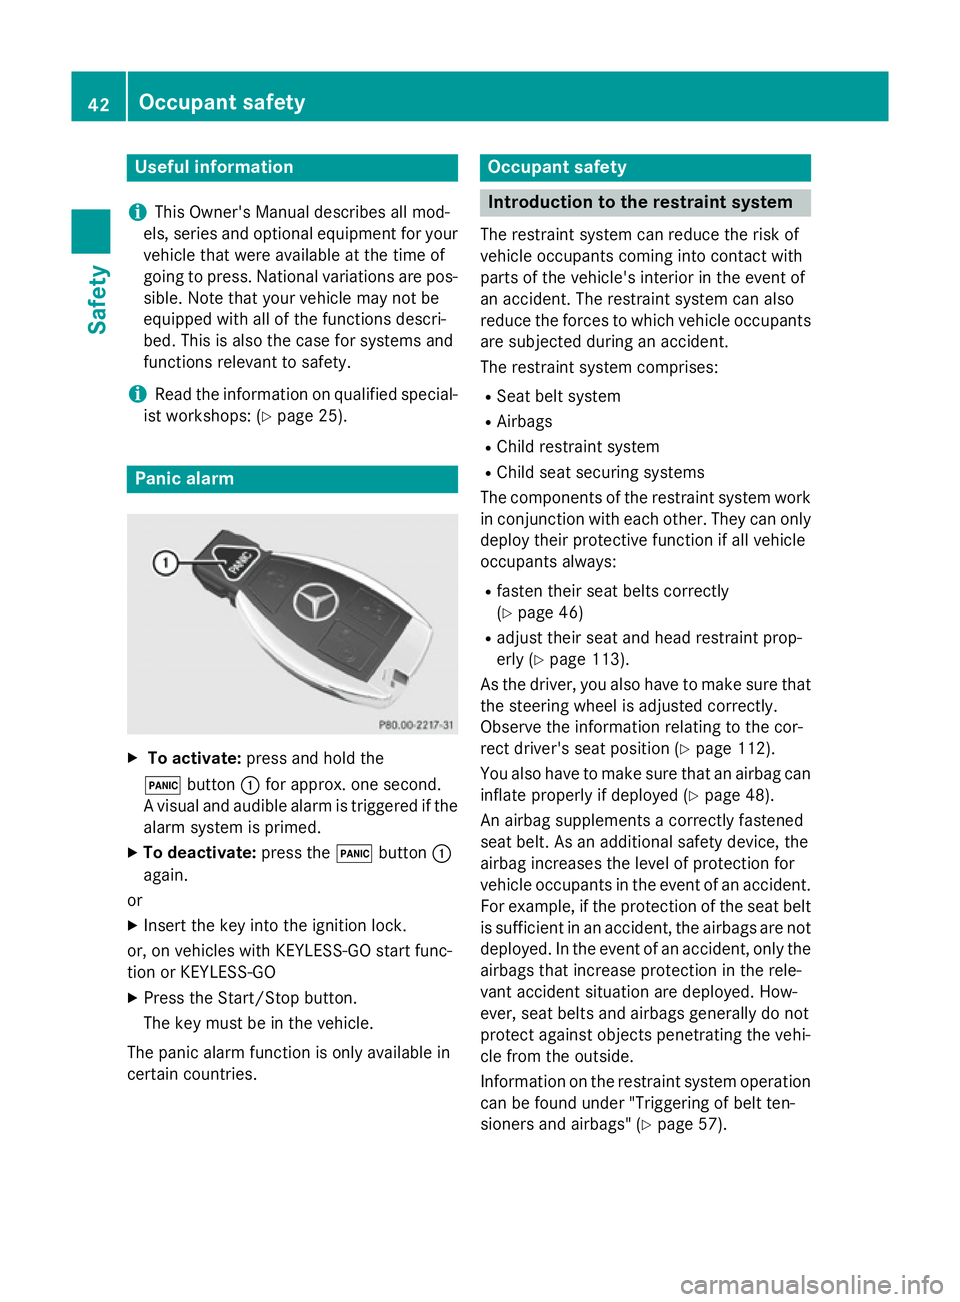
X
To activate: press and hold the
! button :for approx. one second.
A visual and audible alarm is triggered if the alarm system is primed.
X To deactivate: press the!button :
again.
or
X Insert the key into the ignition lock.
or, on vehicles with KEYLESS-GO start func-
tion or KEYLESS ‑GO
X Press the Start/Stop button.
The key must be in the vehicle.
The panic alarm function is only available in
certain countries. Occupant safety
Introduction to the restraint system
The restraint system can reduce the risk of
vehicle occupants coming into contact with
parts of the vehicle's interior in the event of
an accident. The restraint system can also
reduce the forces to which vehicle occupants
are subjected during an accident.
The restraint system comprises:
R Seat belt system
R Airbags
R Child restraint system
R Child seat securing systems
The components of the restraint system work
in conjunction with each other. They can only
deploy their protective function if all vehicle
occupants always:
R fasten their seat belts correctly
(Y page 46)
R adjust their seat and head restraint prop-
erly (Y page 113).
As the driver, you also have to make sure that
the steering wheel is adjusted correctly.
Observe the information relating to the cor-
rect driver's seat position (Y page 112).
You also have to make sure that an airbag can inflate properly if deployed (Y page 48).
An airbag supplements a correctly fastened
seat belt. As an additional safety device, the
airbag increases the level of protection for
vehicle occupants in the event of an accident.
For example, if the protection of the seat belt is sufficient in an accident, the airbags are not
deployed. In the event of an accident, only the airbags that increase protection in the rele-
vant accident situation are deployed. How-
ever, seat belts and airbags generally do not
protect against objects penetrating the vehi-
cle from the outside.
Information on the restraint system operation
can be found under "Triggering of belt ten-
sioners and airbags" (Y page 57).42
Occupant safetySafety
Page 48 of 421
cause additional injuries in the event of an
accident, sudden braking or abrupt changes
of direction. There is an increased risk of
injury, possibly even fatal.
Always make sure that all vehicle occupants
are wearing their seat belt properly and are
seated correctly. G
WARNING
The seat belt does not offer the intended level of protection if you have not moved the back-
rest to an almost vertical position. When brak-
ing or in the event of an accident, you could
slide underneath the seat belt and sustain
abdomen or neck injuries, for example. This
poses an increased risk of injury or even fatal injury.
Adjust the seat properly before beginning
your journey. Always ensure that the backrest
is in an almost vertical position and that the
shoulder section of your seatbelt is routed
across the centre of your shoulder. G
WARNING
Persons under 1.50 mtall cannot wear the
seat belts correctly without a suitable, addi-
tional restraint system. The seat belt cannot
perform its intended protective function if it is not fastened correctly. Also, an improperly
fastened seat belt can cause additional inju-
ries in the event of an accident, sudden brak-
ing or abrupt changes of direction. There is an increased risk of injury, possibly even fatal.
Secure persons less than 1.50 mtall in a suit-
able restraint system.
If a child younger than twelve years old and
under 1.50 m in height is travelling in the
vehicle:
R always secure the child in a child restraint
system suitable for this Mercedes-Benz
vehicle. The child restraint system must be appropriate to the age, weight and size of
the child.
R always observe the instructions and safety
notes on the automatic front-passenger front airbag deactivation system
(Y
page 51)
R always observe the instructions and safety
notes on "Children in the vehicle" in this
Owner's Manual (Y page 59) in addition
to the child restraint system manufactur-
er's installation instructions G
WARNING
Seat belts cannot protect as intended, if:
R they are damaged, have been modified, are
extremely dirty, bleached or dyed
R the seat belt buckle is damaged or
extremely dirty
R modifications have been made to the belt
tensioners, belt anchorages or inertia reels
Seat belts may sustain non-visible damage in an accident, e.g. due to glass splinters. Modi-
fied or damaged seat belts can tear or fail, for example in the event of an accident. Modified
seat belt tensioners may be deployed unin-
tentionally or fail to be deployed when
required. There is an increased risk of injury,
possibly even fatal.
Never modify safety belts, seat belt tension-
ers, seat belt anchorages and inertia reels.
Ensure that seat belts are not damaged or
worn and are clean. After an accident, have
the seat belts checked immediately at a quali- fied specialist workshop.
Mercedes-Benz recommends that you only
use seat belts which have been approved
specifically for your vehicle by Mercedes-
Benz. Otherwise, your vehicle's general oper- ating permit could be invalidated.
Sports seat or AMG Performance seat: this
seat is designed for the standard three-point
seat belt. If you fit another multipoint seat
belt, e.g. sport or racing seat belts, the
restraint system cannot provide the best level of protection. G
WARNING
If you feed seat belts through the opening in
the seat backrest, the seat backrest may be
damaged or may even break in the event of an Occupant safety
45Safety
Z
Page 49 of 421
accident. This poses an increased risk of
injury or even fatal injury.
Only use the standard three-point seat belt.
Never modify the seat belt system.
Correct seat belt use Observe the safety notes on the seat belt
(Y page 44).
All vehicle occupants must be wearing the
seat belt correctly before beginning the jour-
ney. Also make sure that all vehicle occu-
pants are always wearing the seat belt cor-
rectly while the vehicle is in motion.
When fastening the seat belt, always make
sure that:
R the seat belt tongue is only inserted into the
belt buckle belonging to that seat
R the seat belt is tight across your body
Avoid wearing bulky clothing, e.g. a winter
coat.
R the seat belt is not twisted
Only then can forces which occur be dis-
tributed across the surface of the seat belt.
R the shoulder section of the belt is always
routed across the centre of your shoulder
The shoulder section of the seat belt should
not touch your neck nor be routed under
your arm. If possible, adjust the seat belt to
the appropriate height.
R the lap belt passes across your lap as
tightly and as low down as possible
The lap belt must always be routed across
your hip joints and never across your abdo-
men. This applies particularly to pregnant
women. If necessary, press the lap belt
down into your hip joints and pull tight with the shoulder section of the belt.
R the seat belt is not routed across sharp,
pointed or fragile objects
If you have such items located on or in your
clothing, e.g. pens, keys or spectacles,
store these in a suitable place.
R only one person is using a seat belt Infants and children must never travel sit-
ting on the lap of a vehicle occupant. In the
event of an accident, they could be crushed
between the vehicle occupant and seat
belt.
R objects are never secured with a seat belt if
the seat belt is also being used by one of the
vehicle's occupants
Also ensure that no objects are placed
between a person and the seat. e.g. a cush- ion.
Seat belts are only intended to secure and
restrain vehicle occupants. Always observe
the "Loading guidelines" for securing objects,
luggage or loads (Y page 316).
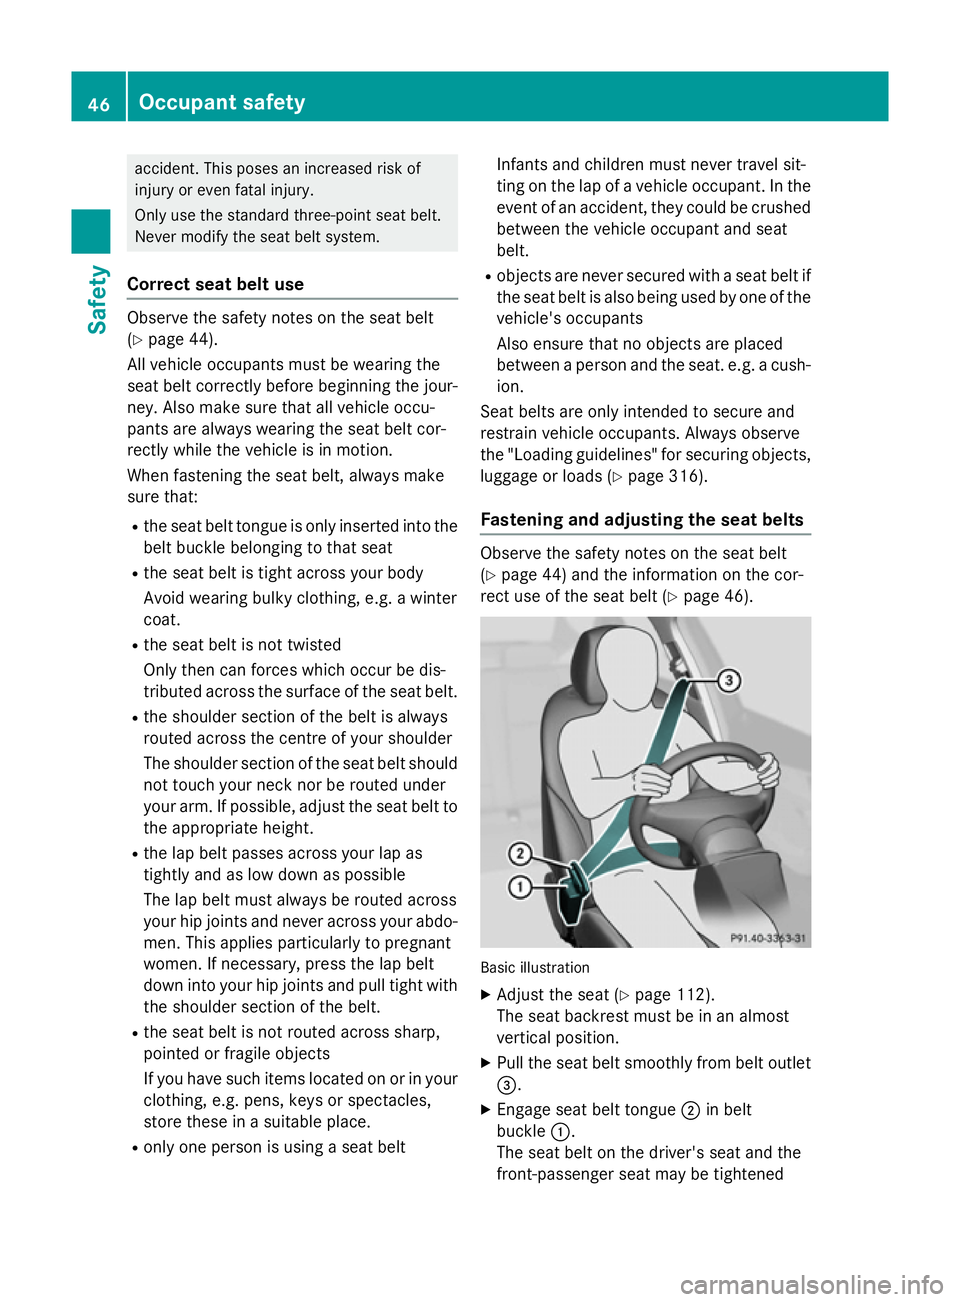
Fastening and adjusting the seat belts Observe the safety notes on the seat belt
(Y
page 44) and the information on the cor-
rect use of the seat belt (Y page 46). Basic illustration
X Adjust the seat (Y page 112).
The seat backrest must be in an almost
vertical position.
X Pull the seat belt smoothly from belt outlet
=.
X Engage seat belt tongue ;in belt
buckle :.
The seat belt on the driver's seat and the
front-passenger seat may be tightened 46
Occupant safetySafety