2015 MERCEDES-BENZ CLA SHOOTING BRAKE instrument cluster
[x] Cancel search: instrument clusterPage 80 of 421
pulling away on wet or slippery roads. ESP
®
can also stabilise the vehicle during braking.
ETS/4ETS (Electronic Traction System) i
Observe the "Important safety notes" sec-
tion (Y page 72).
ETS traction control is part of ESP ®
. On vehi-
cles with 4MATIC, 4ETS is a component of
ESP ®
.
Traction control brakes the drive wheels indi-
vidually if they spin. This enables you to pull
away and accelerate on slippery surfaces, for
example if the road surface is slippery on one side. In addition, more drive torque is trans-
ferred to the wheel or wheels with traction.
Traction control remains active if you deacti-
vate ESP ®
.
Important safety notes i
Observe the "Important safety notes" sec-
tion (Y page 72). G
WARNING
If ESP ®
is malfunctioning, ESP ®
is unable to
stabilise the vehicle. In addition, other driving
safety systems are switched off. This increa-
ses the risk of skidding and an accident.
Drive on carefully. Have ESP ®
checked at a
qualified specialist workshop.
Vehicles without 4MATIC: when towing
away your vehicle with the front axle raised,
please observe the notes on ESP ®
(Y page 364).
If the å ESP®
OFF warning lamp lights up
continuously, ESP ®
is deactivated.
If the ÷ ESP®
warning lamp and the å
warning lamp are lit continuously, ESP ®
is not
available due to a malfunction.
Observe the information on warning lamps
(Y page 306) and display messages which
may be shown in the instrument cluster
(Y page 266). Only use wheels with the recommended tyre
sizes. Only then will ESP
®
function properly.
Characteristics of ESP ® General notes
If the
÷ ESP warning lamp goes out before
beginning the journey, ESP ®
is automatically
active.
If ESP ®
intervenes, the ÷ESP®
warning
lamp flashes in the instrument cluster.
If ESP ®
intervenes:
X Do not deactivate ESP ®
under any circum-
stances.
X When pulling away, only depress the accel-
erator pedal as far as is necessary.
X Adapt your driving style to suit the prevail-
ing road and weather conditions.
ECO start/stop function
The ECO start/stop function switches the
engine off automatically if the vehicle stops
moving. When pulling away again, the engine starts automatically. ESP ®
remains in its pre-
viously selected status. Example:if ESP®
was deactivated before the engine was
switched off, ESP ®
remains deactivated when
the engine is switched on again.
Deactivating/activating ESP ®
(except
Mercedes ‑AMG vehicles) Important safety notes
You can select between the following sta-
tuses of ESP ®
:
R ESP ®
is activated
R ESP ®
is deactivated G
WARNING
If you deactivate ESP ®
, ESP ®
no longer sta-
bilises the vehicle. There is an increased risk
of skidding and an accident.
Only deactivate ESP ®
in the situations descri-
bed in the following. Driving safety systems
77Safety Z
Page 81 of 421
It may be best to deactivate ESP
®
in the fol-
lowing situations:
R when using snow chains
R in deep snow
R on sand or gravel
i Activate ESP ®
as soon as the situations
described above no longer apply. ESP ®
will
otherwise not be able to stabilise the vehi-
cle if the vehicle starts to skid or a wheel
starts to spin.
Deactivating/activating ESP ®
You can deactivate or activate ESP ®
via the
on-board computer (Y page 256).
ESP ®
deactivated:
The å ESP®
OFF warning lamp in the
instrument cluster lights up.
ESP ®
activated:
The å ESP®
OFF warning lamp in the
instrument cluster goes out.
Characteristics when ESP ®
is deactivated
If ESP ®
is deactivated and one or more wheels
start to spin, the ÷ESP®
warning lamp in
the instrument cluster flashes. In such situa-
tions, ESP ®
will not stabilise the vehicle.
If you deactivate ESP ®
:
R ESP ®
no longer improves driving stability
R Engine torque is no longer limited and the
drive wheels are able to spin
The spinning of the wheels results in a cut-
ting action for better traction on loose sur- faces.
R Traction control is still activated
R COLLISION PREVENTION ASSIST is no lon-
ger available; nor is it activated if you brake
firmly with assistance from ESP ®
R PRE-SAFE ®
is no longer available; it is also
not activated if you brake firmly with assis-
tance from ESP ®
R ESP ®
still provides support when you brake
firmly Deactivating/activating ESP
®
(Mercedes‑AMG vehicles) Important safety notes
i Observe the "Important safety notes" sec-
tion (Y page 72).
You can select between the following sta-
tuses of ESP ®
:
R ESP ®
is activated
R SPORT handling mode is activated
R ESP ®
is deactivated
ESP ®
is activated every time the engine is
switched on, regardless of whether ESP ®
was
deactivated before the engine was switched
off. G
WARNING
When SPORT handling mode is activated,
there is a greater risk of skidding and acci-
dents.
Only activate SPORT handling mode in the sit- uations described in the following. G
WARNING
If you deactivate ESP ®
, ESP ®
no longer sta-
bilises the vehicle. There is an increased risk
of skidding and an accident.
Only deactivate ESP ®
in the situations descri-
bed in the following.
In the following situations, it may be better to activate SPORT handling mode or deactivate
ESP ®
:
R when using snow chains
R in deep snow
R on sand or gravel
R on specially designated roads when the
vehicle's own oversteering and understeer-
ing characteristics are desired
Driving in SPORT handling mode or without
ESP ®
requires an extremely qualified and
experienced driver.
i Activate ESP ®
as soon as the situations
described above no longer apply. ESP ®
will 78
Driving safety systemsSafety
Page 82 of 421
otherwise not be able to stabilise the vehi-
cle if the vehicle starts to skid or a wheel
starts to spin.
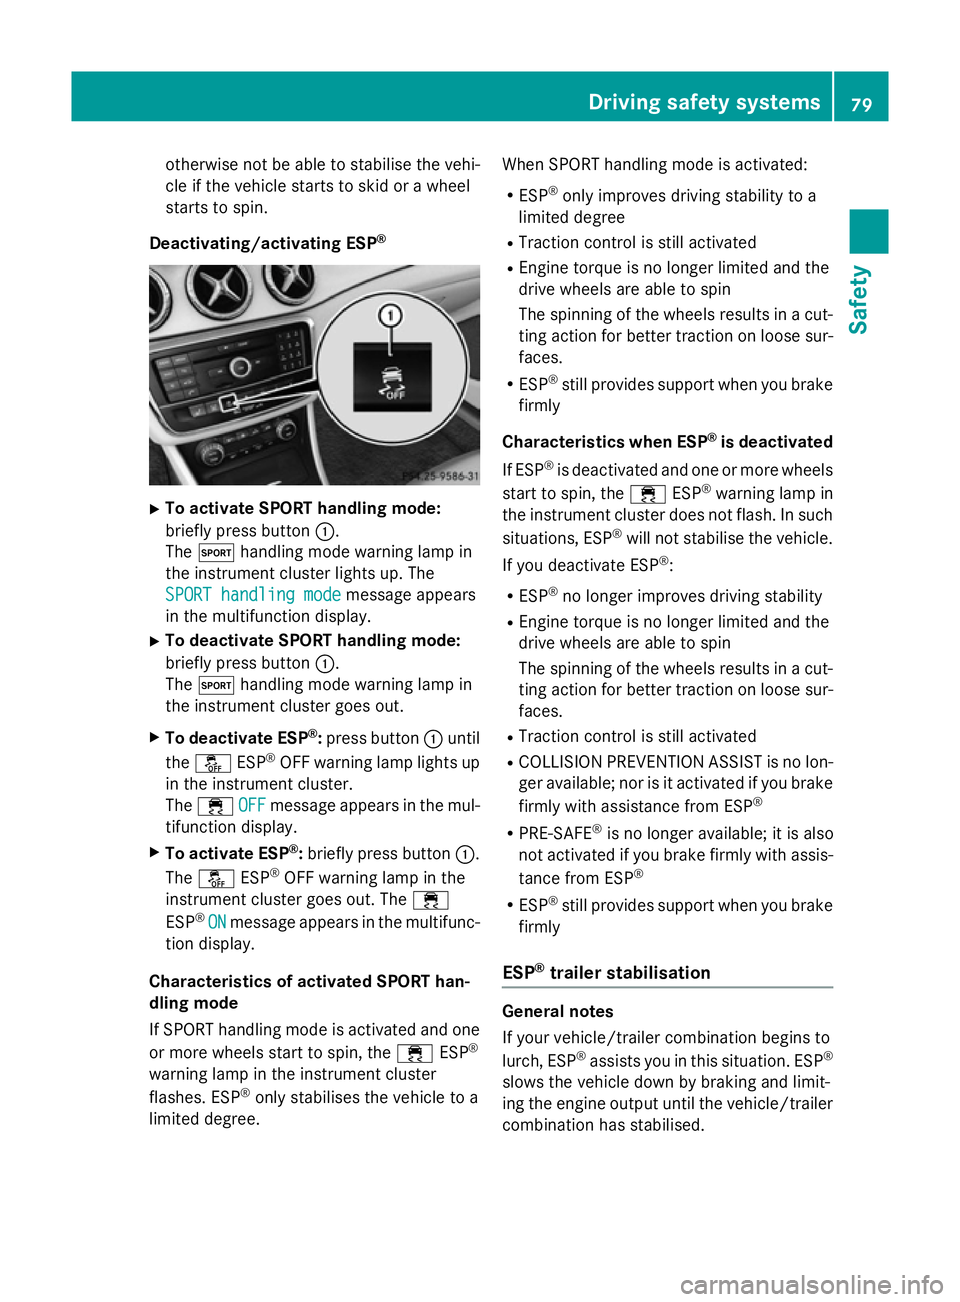
Deactivating/activating ESP ®X
To activate SPORT handling mode:
briefly press button :.
The M handling mode warning lamp in
the instrument cluster lights up. The
SPORT handling mode SPORT handling mode message appears
in the multifunction display.
X To deactivate SPORT handling mode:
briefly press button :.
The M handling mode warning lamp in
the instrument cluster goes out.
X To deactivate ESP ®
:press button :until
the å ESP®
OFF warning lamp lights up
in the instrument cluster.
The ÷ OFF
OFF message appears in the mul-
tifunction display.
X To activate ESP ®
:briefly press button :.
The å ESP®
OFF warning lamp in the
instrument cluster goes out. The ÷
ESP ®
ON
ON message appears in the multifunc-
tion display.
Characteristics of activated SPORT han-
dling mode
If SPORT handling mode is activated and one or more wheels start to spin, the ÷ESP®
warning lamp in the instrument cluster
flashes. ESP ®
only stabilises the vehicle to a
limited degree. When SPORT handling mode is activated:
R ESP ®
only improves driving stability to a
limited degree
R Traction control is still activated
R Engine torque is no longer limited and the
drive wheels are able to spin
The spinning of the wheels results in a cut-
ting action for better traction on loose sur-faces.
R ESP ®
still provides support when you brake
firmly
Characteristics when ESP ®
is deactivated
If ESP ®
is deactivated and one or more wheels
start to spin, the ÷ESP®
warning lamp in
the instrument cluster does not flash. In such
situations, ESP ®
will not stabilise the vehicle.
If you deactivate ESP ®
:
R ESP ®
no longer improves driving stability
R Engine torque is no longer limited and the
drive wheels are able to spin
The spinning of the wheels results in a cut-
ting action for better traction on loose sur- faces.
R Traction control is still activated
R COLLISION PREVENTION ASSIST is no lon-
ger available; nor is it activated if you brake
firmly with assistance from ESP ®
R PRE-SAFE ®
is no longer available; it is also
not activated if you brake firmly with assis-
tance from ESP ®
R ESP ®
still provides support when you brake
firmly
ESP ®
trailer stabilisation General notes
If your vehicle/trailer combination begins to
lurch, ESP
®
assists you in this situation. ESP ®
slows the vehicle down by braking and limit-
ing the engine output until the vehicle/trailer combination has stabilised. Driving safety systems
79Safety Z
Page 130 of 421
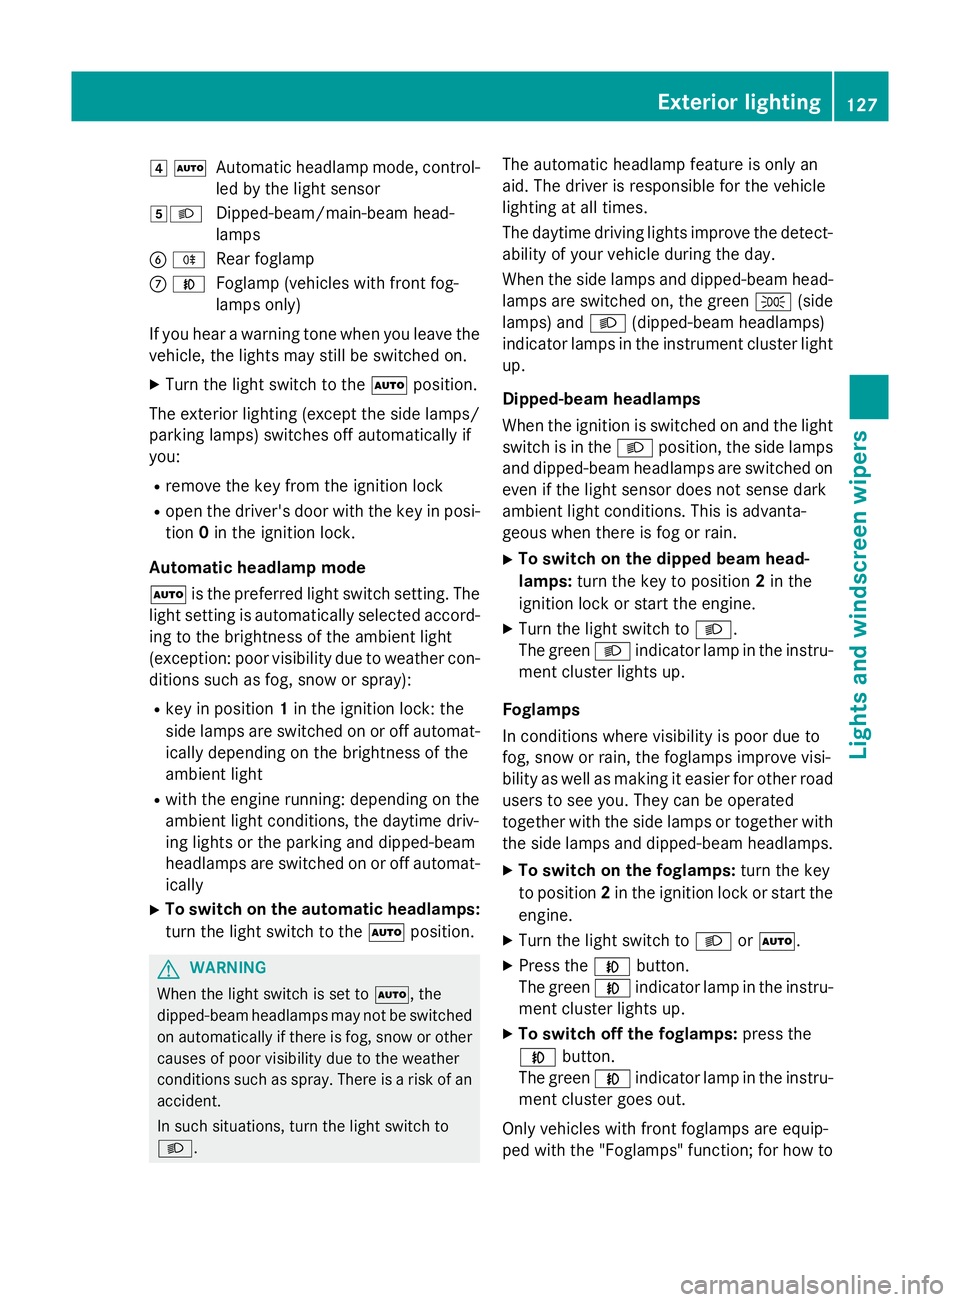
4
Ã
Automatic headlamp mode, control-
led by the light sensor
5L Dipped-beam/main-beam head-
lamps
B R
Rear foglamp
C N
Foglamp (vehicles with front fog-
lamps only)
If you hear a warning tone when you leave the
vehicle, the lights may still be switched on.
X Turn the light switch to the Ãposition.
The exterior lighting (except the side lamps/
parking lamps) switches off automatically if
you:
R remove the key from the ignition lock
R open the driver's door with the key in posi-
tion 0in the ignition lock.
Automatic headlamp mode
à is the preferred light switch setting. The
light setting is automatically selected accord- ing to the brightness of the ambient light
(exception: poor visibility due to weather con-
ditions such as fog, snow or spray):
R key in position 1in the ignition lock: the
side lamps are switched on or off automat- ically depending on the brightness of the
ambient light
R with the engine running: depending on the
ambient light conditions, the daytime driv-
ing lights or the parking and dipped-beam
headlamps are switched on or off automat- ically
X To switch on the automatic headlamps:
turn the light switch to the Ãposition. G
WARNING
When the light switch is set to Ã, the
dipped-beam headlamps may not be switched on automatically if there is fog, snow or othercauses of poor visibility due to the weather
conditions such as spray. There is a risk of an
accident.
In such situations, turn the light switch to
L. The automatic headlamp feature is only an
aid. The driver is responsible for the vehicle
lighting at all times.
The daytime driving lights improve the detect-
ability of your vehicle during the day.
When the side lamps and dipped-beam head-lamps are switched on, the green T(side
lamps) and L(dipped-beam headlamps)
indicator lamps in the instrument cluster light
up.
Dipped-beam headlamps
When the ignition is switched on and the light
switch is in the Lposition, the side lamps
and dipped-beam headlamps are switched on even if the light sensor does not sense dark
ambient light conditions. This is advanta-
geous when there is fog or rain.
X To switch on the dipped beam head-
lamps: turn the key to position 2in the
ignition lock or start the engine.
X Turn the light switch to L.
The green Lindicator lamp in the instru-
ment cluster lights up.
Foglamps
In conditions where visibility is poor due to
fog, snow or rain, the foglamps improve visi-
bility as well as making it easier for other road
users to see you. They can be operated
together with the side lamps or together with the side lamps and dipped-beam headlamps.
X To switch on the foglamps: turn the key
to position 2in the ignition lock or start the
engine.
X Turn the light switch to LorÃ.
X Press the Nbutton.
The green Nindicator lamp in the instru-
ment cluster lights up.
X To switch off the foglamps: press the
N button.
The green Nindicator lamp in the instru-
ment cluster goes out.
Only vehicles with front foglamps are equip-
ped with the "Foglamps" function; for how to Exterior lighting
127Lights andwindscreen wipers Z
Page 131 of 421
operate the foglamps on vehicles with the
Intelligent Light System (Y page 131).
Rear foglamp
The rear foglamp improves the visibility of
your vehicle in heavy fog for the following
traffic. Please observe the country-specific
laws on the use of rear foglamps.
X To switch on the rear foglamp: turn the
key to position 2in the ignition lock or start
the engine.
X Turn the light switch to LorÃ.
X Press the Rbutton.
The yellow Rindicator lamp in the
instrument cluster lights up.
X To switch off the rear foglamp: press the
R button.
The yellow Rindicator lamp in the
instrument cluster goes out.
i When the rear foglamp is switched on, the
centre brake lamp in the tail lamp switches off due to a legal requirement.
Side lamps ! If the battery has been excessively dis-
charged, the side lamps or parking lamps
are automatically switched off to enable
the next engine start. Always park your
vehicle safely and sufficiently lit according
to legal standards. Avoid the continuous
use of the Tside lamps for several
hours. If possible, switch on the Xright
or the Wleft parking lamp.
X To switch on: turn the light switch to T.
The green Tindicator lamp in the instru-
ment cluster lights up.
Parking lamps
Switching on the parking lamps ensures that
the corresponding side of the vehicle is illu-
minated. X
To switch on the parking lamps: the key
should not be in the ignition lock or it
should be in position 0.
X Turn the light switch to W(left-hand side
of the vehicle) or X(right-hand side of
the vehicle).
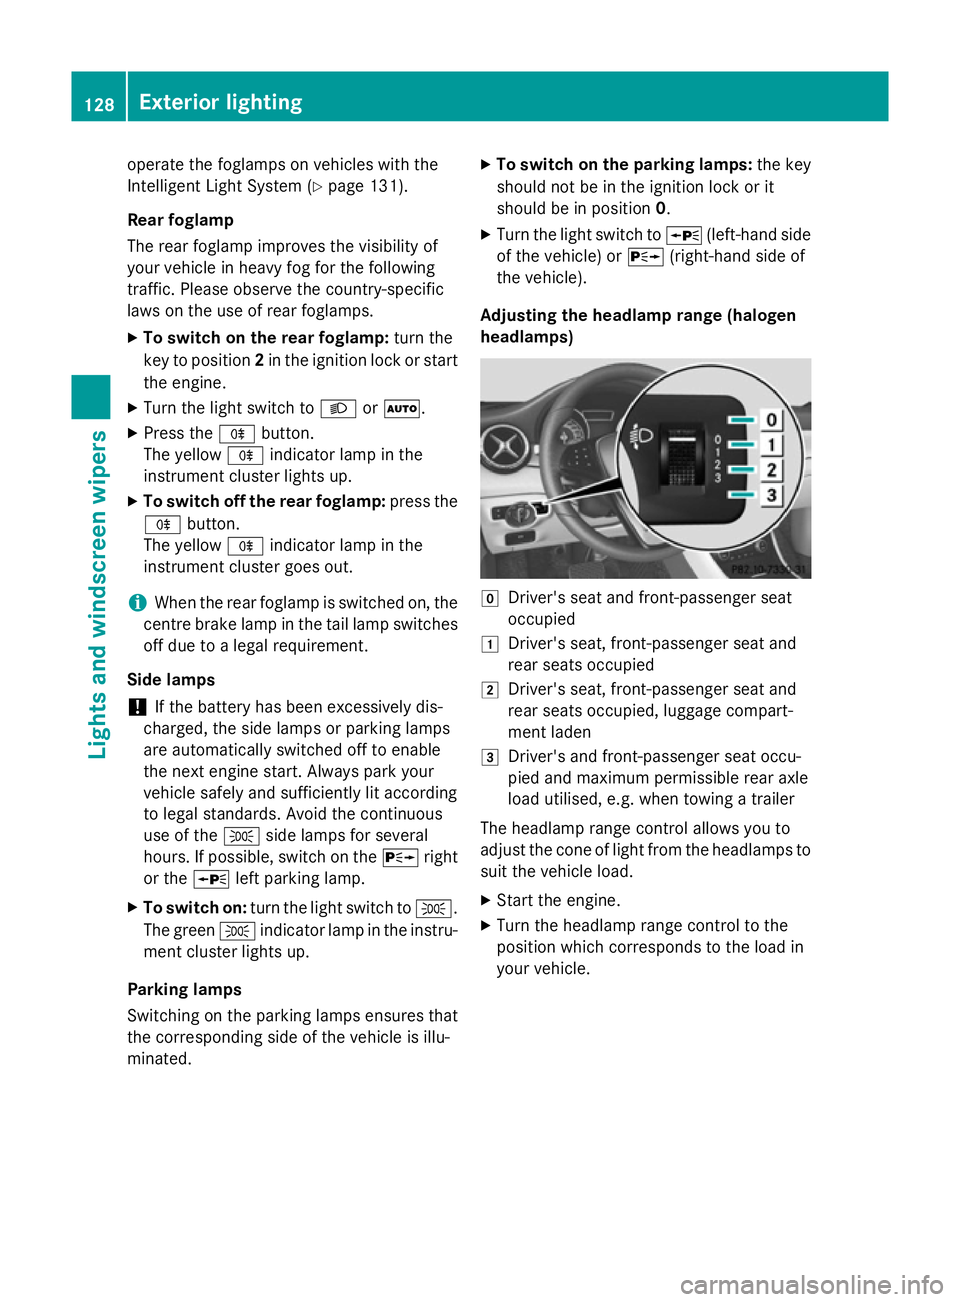
Adjusting the headlamp range (halogen
headlamps) g
Driver's seat and front-passenger seat
occupied
1 Driver's seat, front-passenger seat and
rear seats occupied
2 Driver's seat, front-passenger seat and
rear seats occupied, luggage compart-
ment laden
3 Driver's and front-passenger seat occu-
pied and maximum permissible rear axle
load utilised, e.g. when towing a trailer
The headlamp range control allows you to
adjust the cone of light from the headlamps to suit the vehicle load.
X Start the engine.
X Turn the headlamp range control to the
position which corresponds to the load in
your vehicle. 128
Exterior lightingLights and windscreen wipers
Page 135 of 421

Important safety notes
G
WARNING
Adaptive Highbeam Assist does not recognise road users:
R who have no lights, e.g. pedestrians
R who have poor lighting, e.g. cyclists
R whose lighting is blocked, e.g. by a barrier
In very rare cases, Adaptive Highbeam Assist
recognises road users too late or not at all. In
this, or in similar situations, the automatic
main-beam headlamps will not be deactivated
or activated regardless. There is a risk of an
accident.
Always carefully observe the traffic conditions and switch off the main-beam headlamps in
good time.
Adaptive Highbeam Assist cannot take into
account road, weather or traffic conditions.
Adaptive Highbeam Assist is only an aid. You
are responsible for adjusting the vehicle's
lighting to the prevailing light, visibility and
traffic conditions.
In particular, the detection of obstacles can
be restricted if there is:
R poor visibility, e.g. due to fog, heavy rain or
snow
R dirt on the sensors or if the sensors are
obscured
Switching Adaptive Highbeam Assist
on/off X
To switch on: turn the light switch to Ã.
X Press the combination switch beyond the
pressure point in the direction of arrow :.
The _ indicator lamp in the multifunc-
tion display lights up when it is dark and the
light sensor switches on the dipped-beam
headlamps.
If you are driving at speeds above 25 km/h:
The headlamp range is set automatically
depending on the distance between the
vehicle and other road users. If you are driving at speeds above approx-
imately 30 km/h and no other road users
are recognised:
The main-beam headlamps are switched on
automatically. The Kindicator lamp in
the instrument cluster also lights up.
If you are driving at speeds below 25 km/h
or other road users are recognised or the
roads are adequately lit:
The main-beam headlamps are switched off automatically. The Kindicator lamp in
the instrument cluster goes out. The _
indicator lamp in the multifunction display
remains lit.
X To deactivate: move the combination
switch back to its normal position.
The _ indicator lamp in the multifunc-
tion display goes out. Headlamps misted up on the inside
Certain climatic and physical conditions may
cause moisture to form in the headlamp. This
moisture does not affect the functionality of
the headlamp. Interior lighting
Overview of interior lighting
Front overhead control panel :
p Switches the left-hand front reading
lamp on/off
; c Switches the front interior lighting
on 132
Interior lightingLights and windscreen wipers
Page 141 of 421
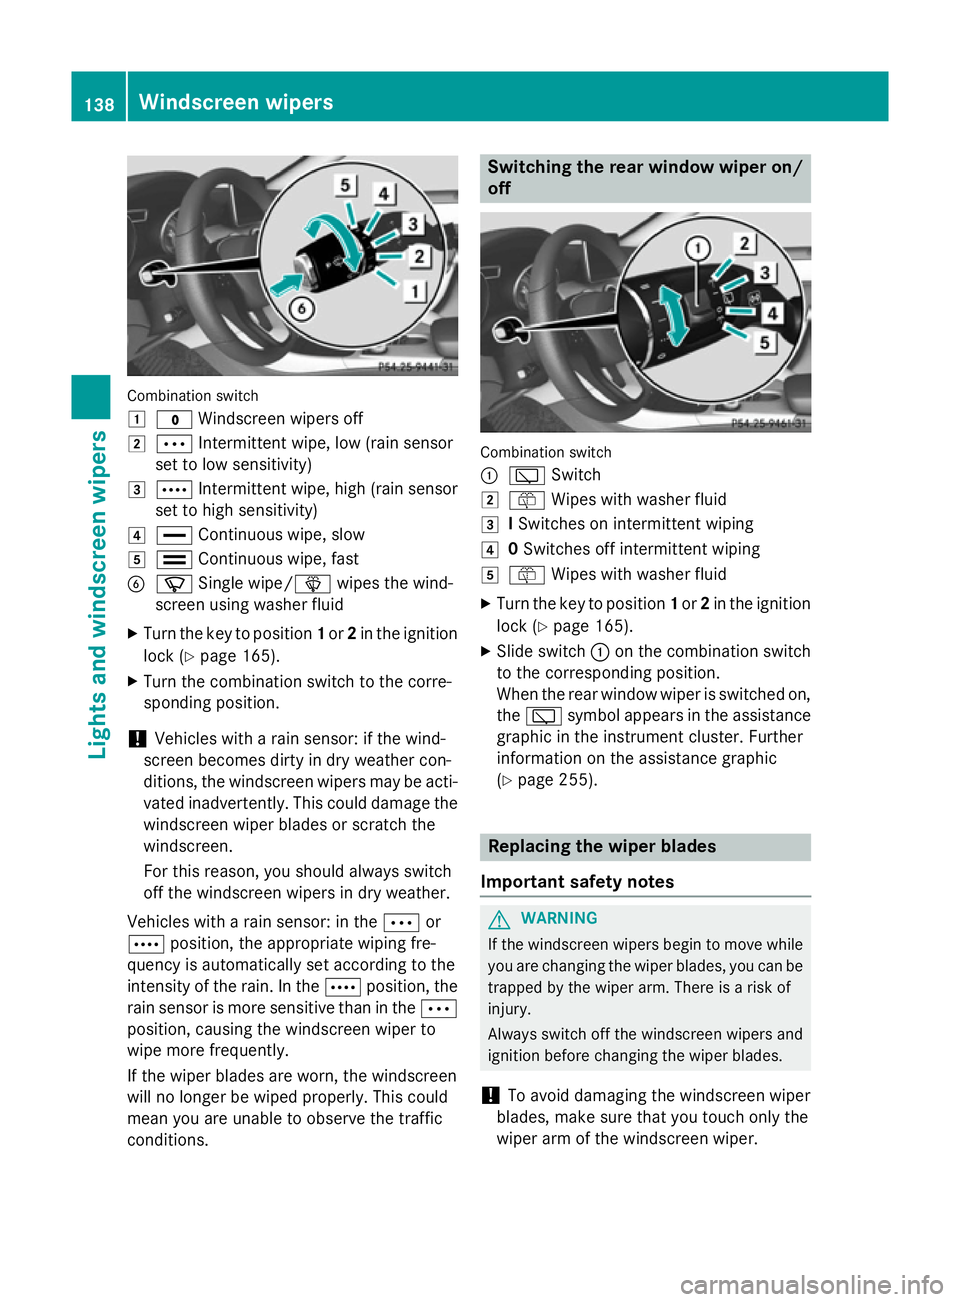
Combination switch
1
$ Windscreen wipers off
2 Ä Intermittent wipe, low (rain sensor
set to low sensitivity)
3 Å Intermittent wipe, high (rain sensor
set to high sensitivity)
4 ° Continuous wipe, slow
5 ¯ Continuous wipe, fast
B í Single wipe/ îwipes the wind-
screen using washer fluid
X Turn the key to position 1or 2in the ignition
lock (Y page 165).
X Turn the combination switch to the corre-
sponding position.
! Vehicles with a rain sensor: if the wind-
screen becomes dirty in dry weather con-
ditions, the windscreen wipers may be acti- vated inadvertently. This could damage the
windscreen wiper blades or scratch the
windscreen.
For this reason, you should always switch
off the windscreen wipers in dry weather.
Vehicles with a rain sensor: in the Äor
Å position, the appropriate wiping fre-
quency is automatically set according to the
intensity of the rain. In the Åposition, the
rain sensor is more sensitive than in the Ä
position, causing the windscreen wiper to
wipe more frequently.
If the wiper blades are worn, the windscreen
will no longer be wiped properly. This could
mean you are unable to observe the traffic
conditions. Switching the rear window wiper on/
off Combination switch
:
è Switch
2 ô Wipes with washer fluid
3 ISwitches on intermittent wiping
4 0Switches off intermittent wiping
5 ô Wipes with washer fluid
X Turn the key to position 1or 2in the ignition
lock (Y page 165).
X Slide switch :on the combination switch
to the corresponding position.
When the rear window wiper is switched on,
the è symbol appears in the assistance
graphic in the instrument cluster. Further
information on the assistance graphic
(Y page 255). Replacing the wiper blades
Important safety notes G
WARNING
If the windscreen wipers begin to move while
you are changing the wiper blades, you can be trapped by the wiper arm. There is a risk of
injury.
Always switch off the windscreen wipers and
ignition before changing the wiper blades.
! To avoid damaging the windscreen wiper
blades, make sure that you touch only the
wiper arm of the windscreen wiper. 138
Windscreen wipersLights and windscreen wipers
Page 169 of 421
Pressing the Start/Stop button several times
in succession corresponds to the different
key positions in the ignition lock. Pre-requi-
site for this is that:
R you do not depress the brake pedal (vehi-
cles with automatic transmission)
R you do not depress the clutch pedal (vehi-
cles with manual transmission)
If you depress the brake pedal and press the
Start/Stop button, the engine starts immedi- ately (vehicles with automatic transmission).
If you depress the clutch pedal and press the
Start/Stop button, the engine starts immedi- ately (vehicles with manual transmission).
To start the vehicle without actively using the
key:
R the Start/Stop button must be inserted in
the ignition lock
R the key must be in the vehicle
R the vehicle must not be locked with the key
or KEYLESS-GO (Y page 87)
Do not keep the KEYLESS-GO key:
R with electronic devices, e.g. a mobile
phone or another key
R with metallic objects, e.g. coins or metal
film
R inside metallic objects, e.g. a metal case
This can affect the functionality of KEYLESS-
GO.
If you lock the vehicle with the key's remote
control or with KEYLESS-GO, after a short
time:
R you will not be able to switch on the ignition
with the Start/Stop button
R you will not be able to start the engine with
the Start/Stop button until the vehicle is
unlocked again
If you lock the vehicle centrally using the but- ton on the front door (Y page 94), you can
continue to start the engine with the Start/
Stop button.
The engine can be switched off while the vehi-
cle is in motion by pressing and holding the
Start/Stop button for three seconds. This function operates independently of the ECO
start/stop automatic engine switch-off func-
tion.
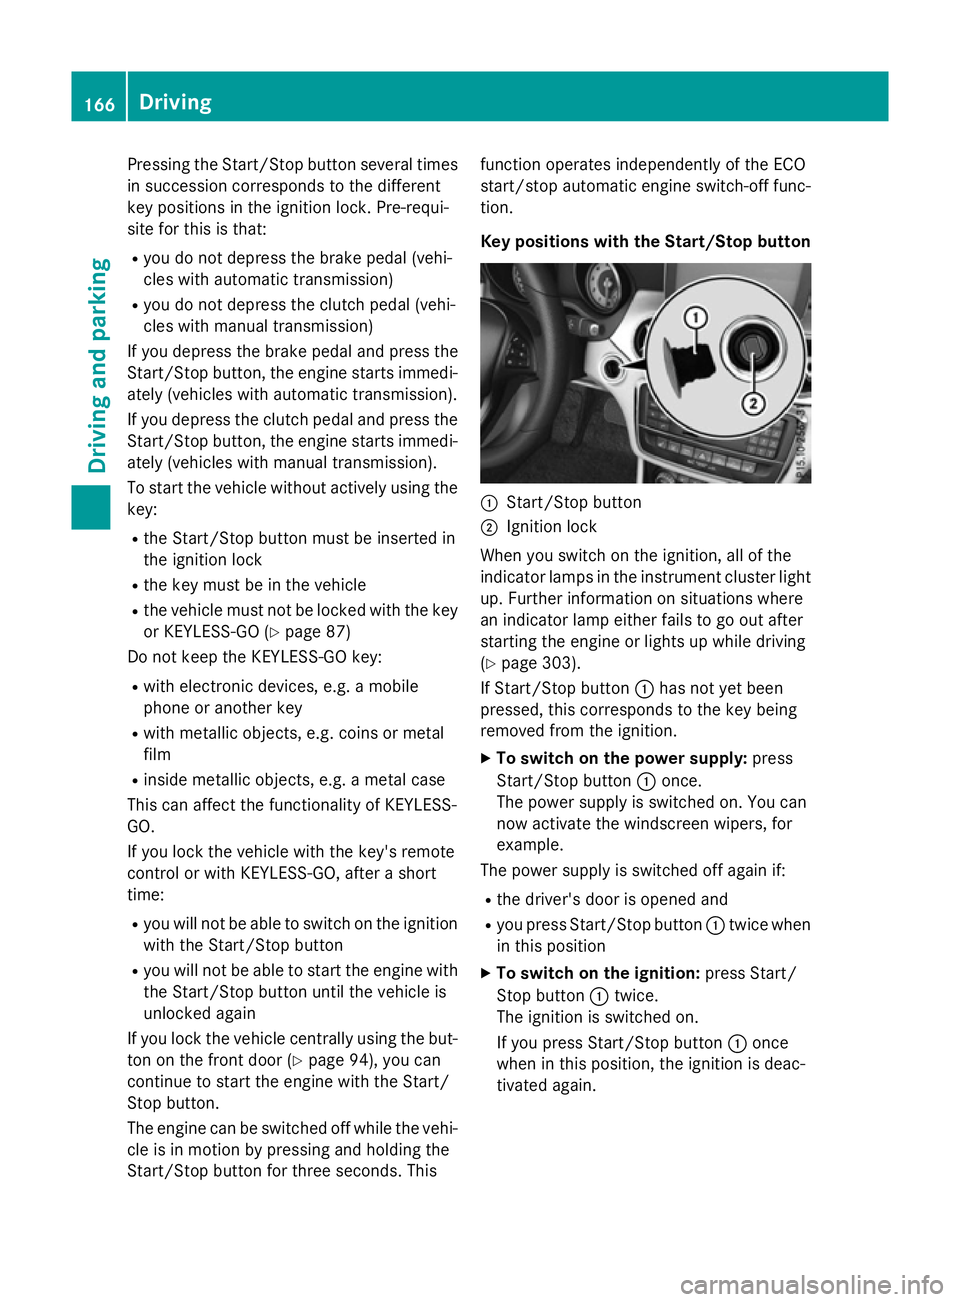
Key positions with the Start/Stop button
:
Start/Stop button
; Ignition lock
When you switch on the ignition, all of the
indicator lamps in the instrument cluster light up. Further information on situations where
an indicator lamp either fails to go out after
starting the engine or lights up while driving
(Y page 303).
If Start/Stop button :has not yet been
pressed, this corresponds to the key being
removed from the ignition.
X To switch on the power supply: press
Start/Stop button :once.
The power supply is switched on. You can
now activate the windscreen wipers, for
example.
The power supply is switched off again if:
R the driver's door is opened and
R you press Start/Stop button :twice when
in this position
X To switch on the ignition: press Start/
Stop button :twice.
The ignition is switched on.
If you press Start/Stop button :once
when in this position, the ignition is deac-
tivated again. 166
DrivingDriving and parking