2015 MERCEDES-BENZ B-CLASS SPORTS fuel pressure
[x] Cancel search: fuel pressurePage 18 of 346
Switching on/off........................... 106
Start/Stop button
Removing ....................................... 136
Starting the engine ........................ 138
Start/stop function
see ECO start/stop function
Starting (engine) ................................ 137
Status overview (on-board com- puter) .................................................. 201
STEER CONTROL .................................. 66
Steering (display message) .............. 233
Steering assistant STEER CON- TROL
see STEER CONTROL
Steering wheel
Adjusting (manually) ........................ 97
Button overview ............................... 31
Buttons (on-board computer) ......... 193
Cleaning ......................................... 280
Important safety notes .................... 97
Paddle shifters ............................... 147
Steering wheel paddle shifters ........ 147
Stowage compartments
Armrest (front) ............................... 250
Armrest (under) ............................. 250
Center console .............................. 249
Center console (rear) ..................... 250
Cup holders ................................... 259
Eyeglasses compartment ............... 249
Glove box ....................................... 249
Important safety information ......... 249
Map pockets .................................. 251
Stowage net ................................... 251
Under driver's seat/front-
passenger sea t.............................. 250
Stowage net ....................................... 251
Summer tires ..................................... 304
Sun visor ............................................ 261
Switching air-recirculation mode
on/off ................................................. 130
T
Tachometer ........................................ 193
Tail lamps
Display message ............................ 220
see Lights Tailgate
Display message ............................ 232
Emergency unlocking ....................... 80
Important safety notes .................... 79
Opening dimensions ...................... 341
Opening/closing (from outside) ....... 80
Tank content
Fuel gauge ....................................... 29
Technical data
Capacities ...................................... 335
Emergency spare wheel ................. 331
Information .................................... 334
Tires/wheels ................................. 326
Vehicle data ................................... 341
Telephone
Accepting a call (multifunction
steering wheel) .............................. 200
Display message ............................ 233
Introduction ................................... 200
Menu (on-board computer) ............ 200
Number from the phone book ........ 200
Redialing ........................................ 201
Rejecting/ending a call ................. 200
Temperature
Coolant .......................................... 192
Outside temperature ...................... 193
Setting (climate control )................ 126
Through-loading feature ................... 252
Tire pressure
Checking manually ........................ 309
Display message ............................ 229
Maximum ....................................... 308
Not reached (TIREFIT) .................... 288Note s............................................. 307
Reached (TIREFIT) .......................... 288
Recommended ............................... 305
Tire pressure loss warning system
General notes ................................ 309
Important safety notes .................. 309
Restarting ...................................... 309
TIREFIT kit .......................................... 286
Tires
Aspect ratio (definition) ................. 321
Average weight of the vehicle
occupants (definition) .................... 320
Bar (definition) ............................... 319
Changing a whee l.......................... 322
Characteristics .............................. 319
16Index
Page 22 of 346
Protection of the environment
General notes
HEnvironmental note
Daimler's declared policy is one of compre-
hensive environmental protection.
The objectives are for the natural resources
that form the basis of our existence on this
planet to be used sparingly and in a manner
that takes the requirements of both nature
and humanity into account.
You too can help to protect the environment
by operating your vehicle in an environmen-
tally responsible manner.
Fuel consumption and the rate of engine,
transmission, brake and tire wear are affected by these factors:
R operating conditions of your vehicle
R your personal driving style
You can influence both factors. You should
bear the following in mind:
Operating conditions:
R avoid short trips as these increase fuel con-
sumption.
R always make sure that the tire pressures
are correct.
R do not carry any unnecessary weight.
R remove roof racks once you no longer need
them.
R a regularly serviced vehicle will contribute
to environmental protection. You should
therefore adhere to the service intervals.
R always have service work carried out at a
qualified specialist workshop.
Personal driving style:
R do not depress the accelerator pedal when
starting the engine.
R do not warm up the engine when the vehicle
is stationary.
R drive carefully and maintain a safe distance
from the vehicle in front.
R avoid frequent, sudden acceleration andbraking.
R change gear in good time and use each gear
only up to Ôof its maximum engine speed.
R switch off the engine in stationary traffic.
R keep an eye on the vehicle's fuel consump-
tion.
Environmental concerns and recom-
mendations
Wherever the operating instructions require
you to dispose of materials, first try to regen-
erate or re-use them. Observe the relevant
environmental rules and regulations when
disposing of materials. In this way you will
help to protect the environment.
Genuine Mercedes-Benz parts
HEnvironmental note
Daimler AG also supplies reconditioned major
assemblies and parts which are of the same
quality as new parts. They are covered by the same Limited Warranty entitlements as newparts.
!Air bags and Emergency Tensioning Devi-
ces, as well as control units and sensors for these restraint systems, may be installed in
the following areas of your vehicle:
R doors
R door pillars
R door sills
R seats
R cockpit
R instrument cluster
R center console
Do not install accessories such as audio
systems in these areas. Do not carry out
repairs or welding. You could impair the
operating efficiency of the restraint sys-tems.
Have aftermarket accessories installed at a qualified specialist workshop.
20Introduction
Page 153 of 346
!Overfilling the fuel tank could damage the
fuel system.
!Take care not to spill any fuel on painted
surfaces. You could otherwise damage the
paintwork.
!Use a filter when refueling from a fuel can.
Otherwise, the fuel lines and/or injection
system could be blocked by particles from
the fuel can.
Do not get into the vehicle again during the
refueling process. Otherwise, electrostatic
charge could build up again.
If you overfill the fuel tank, fuel could spray
out when the fuel pump nozzle is removed.
For further information on fuel and fuel quality ( Y page 335).
Refueling
General information
The fuel filler flap is unlocked or locked auto- matically when you unlock or lock the vehicle
with the key.
The position of the fuel filler cap is displayed æ in the instrument cluster. The arrow on
the filling pump indicates the side of the vehi-
cle.
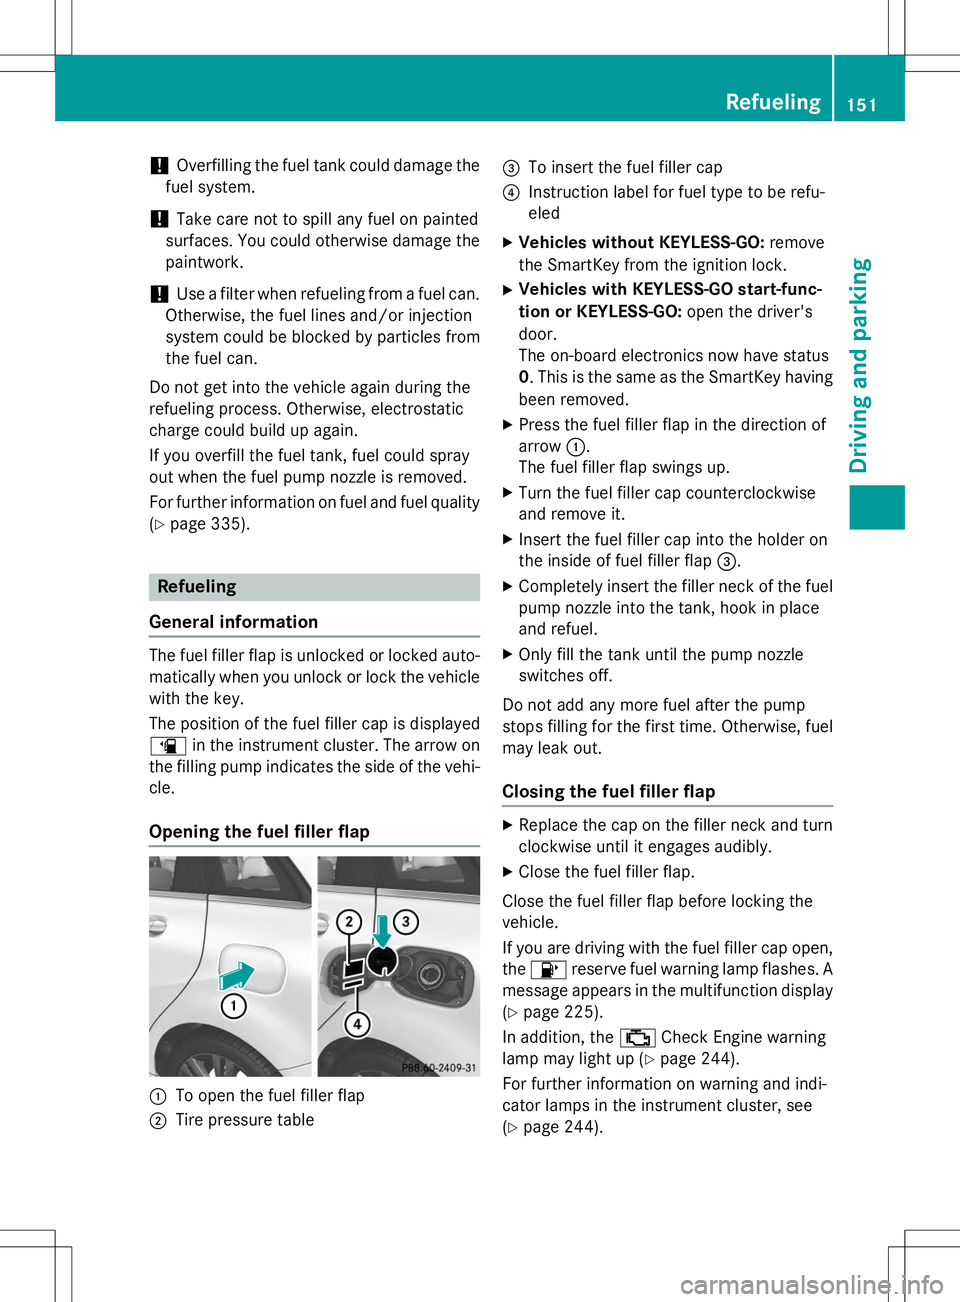
Opening the fuel filler flap
:To open the fuel filler flap
;Tire pressure table
=To insert the fuel filler cap
?Instruction label for fuel type to be refu- eled
X Vehicles without KEYLESS-GO: remove
the SmartKey from the ignition lock.
X Vehicles with KEYLESS-GO start-func-
tion or KEYLESS-GO: open the driver's
door.
The on-board electronics now have status0 . This is the same as the SmartKey having
been removed.
X Press the fuel filler flap in the direction ofarrow :.
The fuel filler flap swings up.
X Turn the fuel filler cap counterclockwise
and remove it.
X Insert the fuel filler cap into the holder on
the inside of fuel filler flap =.
X Completely insert the filler neck of the fuel
pump nozzle into the tank, hook in place
and refuel.
X Only fill the tank until the pump nozzle
switches off.
Do not add any more fuel after the pump
stops filling for the first time. Otherwise, fuel
may leak out.
Closing the fuel filler flap
X Replace the cap on the filler neck and turn
clockwise until it engages audibly.
X Close the fuel filler flap.
Close the fuel filler flap before locking the vehicle.
If you are driving with the fuel filler cap open, the 8 reserve fuel warning lamp flashes. A
message appears in the multifunction display
( Y page 225).
In addition, the ;Check Engine warning
lamp may light up ( Ypage 244).
For further information on warning and indi-
cator lamps in the instrument cluster, see( Y page 244).
Refueling151
Driving and parking
Z
Page 158 of 346
Drive sensibly – save fuel
Observe the following tips to save fuel:R The tires should always be inflated to the
recommended tire pressure.
R Remove unnecessary loads.
R Remove roof racks when they are not nee-ded.
R Warm up the engine at low engine speeds.
R Avoid frequent acceleration or braking.
R Have all maintenance work carried out as
indicated by the service intervals in the
Maintenance Booklet or by the service
interval display.
Fuel consumption also increases when driv-
ing in cold weather, in stop-start traffic and in
hilly terrain.
Drinking and driving
GWARNING
Drinking and driving and/or taking drugs and driving are very dangerous combinations.
Even a small amount of alcohol or drugs can
affect your reflexes, perceptions and judg-
ment.
The possibility of a serious or even fatal acci-
dent is greatly increased when you drink or
take drugs and drive.
Do not drink or take drugs and drive or allow
anyone to drive who has been drinking or tak-
ing drugs.
Emission control
GWARNING
Combustion engines emit poisonous exhaust
gases such as carbon monoxide. Inhaling
these exhaust gases leads to poisoning. There is a risk of fatal injury. Therefore never leave
the engine running in enclosed spaces with-
out sufficient ventilation.
Certain engine systems are designed to keep
the level of poisonous components in exhaust
fumes within legal limits. These systems only work at peak efficiency if
they are serviced exactly in accordance with
the manufacturer's specifications. For this
reason, only have work on the engine carried
out by qualified and authorized Mercedes-
Benz technicians.
The engine settings must not be changed
under any circumstances. Furthermore, all
specific service work must be carried out at
regular intervals and in accordance with the
Mercedes-Benz service requirements. Details
can be found in the Maintenance Booklet.
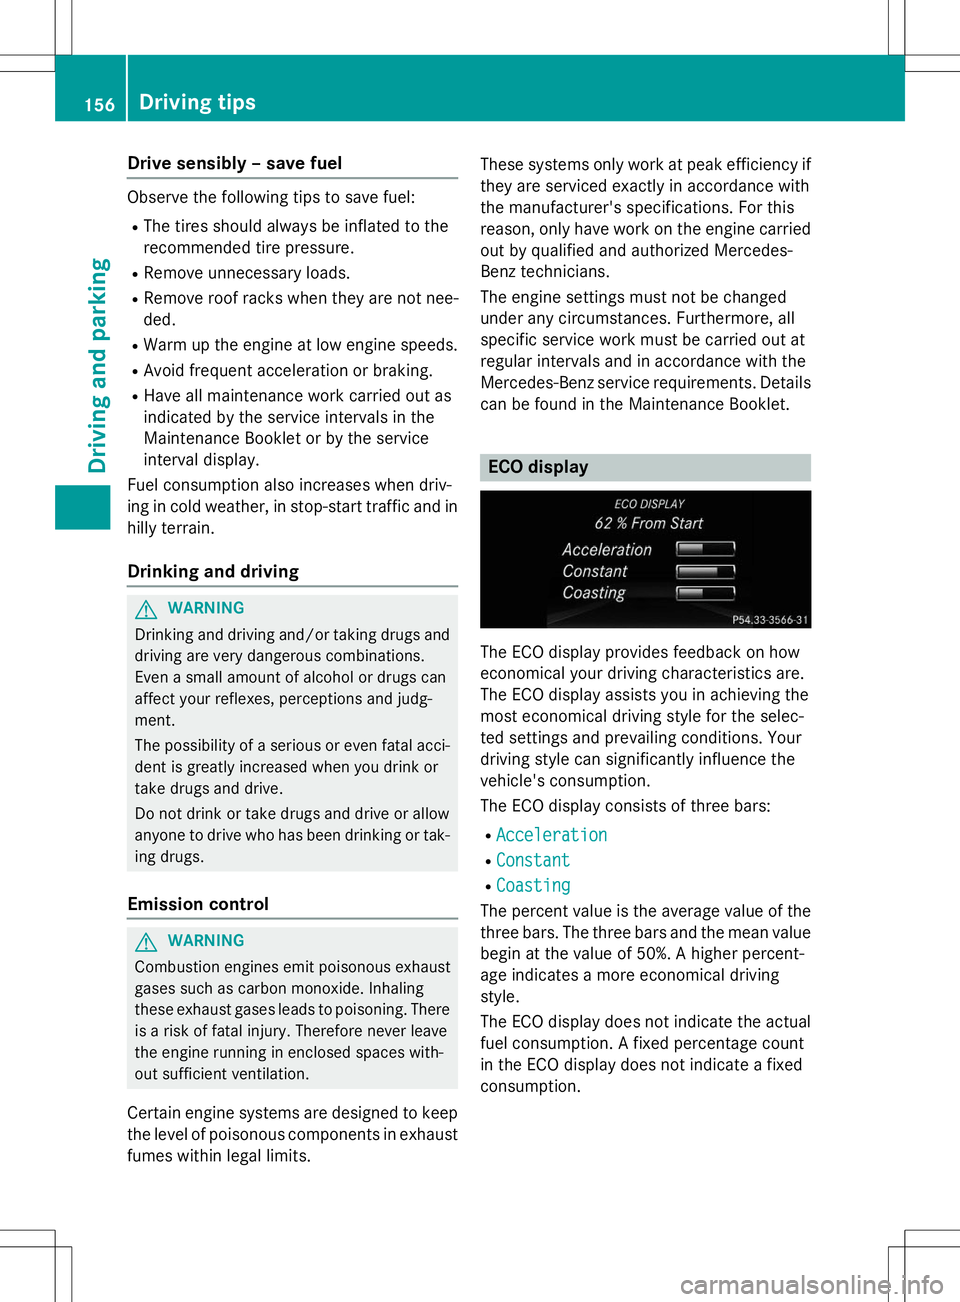
ECO display
The ECO display provides feedback on how
economical your driving characteristics are.
The ECO display assists you in achieving the
most economical driving style for the selec-
ted settings and prevailing conditions. Your
driving style can significantly influence the
vehicle's consumption.
The ECO display consists of three bars: R
Acceleration
RConstant
RCoasting
The percent value is the average value of the three bars. The three bars and the mean value
begin at the value of 50%. A higher percent-
age indicates a more economical driving
style.
The ECO display does not indicate the actual fuel consumption. A fixed percentage count
in the ECO display does not indicate a fixed
consumption.
156Driving tips
Driving and pa rking
Page 206 of 346
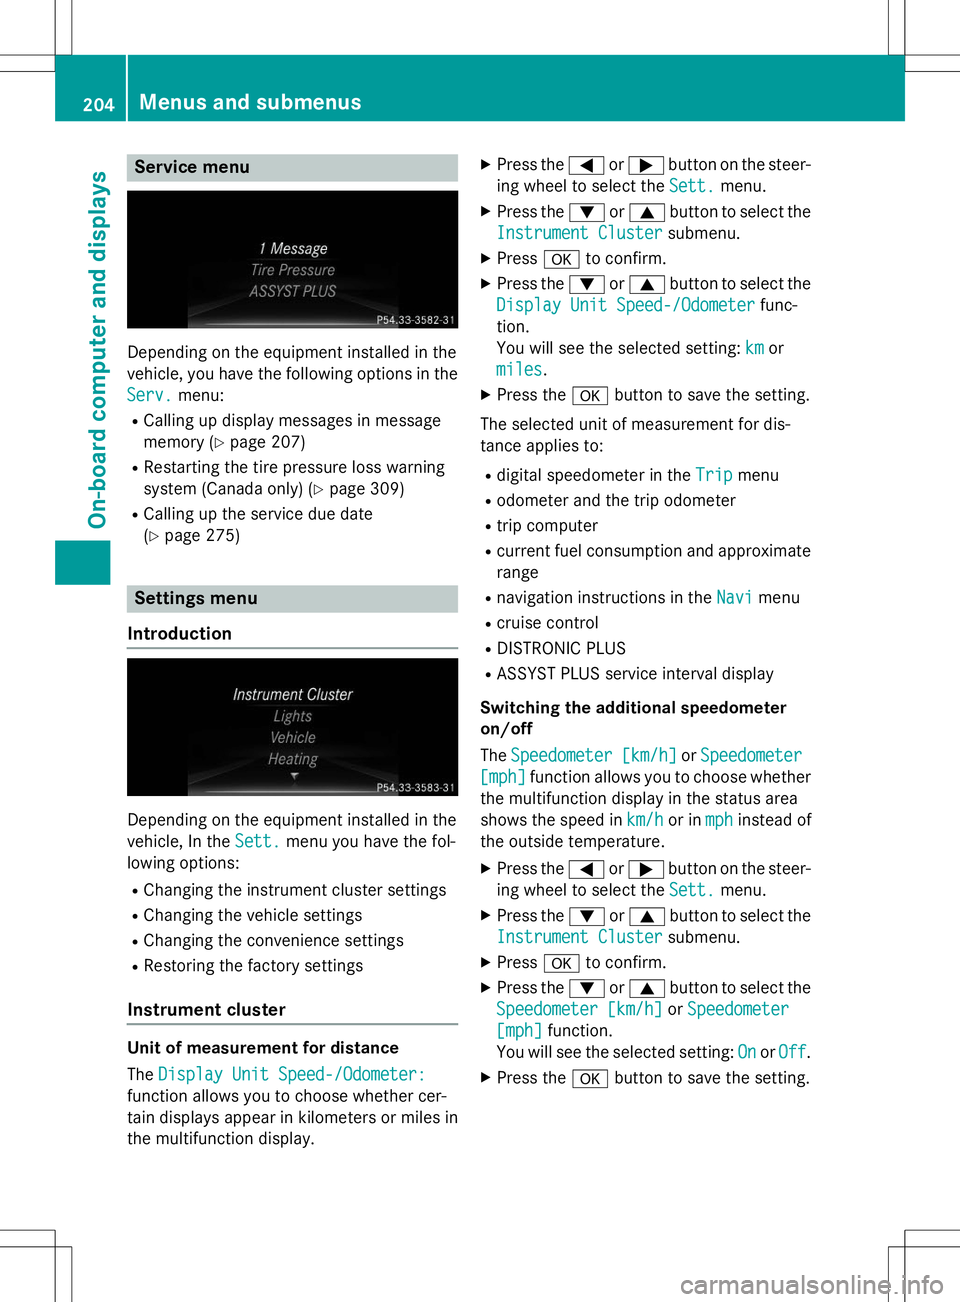
Service menu
Depending on the equipment installed in the
vehicle, you have the following options in the
Serv.menu:
R Calling up display messages in message
memory ( Ypage 207)
R Restarting the tire pressure loss warning
system (Canada only) ( Ypage 309)
R Calling up the service due date(Y page 275)
Settings menu
Introduction
Depending on the equipment installed in the
vehicle, In the
Sett.menu you have the fol-
lowing options:
R Changing the instrument cluster settings
R Changing the vehicle settings
R Changing the convenience settings
R Restoring the factory settings
Instrument cluster
Unit of measurement for distance The
Display Unit Speed-/Odometer:
function allows you to choose whether cer-
tain displays appear in kilometers or miles in
the multifunction display. X
Press the =or; button on the steer-
ing wheel to select the
Sett.menu.
X Press the :or9 button to select the
Instrument Clustersubmenu.
X Press ato confirm.
X Press the :or9 button to select the
Display Unit Speed-/Odometerfunc-
tion.
You will see the selected setting:
kmor
miles.
X Press the abutton to save the setting.
The selected unit of measurement for dis-
tance applies to: R digital speedometer in the
Tripmenu
R odometer and the trip odometer
R trip computer
R current fuel consumption and approximate
range
R navigation instructions in the
Navimenu
R cruise control
R DISTRONIC PLUS
R ASSYST PLUS service interval display
Switching the additional speedometer on/off The
Speedometer [km/h]orSpeedometer
[mph]function allows you to choose whether
the multifunction display in the status area
shows the speed in
km/hor inmphinstead of
the outside temperature.
X Press the =or; button on the steer-
ing wheel to select the
Sett.menu.
X Press the :or9 button to select the
Instrument Clustersubmenu.
X Press ato confirm.
X Press the :or9 button to select the
Speedometer [km/h]orSpeedometer
[mph]function.
You will see the selected setting:
OnorOff.
X Press the abutton to save the setting.
204Menus and submenus
On-board computer and displays
Page 227 of 346
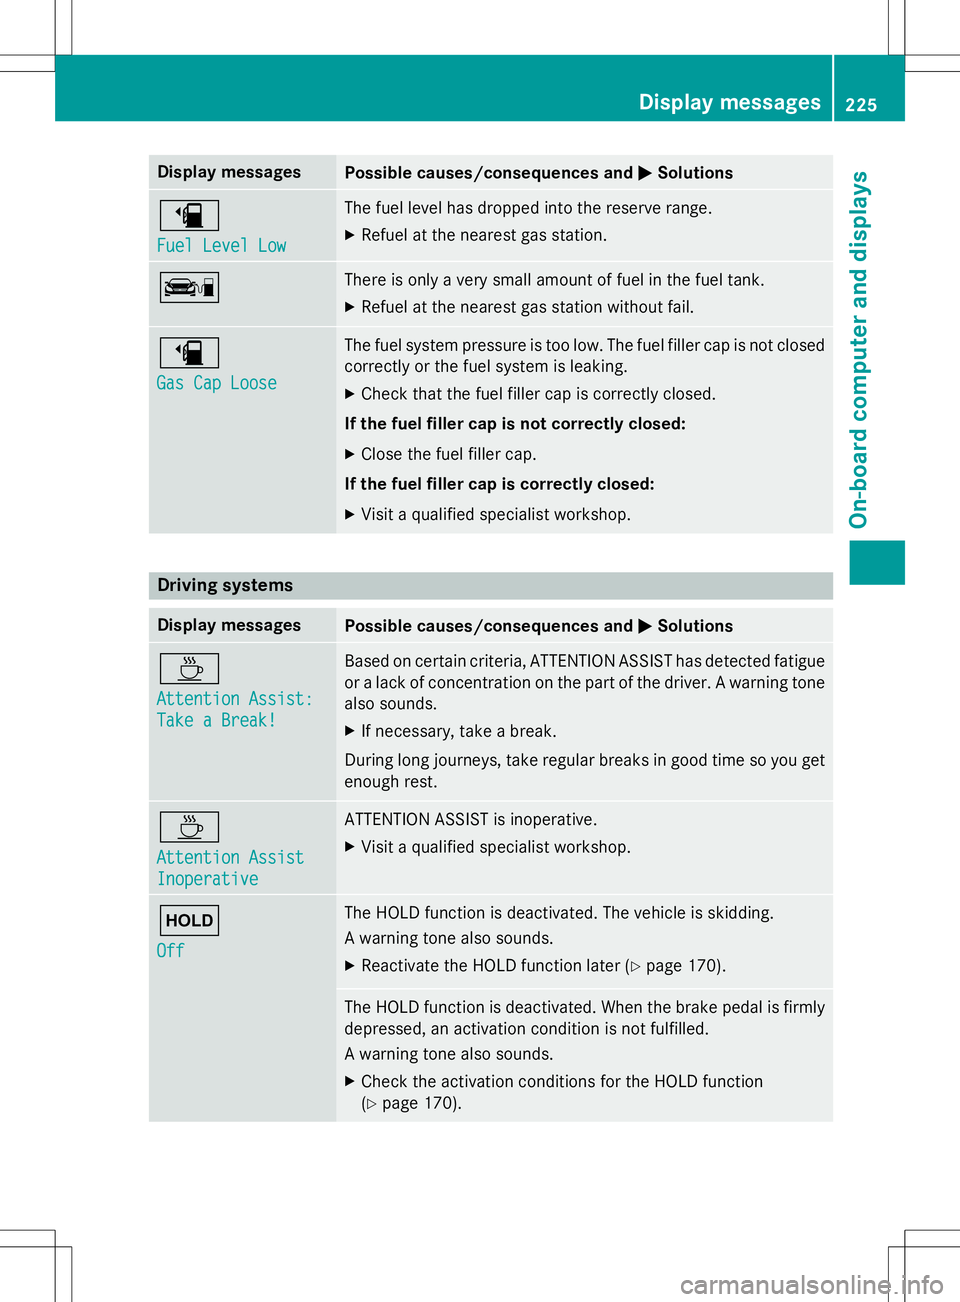
Display messagesPossible causes/consequences andMSolutions
æ
Fuel Level Low
The fuel level has dropped into the reserve range.
X Refuel at the nearest gas station.
çThere is only a very small amount of fuel in the fuel tank.
X Refuel at the nearest gas station without fail.
æ
Gas Cap Loose
The fuel system pressure is too low. The fuel filler cap is not closed
correctly or the fuel system is leaking.
X Check that the fuel filler cap is correctly closed.
If the fuel filler cap is not correctly closed: X Close the fuel filler cap.
If the fuel filler cap is correctly closed: X Visit a qualified specialist workshop.
Driving systems
Display messagesPossible causes/consequences and MSolutions
À
Attention Assist:
Take a Break!
Based on certain criteria, ATTENTION ASSIST has detected fatigue
or a lack of concentration on the part of the driver. A warning tone also sounds.
X If necessary, take a break.
During long journeys, take regular breaks in good time so you get enough rest.
À
Attention Assist
Inoperative
ATTENTION ASSIST is inoperative.
X Visit a qualified specialist workshop.
ë
Off
The HOLD function is deactivated. The vehicle is skidding.
A warning tone also sounds.
X Reactivate the HOLD function later ( Ypage 170).
The HOLD function is deactivated. When the brake pedal is firmly
depressed, an activation condition is not fulfilled.
A warning tone also sounds.
X Check the activation conditions for the HOLD function (Y page 170).
Display messages225
On-board computer and displays
Z
Page 246 of 346
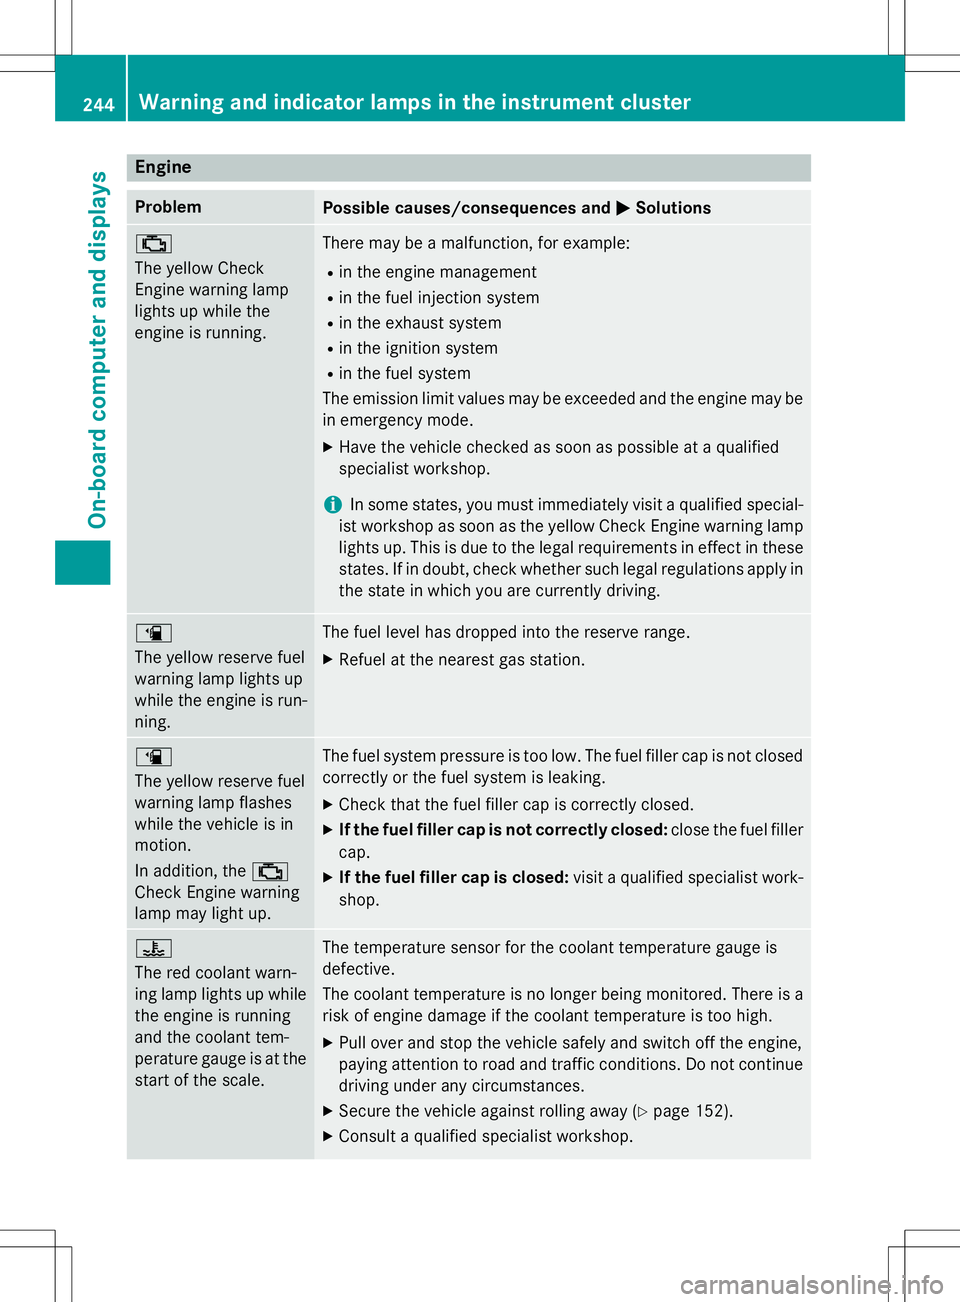
Engine
ProblemPossible causes/consequences andMSolutions
;
The yellow Check
Engine warning lamp
lights up while the
engine is running.There may be a malfunction, for example:
R in the engine management
R in the fuel injection system
R in the exhaust system
R in the ignition system
R in the fuel system
The emission limit values may be exceeded and the engine may be
in emergency mode.
X Have the vehicle checked as soon as possible at a qualified
specialist workshop.
iIn some states, you must immediately visit a qualified special-
ist workshop as soon as the yellow Check Engine warning lamp
lights up. This is due to the legal requirements in effect in these
states. If in doubt, check whether such legal regulations apply in the state in which you are currently driving.
æ
The yellow reserve fuel
warning lamp lights up
while the engine is run-
ning.The fuel level has dropped into the reserve range.
X Refuel at the nearest gas station.
æ
The yellow reserve fuel
warning lamp flashes
while the vehicle is in
motion.
In addition, the ;
Check Engine warning
lamp may light up.The fuel system pressure is too low. The fuel filler cap is not closed
correctly or the fuel system is leaking.
X Check that the fuel filler cap is correctly closed.
X If the fuel filler cap is not correctly closed: close the fuel filler
cap.
X If the fuel filler cap is closed: visit a qualified specialist work-
shop.
?
The red coolant warn-
ing lamp lights up while
the engine is running
and the coolant tem-
perature gauge is at the start of the scale.The temperature sensor for the coolant temperature gauge is
defective.
The coolant temperature is no longer being monitored. There is arisk of engine damage if the coolant temperature is too high.
X Pull over and stop the vehicle safely and switch off the engine,
paying attention to road and traffic conditions. Do not continue
driving under any circumstances.
X Secure the vehicle against rolling away ( Ypage 152).
X Consult a qualified specialist workshop.
244Warning and indicator lamps in the instrument cluster
On-board computer and displays
Page 291 of 346
XCorrect the tire pressure if it is still at least
130 kP a(1.3 bar/19 psi). See the Tire and
Loading Information placard on the driver's side B-pilla ror the tire pressure table in the
fuel filler flap for values.
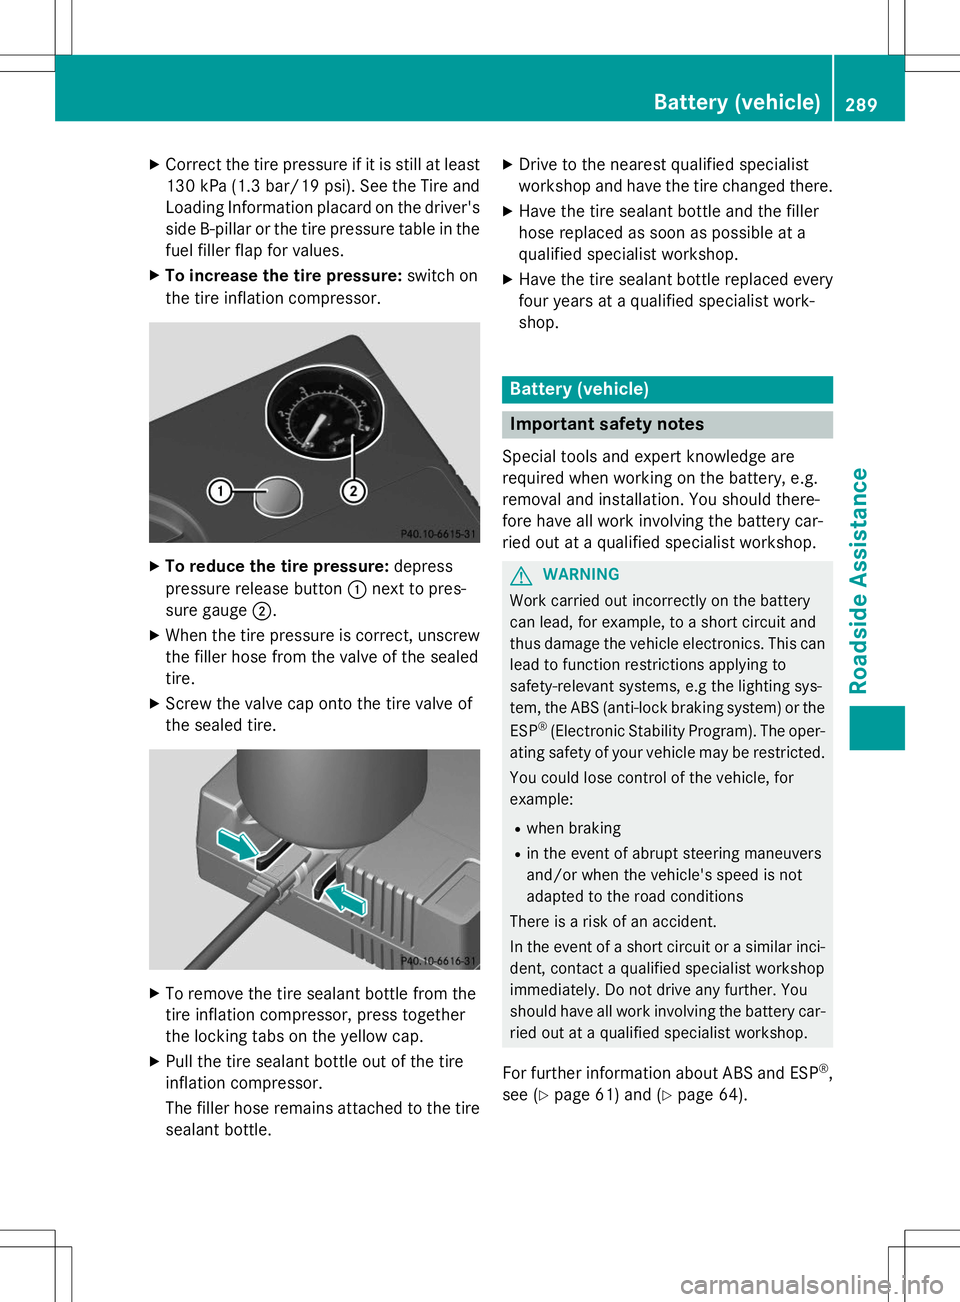
X To increase the tire pressure: switch on
the tire inflation compressor.
X To reduce the tire pressure: depress
pressure release button :next to pres-
sure gauge ;.
X When the tire pressure is correct, unscrew
the filler hose from the valve of the sealed tire.
X Screw the valve cap onto the tire valve of
the sealed tire.
XTo remove the tire sealant bottle from the
tire inflation compressor, press together
the locking tabs on the yellow cap.
X Pull the tire sealant bottle out of the tire
inflation compressor.
The filler hose remains attached to the tire
sealant bottle. X
Drive to the nearest qualified specialist
workshop and have the tire changed there.
X Have the tire sealant bottle and the filler
hose replaced as soon as possible at a
qualified specialist workshop.
X Have the tire sealant bottle replaced every
four years at a qualified specialist work-shop.
Battery (vehicle)
Important safety notes
Special tools and expert knowledge are
required when working on the battery, e.g.
removal and installation. You should there-
fore have all work involving the battery car-
ried out at a qualified specialist workshop.
GWARNING
Work carried out incorrectly on the battery
can lead, for example, to a short circuit and
thus damage the vehicle electronics. This can lead to function restrictions applying to
safety-relevant systems, e.g the lighting sys-
tem, the ABS (anti-lock braking system) or the
ESP ®
(Electronic Stability Program). The oper-
ating safety of your vehicle may be restricted.
You could lose control of the vehicle, for
example:
R when braking
R in the event of abrupt steering maneuvers
and/or when the vehicle's speed is not
adapted to the road conditions
There is a risk of an accident.
In the event of a short circuit or a similar inci-
dent, contact a qualified specialist workshop
immediately. Do not drive any further. You
should have all work involving the battery car- ried out at a qualified specialist workshop.
For further information about ABS and ESP ®
,
see ( Ypage 61) and ( Ypage 64).
Battery (vehicle)289
Roadside Assistance
Z