2015 MERCEDES-BENZ B-CLASS SPORTS warning light
[x] Cancel search: warning lightPage 133 of 346
Switching on/off
XTurn the key to position 0in the ignition
lock or remove it ( Ypage 135).
X To activate: press theÌbutton.
The indicator lamp in the Ìbutton lights
up.
X To deactivate: press theÌbutton.
The indicator lamp in the Ìbutton goes
out.
iResidual heat is deactivated automati-
cally:
R after approximately 30 minutes
R when the ignition is switched on
R if the battery voltage drops
Air vents
Important safety notes
GWARNING
Very hot or very cold air can flow from the air
vents. This could result in burns or frostbite in the immediate vicinity of the air vents. There
is a risk of injury.
Make sure that all vehicle occupants always
maintain a sufficient distance to the air out-
lets. If necessary, redirect the airflow to
another area of the vehicle interior.
In order to ensure the direct flow of fresh air
through the air vents into the vehicle interior,
please observe the following notes:
R keep the air inlet between the windshield
and the hood free of blockages, such as ice,
snow or leaves.
R never cover the air vents or air intake grilles
in the vehicle interior.
iYou can move the adjusters for the air
vents vertically or horizontally to set the
direction of the airflow.
iFor optimal climate control in the vehicle,
open the air vents completely and set the
adjusters to the central position.
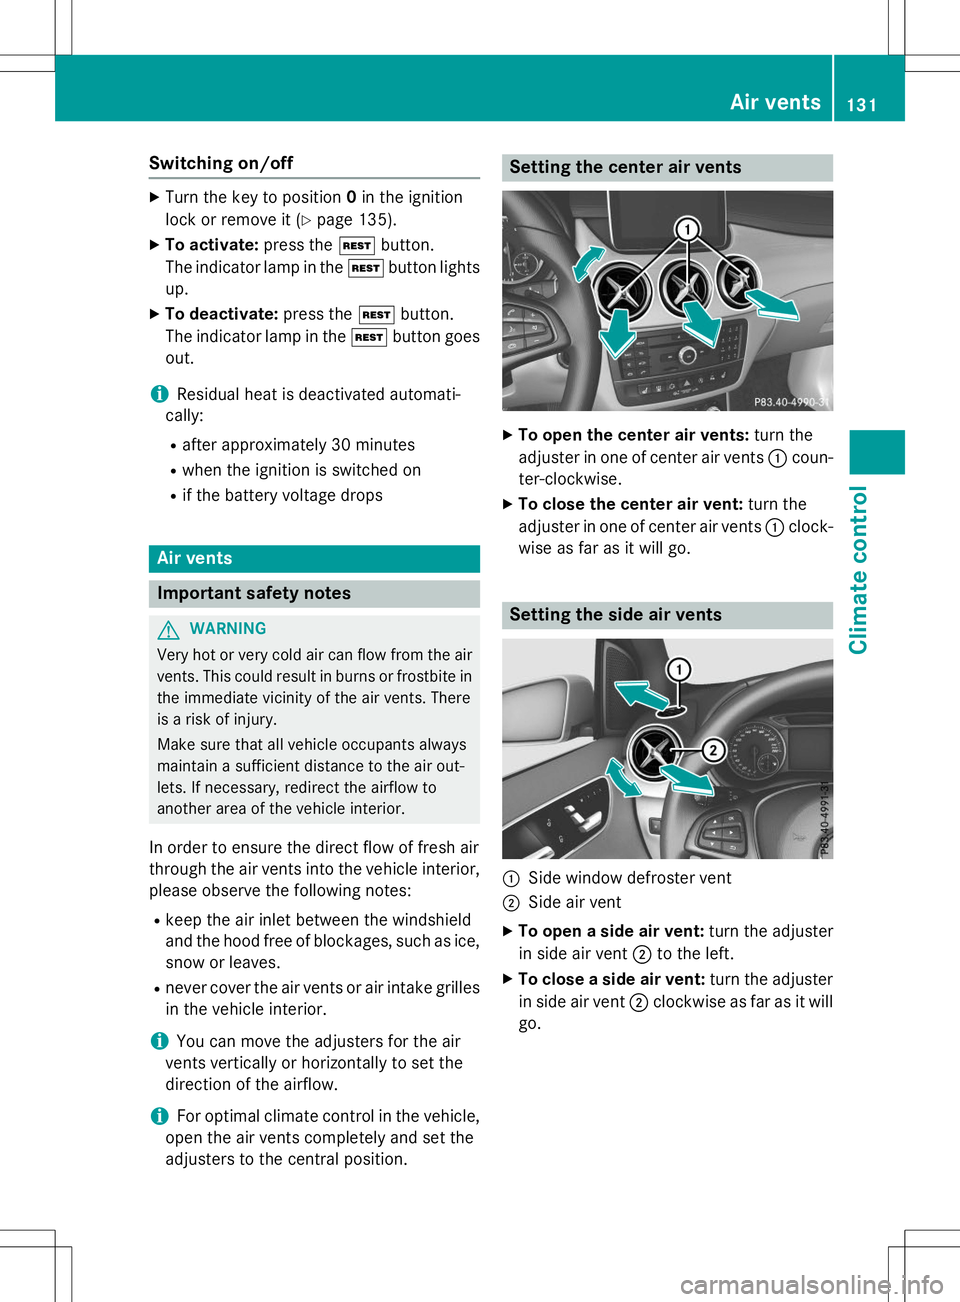
Setting the center air vents
X To open the center air vents: turn the
adjuster in one of center air vents :coun-
ter-clockwise.
X To close the center air vent: turn the
adjuster in one of center air vents :clock-
wise as far as it will go.
Setting the side air vents
:Side window defroster vent
;Side air vent
X To open a side air vent: turn the adjuster
in side air vent ;to the left.
X To close a side air vent: turn the adjuster
in side air vent ;clockwise as far as it will
go.
Air vents131
Climate control
Z
Page 144 of 346

ProblemPossible causes/consequences andMSolutions
The engine is not run-
ning smoothly and ismisfiring.There is a malfunction in the engine electronics or in a mechanical
component of the engine management system.
X Only depress the accelerator pedal slightly.
Otherwise, non-combusted fuel may get into the catalytic con-
verter and damage it.
X Have the cause rectified immediately at a qualified specialistworkshop.
The coolant tempera-
ture gauge shows a
value above 248 ‡
(120 †). The coolant
warning lamp may also
be on and a warning
tone may sound.The coolant level is too low. The coolant is too hot and the engine
is no longer being cooled sufficiently.
X Stop as soon as possible and allow the engine and the coolant to
cool down.
X Check the coolant level ( Ypage 273). Observe the warning
notes as you do so and add coolant if necessary.
Automatic transmission
Important safety notes
GWARNING
If the engine speed is above the idling speed
and you engage transmission position Dor R,
the vehicle could pull away suddenly. There is a risk of an accident.
When engaging transmission position Dor R,
always firmly depress the brake pedal and do not simultaneously accelerate.
GWARNING
The automatic transmission switches to neu-
tral position Nwhen you switch off the engine.
The vehicle may roll away. There is a risk of an
accident.
After switching off the engine, always switch
to parking position P. Prevent the parked vehi-
cle from rolling away by applying the parkingbrake.
Bear in mind that the power transmission
between the engine and the transmission is
interrupted when the engine is switched off. To prevent the vehicle from rolling away:
R when the engine is switched off and the
vehicle is stationary shift the automatic
transmission to park position Pand
R apply the electric parking brake
DIRECT SELECT lever
Overview of transmission positions
jPark position with parking lock
kReverse gear
iNeutral
hDrive
The DIRECT SELECT lever is on the right of the
steering column.
142Automatic transmission
Driving and parking
Page 153 of 346
!Overfilling the fuel tank could damage the
fuel system.
!Take care not to spill any fuel on painted
surfaces. You could otherwise damage the
paintwork.
!Use a filter when refueling from a fuel can.
Otherwise, the fuel lines and/or injection
system could be blocked by particles from
the fuel can.
Do not get into the vehicle again during the
refueling process. Otherwise, electrostatic
charge could build up again.
If you overfill the fuel tank, fuel could spray
out when the fuel pump nozzle is removed.
For further information on fuel and fuel quality ( Y page 335).
Refueling
General information
The fuel filler flap is unlocked or locked auto- matically when you unlock or lock the vehicle
with the key.
The position of the fuel filler cap is displayed æ in the instrument cluster. The arrow on
the filling pump indicates the side of the vehi-
cle.
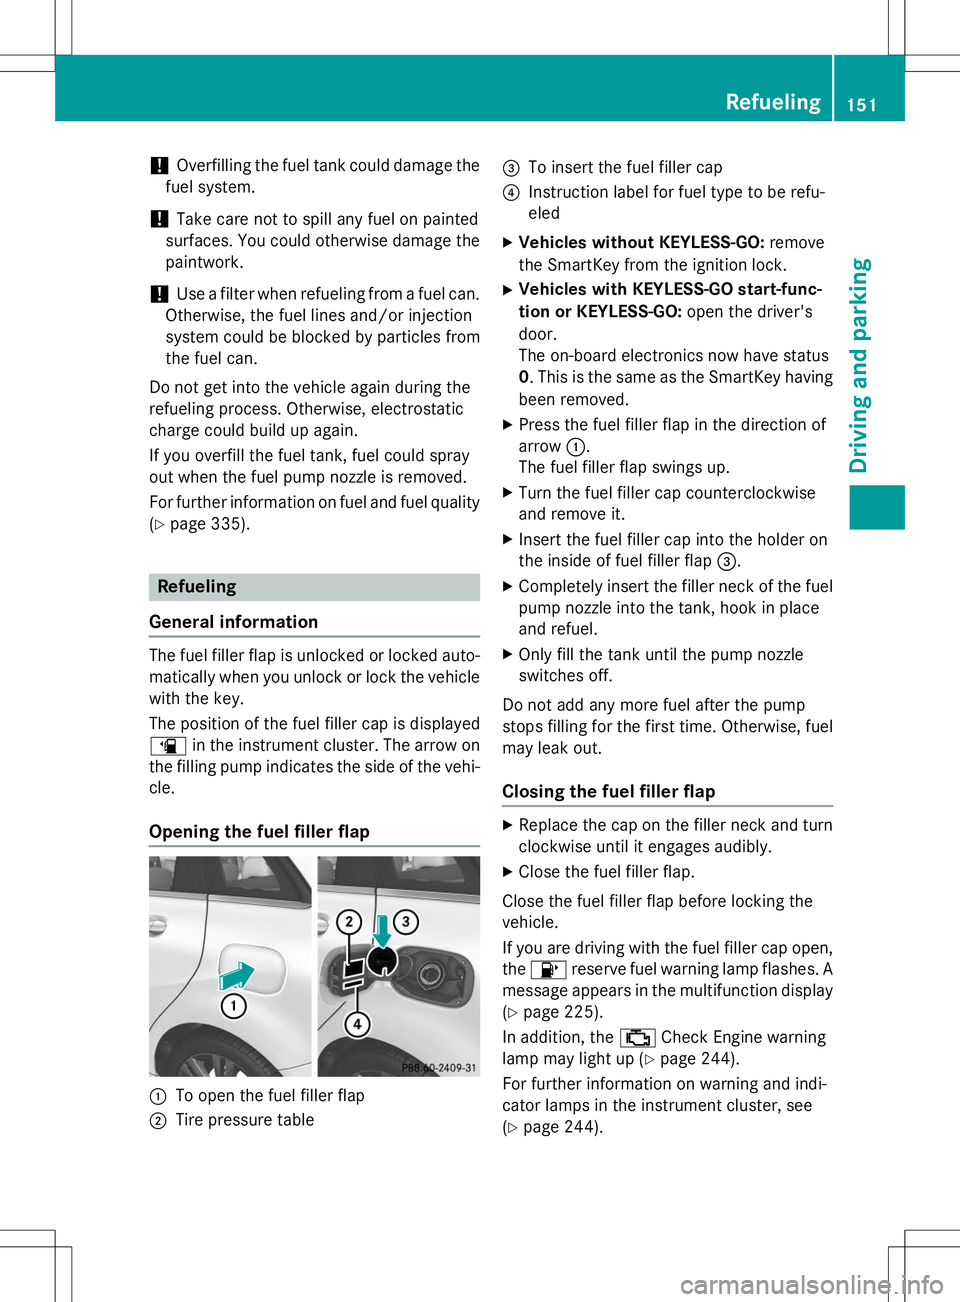
Opening the fuel filler flap
:To open the fuel filler flap
;Tire pressure table
=To insert the fuel filler cap
?Instruction label for fuel type to be refu- eled
X Vehicles without KEYLESS-GO: remove
the SmartKey from the ignition lock.
X Vehicles with KEYLESS-GO start-func-
tion or KEYLESS-GO: open the driver's
door.
The on-board electronics now have status0 . This is the same as the SmartKey having
been removed.
X Press the fuel filler flap in the direction ofarrow :.
The fuel filler flap swings up.
X Turn the fuel filler cap counterclockwise
and remove it.
X Insert the fuel filler cap into the holder on
the inside of fuel filler flap =.
X Completely insert the filler neck of the fuel
pump nozzle into the tank, hook in place
and refuel.
X Only fill the tank until the pump nozzle
switches off.
Do not add any more fuel after the pump
stops filling for the first time. Otherwise, fuel
may leak out.
Closing the fuel filler flap
X Replace the cap on the filler neck and turn
clockwise until it engages audibly.
X Close the fuel filler flap.
Close the fuel filler flap before locking the vehicle.
If you are driving with the fuel filler cap open, the 8 reserve fuel warning lamp flashes. A
message appears in the multifunction display
( Y page 225).
In addition, the ;Check Engine warning
lamp may light up ( Ypage 244).
For further information on warning and indi-
cator lamps in the instrument cluster, see( Y page 244).
Refueling151
Driving and parking
Z
Page 160 of 346
Heavy and light loads
GWARNING
If you rest your foot on the brake pedal while
driving, the braking system can overheat. Thisincreases the stopping distance and can even
cause the braking system to fail. There is a
risk of an accident.
Never use the brake pedal as a footrest. Never
depress the brake pedal and the accelerator
pedal at the same time.
!Depressing the brake pedal constantly
results in excessive and premature wear to
the brake pads.
If the brakes have been subjected to a heavy load, do not stop the vehicle immediately.
Drive on for a short while. This allows the air-
flow to cool the brakes more quickly.
Wet roads
If you have driven for a long time in heavy rain
without braking, there may be a delayed reac- tion from the brakes when braking for the firsttime. This may also occur after the vehicle has
been washed or driven through deep water.
You have to depress the brake pedal more
firmly. Maintain a greater distance from the
vehicle in front.
After driving on a wet road or having the vehi-
cle washed, brake firmly while paying atten-
tion to the traffic conditions. This will warm up
the brake discs, thereby drying them more
quickly and protecting them against corro-sion.
Limited braking performance on salt-
treated roads
If you drive on salted roads, a layer of salt
residue may form on the brake discs and
brake pads. This can result in a significantly
longer braking distance. R
In order to prevent any salt build-up, apply
the brakes occasionally while paying atten-
tion to the traffic conditions.
R Carefully depress the brake pedal and the
beginning and end of a journey.
R Maintain a greater distance to the vehicle
ahead.
Servicing the brakes
!If the red brake warning lamp lights up in
the instrument cluster and you hear a warn- ing tone while the engine is running, the
brake fluid level may be too low. Observe
additional warning messages in the multi-
function display.
The brake fluid level may be too low due tobrake pad wear or leaking brake lines.
Have the brake system checked immedi-
ately. This work should be carried out at a
qualified specialist workshop.
!A function or performance test should
only be carried out on a 2-axle dynamom-
eter. If you are planning to have the vehicle tested on such a dynamometer, contact an
authorized Mercedes-Benz Center to
obtain further information first. Otherwise,
you could damage the drive train or the
brake system.
!As the ESP ®
system operates automati-
cally, the engine and the ignition must be
switched off (the SmartKey must be in posi-
tion 0or 1in the ignition lock) if:
R the electric parking brake is tested on a
brake dynamometer (for a maximum of
ten seconds)
R the vehicle is towed with the front axle
raised.
Braking triggered automatically by ESP ®
may seriously damage the brake system.
All checks and maintenance work on the
brake system must be carried out at a quali-
fied specialist workshop. Consult a qualified
specialist workshop to arrange this.
158Driving tips
Driving and parking
Page 165 of 346
trol Offtrol Offmessage in the multifunction dis-
play for approximately five seconds.
iWhen you switch off the engine, the last
speed stored is cleared.
DISTRONIC PLUS
General notes
DISTRONIC PLUS regulates the speed and
automatically helps you maintain the dis-
tance to the vehicle detected in front. Vehi-
cles are detected with the aid of the radar
sensor system. DISTRONIC PLUS brakes
automatically to avoid exceeding the set
speed or to maintain the designated distance
from the vehicle in front.
Change into a lower gear in good time on long
and steep downhill gradients. This is espe-
cially important if the vehicle is laden. By
doing so, you will make use of the braking
effect of the engine. This relieves the load on
the brake system and prevents the brakes
from overheating and wearing too quickly.
If DISTRONIC PLUS detects that there is a risk of a collision, you will be warned visually and
acoustically. DISTRONIC PLUS cannot pre-
vent a collision without your intervention. An
intermittent warning tone will then sound and the distance warning lamp will light up in theinstrument cluster. Brake immediately in
order to increase the distance to the vehicle
in front or take evasive action provided it is
safe to do so.
DISTRONIC PLUS operates in range between0 mph (0 km/h) and 120 mph (200 km/h).
Do not use DISTRONIC PLUS while driving on
roads with steep gradients.
Important safety notes
GWARNING
DISTRONIC PLUS does not react to:
R people or animals
R stationary obstacles on the road, e.g. stop-
ped or parked vehicles
R oncoming and crossing traffic
As a result, DISTRONIC PLUS may neither give
warnings nor intervene in such situations.
There is a risk of an accident.
Always pay careful attention to the traffic sit- uation and be ready to brake.
GWARNING
DISTRONIC PLUS cannot always clearly iden-tify other road users and complex traffic sit- uations.
In such cases, DISTRONIC PLUS may:
R give an unnecessary warning and then
brake the vehicle
R neither give a warning nor intervene
R accelerate or brake unexpectedly
There is a risk of an accident.
Continue to drive carefully and be ready to
brake, in particular when warned to do so by
DISTRONIC PLUS.
GWARNING
DISTRONIC PLUS brakes your vehicle with up to 50% of the maximum possible deceleration.
If this braking force is insufficient, DISTRONIC
PLUS warns you visually and audibly. There is a risk of an accident.
In such cases, apply the brakes yourself and
try to take evasive action.
!If DISTRONIC PLUS or the HOLD function
is activated, the vehicle brakes automati-
cally in certain situations.
Driving systems163
Driving and parking
Z
Page 175 of 346
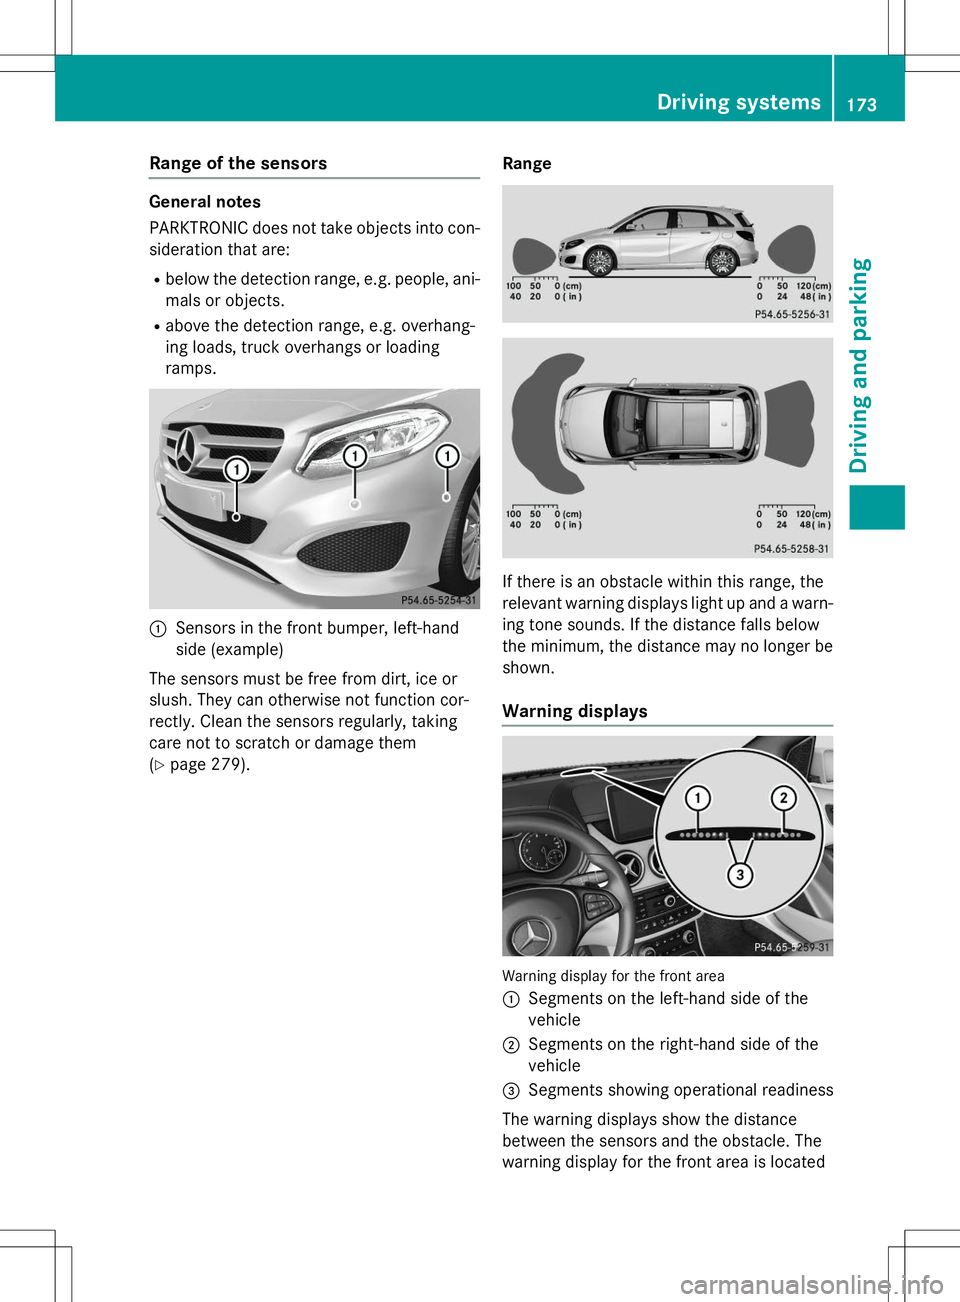
Range of the sensors
General notes
PARKTRONIC does not take objects into con-
sideration that are:
R below the detection range, e.g. people, ani-
mals or objects.
R above the detection range, e.g. overhang-
ing loads, truck overhangs or loading
ramps.
:Sensors in the front bumper, left-hand
side (example)
The sensors must be free from dirt, ice or
slush. They can otherwise not function cor-
rectly. Clean the sensors regularly, taking
care not to scratch or damage them( Y page 279). Range
If there is an obstacle within this range, the
relevant warning displays light up and a warn-
ing tone sounds. If the distance falls below
the minimum, the distance may no longer be
shown.
Warning displays
Warning display for the front area :
Segments on the left-hand side of the
vehicle
;Segments on the right-hand side of the
vehicle
=Segments showing operational readiness
The warning displays show the distance
between the sensors and the obstacle. The
warning display for the front area is located
Driving systems173
Driving and parking
Z
Page 176 of 346
on the dashboard above the center air vents.
The warning display for the rear area is loca-
ted on the headliner in the rear compartment.
The warning display for each side of the vehi-
cle is divided into five yellow and two red seg- ments. PARKTRONIC is operational if yellow
segments showing operational readiness =
light up.
One or more segments light up as the vehicle
approaches an obstacle, depending on the
vehicle's distance from the obstacle.
From the:
R sixth segment onwards, you will hear an
intermittent warning tone for approx-
imately two seconds.
R seventh segment onwards, you will hear a
warning tone for approximately two sec-
onds. This indicates that you have now
reached the minimum distance.
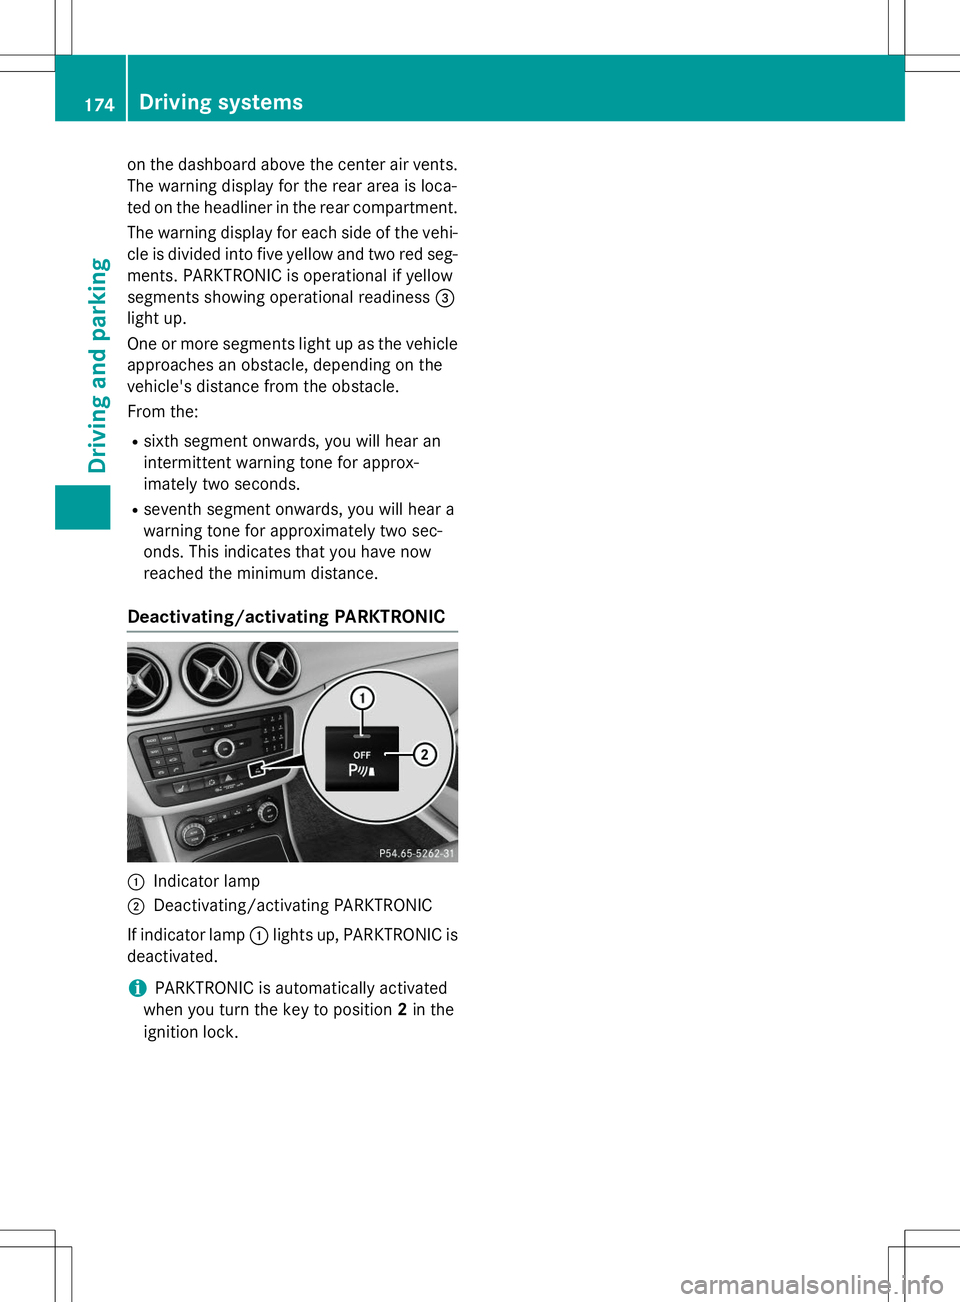
Deactivating/activating PARKTRONIC
:Indicator lamp
;Deactivating/activating PARKTRONIC
If indicator lamp :lights up, PARKTRONIC is
deactivated.
iPARKTRONIC is automatically activated
when you turn the key to position 2in the
ignition lock.
174Driving systems
Driving and parking
Page 177 of 346
Problems with PARKTRONIC
ProblemPossible causes/consequences andMSolutions
Only the red segments
in the PARKTRONIC
warning displays are lit.
You also hear a warning
tone for approximately
two seconds.
PARKTRONIC is then
deactivated and the
indicator lamp on the
PARKTRONIC button
lights up.PARKTRONIC has malfunctioned and has switched off.
X If problems persist, have PARKTRONIC checked at a qualified
specialist workshop.
Only the red segments
in the PARKTRONIC
warning displays are lit.
PARKTRONIC is thendeactivated.The PARKTRONIC sensors are dirty or there is interference. X Clean the PARKTRONIC sensors ( Ypage 279).
X Switch the ignition back on.
The problem may be caused by an external source of radio or
ultrasound waves. XSee if PARKTRONIC functions in a different location.
Active Parking Assist
General notes
Active Parking Assist is an electronic parking
aid with ultrasound. It measures the road on
both sides of the vehicle. A parking symbol
indicates a suitable parking space. Active
steering intervention and brake application
can assist you during parking and when exit-
ing a parking space. You may also use
PARKTRONIC ( Ypage 172).
Important safety notes
Active Parking Assist is merely an aid. It is not
a replacement for your attention to your
immediate surroundings. You are always
responsible for safe maneuvering, parking
and exiting a parking space. Make sure that
no persons, animals or objects are in the
maneuvering range.
When PARKTRONIC is switched off, Active
Parking Assist is also unavailable.
GWARNING
While parking or pulling out of a parking
space, the vehicle swings out and can drive
onto areas of the oncoming lane. This could
result in a collision with another road user.
There is a risk of an accident.
Pay attention to other road users. Stop the
vehicle if necessary or cancel the Active Park-
ing Assist parking procedure.
!If unavoidable, you should drive over
obstacles such as curbs slowly and not at a sharp angle. Otherwise, you may damage
the wheels or tires.
Active Parking Assist may possibly indicate
parking spaces which are not suitable for
parking, for example:
R where parking or stopping is prohibited
R in front of driveways or entrances and exits
R on unsuitable surfaces
Driving systems175
Driving and parking
Z