2015 MERCEDES-BENZ B-CLASS SPORTS warning lights
[x] Cancel search: warning lightsPage 51 of 346
If OCS determines that: Rthe front-passenger seat is unoccupied, the
PASSENGER AIR BAG OFF indicator lamp
lights up after the system self-test and
remains lit. This indicates that the front-
passenger front air bag is deactivated.
R the front-passenger seat is occupied by a
child of up to 12 months old in a standard
child restraint system, the PASSENGER AIR
BAG OFF indicator lamp lights up after the
system self-test and remains lit. This indi-
cates that the front-passenger front air bag
is deactivated.
But in the case of a 12-month-old child in a
standard child restraint system, the
PASSENGER AIR BAG ON can light up per-
manently after the system self-test. This
indicates that the front-passenger front air
bag is activated. The result of the classifi-
cation is dependent on, among other fac-
tors, the child restraint system and the
child's stature. It is recommended that you
install the child restraint system on a suit-
able rear seat.
R the front-passenger seat is occupied by a
person of smaller stature (e.g. a teenager
or small adult), either the PASSENGER AIR
BAG ON or PASSENGER AIR BAG OFF indi-
cator lamp lights up and remains lit after
the system self-test depending on the
result of the classification. - If the PASSENGER AIR BAG ON indicator
lamp lights up, move the front-passenger
seat as far back as possible. Alterna-
tively, a person of smaller stature can sit on a rear seat.
- If the PASSENGER AIR BAG OFF indicator
lamp is lit, a person of smaller stature
should not use the front-passenger seat.
R the front-passenger seat is occupied by an
adult or a person of a stature correspond-
ing to that of an adult, the PASSENGER AIR
BAG ON indicator lamp lights up after the
system self-test and remains lit. This indi-
cates that the front-passenger front air bag
is activated. If children are traveling in the vehicle, be sure
to observe the notes on "Children in the vehi-
cle" ( Ypage 54).
When OCS is malfunctioning, the red 6
restraint system warning lamp in the instru-
ment cluster and the PASSENGER AIR BAG
OFF indicator lamp light up simultaneously.
The front-passenger front air bag is deactiva- ted in this case and does not deploy during an
accident. Have the system checked by quali-
fied technicians as soon as possible. Consult
an authorized Mercedes-Benz Center. The
front-passenger seat should only be repaired at an authorized Mercedes-Benz Center.
If the front-passenger seat, the seat cover or the seat cushion is damaged, have the nec-
essary repair work carried out at an author-
ized Mercedes-Benz Center.
For safety reasons, Mercedes-Benz recom-
mends that you only use seat accessories
that have been approved by Mercedes-Benz.
If the driver's air bag deploys, this does not
mean that the front-passenger front air bag
will also deploy. The Occupant Classification
System (OCS) categorizes the occupant in the
front-passenger seat. Depending on that
result, the front-passenger front air bag is
either enabled or deactivated.
System self-test
GDANGER
If both the PASSENGER AIR BAG OFF and
PASSENGER AIR BAG ON indicator lamps do
not light up during the system self-test, the
system is malfunctioning. The front-
passenger front air bag might be triggered
unintentionally or might not be triggered at all in the event of an accident with high deceler-
ation. This poses an increased risk of injury or even fatal injury.
In this case the front-passenger seat may notbe used. Do not install a child restraint system
on the front-passenger seat. Have the Occu-
pant Classification System (OCS) checked
and repaired immediately at a qualified spe-
cialist workshop.
Occupant safety49
Safety
Z
Page 54 of 346
Deployment of Emergency TensioningDevices and air bags
Important safety notes
GWARNING
The air bag parts are hot after an air bag has
been deployed. There is a risk of injury.
Do not touch the air bag parts. Have a
deployed air bag replaced at a qualified spe-
cialist workshop as soon as possible.
GWARNING
A deployed air bag no longer offers any pro-
tection and cannot provide the intended pro-
tection in an accident. There is an increased
risk of injury.
Have the vehicle towed to a qualified special- ist workshop in order to have a deployed air
bag replaced.
It is important for your safety and that of your
passenger to have deployed air bags replaced and to have any malfunctioning air bags
repaired. This will help to make sure the air
bags continue to perform their protective
function for the vehicle occupants in the
event of a crash.
GWARNING
Pyrotechnic Emergency Tensioning Devices
that have been deployed are no longer opera-tional and are unable to perform their inten-
ded protective function. This poses an
increased risk of injury or even fatal injury.
Therefore, have pyrotechnic Emergency Ten-
sioning Devices which have been triggered
immediately replaced at a qualified specialist workshop.
If Emergency Tensioning Devices are trig-
gered or air bags are deployed, you will hear a
bang, and a small amount of powder may also be released. The 6restraint system warn-
ing lamp lights up.
Only in rare cases will the bang affect your
hearing. The powder that is released gener-
ally does not constitute a health hazard, but it may cause short-term breathing difficulties in
people with asthma or other respiratory prob-
lems. To avoid this, you may wish to get out of
the vehicle or open the windows as soon as it is safe to do so.
Air bags and pyrotechnic Emergency Tension-
ing Devices (ETDs) contain perchlorate mate- rial, which may require special handling and
regard for the environment. National guide-
lines must be observed during disposal. In
California, see www.dtsc.ca.gov/
HazardousWaste/Perchlorate/
index.cfm .
Method of operation
During the first stage of a collision, the
restraint system control unit evaluates impor-
tant physical data relating to vehicle deceler- ation or acceleration, such as:
R duration
R direction
R intensity
Based on the evaluation of this data, the
restraint system control unit triggers the
Emergency Tensioning Devices during a fron- tal or rear collision.
An Emergency Tensioning Device can only be
triggered, if: R the ignition is switched on
R the components of the restraint system are
operational; see "Restraint system warning
lamp" ( Ypage 39)
R the belt tongue is engaged in the buckle on
the respective front-passenger seat
The Emergency Tensioning Devices in the
rear compartment are triggered independ-
ently of the lock status of the seat belts.
If the restraint system control unit detects a
more severe accident, further components of the restraint system are activated independ-
ently of each other in certain frontal collision
situations:
52Occupant safety
Safety
Page 63 of 346
chains. Only in this way will the driving safety
systems described in this section work as
effectively as possible.
ABS (Anti-lock Braking System)
General information
ABS regulates brake pressure in such a way
that the wheels do not lock when you brake.
This allows you to continue steering the vehi- cle when braking. The ! ABS warning lamp in the instrument
cluster lights up when the ignition is switched
on. It goes out when the engine is running.
Important safety notes
iObserve the "Important safety notes" sec-
tion ( Ypage 60).
GWARNING
If ABS is faulty, the wheels could lock when
braking. The steerability and braking charac-
teristics may be severely impaired. Addition-
ally, further driving safety systems are deac-
tivated. There is an increased danger of skid-
ding and accidents.
Drive on carefully. Have ABS checked imme-
diately at a qualified specialist workshop.
When ABS is malfunctioning, other systems,
including driving safety systems, will also
become inoperative. Observe the information on the ABS warning lamp ( Ypage 238) and
display messages which may be shown in the
instrument cluster ( Ypage 208).
ABS works from a speed of about 5 mph
(8 km/h), regardless of road-surface condi-
tions. ABS works on slippery surfaces, even
when you only brake gently.
Braking
X If ABS intervenes: continue to depress the
brake pedal vigorously until the braking sit-
uation is over.
X To make a full brake application:
depress the brake pedal with full force.
If ABS intervenes when braking, you will feel a
pulsing in the brake pedal.
The pulsating brake pedal can be an indica-
tion of hazardous road conditions, and func-
tions as a reminder to take extra care while
driving.
BAS (Brake Assist System)
General information
BAS operates in emergency braking situa-
tions. If you depress the brake pedal quickly,
BAS automatically boosts the braking force,
thus shortening the stopping distance.
Important safety notes
iObserve the "Important safety notes" sec-
tion ( Ypage 60).
GWARNING
If BAS is malfunctioning, the braking distance
in an emergency braking situation is
increased. There is a risk of an accident.
In an emergency braking situation, depress
the brake pedal with full force. ABS prevents
the wheels from locking.
Braking
X
Keep the brake pedal firmly depressed until
the emergency braking situation is over.
ABS prevents the wheels from locking.
The brakes will function as usual once you
release the brake pedal. BAS is deactivated.
Driving safety systems61
Safety
Z
Page 67 of 346
ing safety systems are deactivated. This
increases the risk of skidding and an accident.Drive on carefully. Have ESP ®
checked at a
qualified specialist workshop.
ESP ®
is only deactivated if the åwarning
lamp is lit continuously.
If the ÷ warning lamp and the åwarn-
ing lamp are lit continuously, ESP ®
is not
available due to a malfunction.
Observe the information on warning lamps ( Y page 240) and display messages which
may be shown in the instrument cluster( Y page 208).
Only use wheels with the recommended tire
sizes. Only then will ESP ®
function properly.
Characteristics of ESP®
General information
If the ÷ ESP®
warning lamp goes out
before beginning the journey, ESP ®
is auto-
matically active.
If ESP ®
intervenes, the ÷ESP®
warning
lamp flashes in the instrument cluster.
If ESP ®
intervenes:
X Do not deactivate ESP ®
under any circum-
stances.
X Only depress the accelerator pedal as far as
necessary when pulling away.
X Adapt your driving style to suit the prevail-
ing road and weather conditions.
ECO start/stop function
The ECO start/stop function switches the
engine off automatically when the vehicle
stops moving. The engine starts automati-
cally when the driver wants to pull away again. ESP ®
remains in its previously selected sta-
tus. Example: if ESP®
was deactivated before
the engine was switched off, ESP ®
remains
deactivated when the engine is switched onagain.
Deactivating/activating ESP®
Important safety notes
You can select between the following states
of ESP ®
:
R ESP ®
is activated.
R ESP ®
is deactivated.
GWARNING
If you deactivate ESP ®
, ESP ®
no longer sta-
bilizes the vehicle. There is an increased risk
of skidding and an accident.
Only deactivate ESP ®
in the situations descri-
bed in the following.
It may be best to deactivate ESP ®
in the fol-
lowing situations:
R when using snow chains
R in deep snow
R on sand or gravel
iActivate ESP ®
as soon as the situations
described above no longer apply. ESP ®
will
otherwise not be able to stabilize the vehi-
cle if the vehicle starts to skid or a wheel
starts to spin.
!Avoid spinning the driven wheels for an
extended period with ESP ®
deactivated.
You could otherwise damage the drivetrain.
Deactivating/activating ESP ®
You can deactivate or activate ESP ®
via the
on-board computer ( Ypage 202).
ESP ®
deactivated:
The å ESP®
OFF warning lamp in the
instrument cluster lights up. ESP ®
activated:
The å ESP®
OFF warning lamp in the
instrument cluster goes out.
Characteristics when ESP ®
is deactivated
If ESP ®
is deactivated and one or more wheels
start to spin, the ÷ESP®
warning lamp in
the instrument cluster flashes. In such situa-
tions, ESP ®
will not stabilize the vehicle.
Driving safety systems65
Safety
Z
Page 75 of 346
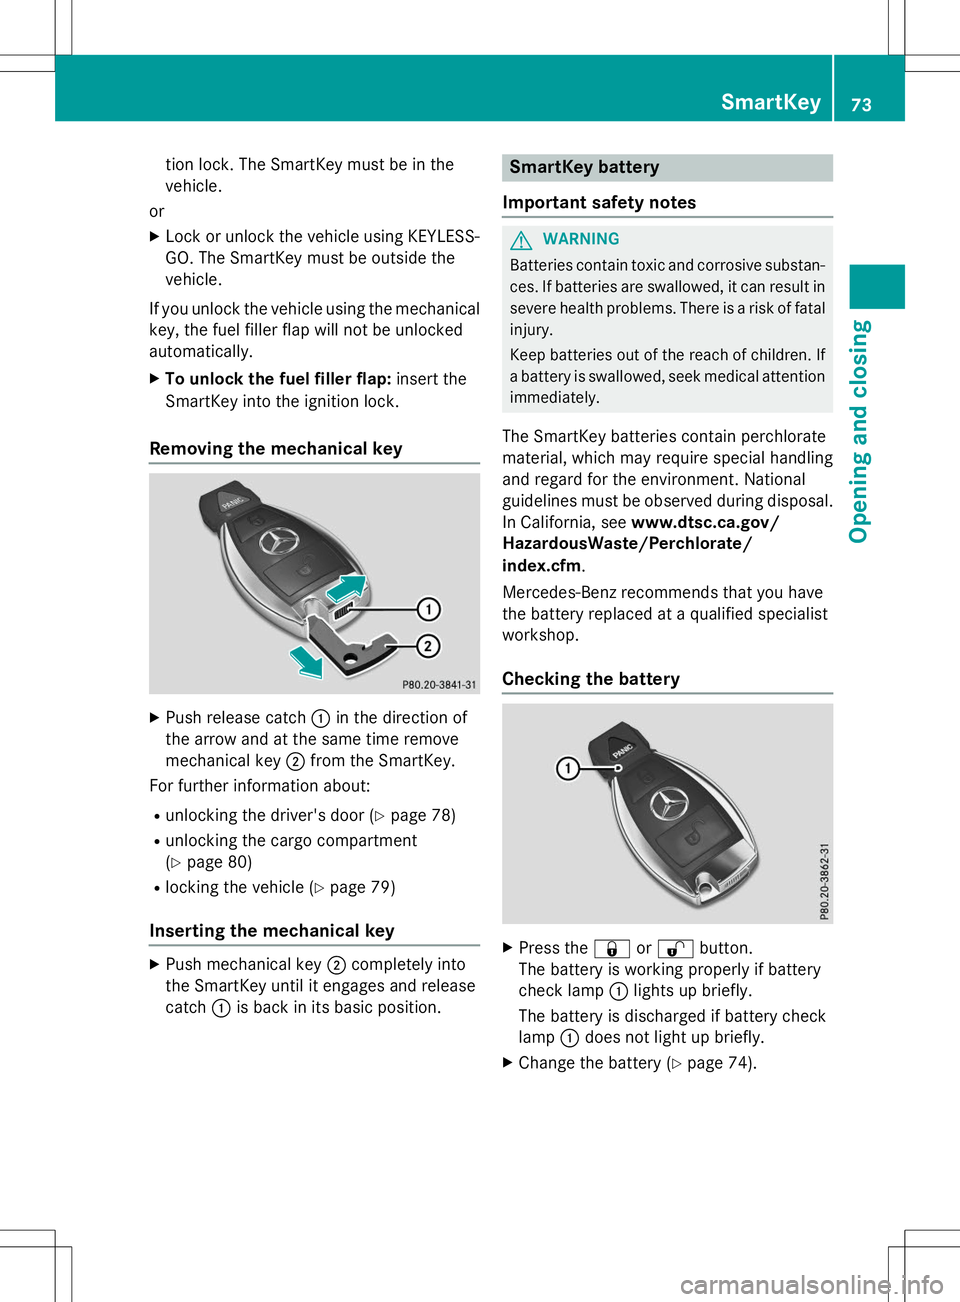
tion lock. The SmartKey must be in the
vehicle.
or
X Lock or unlock the vehicle using KEYLESS-
GO. The SmartKey must be outside the
vehicle.
If you unlock the vehicle using the mechanical key, the fuel filler flap will not be unlocked
automatically. X To unlock the fuel filler flap: insert the
SmartKey into the ignition lock.
Removing the mechanical key
X Push release catch :in the direction of
the arrow and at the same time remove
mechanical key ;from the SmartKey.
For further information about:
R unlocking the driver's door ( Ypage 78)
R unlocking the cargo compartment(Y page 80)
R locking the vehicle ( Ypage 79)
Inserting the mechanical key
X
Push mechanical key ;completely into
the SmartKey until it engages and release
catch :is back in its basic position.
SmartKey battery
Important safety notes
GWARNING
Batteries contain toxic and corrosive substan- ces. If batteries are swallowed, it can result in
severe health problems. There is a risk of fatal injury.
Keep batteries out of the reach of children. If
a battery is swallowed, seek medical attention immediately.
The SmartKey batteries contain perchlorate
material, which may require special handling
and regard for the environment. National
guidelines must be observed during disposal.
In California, see www.dtsc.ca.gov/
HazardousWaste/Perchlorate/
index.cfm .
Mercedes-Benz recommends that you have
the battery replaced at a qualified specialist
workshop.
Checking the battery
X Press the &or% button.
The battery is working properly if battery
check lamp :lights up briefly.
The battery is discharged if battery check
lamp :does not light up briefly.
X Change the battery ( Ypage 74).
SmartKey73
Opening and closing
Z
Page 100 of 346
Mirrors
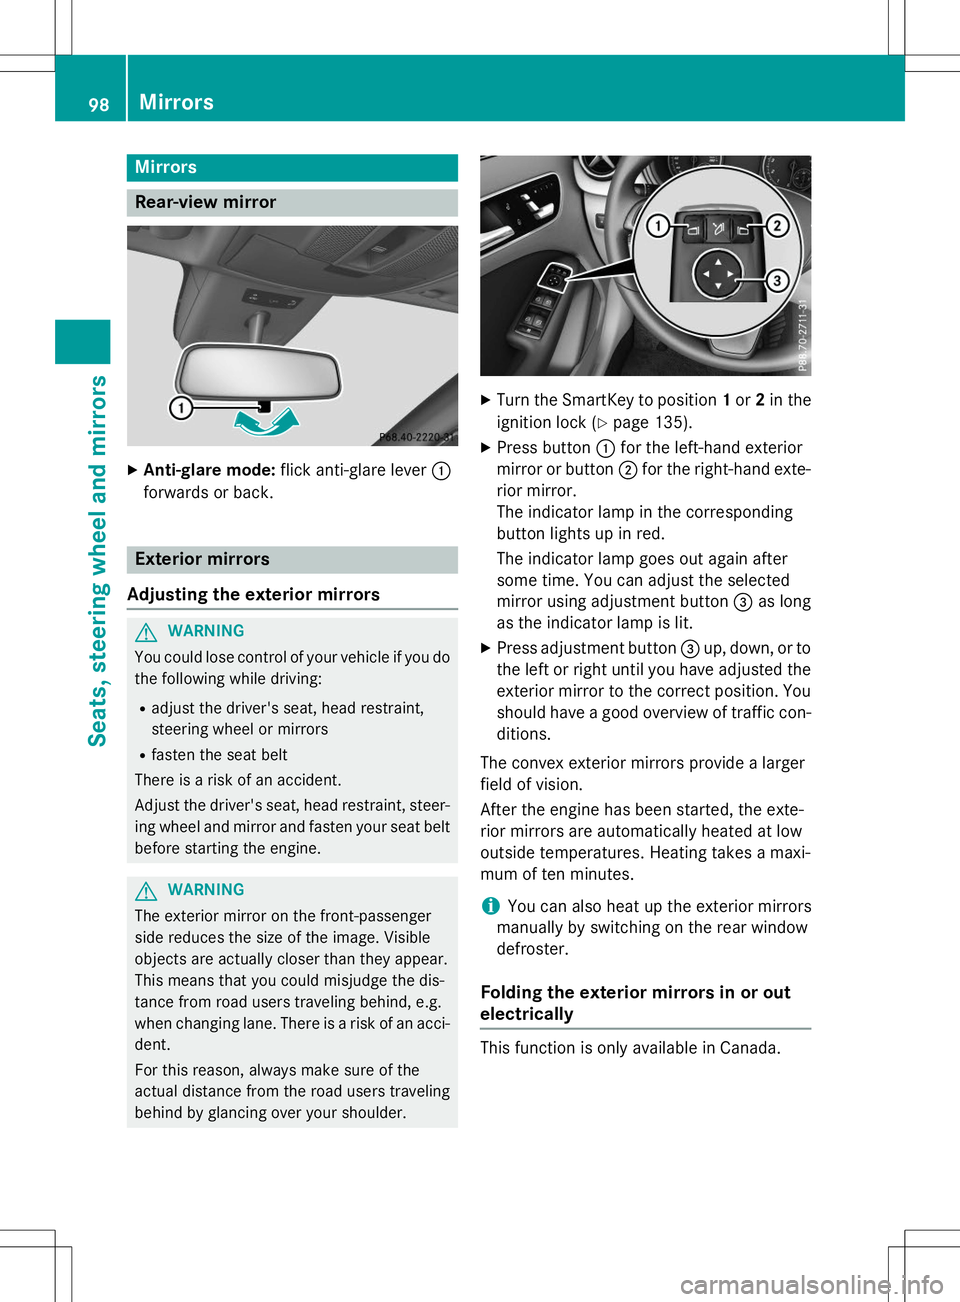
Rear-view mirror
XAnti-glare mode: flick anti-glare lever :
forwards or back.
Exterior mirrors
Adjusting the exterior mirrors
GWARNING
You could lose control of your vehicle if you do the following while driving:
R adjust the driver's seat, head restraint,
steering wheel or mirrors
R fasten the seat belt
There is a risk of an accident.
Adjust the driver's seat, head restraint, steer-
ing wheel and mirror and fasten your seat belt before starting the engine.
GWARNING
The exterior mirror on the front-passenger
side reduces the size of the image. Visible
objects are actually closer than they appear.
This means that you could misjudge the dis-
tance from road users traveling behind, e.g.
when changing lane. There is a risk of an acci-dent.
For this reason, always make sure of the
actual distance from the road users traveling
behind by glancing over your shoulder.
X Turn the SmartKey to position 1or 2in the
ignition lock ( Ypage 135).
X Press button :for the left-hand exterior
mirror or button ;for the right-hand exte-
rior mirror.
The indicator lamp in the corresponding
button lights up in red.
The indicator lamp goes out again after
some time. You can adjust the selected
mirror using adjustment button =as long
as the indicator lamp is lit.
X Press adjustment button =up, down, or to
the left or right until you have adjusted the
exterior mirror to the correct position. You
should have a good overview of traffic con- ditions.
The convex exterior mirrors provide a larger
field of vision.
After the engine has been started, the exte-
rior mirrors are automatically heated at low
outside temperatures. Heating takes a maxi-
mum of ten minutes.
iYou can also heat up the exterior mirrors
manually by switching on the rear window
defroster.
Folding the exterior mirrors in or out
electrically
This function is only available in Canada.
98Mirrors
Seats, steering wheel and mirrors
Page 106 of 346
Useful information
iThis Operator's Manual describes all
models and all standard and optional equip- ment of your vehicle available at the time of
publication of the Operator's Manual.
Country-specific differences are possible.
Please note that your vehicle may not be
equipped with all features described. This
also applies to safety-related systems and
functions.
iRead the information on qualified special-
ist workshops ( Ypage 24).
Exterior lighting
General notes
For reasons of safety, Mercedes-Benz recom-
mends that you drive with the lights switchedon even during the daytime. In some coun-
tries, operation of the headlamps varies due
to legal requirements and self-imposed obli-
gations.
Setting the exterior lighting
Setting options
Exterior lighting can be set using: R the light switch
R the combination switch ( Ypage 106)
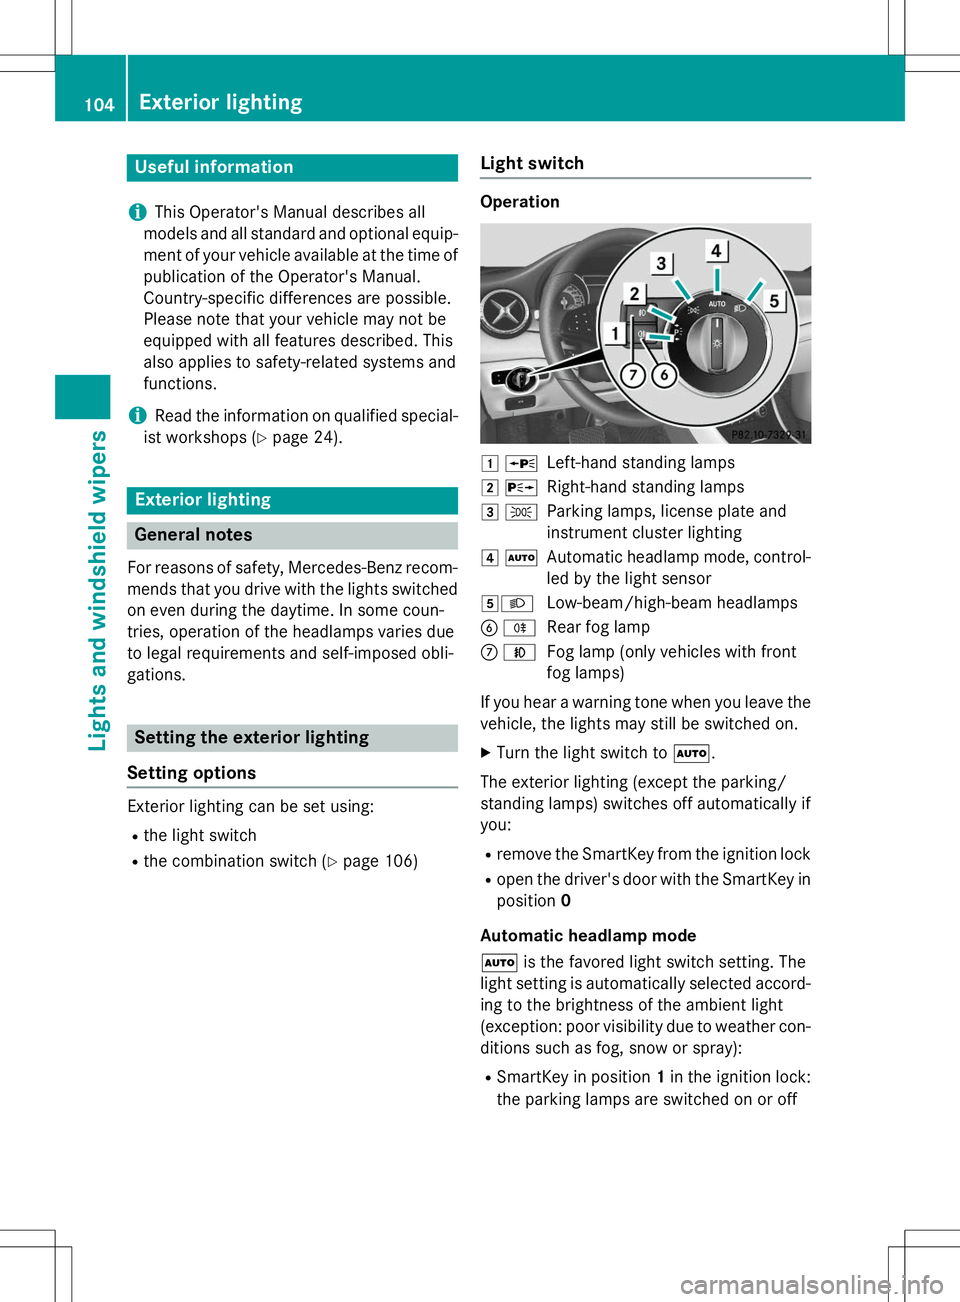
Light switch
Operation
1 WLeft-hand standing lamps
2XRight-hand standing lamps
3 TParking lamps, license plate and
instrument cluster lighting
4ÃAutomatic headlamp mode, control-
led by the light sensor
5 LLow-beam/high-beam headlamps
B RRear fog lamp
CNFog lamp (only vehicles with front
fog lamps)
If you hear a warning tone when you leave the
vehicle, the lights may still be switched on. X Turn the light switch to Ã.
The exterior lighting (except the parking/
standing lamps) switches off automatically ifyou: R remove the SmartKey from the ignition lock
R open the driver's door with the SmartKey in
position 0
Automatic headlamp mode à is the favored light switch setting. The
light setting is automatically selected accord- ing to the brightness of the ambient light
(exception: poor visibility due to weather con-
ditions such as fog, snow or spray):
R SmartKey in position 1in the ignition lock:
the parking lamps are switched on or off
104Exterior lighting
Lights and windshield wipers
Page 107 of 346
automatically depending on the brightnessof the ambient light.
R With the engine running: if you have acti-
vated the "Daytime running lamps" func-
tion via the on-board computer, the day-
time running lamps or the parking lamps
and the low-beam headlamps are switched
on or off automatically depending on the
brightness of the ambient light.
X To switch on automatic headlamp
mode: turn the light switch to Ã.
GWARNING
When the light switch is set to Ã, the low-
beam headlamps may not be switched on
automatically if there is fog, snow or other
causes of poor visibility due to the weather
conditions such as spray. There is a risk of an
accident.
In such situations, turn the light switch to L .
The automatic headlamp feature is only an
aid. The driver is responsible for the vehicle's lighting at all times.
The daytime running lamps improve the visi-
bility of your vehicle during the day. The day- time running lamps function is required by lawin Canada. It cannot therefore be deactivated.
When the engine is running and the vehicle is
stationary: if you move the selector lever from a drive position to P, the daytime running
lamps/low-beam headlamps go out after
three minutes.
When the engine is running, the vehicle is
stationary and in bright ambient light: if you
turn the light switch to T, you turn on the
daytime running lamps and parking lamps.
If the engine is running and you turn the light
switch to L, the manual settings take
precedence over the daytime running lamps.
Low-beam headlamps
Even if the light sensor does not detect that it is dark, the parking lamps and low-beam
headlamps switch on when the ignition is
switched on and the light switch is set to the L
position. This is a particularly useful
function in the event of rain and fog. X To switch on the low-beam headlamps:
turn the SmartKey in the ignition lock to
position 2or start the engine.
X Turn the light switch to L.
The green Lindicator lamp in the instru-
ment cluster lights up.
Front fog lamps
In conditions where visibility is poor due to
fog, snow or rain, the fog lamps improve vis-
ibility as well as making it easier for other road
users to see you. They can be operated
together with the parking lamps or together
with the parking lamps and low-beam head-
lamps. X To switch on the front fog lamps: turn
the SmartKey in the ignition lock to position 2 or start the engine.
X Turn the light switch to Lorà .
X Press the Nbutton.
The green Nindicator lamp in the instru-
ment cluster lights up.
X To switch off the front fog lamps: press
the N button.
The green Nindicator lamp in the instru-
ment cluster goes out.
Rear fog lamp
The rear fog lamp improves visibility of your
vehicle for the traffic behind in the event of
thick fog. Please take note of the country-
specific regulations for the use of rear fog
lamps. X To switch on the rear fog lamps: turn the
SmartKey to position 2in the ignition lock
or start the engine.
X Turn the light switch to Lorà .
Exterior lighting105
Lights and windshield wipers
Z