2015 MERCEDES-BENZ B-CLASS SPORTS lock
[x] Cancel search: lockPage 255 of 346
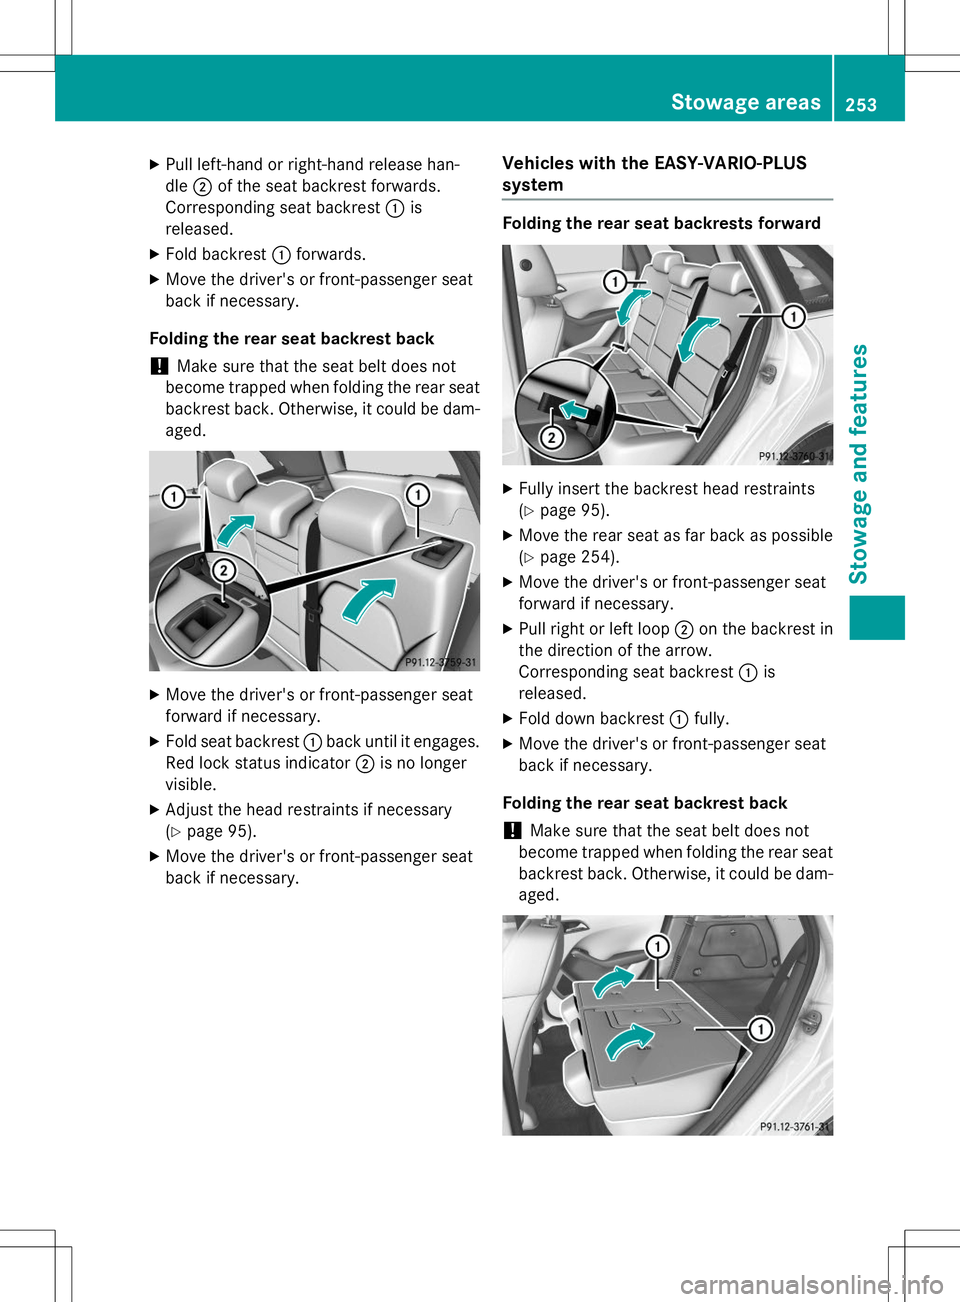
XPull left-hand or right-hand release han- dle ;of the seat backrest forwards.
Corresponding seat backrest :is
released.
X Fold backrest :forwards.
X Move the driver's or front-passenger seat
back if necessary.
Folding the rear seat backrest back
!Make sure that the seat belt does not
become trapped when folding the rear seat backrest back. Otherwise, it could be dam-
aged.
X Move the driver's or front-passenger seat
forward if necessary.
X Fold seat backrest :back until it engages.
Red lock status indicator ;is no longer
visible.
X Adjust the head restraints if necessary(Y page 95).
X Move the driver's or front-passenger seat
back if necessary.
Vehicles with the EASY-VARIO-PLUSsystem
Folding the rear seat backrests forward
XFully insert the backrest head restraints (Y page 95).
X Move the rear seat as far back as possible(Y page 254).
X Move the driver's or front-passenger seat
forward if necessary.
X Pull right or left loop ;on the backrest in
the direction of the arrow.
Corresponding seat backrest :is
released.
X Fold down backrest :fully.
X Move the driver's or front-passenger seat
back if necessary.
Folding the rear seat backrest back
!Make sure that the seat belt does not
become trapped when folding the rear seat
backrest back. Otherwise, it could be dam- aged.
Stowage areas253
Stowage and features
Z
Page 260 of 346
Always close the cargo compartment floor
before a journey.
!The maximum load capacity of the stow-
age well under the cargo compartment
floor is 55 lbs (25 kg).
There is a stowage area for TIREFIT, the vehi-
cle tool kit, a folding box, etc. underneath the
cargo compartment floor.
Opening/closing the cargo compart-
ment floor
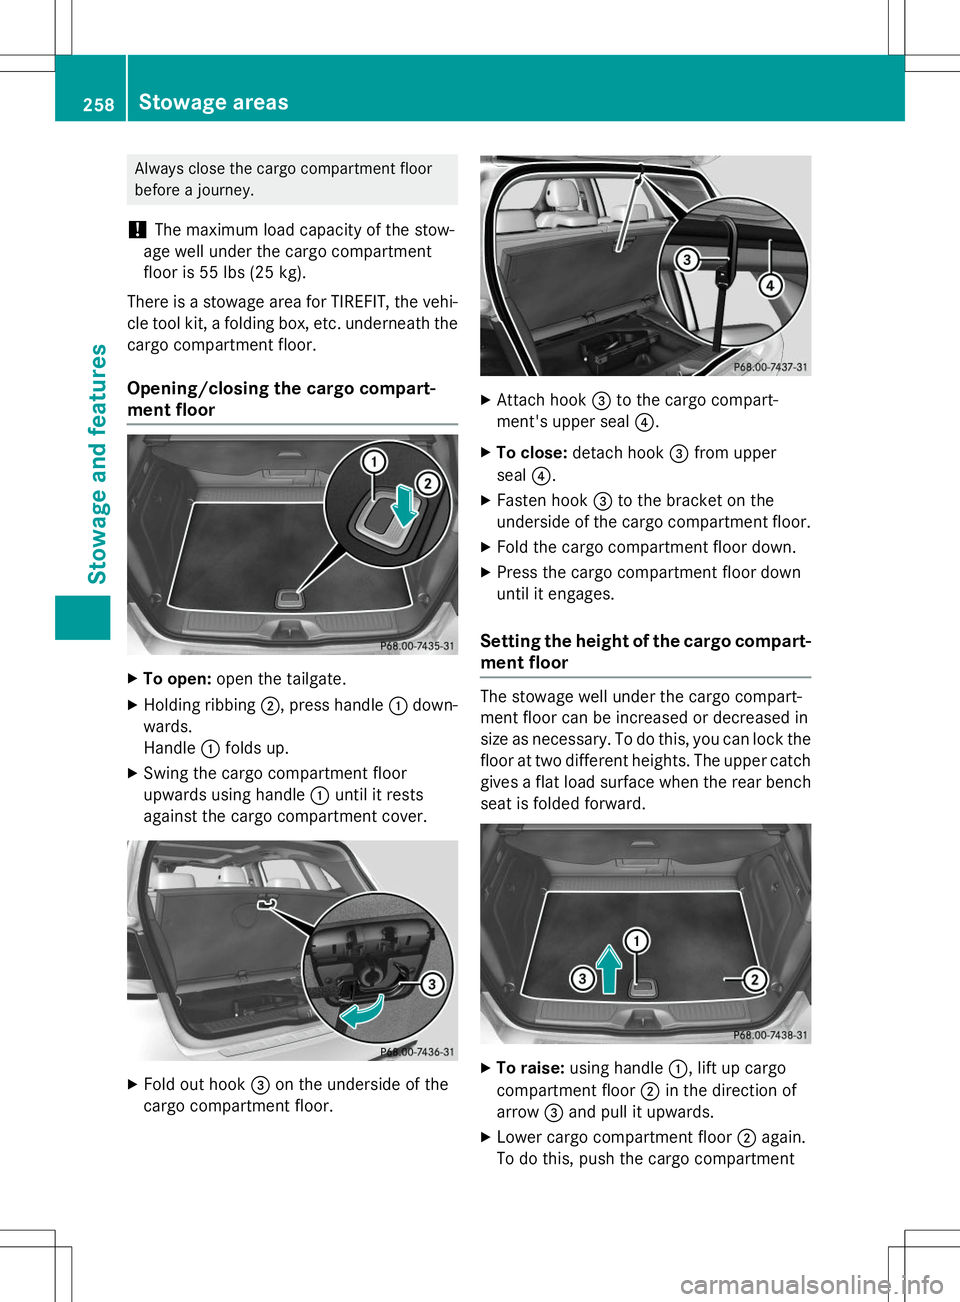
X To open: open the tailgate.
X Holding ribbing ;, press handle :down-
wards.
Handle :folds up.
X Swing the cargo compartment floor
upwards using handle :until it rests
against the cargo compartment cover.
X Fold out hook =on the underside of the
cargo compartment floor.
X Attach hook =to the cargo compart-
ment's upper seal ?.
X To close: detach hook =from upper
seal ?.
X Fasten hook =to the bracket on the
underside of the cargo compartment floor.
X Fold the cargo compartment floor down.
X Press the cargo compartment floor down
until it engages.
Setting the height of the cargo compart-
ment floor
The stowage well under the cargo compart-
ment floor can be increased or decreased in
size as necessary. To do this, you can lock thefloor at two different heights. The upper catch gives a flat load surface when the rear bench
seat is folded forward.
X To raise: using handle :, lift up cargo
compartment floor ;in the direction of
arrow =and pull it upwards.
X Lower cargo compartment floor ;again.
To do this, push the cargo compartment
258Stowage areas
Sto wage an d features
Page 262 of 346
tainers of the right size. Always close the con-tainer, particularly if the liquid is hot.
GWARNING
If objects in the passenger compartment are
stowed incorrectly, they can slide or be
thrown around and hit vehicle occupants.
There is a risk of injury, particularly in the
event of sudden braking or a sudden change
in direction.
R Always stow objects so that they cannot be
thrown around in such situations.
R Always make sure that objects do not pro-
trude from stowage spaces, parcel nets or
stowage nets.
R Close the lockable stowage spaces while
driving.
R Stow and secure objects that are heavy,
hard, pointy, sharp-edged, fragile or too
large in the cargo compartment.
!Only use the cup holders for containers of
the right size and which have lids. The
drinks could otherwise spill.
Observe the loading guidelines ( Ypage 248).
The stowage compartments in the doors pro-
vide space for bottles:
R front: capacity up to 51 fl. oz. (1.5 l)
R rear: capacity up to 17 fl. oz. (0.5 l)
Cup holder in the front-compartment
center console
The cup holder and the rubber mat under-
neath can be removed for cleaning. Clean
them with clean, lukewarm water only.
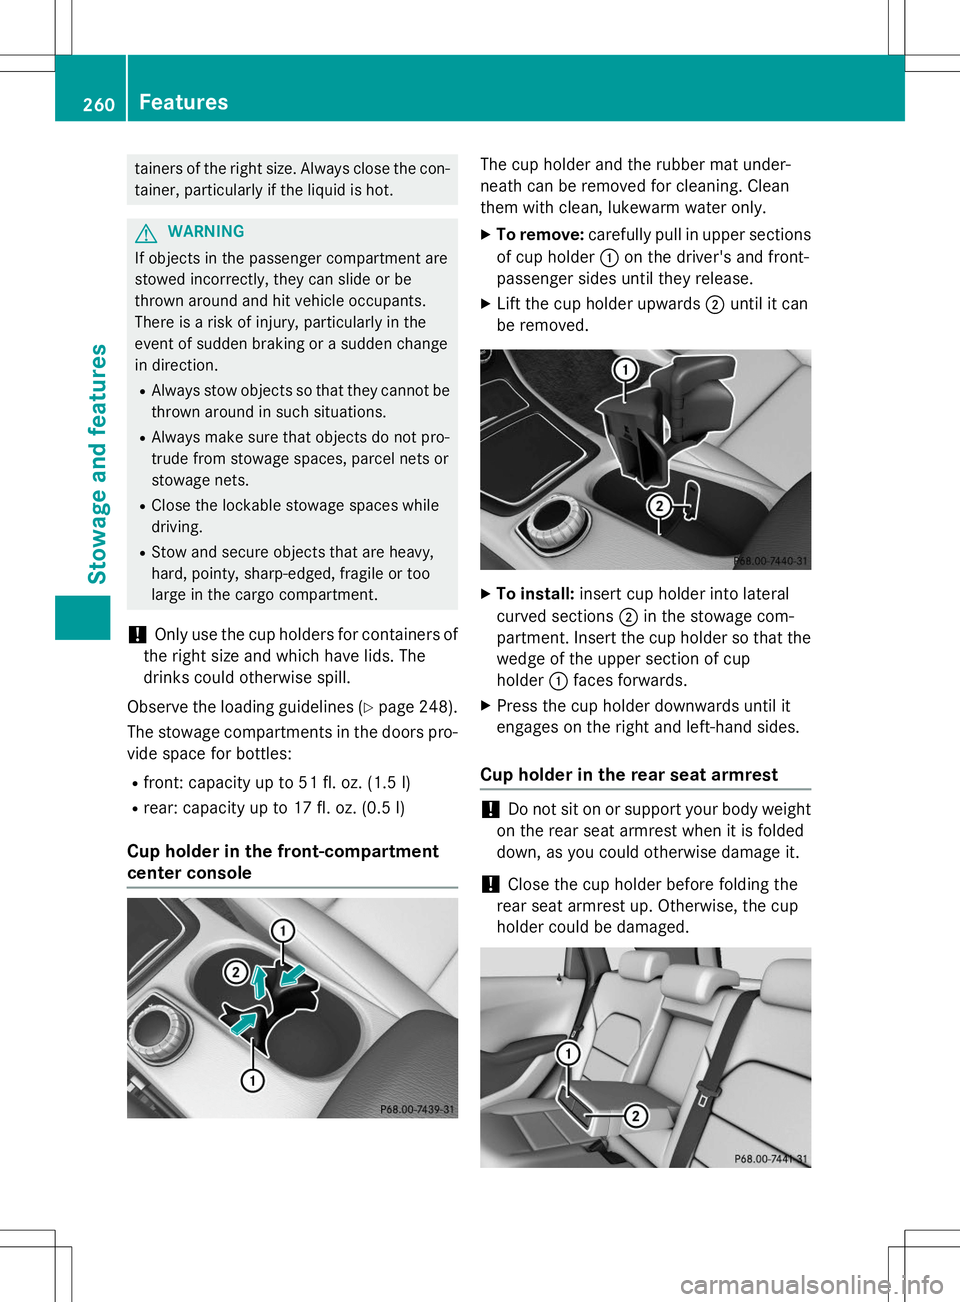
X To remove: carefully pull in upper sections
of cup holder :on the driver's and front-
passenger sides until they release.
X Lift the cup holder upwards ;until it can
be removed.
X To install: insert cup holder into lateral
curved sections ;in the stowage com-
partment. Insert the cup holder so that the wedge of the upper section of cup
holder :faces forwards.
X Press the cup holder downwards until it
engages on the right and left-hand sides.
Cup holder in the rear seat armrest
!Do not sit on or support your body weight
on the rear seat armrest when it is folded
down, as you could otherwise damage it.
!Close the cup holder before folding the
rear seat armrest up. Otherwise, the cup
holder could be damaged.
260Features
Stowage and features
Page 264 of 346
Rear-compartment ashtray
XTo open: pull cover =out by its top edge.
X To remove: pull insert;by recess :in
the direction of arrow ?until it audibly
releases.
X Lift insert ;up and out.
X To install the insert: install insert;from
above into the holder and press down until it engages.
Cigarette lighter
GWARNING
You can burn yourself if you touch the hot
heating element or the socket of the cigarette lighter.
In addition, flammable materials can ignite if:
R the hot cigarette lighter falls
R a child holds the hot cigarette lighter to
objects, for example
There is a risk of fire and injury.
Always hold the cigarette lighter by the knob.
Always make sure that the cigarette lighter is
out of reach of children. Never leave children unsupervised in the vehicle.
Your attention must always be focused on the traffic conditions. Only use the cigarette
lighter when road and traffic conditions per-mit.
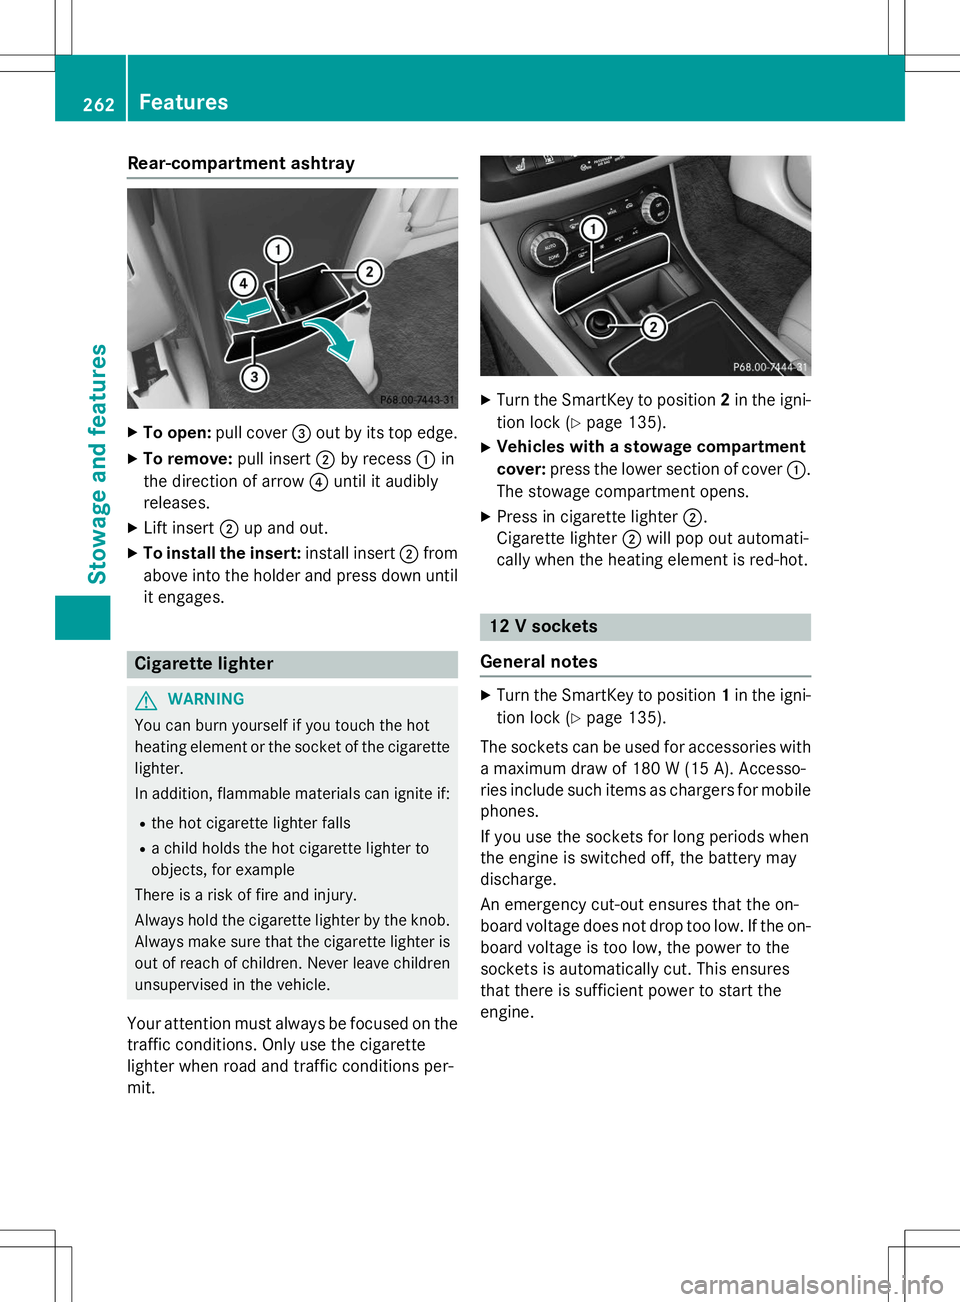
X Turn the SmartKey to position 2in the igni-
tion lock ( Ypage 135).
X Vehicles with a stowage compartment
cover: press the lower section of cover :.
The stowage compartment opens.
X Press in cigarette lighter ;.
Cigarette lighter ;will pop out automati-
cally when the heating element is red-hot.
12 V sockets
General notes
X Turn the SmartKey to position 1in the igni-
tion lock ( Ypage 135).
The sockets can be used for accessories with a maximum draw of 180 W(15 A). Accesso-
ries include such items as chargers for mobile
phones.
If you use the sockets for long periods when
the engine is switched off, the battery may
discharge.
An emergency cut-out ensures that the on-
board voltage does not drop too low. If the on-
board voltage is too low, the power to the
sockets is automatically cut. This ensures
that there is sufficient power to start the
engine.
262Features
Stowage and fea tures
Page 266 of 346
Important safety notes
GWARNING
When you operate or program the garage doorwith the integrated garage door opener, per-
sons in the range of movement of the garage
door can become trapped or struck by the
garage door. There is a risk of injury.
When using the integrated garage door
opener, always make sure that nobody is
within the range of movement of the garage
door.
GWARNING
Combustion engines emit poisonous exhaust
gases such as carbon monoxide. Inhaling
these exhaust gases leads to poisoning. There is a risk of fatal injury. Therefore never leave
the engine running in enclosed spaces with-
out sufficient ventilation.
Programming
Programming buttons
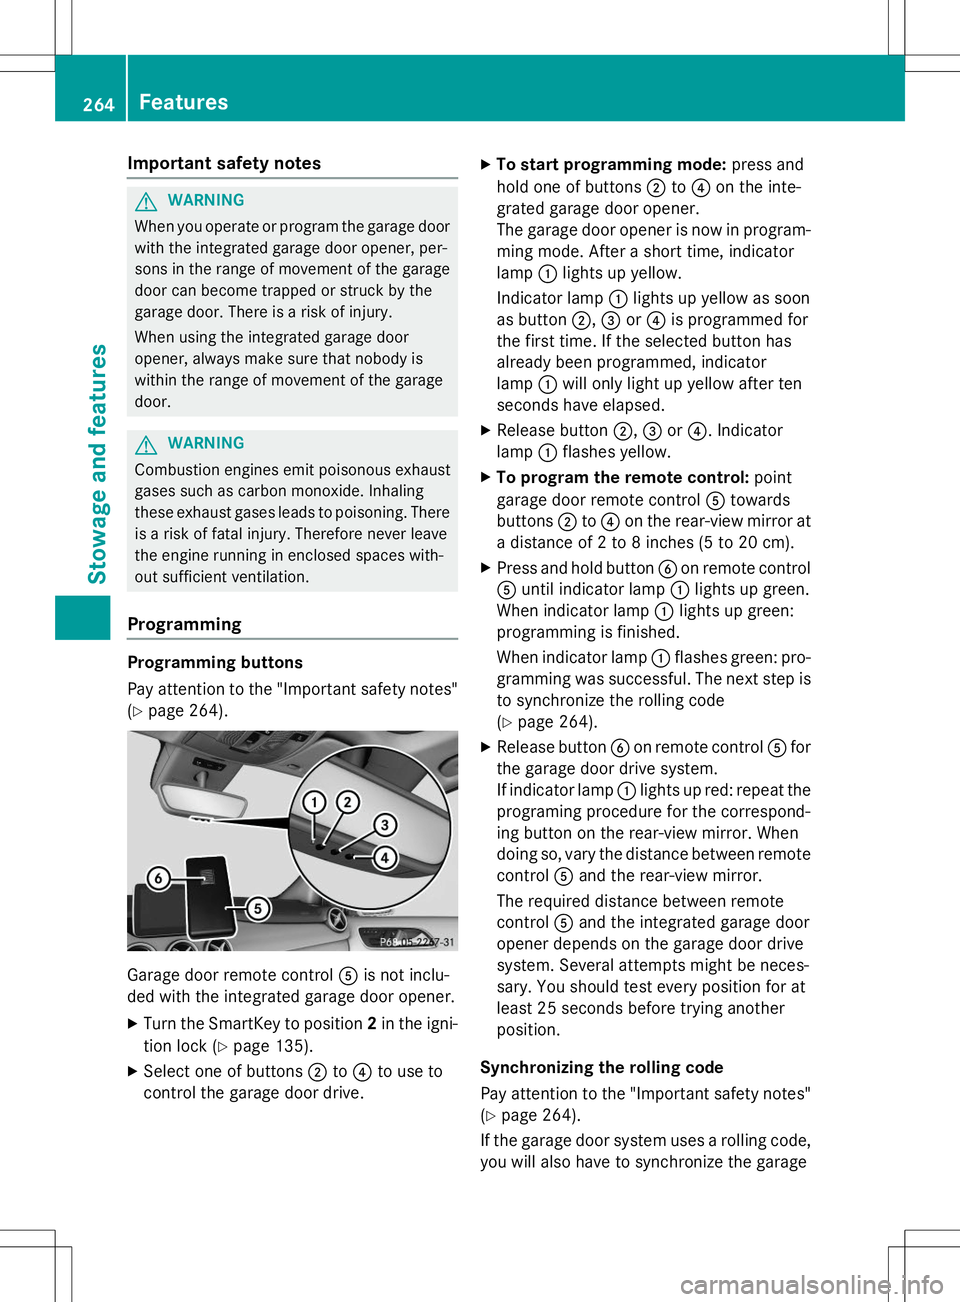
Pay attention to the "Important safety notes"
( Y page 264).
Garage door remote control Ais not inclu-
ded with the integrated garage door opener.
X Turn the SmartKey to position 2in the igni-
tion lock ( Ypage 135).
X Select one of buttons ;to? to use to
control the garage door drive. X
To start programming mode: press and
hold one of buttons ;to? on the inte-
grated garage door opener.
The garage door opener is now in program-
ming mode. After a short time, indicatorlamp :lights up yellow.
Indicator lamp :lights up yellow as soon
as button ;,= or? is programmed for
the first time. If the selected button has
already been programmed, indicatorlamp :will only light up yellow after ten
seconds have elapsed.
X Release button ;,= or? . Indicator
lamp :flashes yellow.
X To program the remote control: point
garage door remote control Atowards
buttons ;to? on the rear-view mirror at
a distance of 2 to 8 inches (5 to 20 cm).
X Press and hold button Bon remote control
A until indicator lamp :lights up green.
When indicator lamp :lights up green:
programming is finished.
When indicator lamp :flashes green: pro-
gramming was successful. The next step is to synchronize the rolling code ( Y page 264).
X Release button Bon remote control Afor
the garage door drive system.
If indicator lamp :lights up red: repeat the
programing procedure for the correspond-
ing button on the rear-view mirror. When
doing so, vary the distance between remote control Aand the rear-view mirror.
The required distance between remote
control Aand the integrated garage door
opener depends on the garage door drive
system. Several attempts might be neces-
sary. You should test every position for at
least 25 seconds before trying another
position.
Synchronizing the rolling code
Pay attention to the "Important safety notes"
( Y page 264).
If the garage door system uses a rolling code,
you will also have to synchronize the garage
264Features
Stowage and featu res
Page 267 of 346
door system with the integrated garage door
opener in the rear-view mirror. To do this you
will need to use the programming button on
the door drive control panel. The program-
ming button may be positioned at different
locations depending on the manufacturer. It
is usually located on the door drive unit on thegarage ceiling.
Familiarize yourself with the garage door
drive operating instructions, e.g. under "Pro-
gramming of additional remote controls",
before carrying out the following steps.
Your vehicle must be within reach of the
garage door or gate opener drive. Make sure
that neither your vehicle nor any persons/
objects are present within the sweep of the
door or gate.
X Turn the SmartKey to position 2in the igni-
tion lock ( Ypage 135).
X Get out of the vehicle.
X Press the programming button on the door
drive unit.
Usually, you now have 30 seconds to ini-
tiate the next step.
X Get into the vehicle.
X Press previously programmed button ;,
= or? on the integrated garage door
opener until the door closes.
The rolling code synchronization is then
complete.
Notes on programming the remote con-
trol
Canadian radio frequency laws require a
"break" (or interruption) of the transmission
signals after broadcasting for a few seconds. Therefore, these signals may not last long
enough for the integrated garage door
opener. The signal is not recognized during
programming. Comparable with Canadian
law, some U.S. garage door openers also fea-
ture a "break". Proceed as follows:
R if you live in Canada
R if you have difficulties programming the
garage door opener (regardless of where
you live) when using the programmingsteps
X Press and hold one of buttons ;to? on
the integrated garage door opener.
After a short time, indicator lamp :lights
up yellow.
X Release the button.
Indicator lamp :flashes yellow.
X Press button Bof garage door remote
control Afor two seconds, then release it
for two seconds.
X Press button Bagain for two seconds.
X Repeat this sequence on button Bof
remote control Auntil indicator lamp :
lights up green.
When indicator lamp :lights up green:
programming is finished.
When indicator lamp :flashes green: pro-
gramming was successful. The next step is to synchronize the rolling code.
X Release button Bof remote control Aof
the garage door drive.
If indicator lamp :lights up red: repeat the
programming process for the correspond-
ing button on the rear-view mirror. When
doing so, vary the distance between remote control Aand the rear-view mirror.
The required distance between remote
control Aand the integrated garage door
opener depends on the garage door drive
system. Several attempts might be neces-
sary. You should test every position for at
least 25 seconds before trying another
position.
Features265
Stowage and features
Z
Page 268 of 346
Problems when programming
If you are experiencing problems programing
the integrated garage door opener on the
rear-view mirror, take note of the following
instructions:
R Check the transmitter frequency used by
garage door drive remote control Aand
whether it is supported. The transmitter
frequency can usually be found on the back
of the garage door drive remote control.
The integrated garage door opener is com-
patible with devices that have units which
operate in the frequency range of 280 to
433 MHz.
R Replace the batteries in garage door
remote control A. This increases the like-
lihood that garage door remote control A
will transmit a strong and precise signal to
the integrated garage door opener.
R When programming, hold remote controlA at varying distances and angles from the
button which you are programming. Try var- ious angles at a distance between 2and
12 inches (5to 30 cm) or at the same angle
but at varying distances.
R If another remote control is available for the
same garage door drive, repeat the same
programming steps with this remote con-
trol. Before performing these steps, make
sure that new batteries have been installed
in garage door drive remote control A.
R Note that some remote controls only trans-
mit for a limited amount of time (the indi-
cator lamp on the remote control goes out).
Press button Bon remote control Aagain
before transmission ends.
R Align the antenna cable of the garage door
opener unit. This can improve signal recep-tion/transmission.
Opening/closing the garage door
After it has been programmed, the integrated
garage door opener performs the function of
the garage door system remote control. Please also read the operating instructions
for the garage door system.
X Turn the SmartKey to position 2in the igni-
tion lock ( Ypage 135).
X Press button ;,= or? which you have
programmed to operate the garage door.
Garage door system with a fixed code: indi-
cator lamp :lights up green.
Garage door system with a rolling code:
indicator lamp :flashes green.
The transmitter will transmit a signal as
long as the button is pressed. The trans-
mission is halted after a maximum of ten
seconds and indicator lamp :lights up
yellow.
X Press button ;,= or? again if neces-
sary.
Clearing the memory
Make sure that you clear the memory of the
integrated garage door opener before selling
the vehicle.
X Turn the SmartKey to position 2in the igni-
tion lock ( Ypage 135).
X Press and hold buttons ;and ?.
The indicator lamp initially lights up yellow
and then green.
X Release buttons ;and ?.
The memory of the integrated garage door
opener in the rear-view mirror is cleared.
266Features
Stowage and features
Page 272 of 346
Useful information
iThis Operator's Manual describes all
models and all standard and optional equip- ment of your vehicle available at the time of
publication of the Operator's Manual.
Country-specific differences are possible.
Please note that your vehicle may not be
equipped with all features described. This
also applies to safety-related systems and
functions.
iRead the information on qualified special-
ist workshops ( Ypage 24).
Engine compartment
Hood
Important safety notes
GWARNING
If the hood is unlatched, it may open up when the vehicle is in motion and block your view.
There is a risk of an accident.
Never unlatch the hood while driving. Before
every trip, ensure that the hood is locked.
GWARNING
When opening and closing the hood, it may
suddenly fall into the closed position. There is a risk of injury to persons within range of
movement of the hood.
Open and close the hood only when no one is
within its range of movement.
GWARNING
Opening the hood when the engine is over-
heated or when there is a fire in the engine
compartment could expose you to hot gases
or other service products. There is a risk of
injury.
Let an overheated engine cool down before
opening the hood. If there is a fire in the
engine compartment, keep the hood closed
and contact the fire department.
GWARNING
The engine compartment contains moving
components. Certain components, such as
the radiator fan, may continue to run or start
again suddenly when the ignition is off. There is a risk of injury.
If you need to do any work inside the engine
compartment:
R switch off the ignition
R never reach into the area where there is a
risk of danger from moving components,
such as the fan rotation area
R remove jewelry and watches
R keep items of clothing and hair, for exam-
ple, away from moving parts
GWARNING
The ignition system and the fuel injection sys-
tem work under high voltage. If you touch
components which are under voltage, you
could get an electric shock. There is a risk of
injury.
Never touch components of the ignition sys-
tem or fuel injection system when the ignition is switched on.
Opening the hood
GWARNING
Certain components in the engine compart-
ment, such as the engine, radiator and parts
of the exhaust system, can become very hot.
Working in the engine compartment poses a
risk of injury.
Where possible, let the engine cool down and touch only the components described in the following.
GWARNING
When the hood is open and the windshield
wipers are set in motion, you can be injured bythe wiper linkage. There is a risk of injury.
Always switch off the windshield wipers and
the ignition before opening the hood.
270Engine compartment
Maintenance and care