2015 MERCEDES-BENZ B-Class ELECTRIC tow
[x] Cancel search: towPage 141 of 338
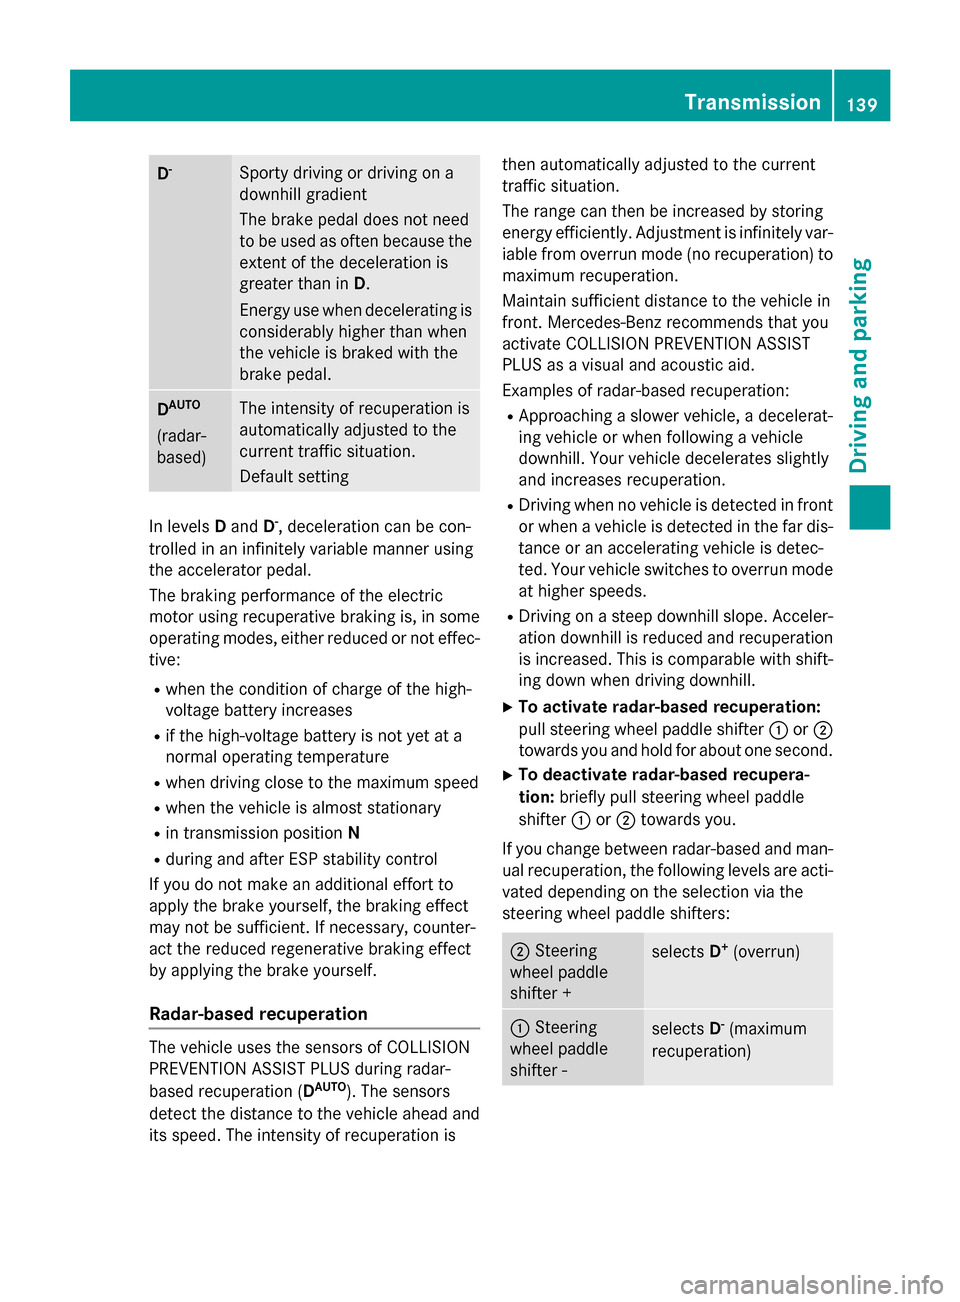
D
- Sporty driving or driving on a
downhill gradient
The brake pedal does not need
to be used as often because the
extent of the deceleration is
greater than in D.
Energy use when decelerating is
considerably higher than when
the vehicle is braked with the
brake pedal. D
AUTO
(radar-
based) The intensity of recuperation is
automatically adjusted to the
current traffic situation.
Default setting
In levels
Dand D-
, deceleration can be con-
trolled in an infinitely variable manner using
the accelerator pedal.
The braking performance of the electric
motor using recuperative braking is, in some
operating modes, either reduced or not effec-
tive:
R when the condition of charge of the high-
voltage battery increases
R if the high-voltage battery is not yet at a
normal operating temperature
R when driving close to the maximum speed
R when the vehicle is almost stationary
R in transmission position N
R during and after ESP stability control
If you do not make an additional effort to
apply the brake yourself, the braking effect
may not be sufficient. If necessary, counter-
act the reduced regenerative braking effect
by applying the brake yourself.
Radar-based recuperation The vehicle uses the sensors of COLLISION
PREVENTION ASSIST PLUS during radar-
based recuperation (D
AUTO
). The sensors
detect the distance to the vehicle ahead and
its speed. The intensity of recuperation is then automatically adjusted to the current
traffic situation.
The range can then be increased by storing
energy efficiently. Adjustment is infinitely var-
iable from overrun mode (no recuperation) to maximum recuperation.
Maintain sufficient distance to the vehicle in
front. Mercedes-Benz recommends that you
activate COLLISION PREVENTION ASSIST
PLUS as a visual and acoustic aid.
Examples of radar-based recuperation:
R Approaching a slower vehicle, a decelerat-
ing vehicle or when following a vehicle
downhill. Your vehicle decelerates slightly
and increases recuperation.
R Driving when no vehicle is detected in front
or when a vehicle is detected in the far dis- tance or an accelerating vehicle is detec-
ted. Your vehicle switches to overrun mode
at higher speeds.
R Driving on a steep downhill slope. Acceler-
ation downhill is reduced and recuperation is increased. This is comparable with shift-
ing down when driving downhill.
X To activate radar-based recuperation:
pull steering wheel paddle shifter :or;
towards you and hold for about one second.
X To deactivate radar-based recupera-
tion: briefly pull steering wheel paddle
shifter :or; towards you.
If you change between radar-based and man- ual recuperation, the following levels are acti-
vated depending on the selection via the
steering wheel paddle shifters: ;
Steering
wheel paddle
shifter + selects
D+
(overrun) :
Steering
wheel paddle
shifter - selects
D-
(maximum
recuperation) Transmission
139Driving and parking Z
Page 142 of 338
In particular, the function of the radar sensors
can be impaired in the case of:
R there is dirt on the sensors or anything else
covering the sensors
R there is snow or heavy rain
R there is interference by other radar sources
R there are strong radar reflections, for
example in parking garages
R a narrow vehicle traveling in front, e.g. a
motorbike
R a vehicle traveling in front on a different line
relative to the center of your vehicle
Following damage to the front end of the vehi-
cle, have the configuration and operation of
the radar sensors checked at a qualified spe-
cialist workshop. This also applies to colli-
sions at slow speeds where there is no visible
damage to the front of the vehicle.
If the radar sensors are not available, the sys-
tem switches automatically to level Dwith
moderate recuperation. Have the radar sen-
sors checked at a qualified specialist work-
shop.
Automatic adjustment of recuperation
on downhill gradients The vehicle can detect steep downhill gradi-
ents. To reduce acceleration downhill and to
charge the high-voltage battery, recuperation is increased steplessly. This is comparable to
the engine brake in a combustion engine
when you downshift a gear on a downhill gra- dient.
Automatic adjustment of recuperation on
downhill gradients is available in level DAUTO
or on vehicles without steering wheel paddle
shifters in level D.
Intelligent recuperation The vehicle uses the map and camera data of
Traffic Sign Assist in addition to the sensors
of COLLISION PREVENTION ASSIST PLUS
during radar-based recuperation (D AUTO
). The
rate of recuperation is then automatically adjusted to the current traffic situation, tak-
ing the current and future maximum speed
into account. High-voltage battery
Important safety notes
G
DANGER
The vehicle's high voltage electrical system is under high voltage. If you modify components
in the vehicle's high-voltage electrical system or touch damaged components, you may be
electrocuted. The components in the vehi-
cle's high-voltage electrical system may be
damaged in an accident, although the damage
is not visible. There is a risk of fatal injury.
Following an accident, do not touch any high- voltage components and never modify the
vehicle's high-voltage electrical system. Have
the vehicle towed away after an accident and the vehicle's high-voltage electrical system
checked by a qualified specialist workshop. G
WARNING
In the event of a vehicle fire, the internal pres- sure of the high-voltage battery can exceed a
critical value. In this case flammable gas
escapes through a ventilation valve on the
underbody. The gas can ignite. There is a risk of injury.
Leave the danger zone immediately. Secure
the danger area at a suitable distance, whilst
observing legal requirements. G
DANGER
If you use incorrectly installed mains sockets or adapters, extension cables or similar to
connect the charging cable to a mains socket,
this could lead to fires or an electric shock.
There is a risk of fatal injury. 140
High-voltage batteryDriving and parking
Page 148 of 338
interruption in the power supply. These
functions protect the vehicle. After the
building fuse is switched on again, the
charging process resumes automatically.
Following an interruption in the power sup- ply without tripping of the building's fuse, it
may take up to 15 minutes for charging to
resume automatically.
Switch on the building's fuse again after the
protection device against overvoltage has
been triggered. Otherwise, the charging proc-
ess cannot be continued. The high-voltage
battery will not be charged and you may not
be able to drive the vehicle.
If other devices are protected by the same
protective device, these are switched off as
well when the protective device is triggered.
Ensure that these other devices are still
operational after reactivating the protection
device. Charging the high-voltage battery via
the electrical outlet
Charging cable Important safety notes
! Only use the charging cable to charge the
high-voltage battery. Do not use the charg-
ing cable for other purposes. It may other-
wise be damaged.
The vehicle is supplied with a single-phase
12 A charging cable. Only use the charging
cable included with the vehicle, which has
been approved for vehicle use.
Pay attention to the "Important safety notes"
(Y page 140).
If you use the supplied 12 Acharging cable to
charge a high-voltage battery:
R the charge time increases considerably
R electrical consumption increases consider-
ably
Where possible, charge the high-voltage bat-
tery at a charging station (Y page 149). Onlythen can certified electrical energy consump-
tion levels be reached.
i The charging process can vary depending
on the charging station. Therefore, always
observe the local information.
Stowing the charging cable
The charging cable can be stowed in a bag in the trunk of the vehicle. To do so, the bag
must be secured to the cargo tie-down rings
using the retaining strap provided.
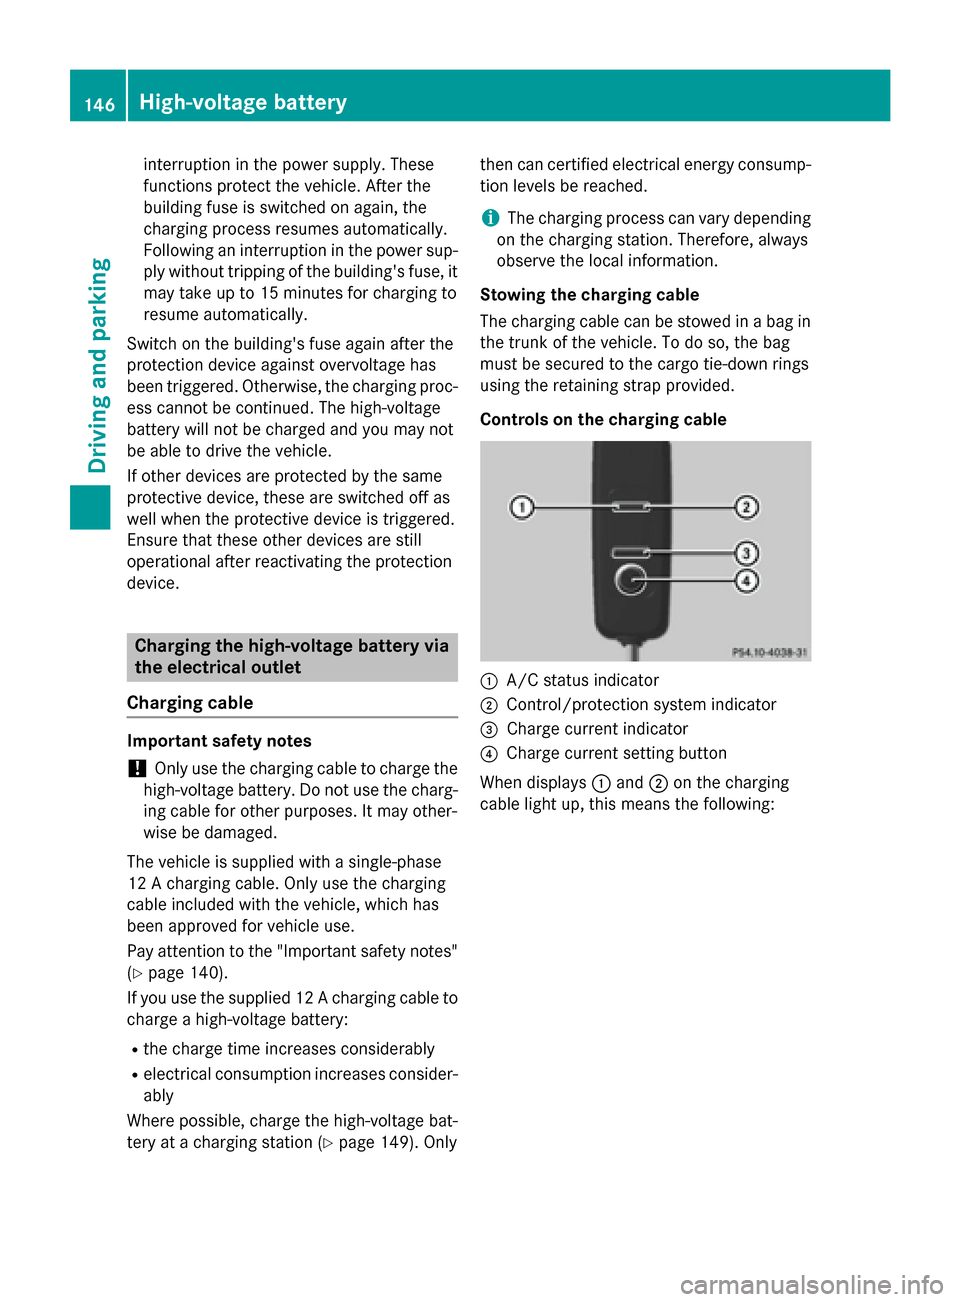
Controls on the charging cable :
A/C status indicator
; Control/protection system indicator
= Charge current indicator
? Charge current setting button
When displays :and ;on the charging
cable light up, this means the following: 146
High-voltage batteryDriving and parking
Page 151 of 338
X
Remove the charging cable from the elec-
trical outlet.
X Stow the charging cable safely in the vehi-
cle (Y page 146). Charging a high-voltage battery at a
charging station/wallbox
General notes Only use charging cables that have been tes-
ted and approved by the manufacturer for
charging the high-voltage battery in an elec-
tric vehicle.
Pay attention to the "Important safety notes"
(Y page 140).
Charging communication at a charging
station The charging station first has to be activated
before you can charge at a charging station.
You can activate the charging station by using
an RFID card or via telephone activation.
Observe the on-site operator instructions for
the charging station.
When the vehicle is connected to the charging station, information and details on technical
parameters are exchanged. It can thus take
up to 30 seconds for the charging process to
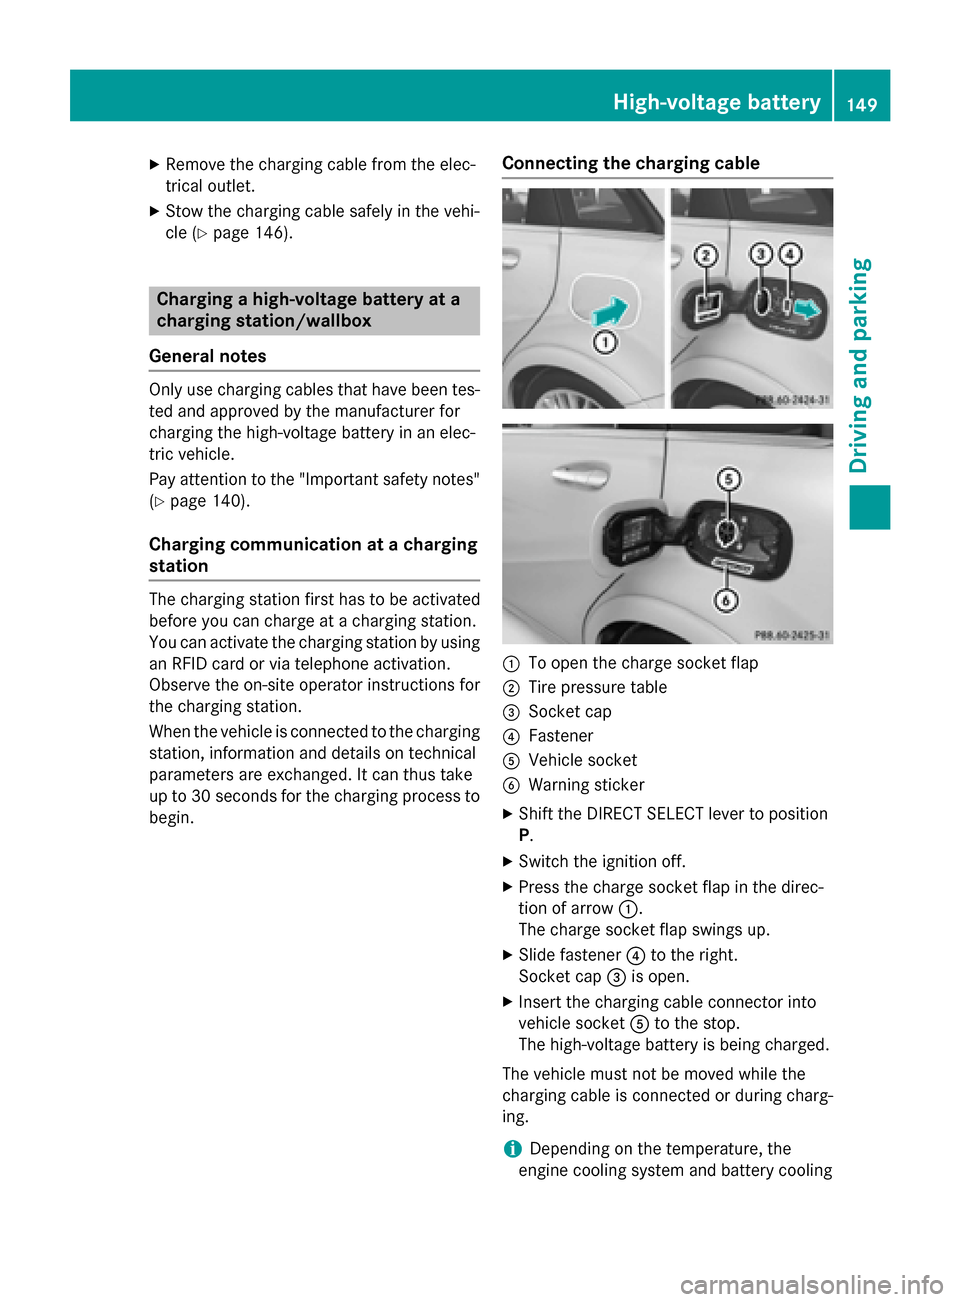
begin. Connecting the charging cable
:
To open the charge socket flap
; Tire pressure table
= Socket cap
? Fastener
A Vehicle socket
B Warning sticker
X Shift the DIRECT SELECT lever to position
P.
X Switch the ignition off.
X Press the charge socket flap in the direc-
tion of arrow :.
The charge socket flap swings up.
X Slide fastener ?to the right.
Socket cap =is open.
X Insert the charging cable connector into
vehicle socket Ato the stop.
The high-voltage battery is being charged.
The vehicle must not be moved while the
charging cable is connected or during charg-
ing.
i Depending on the temperature, the
engine cooling system and battery cooling High-voltage battery
149Driving and parking Z
Page 156 of 338
G
WARNING
If you leave children unsupervised in the vehi- cle, they could set it in motion by, for example:
R release the parking brake.
R shift the transmission out of park position
P.
R start the vehicle's drive system.
They could also operate the vehicle's equip-
ment. There is a risk of an accident and injury.
When leaving the vehicle, always take the
SmartKey with you and lock the vehicle. Never leave children unsupervised in the vehicle.
! While the vehicle is rolling, do not shift the
transmission directly from Dto R, from Rto
D or directly to P.
Do not open the driver's door while the
vehicle is in motion. Otherwise, at low
speeds in transmission position Dor R,
park position Pis engaged automatically
and the electrical parking brake is applied.
The transmission could be damaged.
! Always secure the vehicle correctly
against rolling away. Otherwise, the vehicle
or its drivetrain could be damaged.
To ensure that the vehicle is secured against rolling away unintentionally:
R the electric parking brake must be applied.
R the transmission must be in position P.
R the SmartKey in the ignition lock must be
turned to position 0and removed from the
ignition lock.
R on steep uphill or downhill gradients, turn
the front wheels towards the curb. Switching off the drive system
G
WARNING
If you switch off the ignition while driving,
safety-relevant functions are only available
with limitations, or not at all. This can affect
the power steering and the brake boosting
effect, for example. You will require consider- ably more effort to steer and brake. There is a
risk of an accident.
Do not switch off the ignition while driving.
X Shift the DIRECT SELECT lever to position
P.
X With the SmartKey: turn the SmartKey to
position 0in the ignition lock and remove it.
The immobilizer is activated.
X With the Start/Stop button: press the
Start/Stop button (Y page 131).
The drive system and all the indicator lamps in the instrument cluster go out.
When the driver's door is closed, this cor-
responds to key position 1. When the driv-
er's door is open, this corresponds to key
position 0: "Key removed".
If you switch the drive system off with the
transmission in position Ror D, the transmis-
sion automatically shifts to N.
With the SmartKey: if you then open the
driver's door or the front-passenger door or
remove the SmartKey from the ignition, the
transmission automatically shifts to P.
With the Start/Stop button: if you then
open the driver's door or the front-passenger
door, the transmission automatically shifts to
P.
If you want the transmission to remain in neu- tral N, e.g. when having the vehicle cleaned in
an automatic car wash with a towing system:
Using the SmartKey:
X Switch on the ignition.
X Depress the brake pedal and keep it
depressed.
X Shift to neutral N.
X Release the brake pedal.
X Release the electric parking brake.
X Switch off the ignition and leave the Smart-
Key in the ignition lock. 154
ParkingDriving and parking
Page 161 of 338
Do not depress the brake pedal continuously
while the vehicle is in motion, e.g. causing the
brakes to rub by constantly applying light
pressure to the pedal. This results in exces-
sive and premature wear to the brake pads.
Heavy and light loads G
WARNING
If you rest your foot on the brake pedal while
driving, the braking system can overheat. This increases the stopping distance and can even
cause the braking system to fail. There is a
risk of an accident.
Never use the brake pedal as a footrest. Never
depress the brake pedal and the accelerator
pedal at the same time.
! Depressing the brake pedal constantly
results in excessive and premature wear to
the brake pads.
If the brakes have been subjected to a heavy load, do not stop the vehicle immediately.
Drive on for a short while. This allows the air-
flow to cool the brakes more quickly.
Wet roads If you have driven for a long time in heavy rain
without braking, there may be a delayed reac- tion from the brakes when braking for the firsttime. This may also occur after the vehicle has
been washed or driven through deep water.
You have to depress the brake pedal more
firmly. Maintain a greater distance from the
vehicle in front.
After driving on a wet road or having the vehi-
cle washed, brake firmly while paying atten-
tion to the traffic conditions. This will warm up
the brake discs, thereby drying them more
quickly and protecting them against corro-
sion.
Limited braking performance on salt-
treated roads If you drive on salted roads, a layer of salt
residue may form on the brake discs and brake pads. This can result in a significantly
longer braking distance.
R In order to prevent any salt build-up, apply
the brakes occasionally while paying atten- tion to the traffic conditions.
R Carefully depress the brake pedal and the
beginning and end of a journey.
R Maintain a greater distance to the vehicle
ahead.
Servicing the brakes !
If the red brake warning lamp lights up in
the instrument cluster and you hear a warn- ing tone while the engine is running, the
brake fluid level may be too low. Observe
additional warning messages in the multi-
function display.
The brake fluid level may be too low due to brake pad wear or leaking brake lines.
Have the brake system checked immedi-
ately. This work should be carried out at a
qualified specialist workshop.
! A function or performance test should
only be carried out on a 2-axle dynamom-
eter. If you are planning to have the vehicle tested on such a dynamometer, contact an
authorized Mercedes-Benz Center to
obtain further information first. Otherwise,
you could damage the drive train or the
brake system.
! As the ESP ®
system operates automati-
cally, the engine and the ignition must be
switched off (the SmartKey must be in posi-
tion 0or 1in the ignition lock) if:
R the electric parking brake is tested on a
brake dynamometer (for a maximum of
ten second s)
R the vehicle is towed with the front axle
raised.
Braking triggered automatically by ESP ®
may seriously damage the brake system.
All checks and maintenance work on the
brake system must be carried out at a quali- Driving
tips
159Driving an d parking Z
Page 165 of 338
i
Cruise control may be unable to maintain
the stored speed on uphill gradients. The
stored speed is resumed when the gradient evens out. Cruise control maintains the
stored speed on downhill gradients by
automatically applying the brakes.
Storing the current speed or calling up the
last stored speed G
WARNING
If you call up the stored speed and it differs
from the current speed, the vehicle acceler-
ates or decelerates. If you do not know the
stored speed, the vehicle could accelerate or brake unexpectedly. There is a risk of an acci-
dent.
Pay attention to the road and traffic condi-
tions before calling up the stored speed. If you do not know the stored speed, store the
desired speed again.
X Briefly pull the cruise control lever towards
you =.
X Remove your foot from the accelerator
pedal.
The first time cruise control is activated, it
stores the current speed or regulates the
speed of the vehicle to the previously
stored speed.
Setting a speed Keep in mind that it may take a brief moment
until the vehicle has accelerated or braked to the speed set.
X Press the cruise control lever up :for a
higher speed or down ?for a lower speed.
X To adjust the set speed in 1 mph incre-
ments (1 km/h increments): briefly
press the cruise control lever up :or
down ?to the pressure point.
The last stored speed increases or decrea- ses in 1 mph (1 km/h) increments.
X To adjust the set speed in 5 mph incre-
ments (10 km/h increments): brieflypress the cruise control lever up
:or
down ?to the pressure point.
The last stored speed increases or decrea- ses in 5 mph (10 km/h)increments.
i Cruise control is not deactivated if you
depress the accelerator pedal. For exam-
ple, if you accelerate briefly to overtake,
cruise control adjusts the vehicle's speed
to the last speed stored after you have fin- ished overtaking.
Deactivating cruise control There are several ways to deactivate cruise
control:
X Briefly press the cruise control lever for-
wards =.
or
X Brake.
Cruise control is automatically deactivated if: R the vehicle is secured with the electric
parking brake
R you are driving at less than 20 mph
(30 km/h)
R ESP ®
intervenes or you deactivate ESP ®
R you shift the transmission to position N
while driving
If cruise control is deactivated, you will hear a warning tone. You will see the Cruise Con‐
Cruise Con‐
trol Off trol Off message in the multifunction dis-
play for approximately five seconds.
i When you switch off the engine, the last
speed stored is cleared. HOLD function
General notes The HOLD function can assist the driver in the
following situations:
R when pulling away, especially on steep
slopes
R when maneuvering on steep slopes
R when waiting in traffic Driving systems
163Driving and parking Z
Page 166 of 338
The vehicle is kept stationary without the
driver having to depress the brake pedal.
The braking effect is canceled and the HOLD
function deactivated when you depress the
accelerator pedal to pull away.
Important safety notes G
WARNING
When leaving the vehicle, it can still roll away despite being braked by the HOLD function if:
R there is a malfunction in the system or in
the voltage supply.
R the HOLD function has been deactivated by
pressing the accelerator pedal or the brake
pedal, e.g. by a vehicle occupant.
R the electrical system in the engine com-
partment, the battery or the fuses have
been tampered with.
R the battery is disconnected
There is a risk of an accident.
If you wish to exit the vehicle, always turn off the HOLD function and secure the vehicle
against rolling away.
! If the HOLD function is activated, the vehi-
cle brakes automatically in certain situa-
tions.
To prevent damage to the vehicle, deacti-
vate the HOLD function in the following or
other similar situations:
R when towing the vehicle
R in the car wash
Deactivating the HOLD function
(Y page 164).
Activation conditions You can activate the HOLD function if:
R the vehicle is stationary
R the engine is running or if it has been auto-
matically switched off by the ECO start/
stop function
R the driver's door is closed or your seat belt
is fastened R
the electric parking brake is released
R the transmission is in position D,Ror N
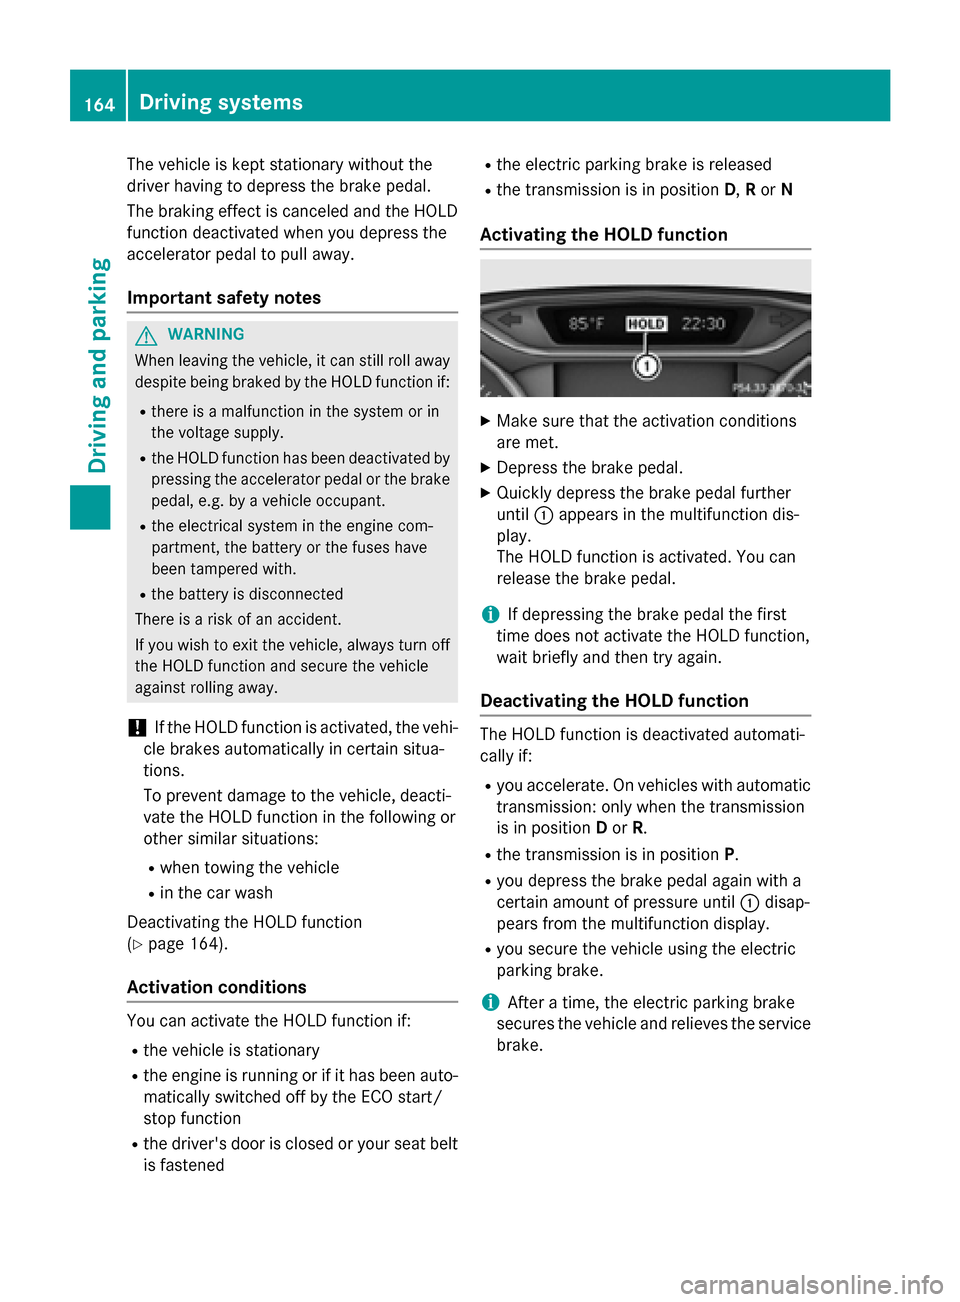
Activating the HOLD function X
Make sure that the activation conditions
are met.
X Depress the brake pedal.
X Quickly depress the brake pedal further
until :appears in the multifunction dis-
play.
The HOLD function is activated. You can
release the brake pedal.
i If depressing the brake pedal the first
time does not activate the HOLD function,
wait briefly and then try again.
Deactivating the HOLD function The HOLD function is deactivated automati-
cally if:
R you accelerate. On vehicles with automatic
transmission: only when the transmission
is in position Dor R.
R the transmission is in position P.
R you depress the brake pedal again with a
certain amount of pressure until :disap-
pears from the multifunction display.
R you secure the vehicle using the electric
parking brake.
i After a time, the electric parking brake
secures the vehicle and relieves the service
brake. 164
Driving systemsDriving and parking