2015 LINCOLN MKT towing
[x] Cancel search: towingPage 6 of 500
Traction Control 201
TractionControl™ ....................................201
Stability Control 202
AdvanceTrac®.......................................203
Parking Aids 204
Sensing system.......................................204
Active park assist.....................................206
Rear-view camera system...............................210
Cruise Control 215
Using cruise control...................................215
Using Adaptive Cruise Control............................216
Driving Aids 225
Driveralert .........................................225
Lane keeping system...................................227
Blind Spot Information System (BLIS) with Cross Traffic Alert
(CTA) .............................................231
Collision warning system................................236
Lincoln adaptive drive..................................240
Steering............................................241
Load Carrying 243
Rear under floor storage................................243
Cargo net...........................................243
Luggage cover.......................................243
Vehicle loading.......................................244
Towing 252
Trailertowing........................................252
Wrecker towing......................................259
Recreational towing...................................260
Table of Contents5
2015 MKT(mkt)
Owners Guide gf, 1st Printing, October 2014
USA(fus)
Page 49 of 500
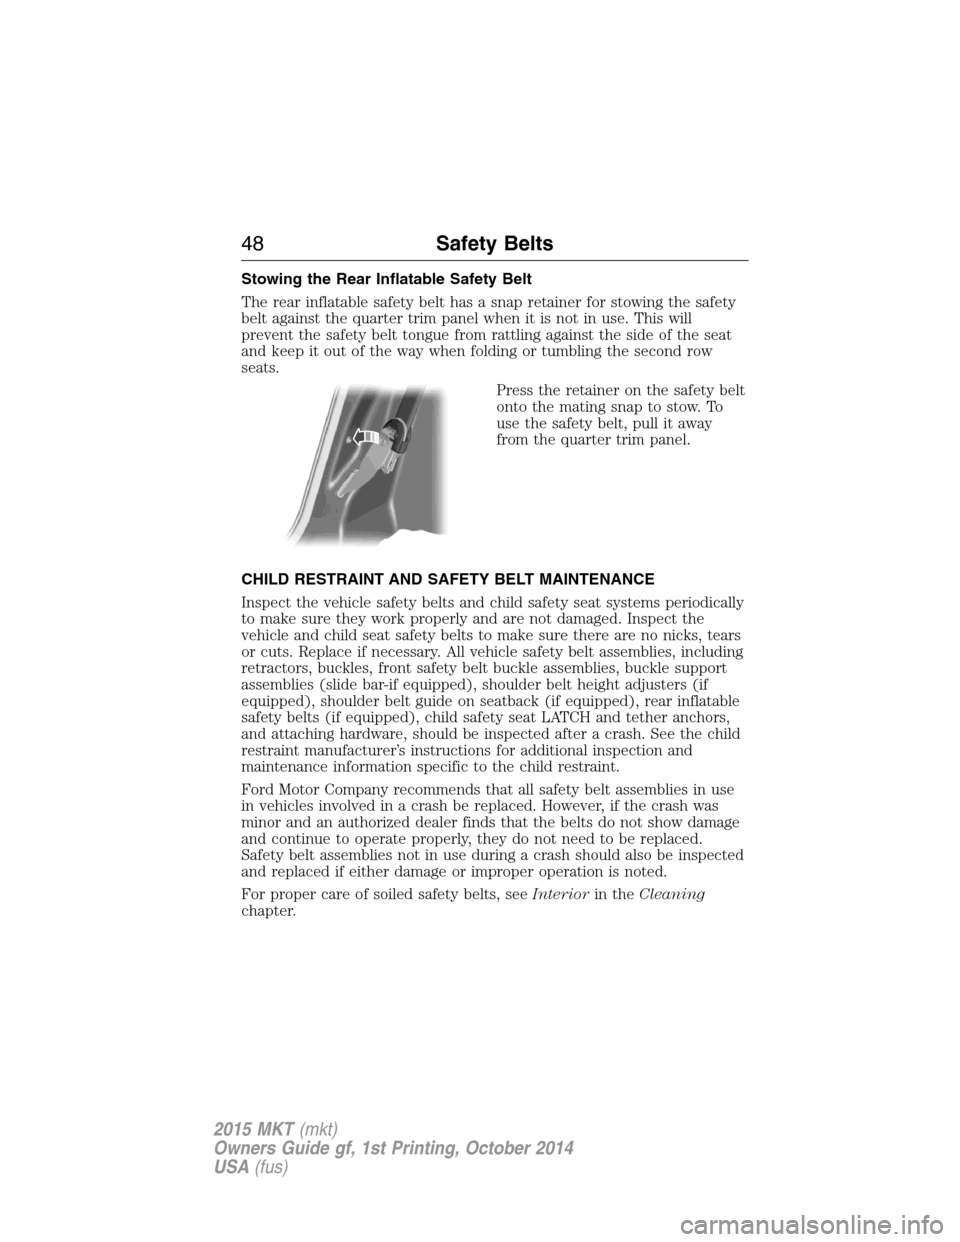
Stowing the Rear Inflatable Safety Belt
The rear inflatable safety belt has a snap retainer for stowing the safety
belt against the quarter trim panel when it is not in use. This will
prevent the safety belt tongue from rattling against the side of the seat
and keep it out of the way when folding or tumbling the second row
seats.
Press the retainer on the safety belt
onto the mating snap to stow. To
use the safety belt, pull it away
from the quarter trim panel.
CHILD RESTRAINT AND SAFETY BELT MAINTENANCE
Inspect the vehicle safety belts and child safety seat systems periodically
to make sure they work properly and are not damaged. Inspect the
vehicle and child seat safety belts to make sure there are no nicks, tears
or cuts. Replace if necessary. All vehicle safety belt assemblies, including
retractors, buckles, front safety belt buckle assemblies, buckle support
assemblies (slide bar-if equipped), shoulder belt height adjusters (if
equipped), shoulder belt guide on seatback (if equipped), rear inflatable
safety belts (if equipped), child safety seat LATCH and tether anchors,
and attaching hardware, should be inspected after a crash. See the child
restraint manufacturer’s instructions for additional inspection and
maintenance information specific to the child restraint.
Ford Motor Company recommends that all safety belt assemblies in use
in vehicles involved in a crash be replaced. However, if the crash was
minor and an authorized dealer finds that the belts do not show damage
and continue to operate properly, they do not need to be replaced.
Safety belt assemblies not in use during a crash should also be inspected
and replaced if either damage or improper operation is noted.
For proper care of soiled safety belts, seeInteriorin theCleaning
chapter.
48Safety Belts
2015 MKT(mkt)
Owners Guide gf, 1st Printing, October 2014
USA(fus)
Page 121 of 500

Settings
Vehicle
Drive ControlHandling in D Sport / Normal / Comfort
Handling in S Sport / Normal
Auto Engine Off — check enabled / uncheck disabled
DTE Calculation Normal / Towing
Easy Entry/Exit — check enabled / uncheck disabled
Lighting Adaptive Head
LampsTraffic Set Up Right Hand / Left
Hand Traffic
Auto Highbeam — check enabled (default) / uncheck
disabled
Autolamp Delay Off or number of seconds
Locks Autolock — check enabled (default) / uncheck disabled
Autounlock — check enabled (default) / uncheck
disabled
Remote Unlocking All doors / Driver’s door
Oil Life Reset Remaining Life XXX %
Power Liftgate Enable / Disable
Remote Start Climate Control
(using this
feature allows you
to select different
climate control
modes when the
vehicle is started
using the remote
start feature)Auto / Last Settings
Seats and wheel
or Seats onlyAuto / Off
Duration 5 / 10 /15 minutes
System — check enabled (default) / uncheck disabled
Windows Remote Open / Close
WipersCourtesy Wipe — check enabled (default) / uncheck
disabled
Rain Sensing — check enabled (default) / uncheck
disabled
120Information Displays
2015 MKT(mkt)
Owners Guide gf, 1st Printing, October 2014
USA(fus)
Page 157 of 500
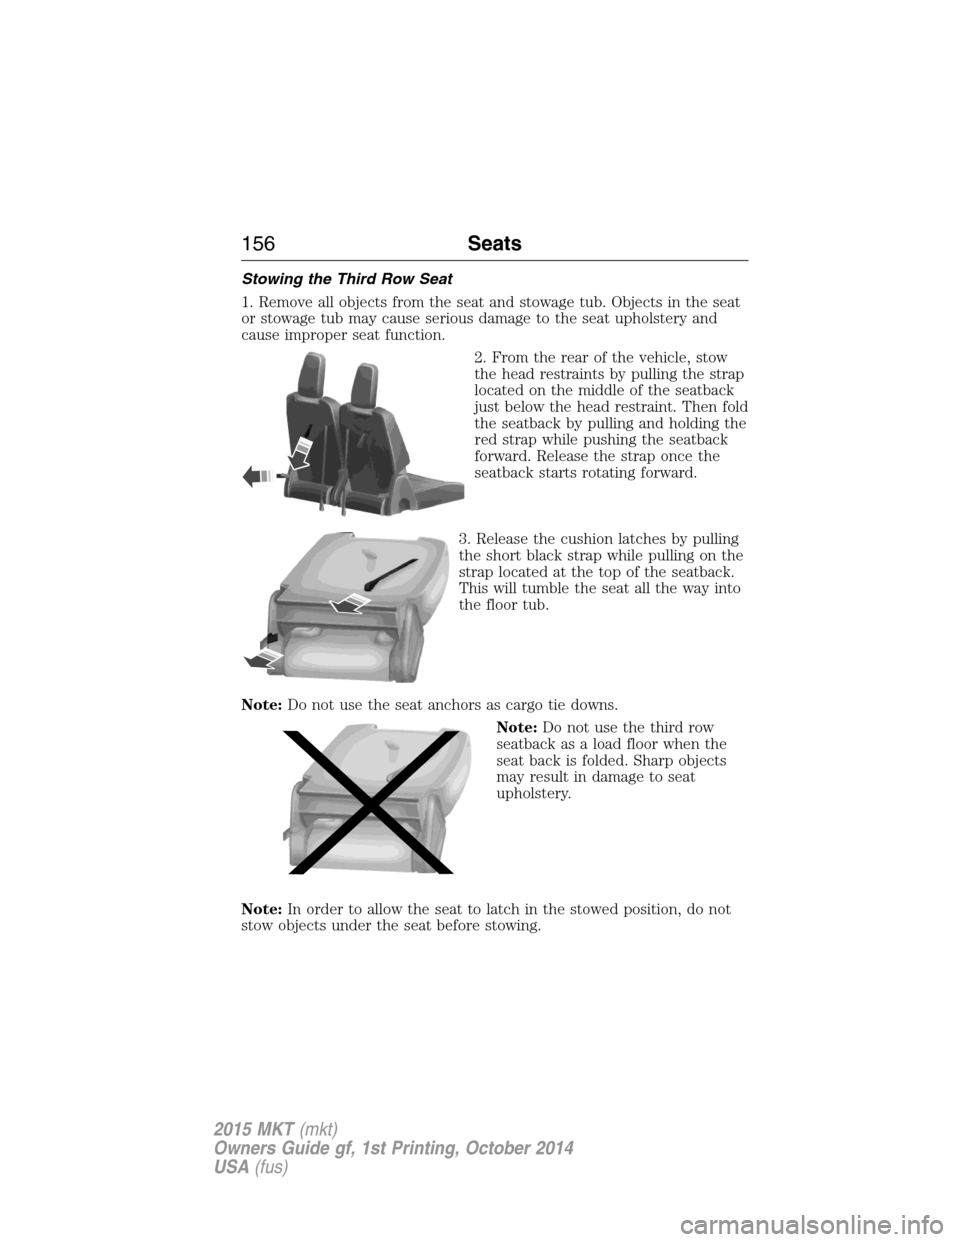
Stowing the Third Row Seat
1. Remove all objects from the seat and stowage tub. Objects in the seat
or stowage tub may cause serious damage to the seat upholstery and
cause improper seat function.
2. From the rear of the vehicle, stow
the head restraints by pulling the strap
located on the middle of the seatback
just below the head restraint. Then fold
the seatback by pulling and holding the
red strap while pushing the seatback
forward. Release the strap once the
seatback starts rotating forward.
3. Release the cushion latches by pulling
the short black strap while pulling on the
strap located at the top of the seatback.
This will tumble the seat all the way into
the floor tub.
Note:Do not use the seat anchors as cargo tie downs.
Note:Do not use the third row
seatback as a load floor when the
seat back is folded. Sharp objects
may result in damage to seat
upholstery.
Note:In order to allow the seat to latch in the stowed position, do not
stow objects under the seat before stowing.
156Seats
2015 MKT(mkt)
Owners Guide gf, 1st Printing, October 2014
USA(fus)
Page 158 of 500
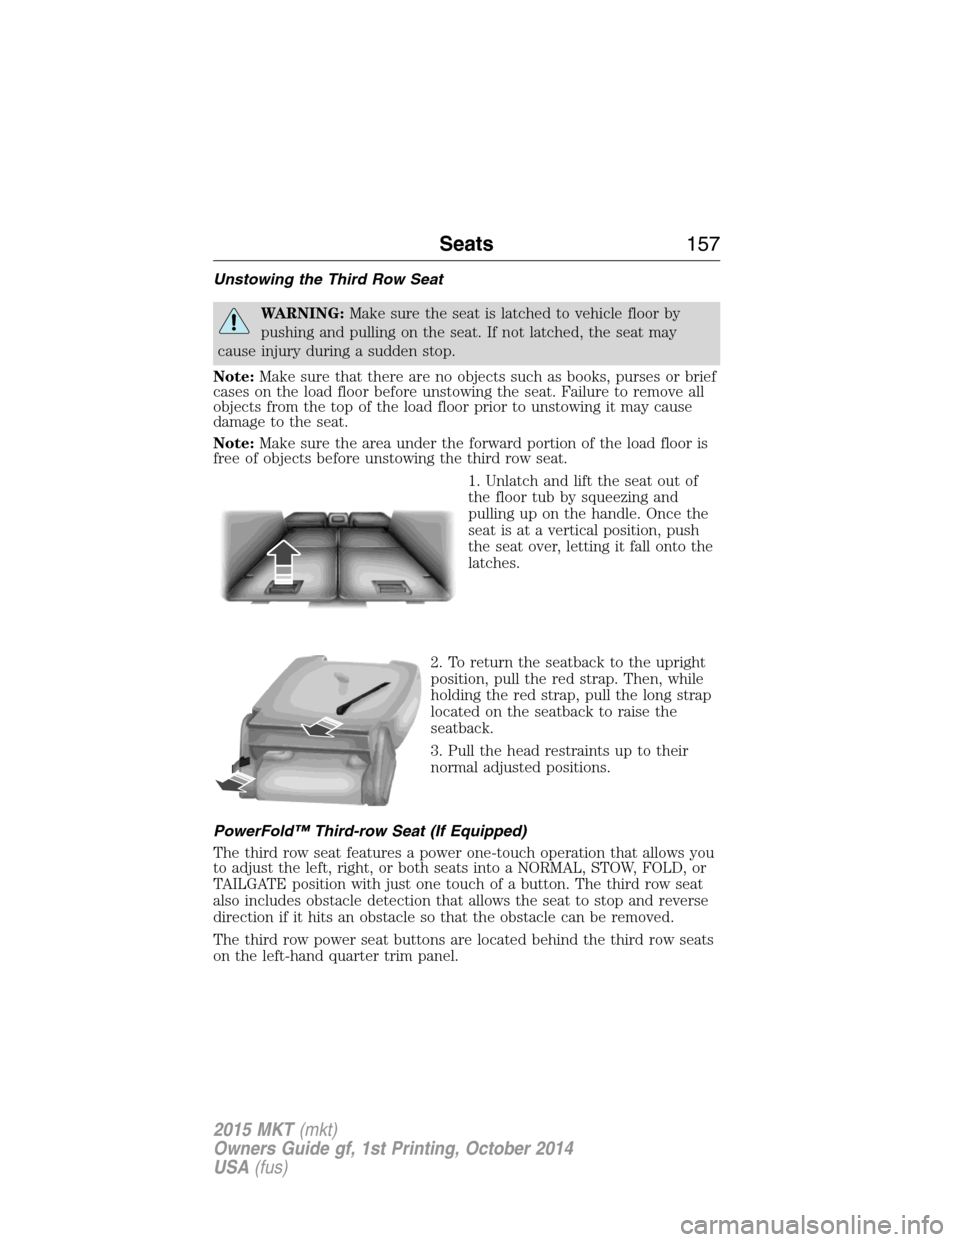
Unstowing the Third Row Seat
WARNING:Make sure the seat is latched to vehicle floor by
pushing and pulling on the seat. If not latched, the seat may
cause injury during a sudden stop.
Note:Make sure that there are no objects such as books, purses or brief
cases on the load floor before unstowing the seat. Failure to remove all
objects from the top of the load floor prior to unstowing it may cause
damage to the seat.
Note:Make sure the area under the forward portion of the load floor is
free of objects before unstowing the third row seat.
1. Unlatch and lift the seat out of
the floor tub by squeezing and
pulling up on the handle. Once the
seat is at a vertical position, push
the seat over, letting it fall onto the
latches.
2. To return the seatback to the upright
position, pull the red strap. Then, while
holding the red strap, pull the long strap
located on the seatback to raise the
seatback.
3. Pull the head restraints up to their
normal adjusted positions.
PowerFold™ Third-row Seat (If Equipped)
The third row seat features a power one-touch operation that allows you
to adjust the left, right, or both seats into a NORMAL, STOW, FOLD, or
TAILGATE position with just one touch of a button. The third row seat
also includes obstacle detection that allows the seat to stop and reverse
direction if it hits an obstacle so that the obstacle can be removed.
The third row power seat buttons are located behind the third row seats
on the left-hand quarter trim panel.
Seats157
2015 MKT(mkt)
Owners Guide gf, 1st Printing, October 2014
USA(fus)
Page 159 of 500

Note:The power fold seats work only when the transmission is in park
(P) and the tailgate is open. If the ignition is off and the feature is still
running, the battery saver will turn it off after 10 minutes. You can
reactivate the power seats by pressing the unlock button on the remote
entry key fob or by using the unlock procedure on the keyless entry
keypad. SeeSecuriCode keyless keypadin theLockschapter. Keep the
key in the accessory or run position to prevent the feature from timing
out.
Press the seat selection button (D) to select either right-hand seat, the
left-hand seat or both. First, select the seat you would like to adjust,
then select one of the following:
•Press the NORMAL button (A) to return the seat to the normal
seating position.
•Press the STOW button (B) to stow the seat into the tub floor.
•Press the FOLD button (C) (the top portion of the button) to fold
down the seat back.
•Press the TAILGATE button (C) (the bottom portion of the button) to
put the seat into the tailgate position.
Note:Pressing a different button while the power seat feature is already
being performed may cause the first selected seat movement to be
cancelled. Allow the first seat movement to be completed before pressing
a button for another function.
Note:Make sure that there are no objects such as books, purses or brief
cases on the load floor before unstowing the seat. Failure to remove all
objects from the top of the load floor prior to unstowing it may cause
damage to the seat.
Note:In order to allow the seat to complete the stowed position, do not
place objects under the seat before stowing. Remove all objects from the
seat and stowage tub. Sharp objects may result in damage to the seat
upholstery and improper seat function.
NORMAL
STOWRH
BOTH
LH
FOLD
TA I L G AT E
ABCD
158Seats
2015 MKT(mkt)
Owners Guide gf, 1st Printing, October 2014
USA(fus)
Page 213 of 500
Note:If the transmission is in R (Reverse) and the trunk/liftgate is ajar,
no rear view camera features are displayed.
Note:If the image comes on while the transmission is not in R
(Reverse), have the system inspected by your authorized dealer.
Note:When towing, the camera only sees what is being towed behind
the vehicle. This might not provide adequate coverage as it usually
provides in normal operation and some objects might not be seen. In
some vehicles, the guidelines may disappear once the trailer tow
connector is engaged.
Note:The camera may not operate correctly under the following
conditions:
•Nighttime or dark areas if one or both reverse lamps are not
operating. Do not use the rear view camera display when lighting is
low until both reverse lamps are functional.
•The camera’s view is obstructed by mud, water or debris. Clean the
lens with a soft, lint-free cloth and non-abrasive cleaner.
•The rear of the vehicle is hit or damaged, causing the camera to
become misaligned. Check with your authorized dealer to have the
rear view camera system checked for proper coverage and operation.
Adjusting the Rear View Camera Settings (If Equipped)
To access any of the rear view camera system settings, make the
following selections in the touch screen when the transmission is not in
R (Reverse):
1. Menu
2. Vehicle
3. Rear View Camera
After changing a system setting, the touch screen shows a preview of the
feature(s) selected.
212Parking Aids
2015 MKT(mkt)
Owners Guide gf, 1st Printing, October 2014
USA(fus)
Page 224 of 500

Blocked Sensor
WARNING:Do not use ACC when towing a trailer with brake
controls. Aftermarket trailer brakes will not function properly
when ACC is activated because the brakes are electronically controlled.
Failing to do so may result in loss of vehicle control, which could result
in serious injury.
WARNING:Do not use tires sizes other than those
recommended because this can affect the normal operation of
ACC. Failing to do so may result in a loss of vehicle control, which
could result in serious injury.
A message regarding a blocked
sensor is displayed if the radar
signals from the sensor have been
obstructed. The sensor is located
behind a fascia cover near the
driver side of the lower grille. A
vehicle ahead cannot be detected
and the system will not function
when the radar signals are obstructed. The following table lists possible
causes and actions for this message being displayed.
Cause Action
The surface of the radar in the
grille is dirty or obstructed in
some way.Clean the grille surface in front of
the radar or remove the object
causing the obstruction.
The surface of the radar in the
grille is clean but the message
remains in the display.Wait a short time. It may take
several minutes for the radar to
detect that it is no longer
obstructed.
Heavy rain or snow is interfering
with the radar signals.Do not use the system in these
conditions because it may not
detect any vehicle ahead.
Cruise Control223
2015 MKT(mkt)
Owners Guide gf, 1st Printing, October 2014
USA(fus)