2015 LINCOLN MKT brake light
[x] Cancel search: brake lightPage 258 of 500

Trailer Lamps
WARNING:Never connect any trailer lamp wiring to the
vehicle’s tail lamp wiring; this may damage the electrical system
resulting in a fire. Contact an authorized dealer as soon as possible for
assistance in proper trailer tow wiring installation. Additional electrical
equipment may be required.
Trailer lamps are required on most towed vehicles. Make sure all running
lights, brake lights, turn signals and hazard lights are working.
Before Towing a Trailer
Practice turning, stopping and backing up to get the feel of your
vehicle-trailer combination before starting on a trip. When turning, make
wider turns so the trailer wheels clear curbs and other obstacles.
When Towing a Trailer
•Do not drive faster than 70 mph (113 km/h) during the first 500 miles
(800 kilometers).
•Do not make full-throttle starts.
•Check your hitch, electrical connections and trailer wheel lug nuts
thoroughly after you have traveled 50 miles (80 kilometers).
•When stopped in congested or heavy traffic during hot weather, place
the gearshift in positionPto aid engine and transmission cooling and
to help air conditioning performance.
•Turn off the speed control with heavy loads or in hilly terrain. The
speed control may turn off automatically when you are towing on
long, steep grades.
•Shift to a lower gear when driving down a long or steep hill. Do not
apply the brakes continuously, as they may overheat and become less
effective.
•If your transmission is equipped with a Grade Assist or Tow/Haul
feature, use this feature when towing. This provides engine braking
and helps eliminate excessive transmission shifting for optimum fuel
economy and transmission cooling.
•Allow more distance for stopping with a trailer attached. Anticipate
stops and brake gradually.
Towing257
2015 MKT(mkt)
Owners Guide gf, 1st Printing, October 2014
USA(fus)
Page 264 of 500

•Add particular accessories to your vehicle (e.g.; bug deflectors,
rollbars or light bars, running boards, ski racks).
•Drive with the wheels out of alignment.
DRIVING THROUGH WATER
WARNING:Do not drive through flowing or deep water as you
may lose control of your vehicle.
Note:Driving through standing water can cause vehicle damage.
Note:Engine damage can occur if water enters the air filter.
Before driving through standing water, check the depth. Never drive
through water that is higher than the bottom of the front rocker area of
your vehicle.
When driving through standing
water, drive very slowly and do not
stop your vehicle. Your brake
performance and traction may be
limited. After driving through water
and as soon as it is safe to do so:
•Lightly press the brake pedal to
dry the brakes and to check that
they work.
•Check that the horn works.
•Check that the exterior lights work.
•Turn the steering wheel to check that the steering power assist works.
FLOOR MATS
WARNING:Always use floor mats that are designed to fit the
foot well of your vehicle. Only use floor mats that leave the pedal
area unobstructed. Only use floor mats that are firmly secured to
retention posts so that they cannot slip out of position and interfere
with the pedals or impair safe operation of your vehicle in other ways.
WARNING:Pedals that cannot move freely can cause loss of
vehicle control and increase the risk of serious personal injury.
Driving Hints263
2015 MKT(mkt)
Owners Guide gf, 1st Printing, October 2014
USA(fus)
Page 287 of 500

Fuse or relay
numberFuse amp
ratingProtected components
7 7.5A Driver door module, Driver seat
module, Keypad
8 10A Power liftgate
9 10A SYNC, Electronic finish panel,
Radio transceiver module
10 10A Run/accessory relay, Front wiper
motor relay, Limousine
run/accessory
11 10A Intelligent access module,
Heads-up display
12 15A Interior lighting, Puddle lamps,
Backlighting
13 15A Right turn lamps, Right rear
stop/turn lamps, Right mirror turn
signal
14 15A Left turn lamps, Left rear
stop/turn lamps, Left mirror turn
signal
15 15A Center high mounted stop lamp,
Backup lamp
16 10A Low beam headlamps (right)
17 10A Low beam headlamps (left)
18 10A 3rd row power seats, Start button
run indicator, Keypad
illumination, Brake shift interlock,
Powertrain control module
wake-up
19 20A Smart amplifier, Subwoofer
amplifier
20 20A Not used (spare)
21 10A Not used (spare)
22 20A Horn relay
286Fuses
2015 MKT(mkt)
Owners Guide gf, 1st Printing, October 2014
USA(fus)
Page 315 of 500
Replacing HID headlamp bulbs
The headlamps on your vehicle use a “high intensity discharge” source.
These lamps operate at a high voltage. When the bulb is burned out, the
bulb and starter capsule assembly must be replaced by your authorized
dealer.
Replacing front parking lamp/turn signal bulbs
For bulb replacement, see your authorized dealer.
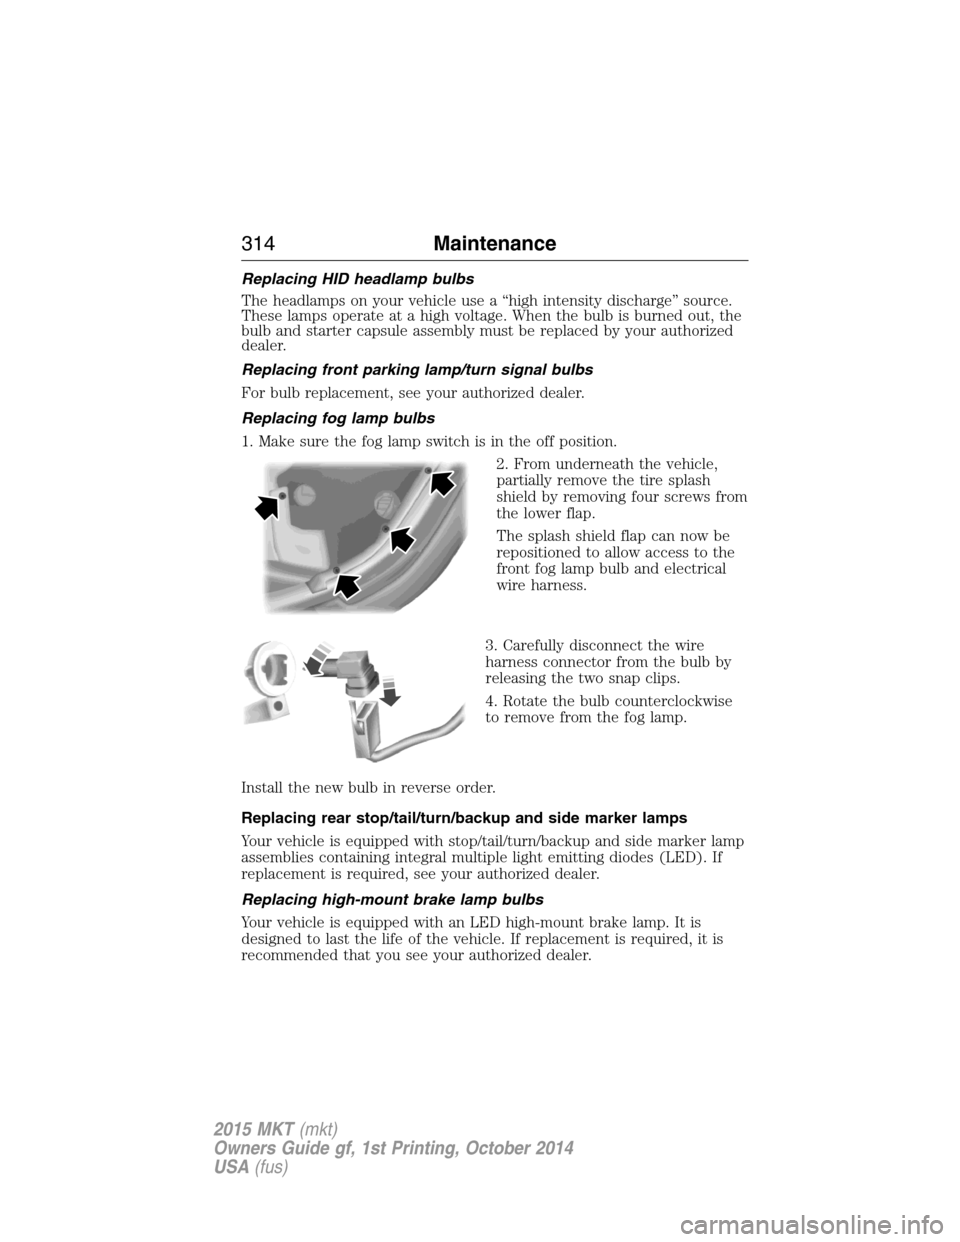
Replacing fog lamp bulbs
1. Make sure the fog lamp switch is in the off position.
2. From underneath the vehicle,
partially remove the tire splash
shield by removing four screws from
the lower flap.
The splash shield flap can now be
repositioned to allow access to the
front fog lamp bulb and electrical
wire harness.
3. Carefully disconnect the wire
harness connector from the bulb by
releasing the two snap clips.
4. Rotate the bulb counterclockwise
to remove from the fog lamp.
Install the new bulb in reverse order.
Replacing rear stop/tail/turn/backup and side marker lamps
Your vehicle is equipped with stop/tail/turn/backup and side marker lamp
assemblies containing integral multiple light emitting diodes (LED). If
replacement is required, see your authorized dealer.
Replacing high-mount brake lamp bulbs
Your vehicle is equipped with an LED high-mount brake lamp. It is
designed to last the life of the vehicle. If replacement is required, it is
recommended that you see your authorized dealer.
314Maintenance
2015 MKT(mkt)
Owners Guide gf, 1st Printing, October 2014
USA(fus)
Page 316 of 500

Replacing license plate lamp bulbs
1. Make sure the headlamp switch is in the off position.
2. Remove the two screws and the
license plate lamp assembly from the
liftgate.
3. Carefully pull the bulb straight out
from the lamp assembly.
Install new bulb(s) in reverse order.
BULB SPECIFICATION CHART
Replacement bulbs are specified in the chart below. Headlamp bulbs
must be marked with an authorized “D.O.T.” for North America and an
“E” for Europe to ensure lamp performance, light brightness and pattern
and safe visibility. The correct bulbs will not damage the lamp assembly
or void the lamp assembly warranty and will provide quality bulb burn
time.
Function Number of BulbsTrade
Number
*Headlamp 2 D3S (HID)
*Front sidemarker lamp N/A LED
*Front parking lamp N/A LED
*Front turn lamp 2 PY24W SV+
Fog lamp 2 H11
*Tail/brake/turn signal
lampN/A LED
*Rear sidemarker N/A LED
*Backup lamp N/A LED
License plate lamp 2 C5WL
*High-mount brake lamp N/A LED
*First row dome/map lamp 2 1600XB
Maintenance315
2015 MKT(mkt)
Owners Guide gf, 1st Printing, October 2014
USA(fus)
Page 324 of 500
You should:
•Remove dust and loose dirt with a vacuum cleaner.
•Clean and treat spills and stains as soon as possible.
Do not use the following products as these may damage the leather:
•Oil and petroleum or silicone-based leather conditioners.
•Household cleaners.
•Alcohol solutions.
•Solvents or cleaners intended specifically for rubber, vinyl and
plastics.Motorcraft
Note:Do not use Motorcraft Premium Leather and Vinyl Cleaner ZC-56
on Lincoln Black Label, Presidential or Reserve Leathers because it can
damage these and other semi-aniline leather seating fabrics. It can also
damage surrounding microfiber accent surfaces. To clean Lincoln Black
Label, Presidential or Reserve Leather, first vacuum the seats to remove
loose dirt. Then wipe the leather with a clean soft cloth dampened with
lukewarm water and a mild soap. Wipe the leather again with a slightly
damp cloth to remove soap residue, and dry with a soft cloth. To
maintain the leather’s resiliency, it should be cleaned whenever soiled.
CLEANING THE ALLOY WHEELS
Note:Do not use chrome cleaner, metal cleaner or polish on wheels and
wheel covers.
A clearcoat paint finish coats aluminum wheels and wheel covers. In
order to maintain their condition:
•Clean weekly with Motorcraft Wheel and Tire Cleaner. Use a sponge to
remove heavy deposits of dirt and brake dust accumulation. Rinse
thoroughly with a strong stream of water when you have completed
the cleaning process.
•To remove tar and grease, use Motorcraft Bug and Tar Remover.
•Never apply any cleaning chemical to hot or warm wheel rims or
covers.
•Some automatic car washes may cause damage to the finish on your
wheel rims or covers.
•Industrial-strength (heavy-duty) cleaners, or cleaning chemicals, in
combination with brush agitation to remove brake dust and dirt, could
wear away the clearcoat finish over time.
Vehicle Care323
2015 MKT(mkt)
Owners Guide gf, 1st Printing, October 2014
USA(fus)
Page 325 of 500

•Do not use hydrofluoric acid-based or high caustic-based wheel
cleaners, steel wool, fuels or strong household detergent.
•If you intend on parking your vehicle for an extended period after
cleaning the wheels with a wheel cleaner, drive your vehicle for a few
minutes before doing so. This reduces the risk of increased corrosion
of the brake discs.
VEHICLE STORAGE
If you plan on storing your vehicle for an extended period of time
(30 days or more), read the following maintenance recommendations to
make sure your vehicle stays in good operating condition.
All motor vehicles and their components were engineered and tested for
reliable, regular driving. Long-term storage under various conditions may
lead to component degradation or failure unless specific precautions are
taken to preserve the components.
General
•Store all vehicles in a dry, ventilated place.
•Protect from sunlight, if possible.
•If vehicles are stored outside, they require regular maintenance to
protect against rust and damage.
Body
•Wash vehicle thoroughly to remove dirt, grease, oil, tar or mud from
exterior surfaces, rear-wheel housing and underside of front fenders.
•Periodically wash vehicles stored in exposed locations.
•Touch up raw or primed metal to prevent rust.
•Cover chrome and stainless steel parts with a thick coat of auto wax
to prevent discoloration. Re-wax as necessary when the vehicle is
washed.
•Lubricate hood latch, all door latches and trunk lid hinges with a light
grade oil.
•Cover interior trim to prevent fading.
•Keep all rubber parts free from oil and solvents.
324Vehicle Care
2015 MKT(mkt)
Owners Guide gf, 1st Printing, October 2014
USA(fus)
Page 351 of 500

CHANGING A ROAD WHEEL
WARNING:The use of tire sealant may damage your tire pressure
monitoring system and should only be used in roadside emergencies.
If you must use a sealant, the Ford Tire Mobility Kit sealant should be
used. The tire pressure monitoring system sensor and valve stem on the
wheel must be replaced by an authorized dealer after use of the sealant.
WARNING:SeeTire Pressure Monitoring Systemin this
chapter for important information. If the tire pressure monitoring
sensor becomes damaged, it will no longer function.
Note:The tire pressure monitoring system indicator light will illuminate
when the spare tire is in use. To restore the full function of the
monitoring system, all road wheels equipped with tire pressure
monitoring sensors must be mounted on this vehicle.
If you get a flat tire while driving, do not apply the brake heavily.
Instead, gradually decrease your speed. Hold the steering wheel firmly
and slowly move to a safe place on the side of the road.
Have a flat serviced by an authorized dealer in order to prevent damage
to the system sensors. SeeTire Pressure Monitoring Systemearlier in
this chapter. Replace the spare tire with a road tire as soon as possible.
During repairing or replacing of the flat tire, have the authorized dealer
inspect the tire pressure monitoring system sensor for damage.
Dissimilar Spare Tire and Wheel Assembly Information
WARNING:Failure to follow these guidelines could result in an
increased risk of loss of vehicle control, injury or death.
If you have a dissimilar spare tire and wheel assembly, then it is intended
for temporary use only. This means that if you need to use it, you should
replace it as soon as possible with a road tire and wheel that is the same
size and type as the road tires and wheels that were originally provided
by Ford. If the dissimilar spare tire or wheel is damaged, it should be
replaced rather than repaired.
A dissimilar spare tire and wheel assembly is defined as a spare tire and
wheel that is different in brand, size or appearance from the road tires
and wheels and can be one of three types:
1.T-type mini-spare:This spare tire begins with the letter T for tire
size and may have Temporary Use Only molded in the sidewall.
350Wheels and Tires
2015 MKT(mkt)
Owners Guide gf, 1st Printing, October 2014
USA(fus)