Page 136 of 500

F.AUTO:Press to activate automatic control of the airflow direction in
the rear of the vehicle. The system automatically determines the airflow
distribution in order to reach and maintain the desired temperature.
G.REAR LOCK:Illuminates when the rear climate system is being
controlled by the front controls. The rear climate controls do not work
when this is illuminated.
GENERAL OPERATING TIPS
•To reduce fog build-up on the windshield during humid weather,
select defrost. Temperature and fan speed can also be increased to
improve clearing.
•To reduce humidity build-up inside the vehicle, do not drive with the
system off or with recirculated air engaged.
•Do not put objects under the front seats that will interfere with the
airflow to the back seats.
•Remove any snow, ice or leaves from the air intake area at the base
of the windshield.
•To improve the air conditioning cool down, drive with the windows
slightly open for 2-3 minutes after start-up or until the vehicle has
been aired out.
•A small amount of air may be felt from the floor vent regardless of
the air distribution setting that is selected.
During extreme high ambient temperatures when idling stationary for
extended periods of time in gear, it is recommended to run the air
conditioning in the MAX A/C mode, adjust the blower fan speed to the
lowest setting and put the vehicle’s transmission into positionPto
continue to receive cool air from your air conditioning system.
For maximum cooling performance in AUTO, pressMAX A/C.
For maximum cooling performance in manual override control (using the
MyLincoln Touch climate controls):
1. Choose panel, A/C, and recirculation controls.
2. Set the temperature to LO.
3. Set the fan to the highest blower setting.
To aid in side window defogging and demisting in cold or humid weather:
1. Select defrost or floor/defrost (on the MyLincoln Touch climate
controls). To maximize performance select defrost.
2. SelectA/C.
3. Adjust the temperature control to maintain comfort.
4. Set the fan speed to the highest setting.
Climate Control135
2015 MKT(mkt)
Owners Guide gf, 1st Printing, October 2014
USA(fus)
Page 218 of 500

WARNING:Do not use the adaptive cruise control when
entering or leaving a highway, in heavy traffic or on roads that
are winding, slippery or unpaved.
WARNING:Do not use in poor visibility, specifically fog, rain,
spray or snow.
Note:It is your responsibility to stay alert, drive safely and be in control
of your vehicle at all times.
The system adjusts your speed to maintain a proper distance between
you and the vehicle in front of you in the same lane. You can select from
one of four GAP settings. The controls are located on the steering wheel.
At startup, the system sets the gap to the last selected setting. Once
activated, you can deactivate the system at any time by pressing the brake
pedal, pressing the steering wheelOFFcontrol or pressing theCNCL
control. In addition, you can temporarily increase the vehicle speed above
the current speed by manually pressing on the accelerator pedal.
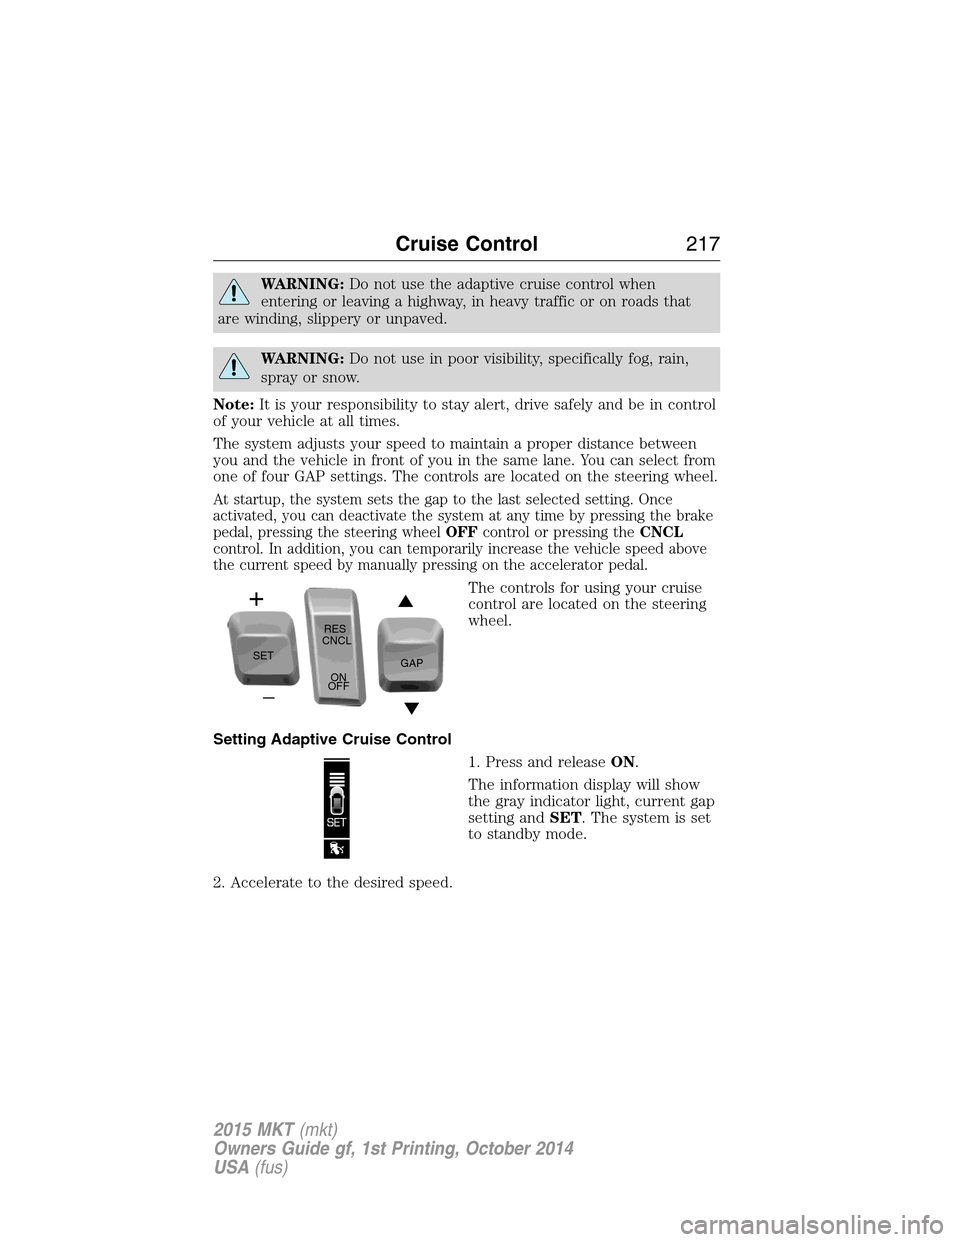
The controls for using your cruise
control are located on the steering
wheel.
Setting Adaptive Cruise Control
1. Press and releaseON.
The information display will show
the gray indicator light, current gap
setting andSET. The system is set
to standby mode.
2. Accelerate to the desired speed.
SETRES
CNCL
ON
OFFGAP
Cruise Control217
2015 MKT(mkt)
Owners Guide gf, 1st Printing, October 2014
USA(fus)
Page 231 of 500

Troubleshooting
Why is the feature not available (line markings are gray) when I
can see the lane markings on the road?
Vehicle speed is outside the operational range of the feature
Sun is shining directly into the camera lens
Quick intentional lane change
Staying too close to the lane marking
Driving at high speeds in curves
Previous feature activation happened within the last one second
Ambiguous lane markings (mainly in construction zones)
Rapid transition from light to dark or vice versa
Sudden offset in lane markings
ABS or AdvanceTrac activation
Camera blockage due to dirt, grime, fog, frost or water on the
windshield
Driving too close to the vehicle in front of you
Transitioning between no lane markings to lane markings or vice versa
Standing water on the road
Faint lane markings (partial yellow lane markings on concrete roads)
Lane width too narrow or too wide
Camera not calibrated after a windshield replacement
When driving on tight roads or on uneven roads
Why does the vehicle not come back into the middle of the lane
always, as expected, in the Aid or Aid + Alert mode?
High cross winds
Large road crown
Rough roads, grooves, shoulder drop-offs
Heavy uneven loading of the vehicle or improper tire inflation pressure
If the tires have been exchanged (including snow tires), or the
suspension has been modified
230Driving Aids
2015 MKT(mkt)
Owners Guide gf, 1st Printing, October 2014
USA(fus)
Page 289 of 500
Fuse or relay
numberFuse amp
ratingProtected components
39 15A High beam headlamps
40 10A Rear park lamps, License plate
lamps, Rear light bar applique
41 7.5A Occupant classification system,
Restraints control module
42 5A Not used (spare)
43 10A Not used (spare)
44 10A Not used (spare)
45 5A Not used (spare)
46 10A Climate control module
47 15A Fog lamps, Fog lamp indicator
48 30A Circuit
BreakerNot used (spare)
49 Delayed
accessory relayBody control module
288Fuses
2015 MKT(mkt)
Owners Guide gf, 1st Printing, October 2014
USA(fus)
Page 315 of 500

Replacing HID headlamp bulbs
The headlamps on your vehicle use a “high intensity discharge” source.
These lamps operate at a high voltage. When the bulb is burned out, the
bulb and starter capsule assembly must be replaced by your authorized
dealer.
Replacing front parking lamp/turn signal bulbs
For bulb replacement, see your authorized dealer.
Replacing fog lamp bulbs
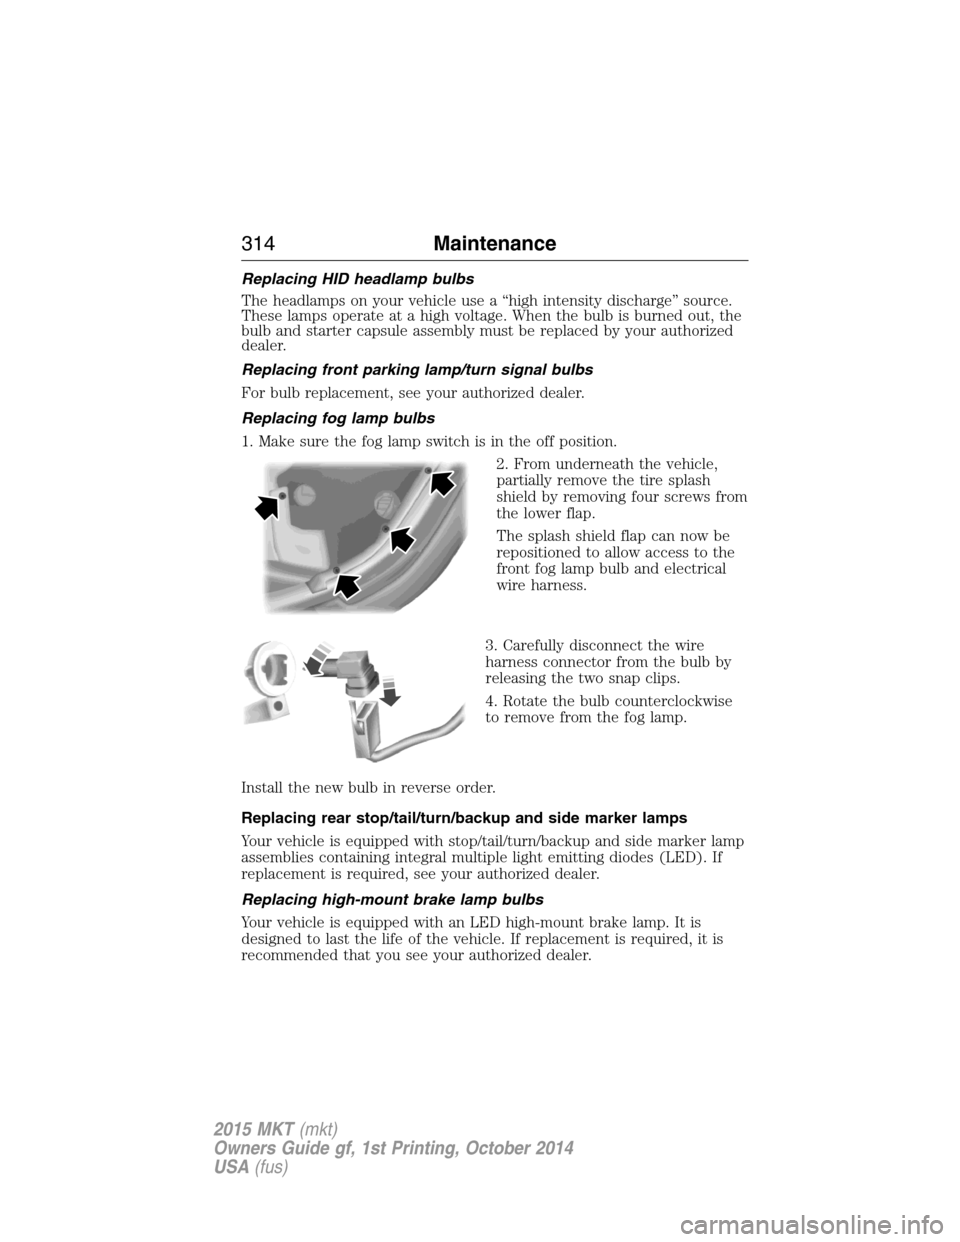
1. Make sure the fog lamp switch is in the off position.
2. From underneath the vehicle,
partially remove the tire splash
shield by removing four screws from
the lower flap.
The splash shield flap can now be
repositioned to allow access to the
front fog lamp bulb and electrical
wire harness.
3. Carefully disconnect the wire
harness connector from the bulb by
releasing the two snap clips.
4. Rotate the bulb counterclockwise
to remove from the fog lamp.
Install the new bulb in reverse order.
Replacing rear stop/tail/turn/backup and side marker lamps
Your vehicle is equipped with stop/tail/turn/backup and side marker lamp
assemblies containing integral multiple light emitting diodes (LED). If
replacement is required, see your authorized dealer.
Replacing high-mount brake lamp bulbs
Your vehicle is equipped with an LED high-mount brake lamp. It is
designed to last the life of the vehicle. If replacement is required, it is
recommended that you see your authorized dealer.
314Maintenance
2015 MKT(mkt)
Owners Guide gf, 1st Printing, October 2014
USA(fus)
Page 316 of 500

Replacing license plate lamp bulbs
1. Make sure the headlamp switch is in the off position.
2. Remove the two screws and the
license plate lamp assembly from the
liftgate.
3. Carefully pull the bulb straight out
from the lamp assembly.
Install new bulb(s) in reverse order.
BULB SPECIFICATION CHART
Replacement bulbs are specified in the chart below. Headlamp bulbs
must be marked with an authorized “D.O.T.” for North America and an
“E” for Europe to ensure lamp performance, light brightness and pattern
and safe visibility. The correct bulbs will not damage the lamp assembly
or void the lamp assembly warranty and will provide quality bulb burn
time.
Function Number of BulbsTrade
Number
*Headlamp 2 D3S (HID)
*Front sidemarker lamp N/A LED
*Front parking lamp N/A LED
*Front turn lamp 2 PY24W SV+
Fog lamp 2 H11
*Tail/brake/turn signal
lampN/A LED
*Rear sidemarker N/A LED
*Backup lamp N/A LED
License plate lamp 2 C5WL
*High-mount brake lamp N/A LED
*First row dome/map lamp 2 1600XB
Maintenance315
2015 MKT(mkt)
Owners Guide gf, 1st Printing, October 2014
USA(fus)