2015 Lexus GS300h 400
[x] Cancel search: 400Page 4 of 620

TABLE OF CONTENTS4
GS450h_300h_OM_OM30F00E_(EE)
5-1. Remote Touch screenRemote Touch/12.3-inch display ......................................... 360
5-2. Using the air conditioning system and defogger
Front automatic air conditioning system .........366
Rear air conditioning system .......................................... 378
Heated steering wheel/ seat heaters/
seat ventilators .......................... 381
5-3. Using the interior lights Interior lights list......................... 386• Interior lights ..........................387
• Personal lights........................387
5-4. Using the storage features List of storage features............ 389• Glove box............................... 390
• Console box .......................... 390
• Cup holders............................. 391
• Auxiliary boxes......................393
Trunk features ..............................394 5-5. Using the other interior features
Other interior features ............ 397• Sun visors ................................ 397
• Vanity mirrors ........................ 397
• Clock........................................ 398
• Ashtrays .................................. 398
• Power outlets .........................399
• Armrest ................................... 400
•Rear sunshade/rear door sunshades .......... 400
• Coat hooks .............................402
• Assist grips..............................403
6-1. Maintenance and care Cleaning and protecting the vehicle exterior.................406
Cleaning and protecting the vehicle interior ................... 410
6-2. Maintenance Maintenance requirements.............................. 413
5Interior features
6Maintenance and care
Page 21 of 620

21Pictorial index
GS450h_300h_OM_OM30F00E_(EE)
Seat heater switches*2 . . . . . . . . . . . . . . . . . . . . . . . . . . . . . . . . . . . . . . . . . . . . . P. 382
Seat ventilator switches
*2 . . . . . . . . . . . . . . . . . . . . . . . . . . . . . . . . . . . . . . . . . . P. 382
Remote Touch . . . . . . . . . . . . . . . . . . . . . . . . . . . . . . . . . . . . . . . . . . . . . . . . . . . . . . . P. 3 60
Lexus parking assist-sensor switch
*1, 2
Rear sunshade switch*2. . . . . . . . . . . . . . . . . . . . . . . . . . . . . . . . . . . . . . . . . . . . . P. 400
Driving mode select switch . . . . . . . . . . . . . . . . . . . . . . . . . . . . . . . . . . . . . . . . . P. 330
Snow mode switch . . . . . . . . . . . . . . . . . . . . . . . . . . . . . . . . . . . . . . . . . . . . . . . . . . . P. 225
EV drive mode switch . . . . . . . . . . . . . . . . . . . . . . . . . . . . . . . . . . . . . . . . . . . . . . . P. 222
*1: Refer to “NAVIGATION AND MULTIMEDIA SYSTEM OWNER’S MANUAL”.
*2: If equipped
1
2
3
4
5
6
7
8
Page 29 of 620

29Pictorial index
GS450h_300h_OM_OM30F00E_(EE)
Rear sunshade switch*2. . . . . . . . . . . . . . . . . . . . . . . . . . . . . . . . . . . . . . . . . . . . . P. 400
Lexus parking assist-sensor switch
*1, 2
Remote Touch . . . . . . . . . . . . . . . . . . . . . . . . . . . . . . . . . . . . . . . . . . . . . . . . . . . . . . . P. 3 60
Seat heater switches
*2 . . . . . . . . . . . . . . . . . . . . . . . . . . . . . . . . . . . . . . . . . . . . . P. 382
Seat ventilator switches
*2 . . . . . . . . . . . . . . . . . . . . . . . . . . . . . . . . . . . . . . . . . . P. 382
Driving mode select switch . . . . . . . . . . . . . . . . . . . . . . . . . . . . . . . . . . . . . . . . . P. 330
Snow mode switch . . . . . . . . . . . . . . . . . . . . . . . . . . . . . . . . . . . . . . . . . . . . . . . . . . . P. 225
EV drive mode switch . . . . . . . . . . . . . . . . . . . . . . . . . . . . . . . . . . . . . . . . . . . . . . . P. 222
*1: Refer to “NAVIGATION AND MULTIMEDIA SYSTEM OWNER’S MANUAL”.
*2: If equipped
1
2
3
4
5
6
7
8
Page 306 of 620

3064-5. Using the driving support systems
GS450h_300h_OM_OM30F00E_(EE)
This mode employs a radar sensor to detect the presence of vehicles up to
approximately 120 m (400 ft.) ahead, determines the current vehicle-to-vehicle
following distance, and operates to maintain a suitable following distance from
the vehicle ahead.
Note that vehicle-to-vehicle distance will close in when traveling on long downhill
slopes.
Example of constant speed cruising
When there are no vehicles ahead
The vehicle travels at the speed set by the driver. The desired vehicle-to-vehicle dis-
tance can also be set by operating the vehicle-to-vehicle distance button.
Example of deceleration cruising and follow-up cruising
When a preceding vehicle driving slower than the set speed appears
When a vehicle is detected running ahead of you, the system automatically deceler-
ates your vehicle. When a greater reduction in vehicle speed is necessary, the system
applies the brakes (the stop lights will come on at this time). The system will respond to
changes in the speed of the vehicle ahead in order to maintain the vehicle-to-vehicle
distance set by the driver. Approach wa rning warns you when the system cannot
decelerate sufficiently to prevent your ve hicle from closing in on the vehicle ahead.
When the vehicle ahead of you stops, your vehicle will also stop (vehicle is stopped by
system control). After the vehicle ahead star ts off, pushing the cruise control lever up
or depressing the accelerator pedal will resume follow-up cruising.
Example of acceleration
When there are no longer any preceding vehicles driving slower than the set
speed
The system accelerates until the set speed is reached. The system then returns to con-
stant speed cruising.
Driving in vehicle-to-veh icle distance control mode
1
2
3
Page 318 of 620

3184-5. Using the driving support systems
GS450h_300h_OM_OM30F00E_(EE)
This mode employs a radar sensor to detect the presence of vehicles up to
approximately 120 m (400 ft.) ahead, determines the current vehicle-to-vehicle
following distance, and operates to maintain a suitable following distance from
the vehicle ahead.
Note that vehicle-to-vehicle distance will close in when traveling on long downhill
slopes.
Example of constant speed cruising
When there are no vehicles ahead
The vehicle travels at the speed set by the driver. The desired vehicle-to-vehicle dis-
tance can also be set by operating the vehicle-to-vehicle distance button.
Example of deceleration cruising and follow-up cruising
When a preceding vehicle driving slower than the set speed appears
When a vehicle is detected running ahead of you, the system automatically deceler-
ates your vehicle. When a greater reduction in vehicle speed is necessary, the system
applies the brakes (the stop lights will come on at this time). The system will respond to
changes in the speed of the vehicle ahead in order to maintain the vehicle-to-vehicle
distance set by the driver. Approach wa rning warns you when the system cannot
decelerate sufficiently to prevent your ve hicle from closing in on the vehicle ahead.
Example of acceleration
When there are no longer any preceding vehicles driving slower than the set
speed
The system accelerates until the set speed is reached. The system then returns to con-
stant speed cruising.
Driving in vehicle-to-vehicle distance control mode
1
2
3
Page 359 of 620

359
5Interior features
GS450h_300h_OM_OM30F00E_(EE)
5-1. Remote Touch screenRemote Touch/12.3-inch display ......................................... 360
5-2. Using the air conditioning system and defogger
Front automatic air conditioning system .........366
Rear air conditioning system .......................................... 378
Heated steering wheel/ seat heaters/
seat ventilators .......................... 381 5-3. Using the interior lights
Interior lights list .........................386• Interior lights .......................... 387
• Personal lights ....................... 387
5-4. Using the storage features List of storage features ............389• Glove box ...............................390
• Console box...........................390
• Cup holders ............................ 391
• Auxiliary boxes ..................... 393
Trunk features .............................. 394
5-5. Using the other interior features Other interior features ............ 397• Sun visors ................................ 397
• Vanity mirrors ........................ 397
• Clock ........................................398
• Ashtrays ...................................398
• Power outlets ......................... 399
• Armrest....................................400
• Rear sunshade/
rear door sunshades...........400
• Coat hooks ............................. 402
• Assist grips.............................. 403
Page 400 of 620

4005-5. Using the other interior features
GS450h_300h_OM_OM30F00E_(EE)
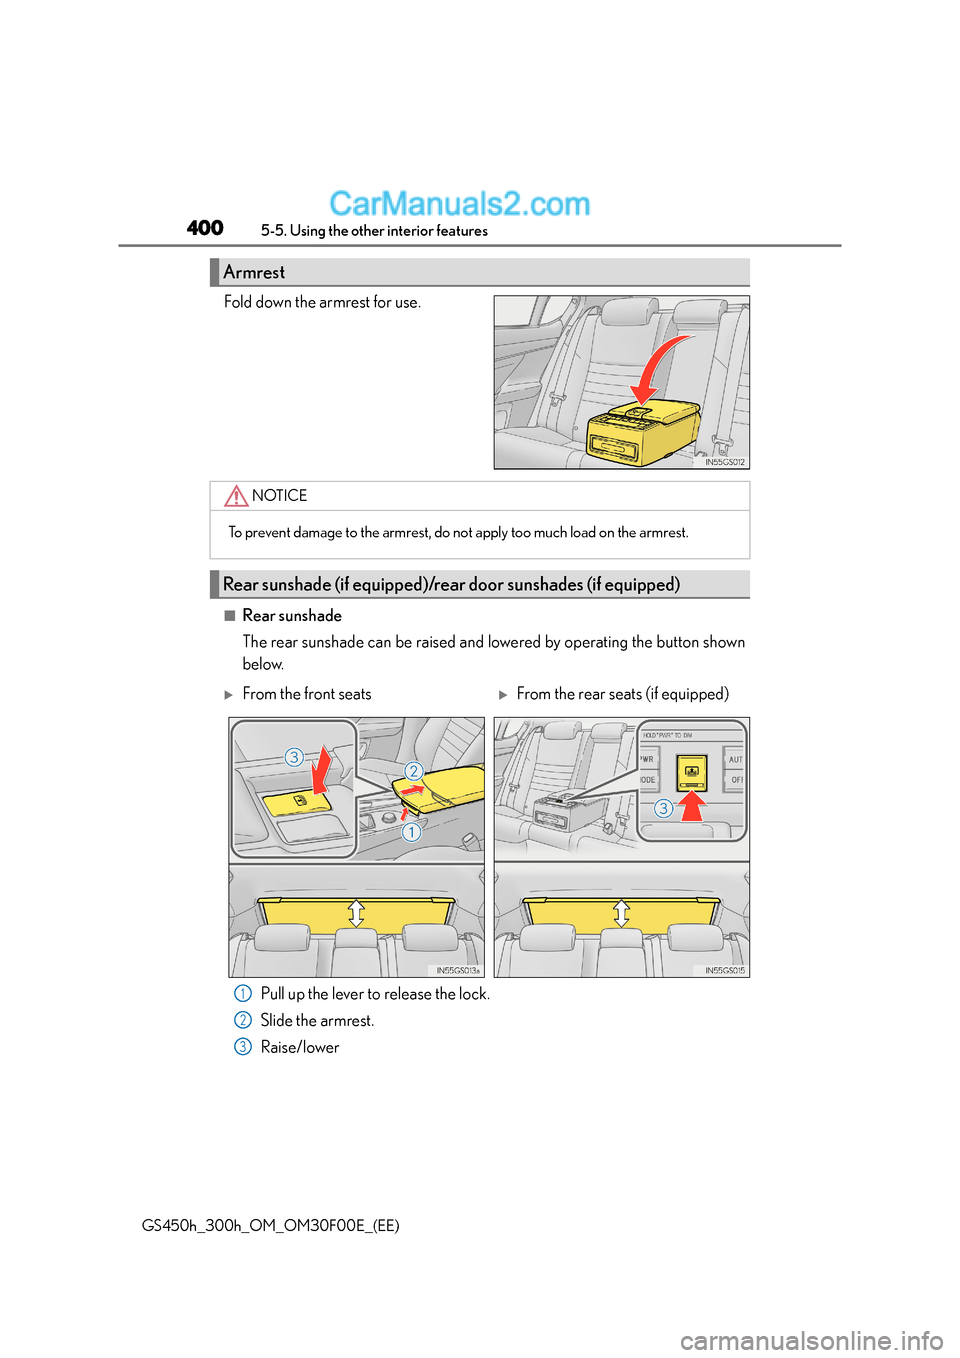
Fold down the armrest for use.
■Rear sunshade
The rear sunshade can be raised and lowered by operating the button shown
below.
Pull up the lever to release the lock.
Slide the armrest.
Raise/lower
Armrest
NOTICE
To prevent damage to the armrest, do not apply too much load on the armrest.
Rear sunshade (if equipped)/rear door sunshades (if equipped)
�XFrom the front seats�XFrom the rear seats (if equipped)
1
2
3
Page 536 of 620

5367-2. Steps to take in an emergency
GS450h_300h_OM_OM30F00E_(EE)
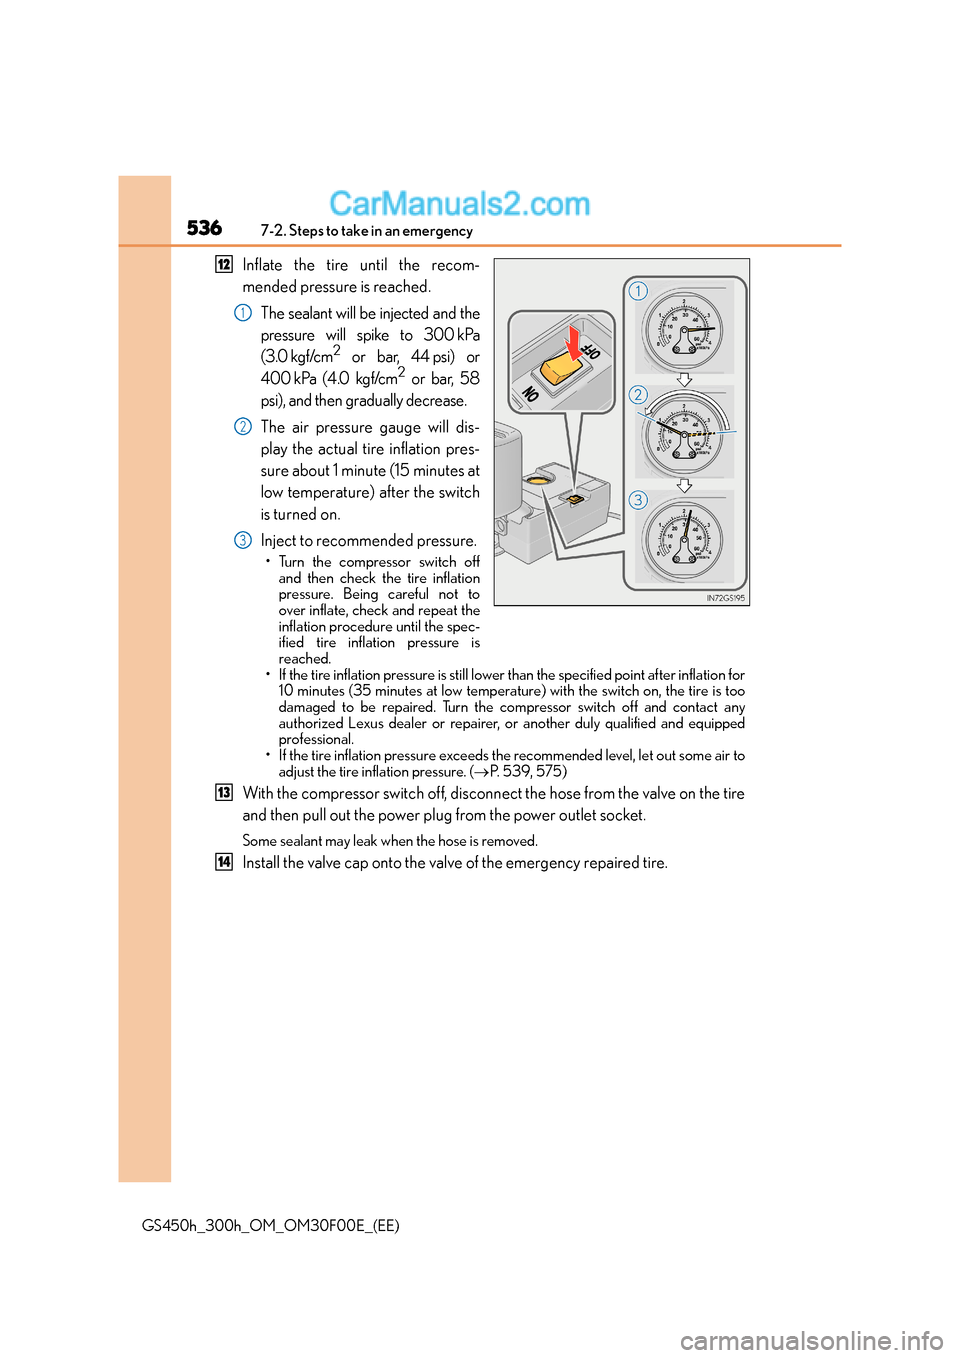
Inflate the tire until the recom-
mended pressure is reached.The sealant will be injected and the
pressure will spike to 300 kPa
(3.0 kgf/cm
2 or bar, 44 psi) or
400 kPa (4.0 kgf/cm2 or bar, 58
psi), and then gradually decrease.
The air pressure gauge will dis-
play the actual tire inflation pres-
sure about 1 minute (15 minutes at
low temperature) after the switch
is turned on.
Inject to recommended pressure.
• Turn the compressor switch off and then check the tire inflation
pressure. Being careful not to
over inflate, check and repeat the
inflation procedure until the spec-
ified tire inflation pressure is
reached.
• If the tire inflation pressure is still lower than the specified point after inflation for 10 minutes (35 minutes at low temperature) with the switch on, the tire is too
damaged to be repaired. Turn the compressor switch off and contact any
authorized Lexus dealer or repairer, or another duly qualified and equipped
professional.
• If the tire inflation pressure exceeds the recommended level, let out some air to
adjust the tire inflation pressure. ( →P. 5 3 9 , 5 7 5 )
With the compressor switch off, disconnect the hose from the valve on the tire
and then pull out the power plug from the power outlet socket.
Some sealant may leak when the hose is removed.
Install the valve cap onto the valve of the emergency repaired tire.
12
1
2
3
13
14