Page 146 of 668
1462. Instrument cluster
GS350_200t_GS F_OM_OM30E87E_(EE)
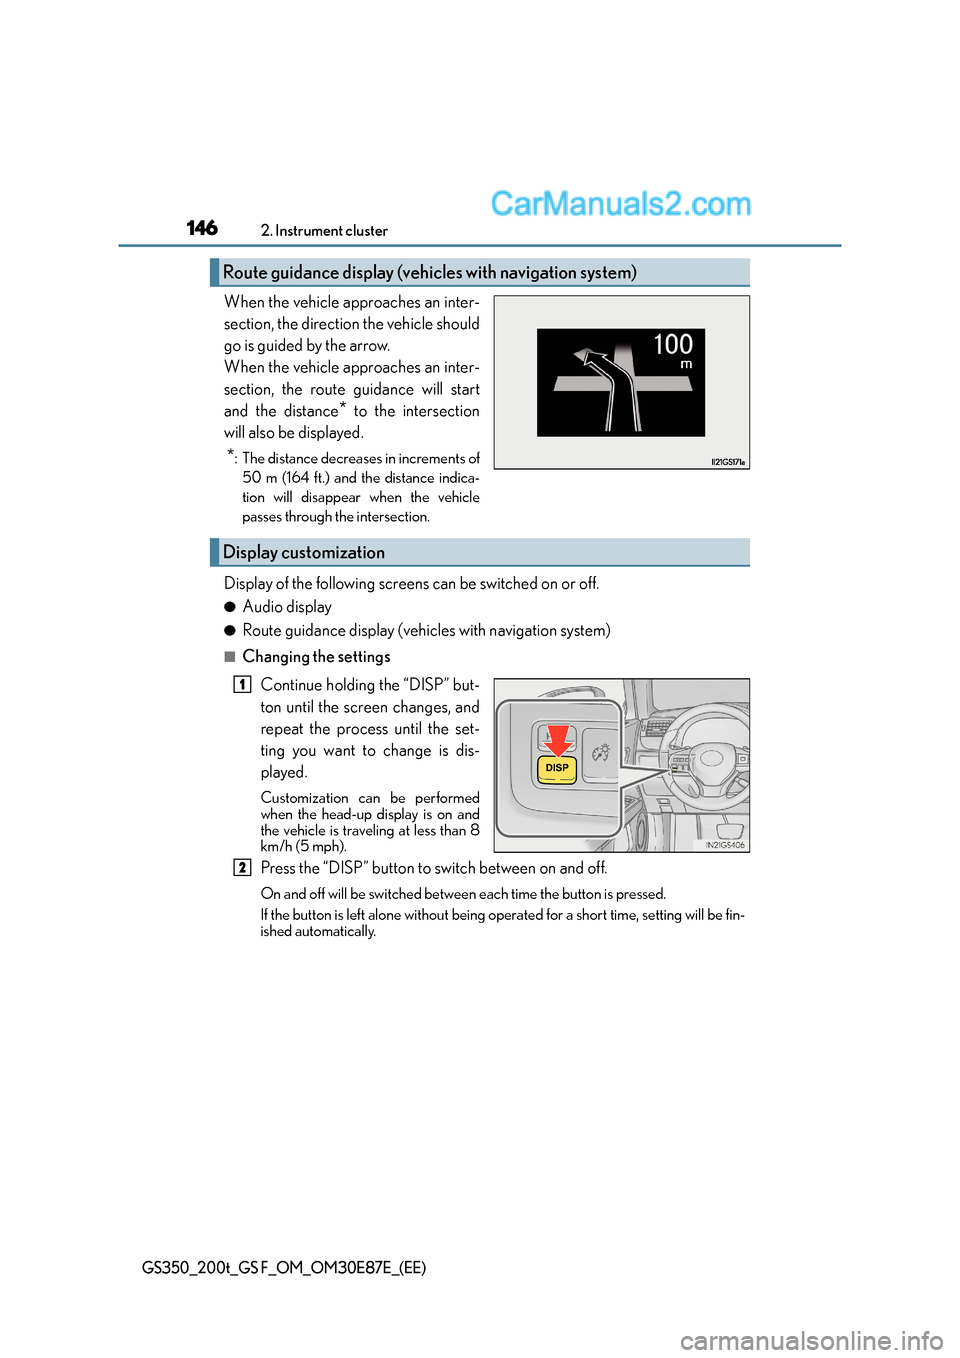
When the vehicle approaches an inter-
section, the direction the vehicle should
go is guided by the arrow.
When the vehicle approaches an inter-
section, the route guidance will start
and the distance
* to the intersection
will also be displayed.
*: The distance decreases in increments of 50 m (164 ft.) and the distance indica-
tion will disappear when the vehicle
passes through the intersection.
Display of the following screens can be switched on or off.
●Audio display
●Route guidance display (vehicles with navigation system)
■Changing the settings
Continue holding the “DISP” but-
ton until the screen changes, and
repeat the process until the set-
ting you want to change is dis-
played.
Customization can be performed
when the head-up display is on and
the vehicle is traveling at less than 8
km/h (5 mph).
Press the “DISP” button to switch between on and off.
On and off will be switched between each time the button is pressed.
If the button is left alone without being op erated for a short time, setting will be fin-
ished automatically.
Route guidance display (vehicles with navigation system)
Display customization
1
2
Page 147 of 668
1472. Instrument cluster
2
Instrument cluster
GS350_200t_GS F_OM_OM30E87E_(EE)
■Head-up display
●The head-up display may seem dark and hard to see when viewed through sunglasses,
especially polarized sunglasses.
Adjust the brightness of the head-up display or remove your sunglasses.
●When the head-up display is turned off, it will remain off even if the engine switch is
turned to IGNITION ON mode after the engine switch has been turned off.
●The startup image will be displayed on the he ad-up display after the engine switch has
been turned to IGNITION ON mode while the head-up display switch is set to on.
■Head-up rev indicator
●The head-up display is linked to the rev indicator in the meter.
●Whether or not to display the rev indicator in the head-up display, as well as display tim-
ing, can be changed through the settings for the rev indicator in the meter. ( →P. 1 3 8 )
■When the battery is disconnected
The customize settings of the head-up display will be reset.
■Head-up display automatic position adjustment
If the display position is recorded into me mory, the head-up display will be automatically
adjusted to the desired position. ( →P. 1 9 8 )
WA R N I N G
■Before using the head-up display
Check that the position and brightness of the head-up display image does not interfere
with safe driving. Incorrect adjustment of the image’s position or brightness may
obstruct the driver’s view and lead to an ac cident, resulting in death or serious injury.
NOTICE
■To prevent damage to components
●Do not touch the inside of the head-up display projector or thrust sharp edges or the
like into the projector.
Doing so could cause mechanical malfunctions.
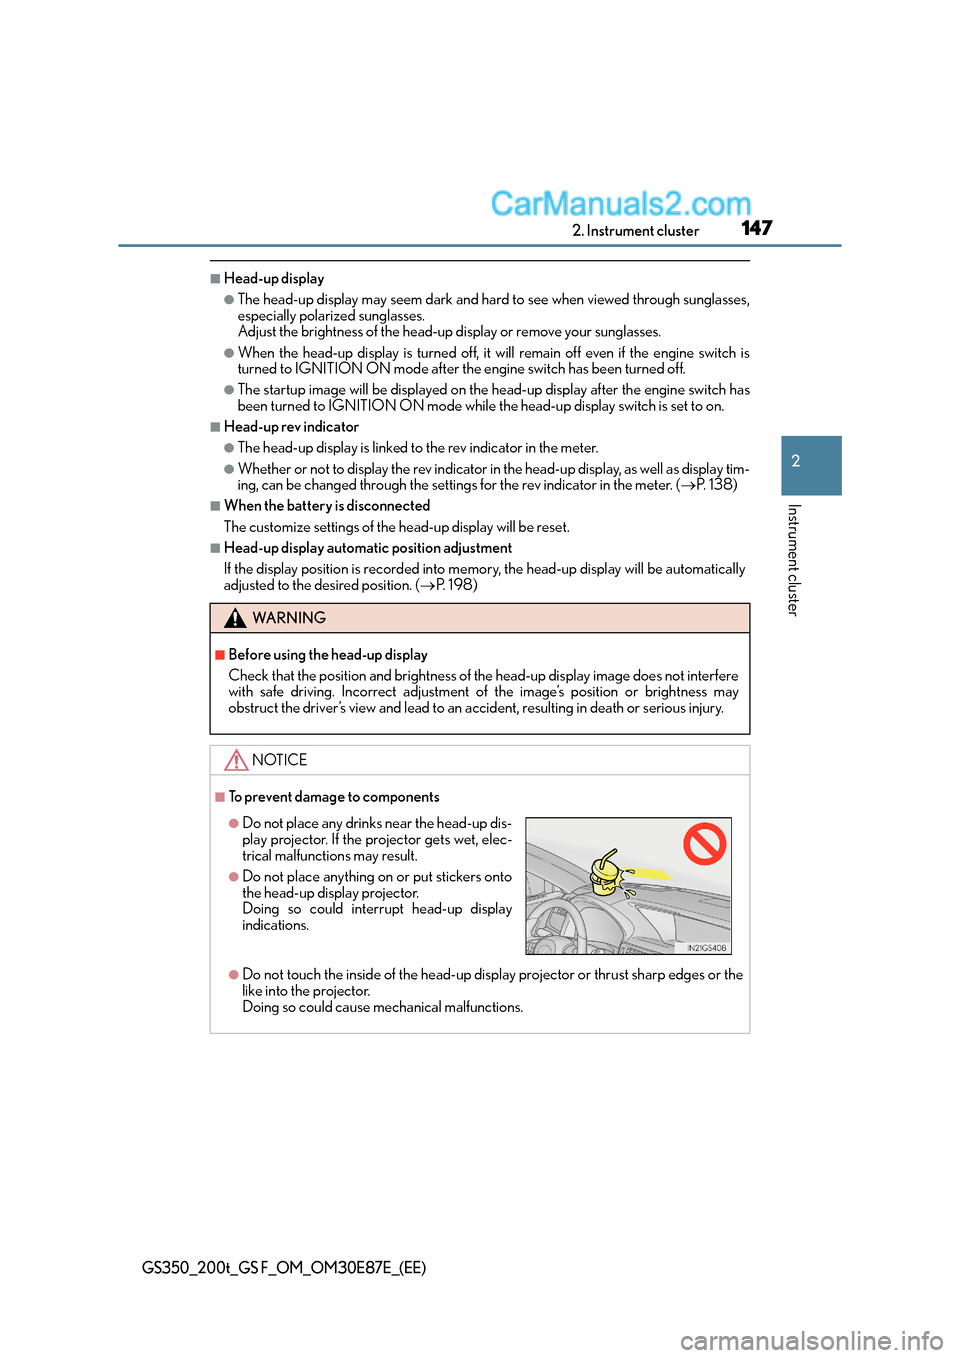
●Do not place any drinks near the head-up dis-
play projector. If the projector gets wet, elec-
trical malfunctions may result.
●Do not place anything on or put stickers onto
the head-up display projector.
Doing so could interrupt head-up display
indications.
Page 148 of 668
1482. Instrument cluster
GS350_200t_GS F_OM_OM30E87E_(EE)
Fuel consumption information
Remote Touch screen
“MENU” button
Remote Touch knob
“ENTER” buttons
Fuel consumption information can be displayed on the Remote Touch screen.
Vehicles with 12.3-inch display: The fu el consumption information can be dis-
played and operated on the side display.
1
2
3
4
Page 149 of 668
1492. Instrument cluster
2
Instrument cluster
GS350_200t_GS F_OM_OM30E87E_(EE)
Press the “MENU” button on the Remote Touch, then select on the “Menu”
screen.
■Trip information
If the “Past record” screen is displayed, select “Trip information”.Resetting the consumption data
Fuel consumption in the past 15
minutes
Current fuel consumption
Average vehicle speed since the
engine was started.
Elapsed time since the engine
was started.
Cruising range ( →P. 1 5 0 )
Average fuel consumption for the past 15 minutes is divided by color into past
averages and averages attained since the engine switch was last turned to IGNI-
TION ON mode. Use the displayed average fuel consumption as a reference.
The image is an example only, and may vary slightly from actual conditions.
Fuel consumption
1
2
3
4
5
6
Page 150 of 668
1502. Instrument cluster
GS350_200t_GS F_OM_OM30E87E_(EE)
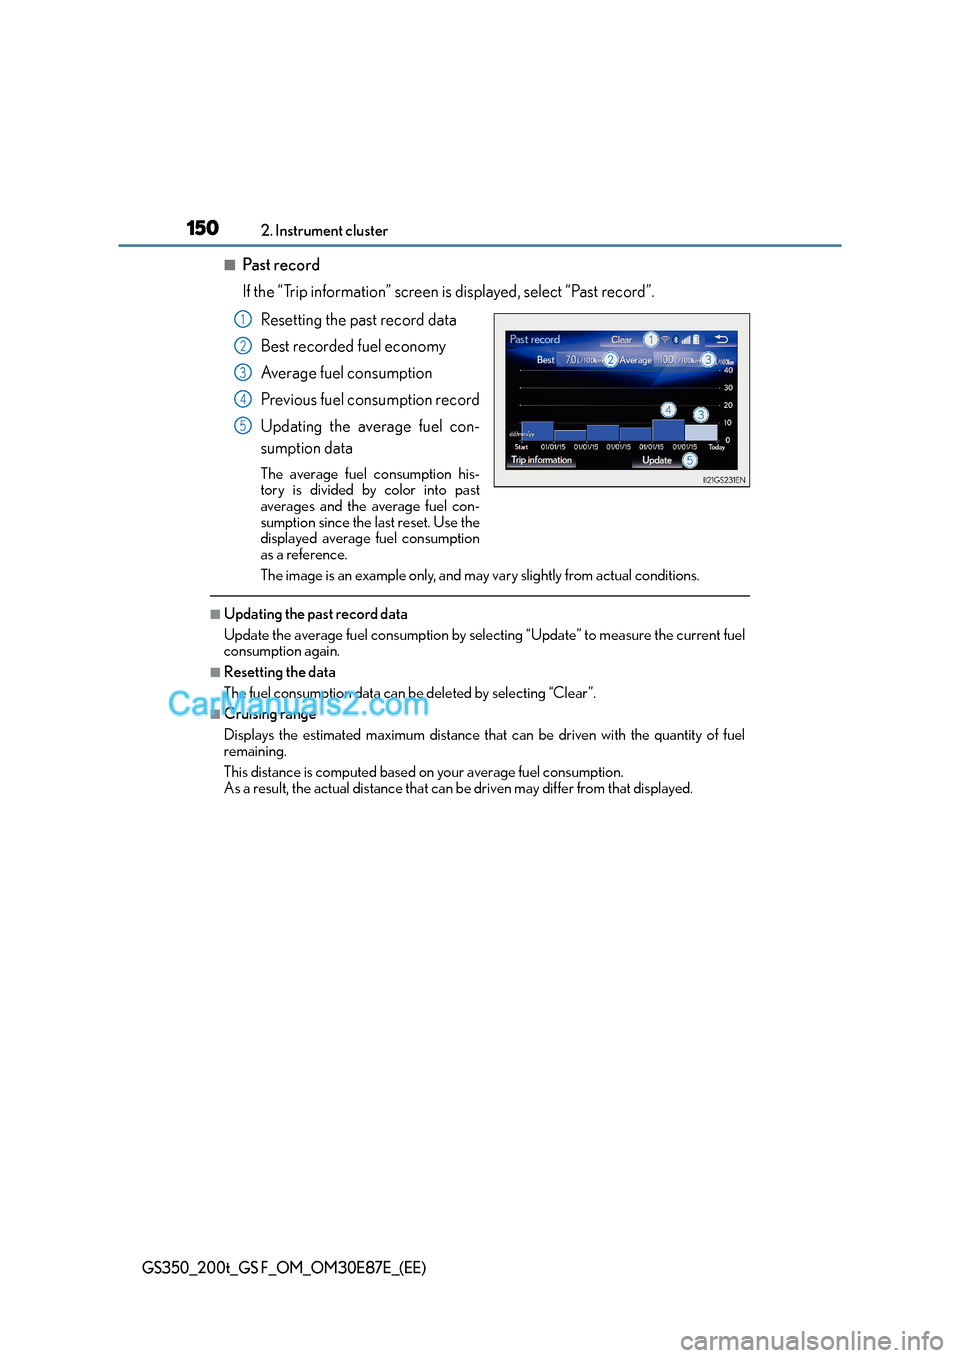
■Pa s t re c o r d
If the “Trip information” screen is displayed, select “Past record”.Resetting the past record data
Best recorded fuel economy
Average fuel consumption
Previous fuel consumption record
Updating the average fuel con-
sumption data
The average fuel consumption his-
tory is divided by color into past
averages and the average fuel con-
sumption since the last reset. Use the
displayed average fuel consumption
as a reference.
The image is an example only, and may vary slightly from actual conditions.
■Updating the past record data
Update the average fuel consumption by selecting “Update” to measure the current fuel
consumption again.
■Resetting the data
The fuel consumption data can be deleted by selecting “Clear”.
■Cruising range
Displays the estimated maximum distance that can be driven with the quantity of fuel
remaining.
This distance is computed based on your average fuel consumption.
As a result, the actual distance that can be driven may differ from that displayed.
1
2
3
4
5
Page 151 of 668
1512. Instrument cluster
2
Instrument cluster
GS350_200t_GS F_OM_OM30E87E_(EE)
Vehicle information can be displayed on the side display (→P. 3 9 3 ) , t h e n s e l e c t
or to select the desired screen.
�XFuel consumption
Displays the average fuel consumption
for the past 10 minutes in 1 minute inter-
vals, as well as the cruising range.
�XPa s t re c o rd
Displays the average fuel consumption
and highest fuel consumption.
�XTrip information
Displays the cruising range, average
fuel consumption and the amount of
time elapsed since the engine was
started.
The image is an example only, and may vary slightly from actual conditions.
Using the side display (vehicles with 12.3-inch display)
Page 164 of 668
1643-2. Opening, closing and locking the doors and trunk
GS350_200t_GS F_OM_OM30E87E_(EE)
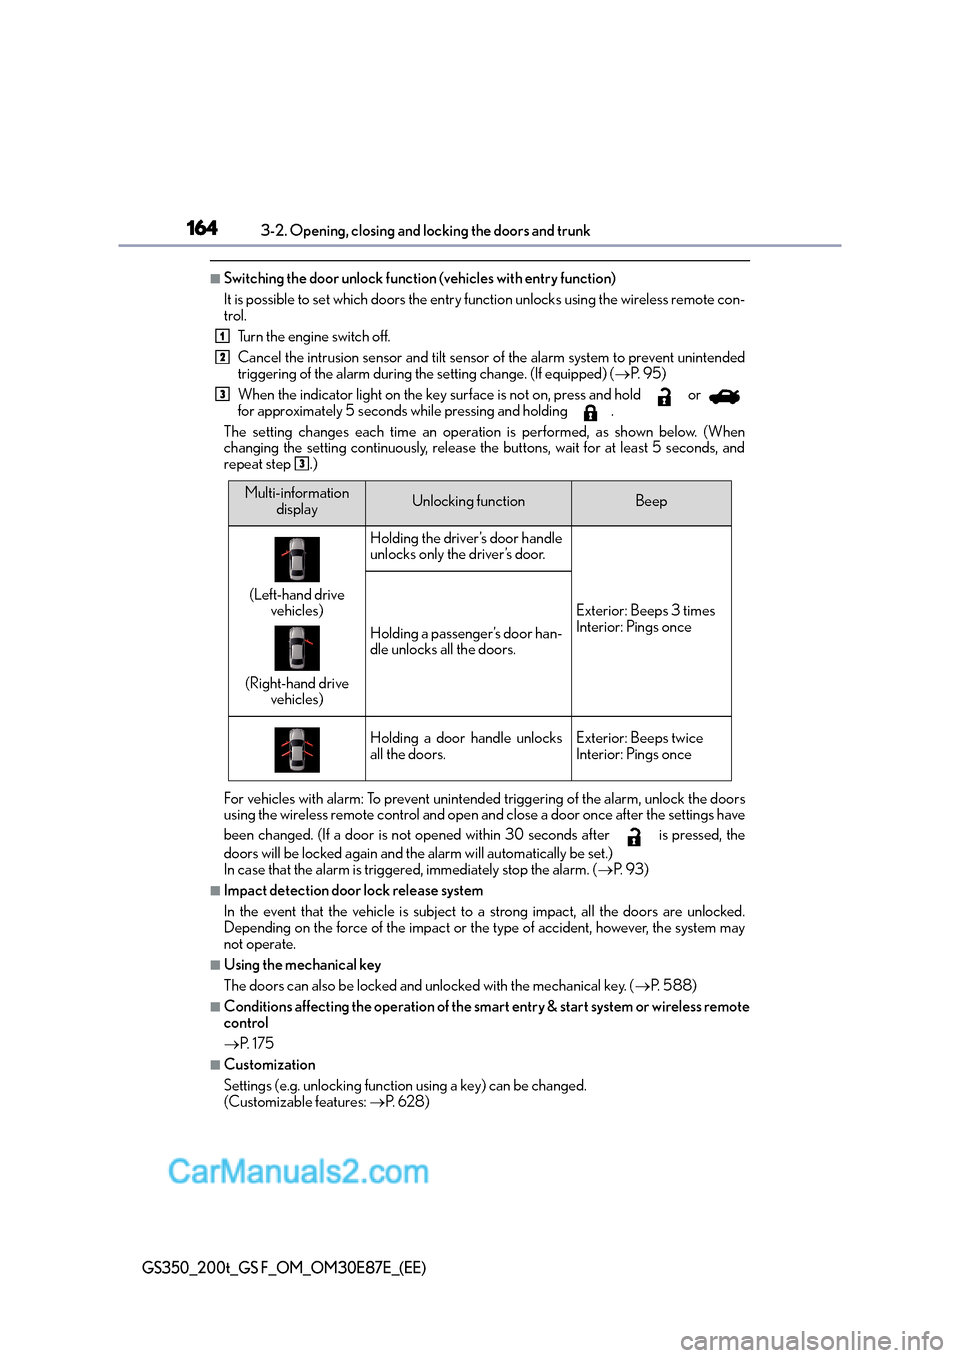
■Switching the door unlock function (vehicles with entry function)
It is possible to set which doors the entry function unlocks using the wireless remote con-
trol. Turn the engine switch off.
Cancel the intrusion sensor and tilt sensor of the alarm system to prevent unintended
triggering of the alarm during the setting change. (If equipped) ( →P. 9 5 )
When the indicator light on the key surface is not on, press and hold or
for approximately 5 seconds while pressing and holding .
The setting changes each time an operation is performed, as shown below. (When
changing the setting continuously, release the buttons, wait for at least 5 seconds, and
repeat step .)
For vehicles with alarm: To prevent unintended triggering of the alarm, unlock the doors
using the wireless remote control and open an d close a door once after the settings have
been changed. (If a door is not opened within 30 seconds after is pressed, the
doors will be locked again and the alarm will automatically be set.)
In case that the alarm is triggered, immediately stop the alarm. ( →P. 9 3 )
■Impact detection door lock release system
In the event that the vehicle is subject to a strong impact, all the doors are unlocked.
Depending on the force of the impact or the type of accident, however, the system may
not operate.
■Using the mechanical key
The doors can also be locked and unlocked with the mechanical key. ( →P. 5 8 8 )
■Conditions affecting the operation of the smart entry & start system or wireless remote
control
→P. 1 7 5
■Customization
Settings (e.g. unlocking function using a key) can be changed.
(Customizable features: →P. 6 2 8 )
1
2
3
3
Multi-information
displayUnlocking functionBeep
(Left-hand drive vehicles)
(Right-hand drive vehicles)
Holding the driver’s door handle
unlocks only the driver’s door.
Exterior: Beeps 3 times
Interior: Pings once
Holding a passenger’s door han-
dle unlocks all the doors.
Holding a door handle unlocks
all the doors.Exterior: Beeps twice
Interior: Pings once
Page 174 of 668
1743-2. Opening, closing and locking the doors and trunk
GS350_200t_GS F_OM_OM30E87E_(EE)
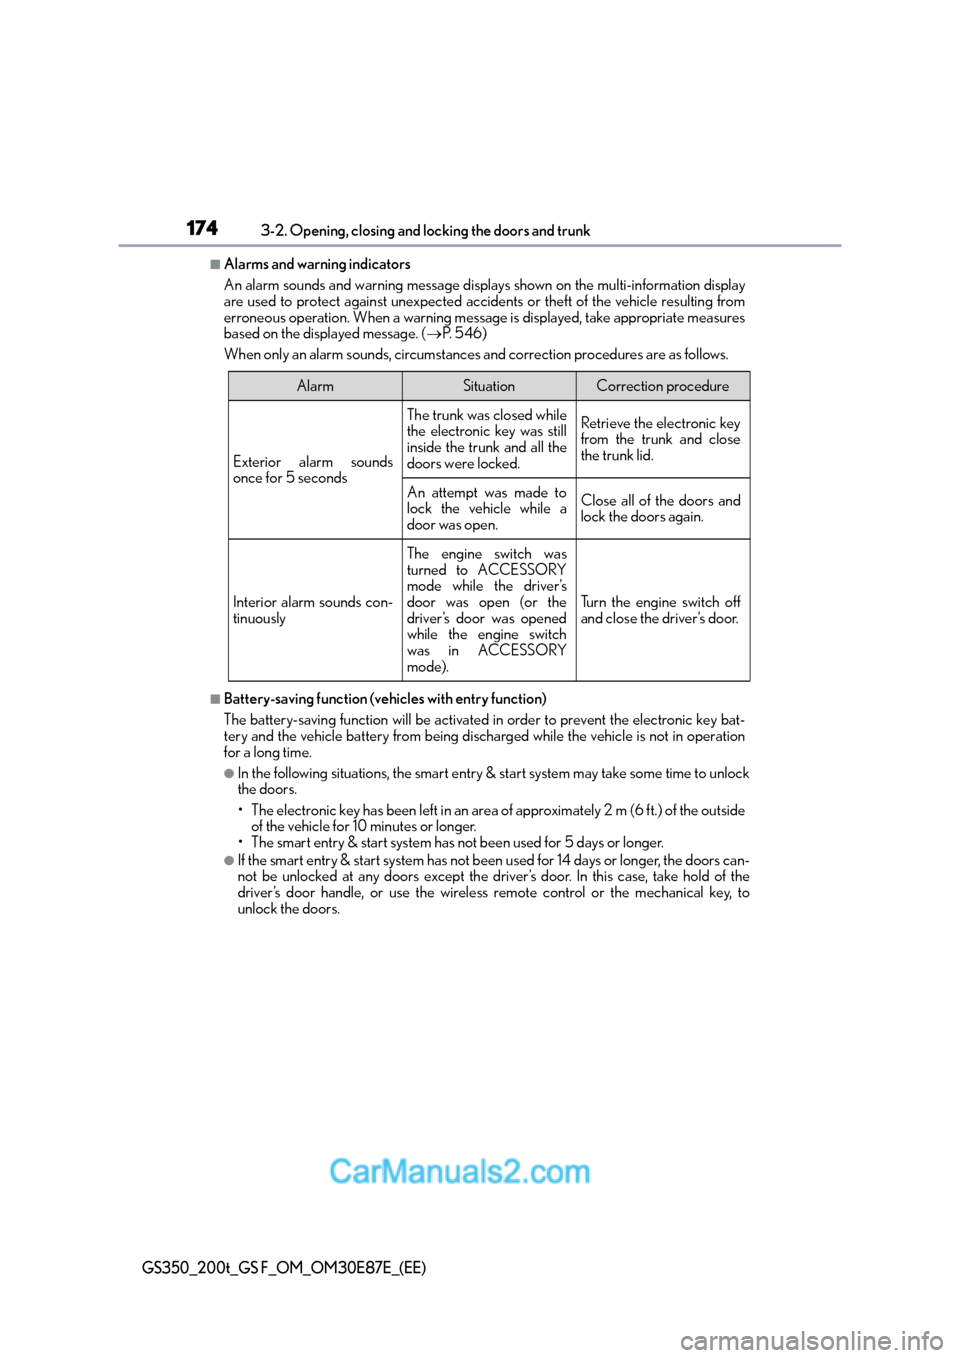
■Alarms and warning indicators
An alarm sounds and warning message displays shown on the multi-information display
are used to protect against unexpected accidents or theft of the vehicle resulting from
erroneous operation. When a warning message is displayed, take appropriate measures
based on the displayed message. ( →P. 5 4 6 )
When only an alarm sounds, circumstances and correction procedures are as follows.
■Battery-saving function (vehicles with entry function)
The battery-saving function will be activated in order to prevent the electronic key bat-
tery and the vehicle battery from being discharged while the vehicle is not in operation
for a long time.
●In the following situations, the smart entry & start system may take some time to unlock
the doors.
• The electronic key has been left in an area of approximately 2 m (6 ft.) of the outside
of the vehicle for 10 minutes or longer.
• The smart entry & start system has not been used for 5 days or longer.
●If the smart entry & start system has not been used for 14 days or longer, the doors can-
not be unlocked at any doors except the driver’s door. In this case, take hold of the
driver’s door handle, or use the wireless remote control or the mechanical key, to
unlock the doors.
AlarmSituationCorrection procedure
Exterior alarm sounds
once for 5 seconds
The trunk was closed while
the electronic key was still
inside the trunk and all the
doors were locked.Retrieve the electronic key
from the trunk and close
the trunk lid.
An attempt was made to
lock the vehicle while a
door was open.Close all of the doors and
lock the doors again.
Interior alarm sounds con-
tinuously
The engine switch was
turned to ACCESSORY
mode while the driver’s
door was open (or the
driver’s door was opened
while the engine switch
was in ACCESSORY
mode).
Turn the engine switch off
and close the driver’s door.