Page 16 of 499
Your vehicle at a glance
62
ENGINE COMPARTMENT
B030000AUN-C1
1. Engine coolant reservoir ..................7-21
2. Engine oil filler cap ..........................7-18
3. Brake/clutch* fluid reservoir ............7-22
4. Positive battery terminal ..................7-29
5. Negative battery terminal ................7-29
6. Fuse box ..........................................7-46
7. Air cleaner ........................................7-24
8. Engine oil dipstick ............................7-18
9. Radiator cap ....................................7-21
10. Windshield washer fluid reservoir ..7-23
* if equipped
OSL074101N/OSL071001N
❈The actual engine room in the vehicle may differ from the illustration.
■
■
GDI engine
■
■ T-GDI engine
Page 121 of 499
Features of your vehicle
34
4
D100100AAM
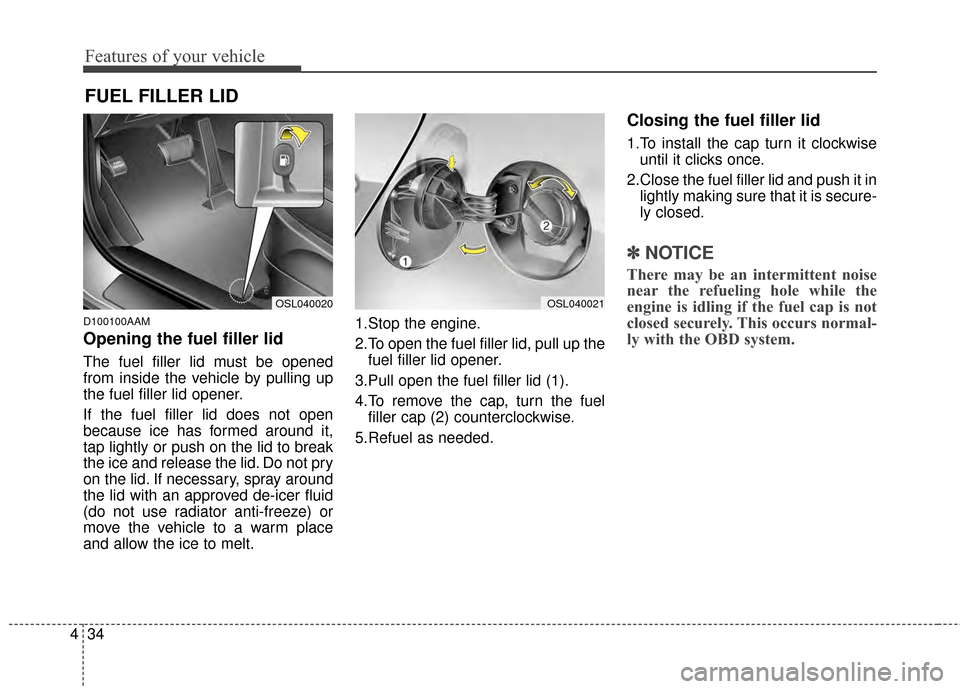
Opening the fuel filler lid
The fuel filler lid must be opened
from inside the vehicle by pulling up
the fuel filler lid opener.
If the fuel filler lid does not open
because ice has formed around it,
tap lightly or push on the lid to break
the ice and release the lid. Do not pry
on the lid. If necessary, spray around
the lid with an approved de-icer fluid
(do not use radiator anti-freeze) or
move the vehicle to a warm place
and allow the ice to melt. 1.Stop the engine.
2.To open the fuel filler lid, pull up the
fuel filler lid opener.
3.Pull open the fuel filler lid (1).
4.To remove the cap, turn the fuel filler cap (2) counterclockwise.
5.Refuel as needed.
Closing the fuel filler lid
1.To install the cap turn it clockwise until it clicks once.
2.Close the fuel filler lid and push it in lightly making sure that it is secure-
ly closed.
✽ ✽ NOTICE
There may be an intermittent noise
near the refueling hole while the
engine is idling if the fuel cap is not
closed securely. This occurs normal-
ly with the OBD system.
FUEL FILLER LID
OSL040020OSL040021
Page 142 of 499
455
Features of your vehicle
If the mirror is jammed with ice, do
not adjust the mirror by force. Use an
approved spray de-icer (not radiator
antifreeze) to release the frozen
mechanism or move the vehicle to a
warm place and allow the ice to melt.
D140201AHM-EE
Remote control
Electric type
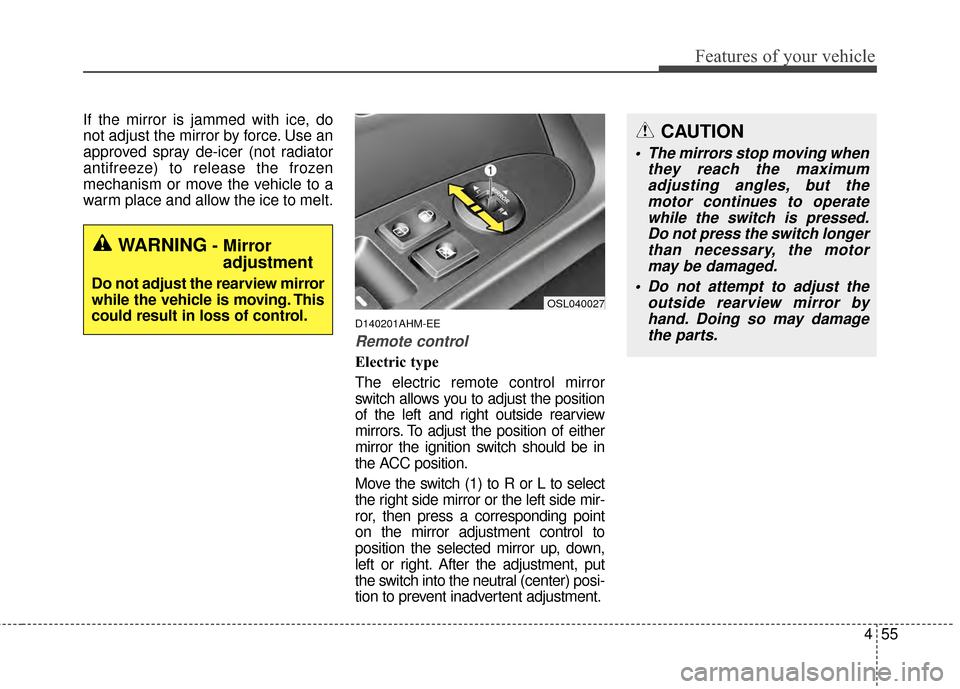
The electric remote control mirror
switch allows you to adjust the position
of the left and right outside rearview
mirrors. To adjust the position of either
mirror the ignition switch should be in
the ACC position.
Move the switch (1) to R or L to select
the right side mirror or the left side mir-
ror, then press a corresponding point
on the mirror adjustment control to
position the selected mirror up, down,
left or right. After the adjustment, put
the switch into the neutral (center) posi-
tion to prevent inadvertent adjustment.
OSL040027
WARNING- Mirror adjustment
Do not adjust the rearview mirror
while the vehicle is moving. This
could result in loss of control.
CAUTION
The mirrors stop moving when
they reach the maximumadjusting angles, but themotor continues to operatewhile the switch is pressed.Do not press the switch longerthan necessary, the motormay be damaged.
Do not attempt to adjust the outside rearview mirror byhand. Doing so may damagethe parts.
Page 146 of 499
459
Features of your vehicle
When the door is opened, or if the
engine is not started within 1 minute,
the tachometer pointer may move
slightly in the ON position with the
engine OFF. This movement is nor-
mal and will not affect the accuracy
of the tachometer once the engine is
running.
D150203AUN
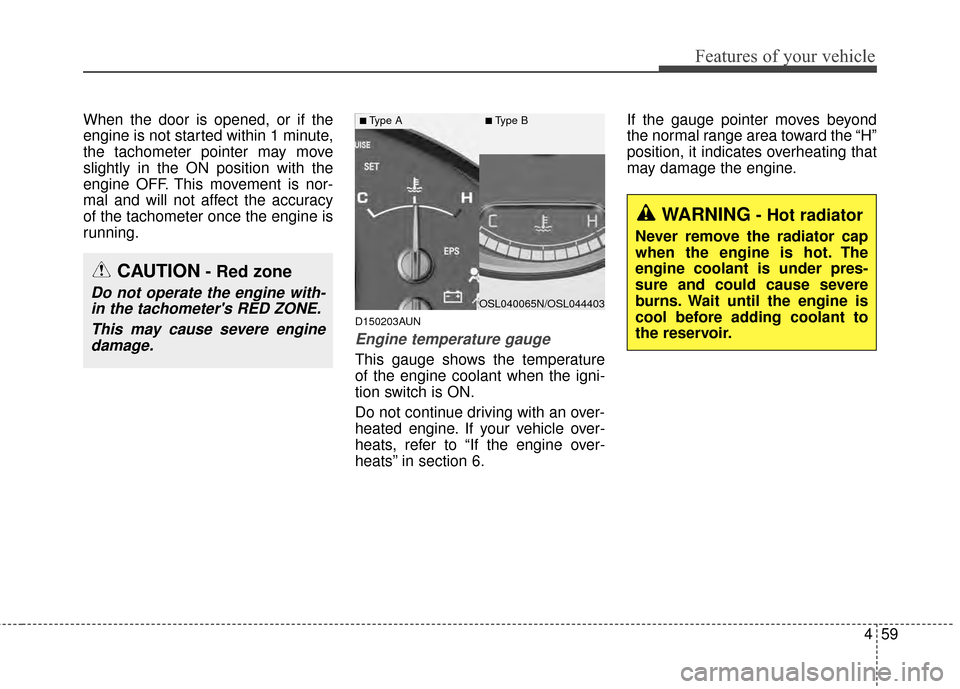
Engine temperature gauge
This gauge shows the temperature
of the engine coolant when the igni-
tion switch is ON.
Do not continue driving with an over-
heated engine. If your vehicle over-
heats, refer to “If the engine over-
heats” in section 6.If the gauge pointer moves beyond
the normal range area toward the “H”
position, it indicates overheating that
may damage the engine.
CAUTION- Red zone
Do not operate the engine with-
in the tachometer's RED ZONE.
This may cause severe enginedamage.
WARNING- Hot radiator
Never remove the radiator cap
when the engine is hot. The
engine coolant is under pres-
sure and could cause severe
burns. Wait until the engine is
cool before adding coolant to
the reservoir.
OSL040065N/OSL044403
■Type A■Type B
Page 402 of 499
67
What to do in an emergency
IF THE ENGINE OVERHEATS
F050000AAM
If your temperature gauge indicates
overheating, you experience a loss
of power, or hear loud pinging or
knocking, the engine will probably be
too hot. If this happens, you should:
1.Pull off the road and stop as soonas it is safe to do so.
2.Place the shift lever in P (Park, automatic transaxle) or Neutral
(manual transaxle) and set the
parking brake. If the air condition-
ing is on, turn it off.
3.If engine coolant is running out under the vehicle or steam is com-
ing out from underneath the hood,
stop the engine. Do not open the
hood until the coolant has stopped
running or the steaming has
stopped. If there is no visible loss
of engine coolant and no steam,
leave the engine running and
check to be sure the engine cool-
ing fan is operating. If the fan is not
running, turn the engine off. 4.Check to see if the water pump
drive belt is missing. If it is not
missing, check to see that it is
tight. If the drive belt seems to be
satisfactory, check for coolant leak-
ing from the radiator, hoses or
under the vehicle. (If the air condi-
tioning had been in use, it is nor-
mal for cold water to be draining
from it when you stop).
5.If the water pump drive belt is bro- ken or engine coolant is leaking
out, stop the engine immediately
and call the nearest authorized Kia
dealer for assistance. 6.If you cannot find the cause of the
overheating, wait until the engine
temperature has returned to nor-
mal. Then, if coolant has been lost,
carefully add coolant to the reser-
voir to bring the fluid level in the
reservoir up to the halfway mark.
7.Proceed with caution, keeping alert for further signs of overheat-
ing. If overheating happens again,
call an authorized Kia dealer for
assistance.
Serious loss of coolant indicates
there is a leak in the cooling system
and this should be checked as soon
as possible by an authorized Kia
dealer.
WARNING- Under the hood
While the engine is running,
keep hair, hands and clothing
away from moving parts such
as the fan and drive belts to pre-
vent injury.
WARNING- Radiator cap
Do not remove the radiator cap
when the engine is hot. This
may result in coolant being
blown out of the opening and
cause serious burns.
Page 418 of 499
Maintenance
27
ENGINE COMPARTMENT
G010000AAM-EU
1. Engine coolant reservoir
2. Engine oil filler cap
3. Brake/clutch* fluid reservoir
4. Positive battery terminal
5. Negative battery terminal
6. Fuse box
7. Air cleaner
8. Engine oil dipstick
9. Radiator cap
10. Windshield washer fluid reservoir
* if equipped
OSL074101N/OSL071001N
❈The actual engine room in the vehicle may differ from the illustration.
■
■
GDI engine
■
■T-GDI engine
Page 422 of 499
Maintenance
67
G030103AHM
At least monthly:
Check the coolant level in theengine coolant reservoir.
Check the operation of all exterior lights, including the stoplights, turn
signals and hazard warning flash-
ers.
Check the inflation pressures of all tires including the spare.
G030104AHM
At least twice a year
(i.e., every Spring and Fall):
Check the radiator, heater and air conditioning hoses for leaks or
damage.
Check the windshield washer spray and wiper operation. Clean
the wiper blades with clean cloth
dampened with washer fluid.
Check the headlight alignment.
Check the muffler, exhaust pipes, shields and clamps.
Check the lap/shoulder belts for wear and function.
Check for worn tires and loose wheel lug nuts.
G030105AHM-C1
At least once a year:
Clean the body and door drainholes.
Lubricate the door hinges and checks, and hood hinges.
Lubricate the door and hood locks and latches.
Lubricate the door rubber weather- strips.
Check the air conditioning system.
Check the power steering fluid level.
Inspect and lubricate the automat- ic transaxle linkage and controls.
Clean the battery and terminals.
Check the brake/clutch fluid level.
Page 431 of 499
715
Maintenance
G050800AUN
Air cleaner filter
A Genuine Kia air cleaner filter is
recommended when the filter is
replaced.
G050900AUN
Spark plugs
Make sure to install new spark plugs
of the correct heat range.
G051000AHM
Valve clearance (if equipped)
Inspect for excessive valve noise
and/or engine vibration and adjust if
necessary. An authorized Kia dealer
should perform the operation.
G051100AHM
Cooling system
Check the cooling system compo-
nents, such as the radiator, coolant
reservoir, hoses and connections for
leakage and damage. Replace any
damaged parts.
G051200AUN
Coolant
The coolant should be changed at
the intervals specified in the mainte-
nance schedule.
G051400AUN
Automatic transaxle fluid
(if equipped)
Automatic transaxle fluid should not
be checked under normal usage
conditions.
But in severe conditions, the fluid
should be changed at an authorized
Kia dealer in accordance to the
scheduled maintenance at the begin-
ning of this section.
✽ ✽NOTICE
Automatic transaxle fluid color is
basically red.
As the vehicle is driven, the auto-
matic transaxle fluid will begin to
look darker.
It is normal condition and you
should not judge the need to replace
the fluid based upon the changed
color.
G051300AUN
Manual transaxle fluid
(if equipped)
Inspect the manual transaxle fluid
according to the maintenance sched-
ule.
G051500AUN
Brake hoses and lines
Visually check for proper installation,
chafing, cracks, deterioration and
any leakage. Replace any deteriorat-
ed or damaged parts immediately.
CAUTION- Transaxle
fluids
The use of a non-specified fluid
could result in transaxle mal-function and failure.