2015 KIA Sportage ABS
[x] Cancel search: ABSPage 383 of 499
Driving your vehicle
60
5
E140100AUN
Hitches
It's important to have the correct
hitch equipment. Crosswinds, large
trucks going by, and rough roads are
a few reasons why you’ll need the
right hitch. Here are some rules to
follow:
Will you have to make any holes in
the body of your vehicle when you
install a trailer hitch? If you do, then
be sure to seal the holes later
when you remove the hitch.
If you don’t seal them, deadly car-
bon monoxide (CO) from your
exhaust can get into your vehicle,
as well as dirt and water.
The bumpers on your vehicle are not intended for hitches. Do not
attach rental hitches or other
bumper-type hitches to them. Use
only a frame-mounted hitch that
does not attach to the bumper.
Kia trailer hitch accessory is avail- able at an authorized Kia dealer.
E140200AUN
Safety chains
You should always attach chains
between your vehicle and your trail-
er. Cross the safety chains under the
tongue of the trailer so that the
tongue will not drop to the road if it
becomes separated from the hitch.
Instructions about safety chains may
be provided by the hitch manufactur-
er or by the trailer manufacturer.
Follow the manufacturer’s recom-
mendation for attaching safety
chains. Always leave just enough
slack so you can turn with your trail-
er. And, never allow safety chains to
drag on the ground.
E140300AUN
Trailer brakes
If your trailer is equipped with a brak-
ing system, make sure it conforms to
your state’s regulations and that it is
properly installed and operating cor-
rectly.
If your trailer weight exceeds the
maximum allowed weight without
trailer brakes, then the trailer will also
require its own brakes as well. Be
sure to read and follow the instruc-
tions for the trailer brakes so you’ll be
able to install, adjust and maintain
them properly.
Don’t tap into or modify your vehi-cle's brake system.
WARNING- Trailerbrakes
Do not use a trailer with its own
brakes unless you are absolute-
ly certain that you have proper-
ly set up the brake system. This
is not a task for amateurs. Use
an experienced, competent
trailer shop for this work.
Page 386 of 499
563
Driving your vehicle
Towing up hill
When towing a trailer on steepgrades (in excess of 6%) pay close
attention to the engine coolant
temperature gauge to ensure the
engine does not overheat. If the
needle of the coolant temperature
gauge moves across the dial
towards “H” (HOT), pull over and
stop as soon as it is safe to do so,
and allow the engine to idle until it
cools down. You may proceed once
the engine has cooled sufficiently.
You must decide driving speed depending on trailer weight and
uphill grade to reduce the possibil-
ity of engine and transaxle over-
heating
E140407AUN-EA
Parking on hills
Generally, if you have a trailer
attached to your vehicle, you should
not park your vehicle on a hill. People
can be seriously or fatally injured,
and both your vehicle and the trailer
can be damaged if they unexpected-
ly roll downhill.
However, if you ever have to park
your trailer on a hill, here's how to do
it:
1.Pull the vehicle into the parkingspace. Turn the steering wheel in
the direction of the curb (right if
headed downhill, left if headed up
hill). 2.If the vehicle has a manual
transaxle, place the car in neutral.
If the vehicle has an automatic
transaxle, place the car in P (Park).
3.Set the parking brake and shut off the vehicle.
4.Place chocks under the trailer wheels on the down hill side of the
wheels.
5.Start the vehicle, hold the brakes, shift to neutral, release the parking
brake and slowly release the
brakes until the trailer chocks
absorb the load.
6.Reapply the brakes, reapply the parking brake and shift the vehicle
to R (Reverse) for manual
transaxle or P (Park) for automatic
transaxle.
7. Shut off the vehicle and release the vehicle brakes but leave the
parking brake set.
Page 452 of 499
Maintenance
36
7
G200600AHM-EU
Tire replacement
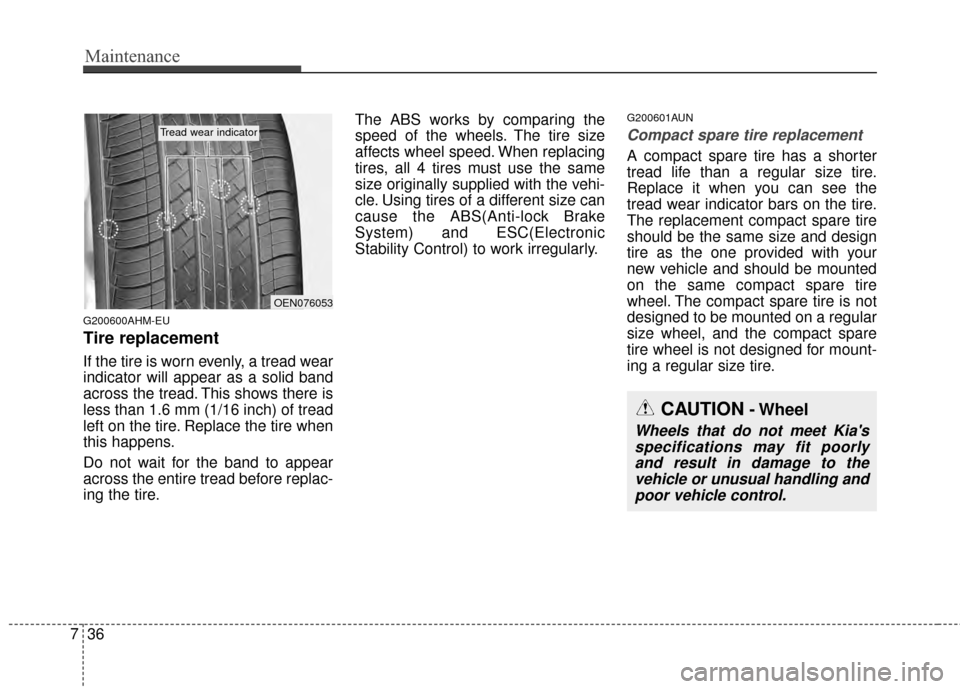
If the tire is worn evenly, a tread wear
indicator will appear as a solid band
across the tread. This shows there is
less than 1.6 mm (1/16 inch) of tread
left on the tire. Replace the tire when
this happens.
Do not wait for the band to appear
across the entire tread before replac-
ing the tire. The ABS works by comparing the
speed of the wheels. The tire size
affects wheel speed. When replacing
tires, all 4 tires must use the same
size originally supplied with the vehi-
cle. Using tires of a different size can
cause the ABS(Anti-lock Brake
System) and ESC(Electronic
Stability Control) to work irregularly.
G200601AUN
Compact spare tire replacement
A compact spare tire has a shorter
tread life than a regular size tire.
Replace it when you can see the
tread wear indicator bars on the tire.
The replacement compact spare tire
should be the same size and design
tire as the one provided with your
new vehicle and should be mounted
on the same compact spare tire
wheel. The compact spare tire is not
designed to be mounted on a regular
size wheel, and the compact spare
tire wheel is not designed for mount-
ing a regular size tire.
OEN076053
Tread wear indicator
CAUTION- Wheel
Wheels that do not meet Kia's
specifications may fit poorlyand result in damage to thevehicle or unusual handling andpoor vehicle control.
Page 470 of 499
Maintenance
54
7
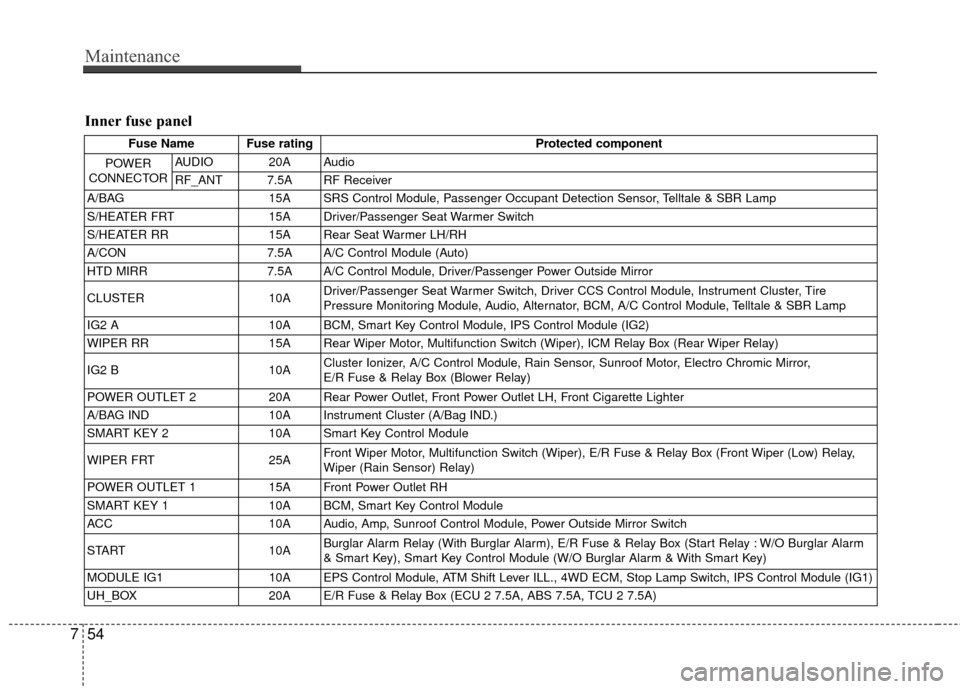
Inner fuse panel
Fuse Name Fuse rating Protected component
POWER
CONNECTOR
AUDIO 20A Audio
RF_ANT 7.5A RF Receiver
A/BAG 15A SRS Control Module, Passenger Occupant Detection Sensor, Telltale & SBR Lamp
S/HEATER FRT 15A Driver/Passenger Seat Warmer Switch
S/HEATER RR 15A Rear Seat Warmer LH/RH
A/CON 7.5A A/C Control Module (Auto)
HTD MIRR 7.5A A/C Control Module, Driver/Passenger Power Outside Mirror
CLUSTER 10A Driver/Passenger Seat Warmer Switch, Driver CCS Control Module, Instrument Cluster, Tire
Pressure Monitoring Module, Audio, Alternator, BCM, A/C Control Module, Telltale & SBR Lamp
IG2 A 10A BCM, Smart Key Control Module, IPS Control Module (IG2)
WIPER RR 15A Rear Wiper Motor, Multifunction Switch (Wiper), ICM Relay Box (Rear Wiper Relay)
IG2 B 10A Cluster Ionizer, A/C Control Module, Rain Sensor, Sunroof Motor, Electro Chromic Mirror,
E/R Fuse & Relay Box (Blower Relay)
POWER OUTLET 2 20A Rear Power Outlet, Front Power Outlet LH, Front Cigarette Lighter
A/BAG IND 10A Instrument Cluster (A/Bag IND.)
SMART KEY 2 10A Smart Key Control Module
WIPER FRT 25A Front Wiper Motor, Multifunction Switch (Wiper), E/R Fuse & Relay Box (Front Wiper (Low) Relay,
Wiper (Rain Sensor) Relay)
POWER OUTLET 1 15A Front Power Outlet RH
SMART KEY 1 10A BCM, Smart Key Control Module
ACC 10A Audio, Amp, Sunroof Control Module, Power Outside Mirror Switch
START 10A Burglar Alarm Relay (With Burglar Alarm), E/R Fuse & Relay Box (Start Relay : W/O Burglar Alarm
& Smart Key), Smart Key Control Module (W/O Burglar Alarm & With Smart Key)
MODULE IG1 10A EPS Control Module, ATM Shift Lever ILL., 4WD ECM, Stop Lamp Switch, IPS Control Module (IG1)
UH_BOX 20A E/R Fuse & Relay Box (ECU 2 7.5A, ABS 7.5A, TCU 2 7.5A)
Page 472 of 499
Maintenance
56
7
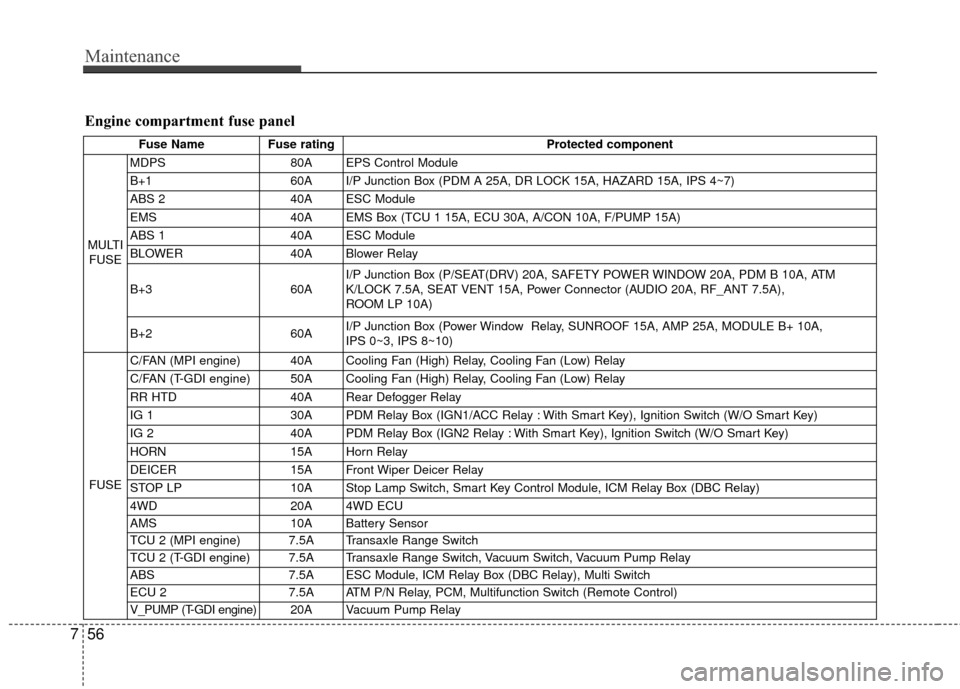
Engine compartment fuse panel
Fuse Name Fuse rating Protected component
MULTI FUSE MDPS
80A EPS Control Module
B+1 60A I/P Junction Box (PDM A 25A, DR LOCK 15A, HAZARD 15A, IPS 4~7)
ABS 2 40A ESC Module
EMS 40A EMS Box (TCU 1 15A, ECU 30A, A/CON 10A, F/PUMP 15A)
ABS 1 40A ESC Module
BLOWER 40A Blower Relay
B+3 60AI/P Junction Box (P/SEAT(DRV) 20A, SAFETY POWER WINDOW 20A, PDM B 10A, ATM
K/LOCK 7.5A, SEAT VENT 15A, Power Connector (AUDIO 20A, RF_ANT 7.5A),
ROOM LP 10A)
B+2 60AI/P Junction Box (Power Window Relay, SUNROOF 15A, AMP 25A, MODULE B+ 10A,
IPS 0~3, IPS 8~10)
FUSE C/FAN (MPI engine) 40A Cooling Fan (High) Relay, Cooling Fan (Low) Relay
C/FAN (T-GDI engine) 50A Cooling Fan (High) Relay, Cooling Fan (Low) Relay
RR HTD
40A Rear Defogger Relay
IG 1 30A PDM Relay Box (IGN1/ACC Relay : With Smart Key), Ignition Switch (W/O Smart Key)
IG 2 40A PDM Relay Box (IGN2 Relay : With Smart Key), Ignition Switch (W/O Smart Key)
HORN 15A Horn Relay
DEICER 15A Front Wiper Deicer Relay
STOP LP 10A Stop Lamp Switch, Smart Key Control Module, ICM Relay Box (DBC Relay)
4WD 20A 4WD ECU
AMS 10A Battery Sensor
TCU 2 (MPI engine) 7.5A Transaxle Range Switch
TCU 2 (T-GDI engine) 7.5A Transaxle Range Switch, Vacuum Switch, Vacuum Pump Relay
ABS 7.5A ESC Module, ICM Relay Box (DBC Relay), Multi Switch
ECU 2 7.5A ATM P/N Relay, PCM, Multifunction Switch (Remote Control)
V_PUMP (T-GDI engine) 20A V acuum Pump Relay
Page 482 of 499
Maintenance
66
7
G270201AUN
Canister
Fuel vapors generated inside the fuel
tank are absorbed and stored in the
onboard canister. When the engine is
running, the fuel vapors absorbed in
the canister are drawn into the surge
tank through the purge control sole-
noid valve.
G270202AHM
Purge Control Solenoid Valve
(PCSV)
The purge control solenoid valve is
controlled by the Engine Control
Module (ECM); when the engine
coolant temperature is low during
idling, the PCSV closes so that evap-
orated fuel is not taken into the
engine. After the engine warms up
during ordinary driving, the PCSV
opens to introduce evaporated fuel to
the engine.
G270300AUN
3. Exhaust emission control system
The Exhaust Emission Control
System is a highly effective system
which controls exhaust emissions
while maintaining good vehicle per-
formance.
G270301AUN
Vehicle modifications
This vehicle should not be modified.
Modification of your vehicle could
affect its performance, safety or
durability and may even violate gov-
ernmental safety and emissions reg-
ulations.
In addition, damage or performance
problems resulting from any modifi-
cation may not be covered under
warranty.
If you use unauthorized electronic
devices, it may cause the vehicle to
operate abnormally, wire damage,
battery discharge or fire. For your
safety, do not use unauthorized
electronic devices.
G270302AUN-EU
Engine exhaust gas precautions
(carbon monoxide)
Carbon monoxide can be present with other exhaust fumes.
Therefore, if you smell exhaust
fumes of any kind inside your vehi-
cle, have it inspected and repaired
immediately. If you ever suspect
exhaust fumes are coming into
your vehicle, drive it only with all
the windows fully open. Have your
vehicle checked and repaired
immediately.
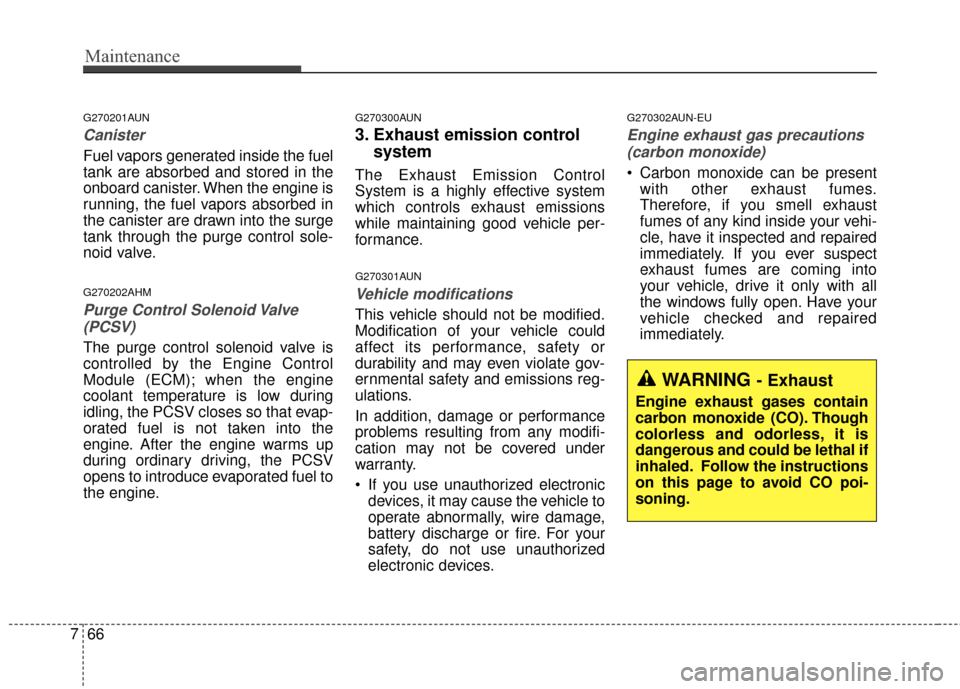
WARNING - Exhaust
Engine exhaust gases contain
carbon monoxide (CO). Though
colorless and odorless, it is
dangerous and could be lethal if
inhaled. Follow the instructions
on this page to avoid CO poi-
soning.
Page 494 of 499
Index
2I
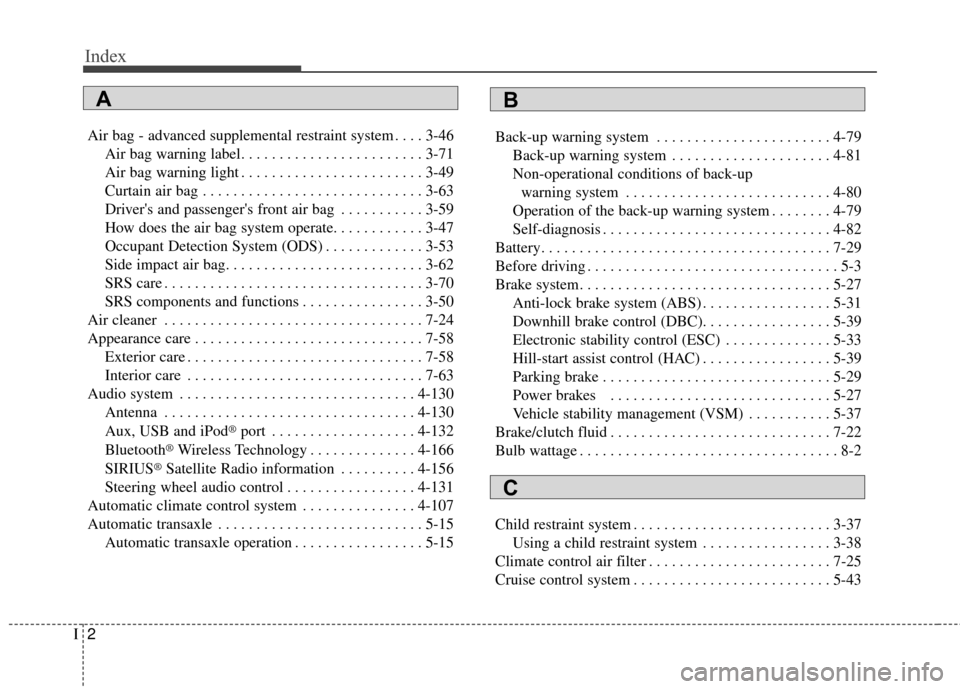
Air bag - advanced supplemental restraint system . . . . 3-46Air bag warning label. . . . . . . . . . . . . . . . . . . . . . . . 3-71
Air bag warning light . . . . . . . . . . . . . . . . . . . . . . . . 3-49
Curtain air bag . . . . . . . . . . . . . . . . . . . . . . . . . . . . . 3-63
Driver's and passenger's front air bag . . . . . . . . . . . 3-59
How does the air bag system operate. . . . . . . . . . . . 3-47
Occupant Detection System (ODS) . . . . . . . . . . . . . 3-53
Side impact air bag. . . . . . . . . . . . . . . . . . . . . . . . . . 3-62
SRS care . . . . . . . . . . . . . . . . . . . . . . . . . . . . . . . . . . 3-70\
SRS components and functions . . . . . . . . . . . . . . . . 3-50
Air cleaner . . . . . . . . . . . . . . . . . . . . . . . . . . . . . . . . . . 7-24\
Appearance care . . . . . . . . . . . . . . . . . . . . . . . . . . . . . . 7-58 Exterior care . . . . . . . . . . . . . . . . . . . . . . . . . . . . . . . 7-58
Interior care . . . . . . . . . . . . . . . . . . . . . . . . . . . . . . . 7-63
Audio system . . . . . . . . . . . . . . . . . . . . . . . . . . . . . . . 4-130 Antenna . . . . . . . . . . . . . . . . . . . . . . . . . . . . . . . . . 4-130
Aux, USB and iPod
®port . . . . . . . . . . . . . . . . . . . 4-132
Bluetooth®Wireless Technology . . . . . . . . . . . . . . 4-166
SIRIUS®Satellite Radio information . . . . . . . . . . 4-156
Steering wheel audio control . . . . . . . . . . . . . . . . . 4-131
Automatic climate control system . . . . . . . . . . . . . . . 4-107
Automatic transaxle . . . . . . . . . . . . . . . . . . . . . . . . . . . 5-15 Automatic transaxle operation . . . . . . . . . . . . . . . . . 5-15 Back-up warning system . . . . . . . . . . . . . . . . . . . . . . . 4-79
Back-up warning system . . . . . . . . . . . . . . . . . . . . . 4-81
Non-operational conditions of back-upwarning system . . . . . . . . . . . . . . . . . . . . . . . . . . . 4-80
Operation of the back-up warning system . . . . . . . . 4-79
Self-diagnosis . . . . . . . . . . . . . . . . . . . . . . . . . . . . . . 4-82
Battery. . . . . . . . . . . . . . . . . . . . . . . . . . . . . . . . . . . . \
. . 7-29
Before driving . . . . . . . . . . . . . . . . . . . . . . . . . . . . . . . . . 5-3
Brake system. . . . . . . . . . . . . . . . . . . . . . . . . . . . . . . . . 5-27 Anti-lock brake system (ABS) . . . . . . . . . . . . . . . . . 5-31
Downhill brake control (DBC). . . . . . . . . . . . . . . . . 5-39
Electronic stability control (ESC) . . . . . . . . . . . . . . 5-33
Hill-start assist control (HAC) . . . . . . . . . . . . . . . . . 5-39
Parking brake . . . . . . . . . . . . . . . . . . . . . . . . . . . . . . 5-29
Power brakes . . . . . . . . . . . . . . . . . . . . . . . . . . . . . 5-27
Vehicle stability management (VSM) . . . . . . . . . . . 5-37
Brake/clutch fluid . . . . . . . . . . . . . . . . . . . . . . . . . . . . . 7-22
Bulb wattage . . . . . . . . . . . . . . . . . . . . . . . . . . . . . . . . . . 8-2
Child restraint system . . . . . . . . . . . . . . . . . . . . . . . . . . 3-37 Using a child restraint system . . . . . . . . . . . . . . . . . 3-38
Climate control air filter . . . . . . . . . . . . . . . . . . . . . . . . 7-25
Cruise control system . . . . . . . . . . . . . . . . . . . . . . . . . . 5-43
AB
C