2015 KIA Soul relay
[x] Cancel search: relayPage 123 of 492

443
Features of your vehicle
Electric power steering (EPS)
The power steering uses a motor to
assist you in steering the vehicle. If
the engine is off or if the power steer-
ing system becomes inoperative, the
vehicle may still be steered, but it will
require increased steering effort.
The motor driven power steering is
controlled by a power steering con-
trol unit which senses the steering
wheel torque and vehicle speed to
command the motor.
The steering becomes heavier as
the vehicle’s speed increases and
becomes lighter as the vehicle’s
speed decreases for optimum steer-
ing control.
Should you notice any change in the
effort required to steer during normal
vehicle operation, have the power
steering checked by an authorized
Kia dealer. If the Electric Power Steering
System does not operate normally,
the warning light will illuminate on
the instrument cluster. The steering
wheel may require increased
steering effort. Take your vehicle to
an authorized Kia dealer and have
the vehicle checked as soon as
possible.
When you operate the steering wheel in low temperature, noise
may occur. If temperature rises, the
noise will likely disappear. This is a
normal condition.
When the vehicle is stationary, when the steering wheel is turned
all the way to the left or right con-
tinuously, the steering wheel
becomes harder to turn. The power
assist is limited to protect the
motor from overheating.
As time passes, the steering wheel
return to its normal condition.
✽ ✽ NOTICE
The following symptoms may occur
during normal vehicle operation:
• The EPS warning light does not
illuminate.
• The steering gets heavy immedi- ately after turning the ignition
switch on. This happens as the sys-
tem performs the EPS system
diagnostics. When the diagnostics
are completed, the steering wheel
will return to its normal condition.
• A click noise may be heard from the EPS relay after the ignition
switch is turned to the ON or
LOCK (OFF) position.
• A motor noise may be heard when the vehicle is at a stop or at a low
driving speed.
• If the Electric Power Steering System does not operate normally,
the warning light will illuminate on
the instrument cluster. The steer-
ing wheel may become difficult to
control or operate abnormally.
Take your vehicle to an authorized
Kia dealer and have the vehicle
checked as soon as possible. (Continued)
STEERING WHEEL
Page 439 of 492
763
Maintenance
✽
✽NOTICE
The actual fuse/relay panel label
may differ from equipped items.
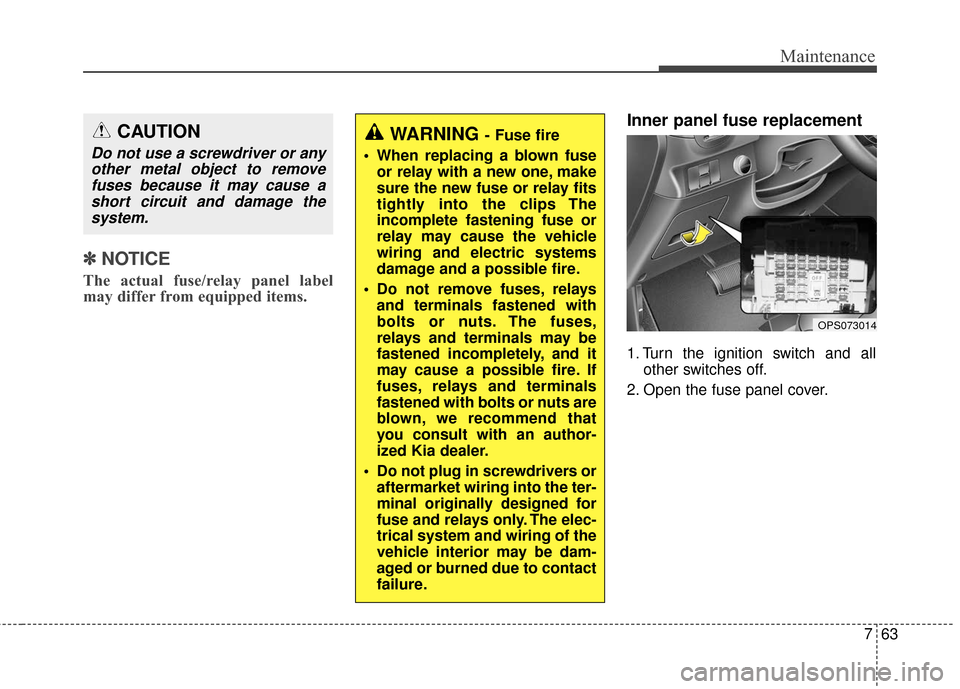
Inner panel fuse replacement
1. Turn the ignition switch and all
other switches off.
2. Open the fuse panel cover.
OPS073014
CAUTION
Do not use a screwdriver or any other metal object to removefuses because it may cause ashort circuit and damage thesystem.
WARNING - Fuse fire
When replacing a blown fuse or relay with a new one, make
sure the new fuse or relay fits
tightly into the clips The
incomplete fastening fuse or
relay may cause the vehicle
wiring and electric systems
damage and a possible fire.
Do not remove fuses, relays and terminals fastened with
bolts or nuts. The fuses,
relays and terminals may be
fastened incompletely, and it
may cause a possible fire. If
fuses, relays and terminals
fastened with bolts or nuts are
blown, we recommend that
you consult with an author-
ized Kia dealer.
Do not plug in screwdrivers or aftermarket wiring into the ter-
minal originally designed for
fuse and relays only. The elec-
trical system and wiring of the
vehicle interior may be dam-
aged or burned due to contact
failure.
Page 443 of 492
767
Maintenance
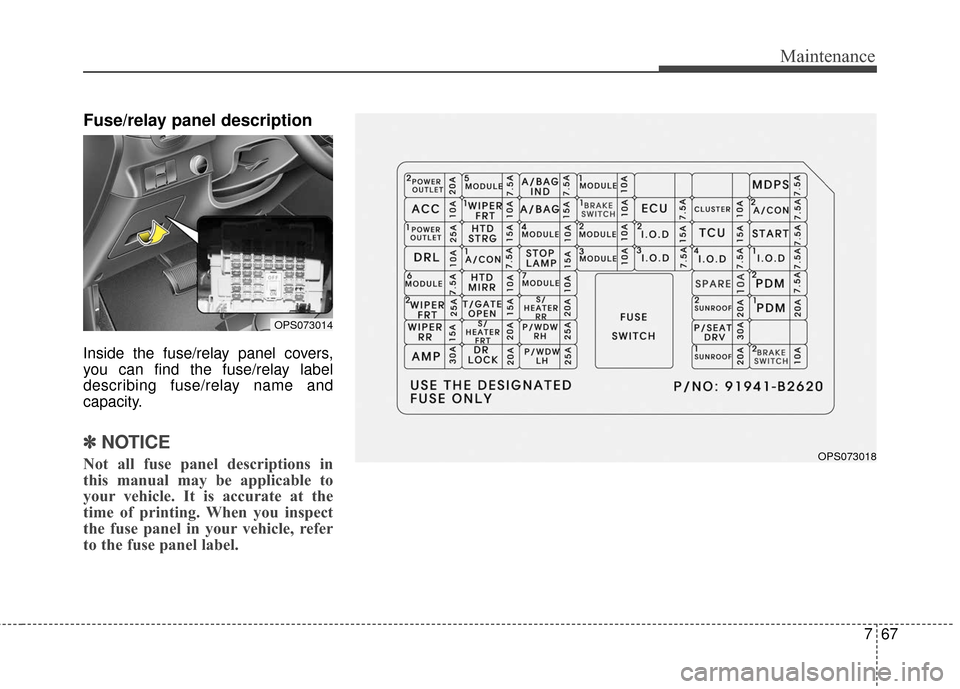
Fuse/relay panel description
Inside the fuse/relay panel covers,
you can find the fuse/relay label
describing fuse/relay name and
capacity.
✽ ✽NOTICE
Not all fuse panel descriptions in
this manual may be applicable to
your vehicle. It is accurate at the
time of printing. When you inspect
the fuse panel in your vehicle, refer
to the fuse panel label.
OPS073014
OPS073018
Page 446 of 492
Maintenance
70
7
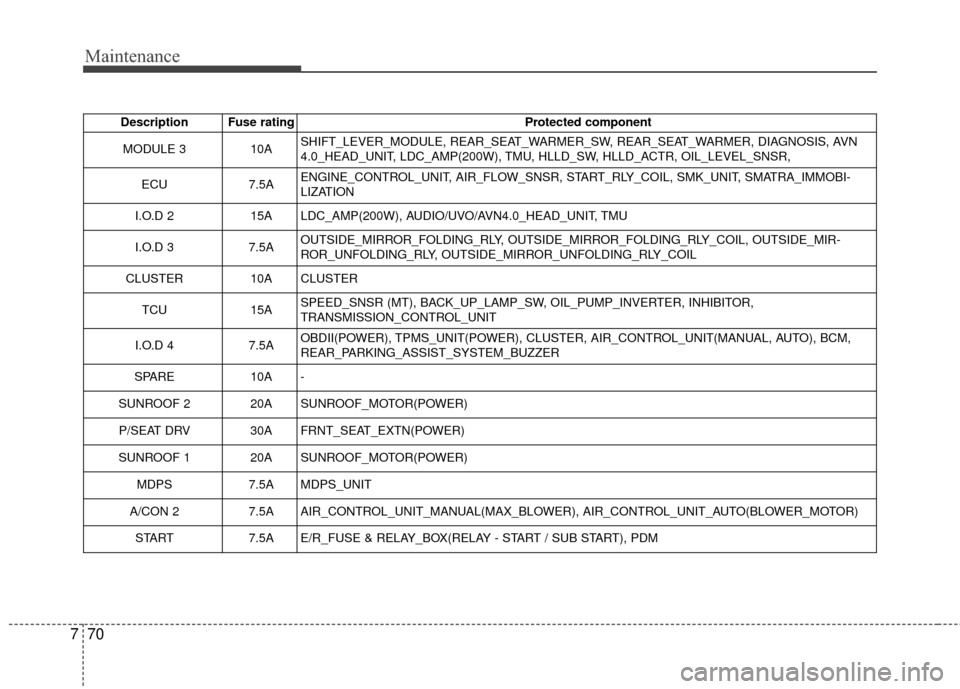
Description Fuse rating Protected component
MODULE 3 10ASHIFT_LEVER_MODULE, REAR_SEAT_WARMER_SW, REAR_SEAT_WARMER, DIAGNOSIS, AVN
4.0_HEAD_UNIT, LDC_AMP(200W), TMU, HLLD_SW, HLLD_ACTR, OIL_LEVEL_SNSR,
ECU 7.5AENGINE_CONTROL_UNIT, AIR_FLOW_SNSR, START_RLY_COIL, SMK_UNIT, SMATRA_IMMOBI-
LIZATION
I.O.D 2 15A LDC_AMP(200W), AUDIO/UVO/AVN4.0_HEAD_UNIT, TMU
I.O.D 3 7.5AOUTSIDE_MIRROR_FOLDING_RLY, OUTSIDE_MIRROR_FOLDING_RLY_COIL, OUTSIDE_MIR-
ROR_UNFOLDING_RLY, OUTSIDE_MIRROR_UNFOLDING_RLY_COIL
CLUSTER 10A CLUSTER
TCU 15ASPEED_SNSR (MT), BACK_UP_LAMP_SW, OIL_PUMP_INVERTER, INHIBITOR,
TRANSMISSION_CONTROL_UNIT
I.O.D 4 7.5AOBDII(POWER), TPMS_UNIT(POWER), CLUSTER, AIR_CONTROL_UNIT(MANUAL, AUTO), BCM,
REAR_PARKING_ASSIST_SYSTEM_BUZZER
SPARE 10A -
SUNROOF 2 20A SUNROOF_MOTOR(POWER) P/SEAT DRV 30A FRNT_SEAT_EXTN(POWER)
SUNROOF 1 20A SUNROOF_MOTOR(POWER) MDPS 7.5A MDPS_UNIT
A/CON 27.5AAIR_CONTROL_UNIT_MANUAL(MAX_BLOWER), AIR_CONTROL_UNIT_AUTO(BLOWER_MOTOR)
START 7.5AE/R_FUSE & RELAY_BOX(RELAY - START / SUB START), PDM
Page 449 of 492
773
Maintenance
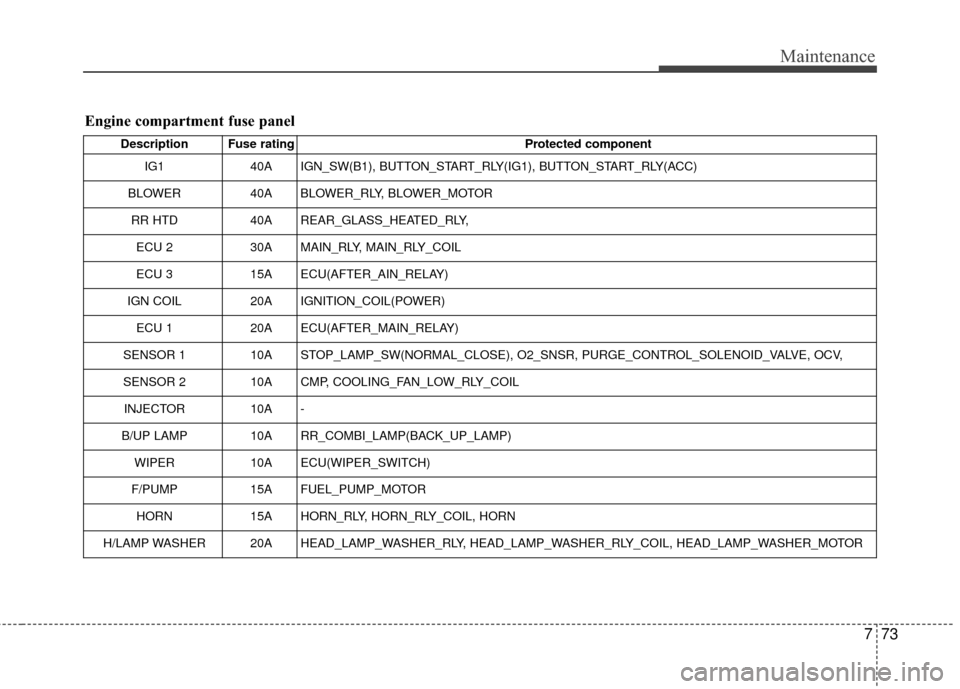
Engine compartment fuse panel
Description Fuse ratingProtected component
IG1 40A IGN_SW(B1), BUTTON_START_RLY(IG1), BUTTON_START_RLY(ACC)
BLOWER 40A BLOWER_RLY, BLOWER_MOTOR
RR HTD 40A REAR_GLASS_HEATED_RLY,
ECU 2 30A MAIN_RLY, MAIN_RLY_COIL
ECU 3 15A ECU(AFTER_AIN_RELAY)
IGN COIL 20A IGNITION_COIL(POWER)
ECU 1 20A ECU(AFTER_MAIN_RELAY)
SENSOR 1 10A STOP_LAMP_SW(NORMAL_CLOSE), O2_SNSR, PURGE_CONTROL_SOLENOID_VALVE, OCV,
SENSOR 2 10A CMP, COOLING_FAN_LOW_RLY_COIL
INJECTOR 10A -
B/UP LAMP 10A RR_COMBI_LAMP(BACK_UP_LAMP)
WIPER 10A ECU(WIPER_SWITCH)
F/PUMP15AFUEL_PUMP_MOTOR
HORN15AHORN_RLY, HORN_RLY_COIL, HORN
H/LAMP WASHER20AHEAD_LAMP_WASHER_RLY, HEAD_LAMP_WASHER_RLY_COIL, HEAD_LAMP_WASHER_MOTOR
Page 487 of 492
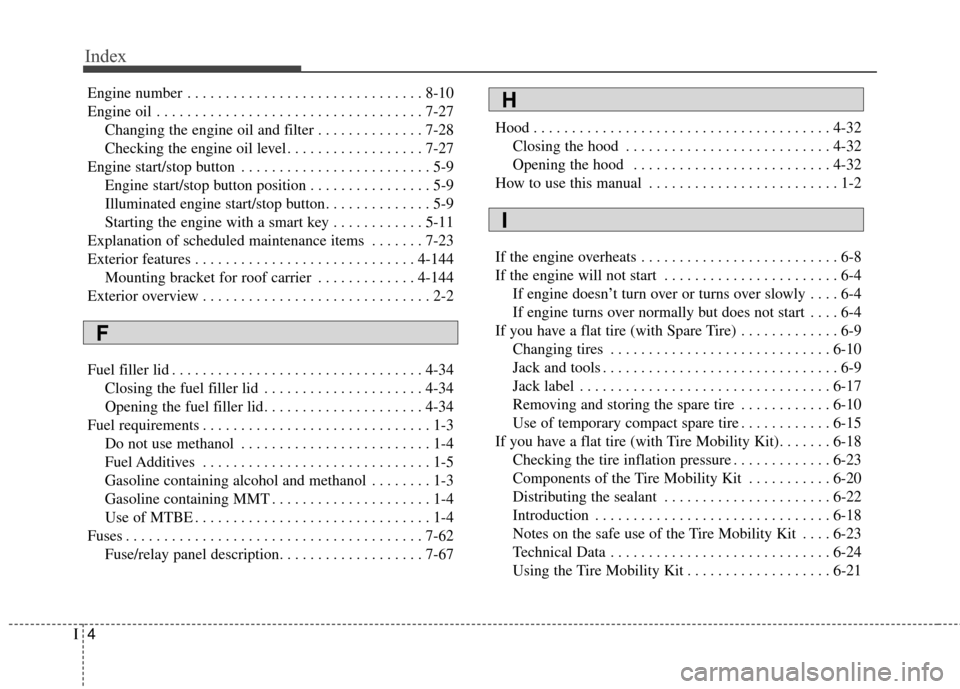
Index
4I
Engine number . . . . . . . . . . . . . . . . . . . . . . . . . . . . . . . 8-10
Engine oil . . . . . . . . . . . . . . . . . . . . . . . . . . . . . . . . . . . 7-\
27Changing the engine oil and filter . . . . . . . . . . . . . . 7-28
Checking the engine oil level . . . . . . . . . . . . . . . . . . 7-27
Engine start/stop button . . . . . . . . . . . . . . . . . . . . . . . . . 5-9 Engine start/stop button position . . . . . . . . . . . . . . . . 5-9
Illuminated engine start/stop button. . . . . . . . . . . . . . 5-9
Starting the engine with a smart key . . . . . . . . . . . . 5-11
Explanation of scheduled maintenance items . . . . . . . 7-23
Exterior features . . . . . . . . . . . . . . . . . . . . . . . . . . . . . 4-144 Mounting bracket for roof carrier . . . . . . . . . . . . . 4-144
Exterior overview . . . . . . . . . . . . . . . . . . . . . . . . . . . . . . 2-2
Fuel filler lid . . . . . . . . . . . . . . . . . . . . . . . . . . . . . . . . . 4-34 Closing the fuel filler lid . . . . . . . . . . . . . . . . . . . . . 4-34
Opening the fuel filler lid. . . . . . . . . . . . . . . . . . . . . 4-34
Fuel requirements . . . . . . . . . . . . . . . . . . . . . . . . . . . . . . 1-3 Do not use methanol . . . . . . . . . . . . . . . . . . . . . . . . . 1-4
Fuel Additives . . . . . . . . . . . . . . . . . . . . . . . . . . . . . . 1-5
Gasoline containing alcohol and methanol . . . . . . . . 1-3
Gasoline containing MMT . . . . . . . . . . . . . . . . . . . . . 1-4
Use of MTBE . . . . . . . . . . . . . . . . . . . . . . . . . . . . . . . 1-4
Fuses . . . . . . . . . . . . . . . . . . . . . . . . . . . . . . . . . . . . \
. . . 7-62 Fuse/relay panel description. . . . . . . . . . . . . . . . . . . 7-67 Hood . . . . . . . . . . . . . . . . . . . . . . . . . . . . . . . . . . . . \
. . . 4-32
Closing the hood . . . . . . . . . . . . . . . . . . . . . . . . . . . 4-32
Opening the hood . . . . . . . . . . . . . . . . . . . . . . . . . . 4-32
How to use this manual . . . . . . . . . . . . . . . . . . . . . . . . . 1-2
If the engine overheats . . . . . . . . . . . . . . . . . . . . . . . . . . 6-8
If the engine will not start . . . . . . . . . . . . . . . . . . . . . . . 6-4 If engine doesn’t turn over or turns over slowly . . . . 6-4
If engine turns over normally but does not start . . . . 6-4
If you have a flat tire (with Spare Tire) . . . . . . . . . . . . . 6-9 Changing tires . . . . . . . . . . . . . . . . . . . . . . . . . . . . . 6-10
Jack and tools . . . . . . . . . . . . . . . . . . . . . . . . . . . . . . . 6-9
Jack label . . . . . . . . . . . . . . . . . . . . . . . . . . . . . . . . . 6-17
Removing and storing the spare tire . . . . . . . . . . . . 6-10
Use of temporary compact spare tire . . . . . . . . . . . . 6-15
If you have a flat tire (with Tire Mobility Kit). . . . . . . 6-18 Checking the tire inflation pressure . . . . . . . . . . . . . 6-23
Components of the Tire Mobility Kit . . . . . . . . . . . 6-20
Distributing the sealant . . . . . . . . . . . . . . . . . . . . . . 6-22
Introduction . . . . . . . . . . . . . . . . . . . . . . . . . . . . . . . 6-18
Notes on the safe use of the Tire Mobility Kit . . . . 6-23
Technical Data . . . . . . . . . . . . . . . . . . . . . . . . . . . . . 6-24
Using the Tire Mobility Kit . . . . . . . . . . . . . . . . . . . 6-21
F
H
I