Page 99 of 492
419
Features of your vehicle
DOOR LOCKS
.Operating door locks from
outside the vehicle
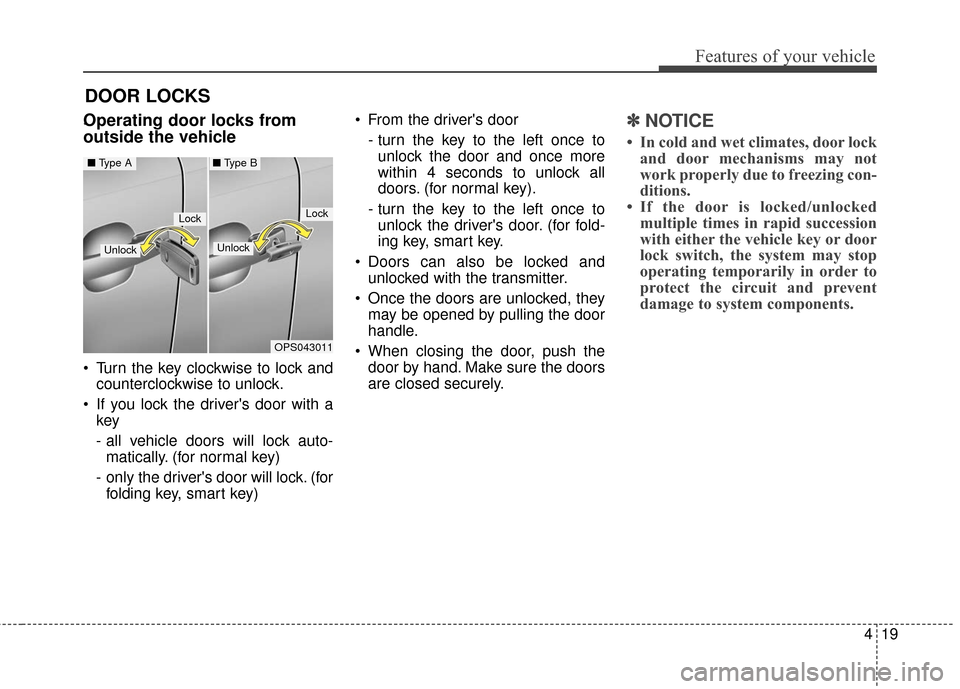
Turn the key clockwise to lock andcounterclockwise to unlock.
If you lock the driver's door with a key
- all vehicle doors will lock auto-
matically. (for normal key)
- only the driver's door will lock. (for folding key, smart key) From the driver's door
- turn the key to the left once tounlock the door and once more
within 4 seconds to unlock all
doors. (for normal key).
- turn the key to the left once to unlock the driver's door. (for fold-
ing key, smart key.
Doors can also be locked and unlocked with the transmitter.
Once the doors are unlocked, they may be opened by pulling the door
handle.
When closing the door, push the door by hand. Make sure the doors
are closed securely.
✽ ✽ NOTICE
• In cold and wet climates, door lock
and door mechanisms may not
work properly due to freezing con-
ditions.
• If the door is locked/unlocked multiple times in rapid succession
with either the vehicle key or door
lock switch, the system may stop
operating temporarily in order to
protect the circuit and prevent
damage to system components.
OPS043011
LockLock
Unlock
■ Type A■ Type B
Unlock
Page 114 of 492
Features of your vehicle
34
4
Opening the fuel filler lid
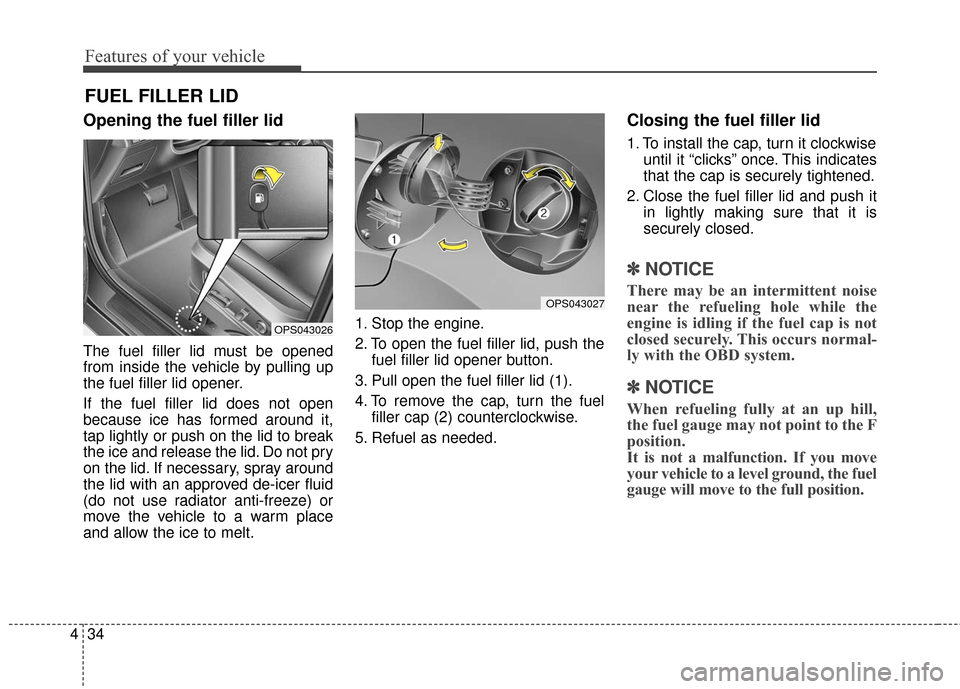
The fuel filler lid must be opened
from inside the vehicle by pulling up
the fuel filler lid opener.
If the fuel filler lid does not open
because ice has formed around it,
tap lightly or push on the lid to break
the ice and release the lid. Do not pry
on the lid. If necessary, spray around
the lid with an approved de-icer fluid
(do not use radiator anti-freeze) or
move the vehicle to a warm place
and allow the ice to melt. 1. Stop the engine.
2. To open the fuel filler lid, push the
fuel filler lid opener button.
3. Pull open the fuel filler lid (1).
4. To remove the cap, turn the fuel filler cap (2) counterclockwise.
5. Refuel as needed.
Closing the fuel filler lid
1. To install the cap, turn it clockwise until it “clicks” once. This indicates
that the cap is securely tightened.
2. Close the fuel filler lid and push it in lightly making sure that it is
securely closed.
✽ ✽NOTICE
There may be an intermittent noise
near the refueling hole while the
engine is idling if the fuel cap is not
closed securely. This occurs normal-
ly with the OBD system.
✽ ✽NOTICE
When refueling fully at an up hill,
the fuel gauge may not point to the F
position.
It is not a malfunction. If you move
your vehicle to a level ground, the fuel
gauge will move to the full position.
FUEL FILLER LID
OPS043027
OPS043026
Page 226 of 492
Features of your vehicle
146
4
If you install aftermarket HID head
lamps, your vehicle’s audio and elec-
tronic devices may malfunction.Antenna (if equipped)
Your vehicle uses a roof antenna to
receive AM or/and FM broadcast sig-
nals.
This antenna pole is removable. To
remove the roof antenna pole, turn it
counterclockwise. To install the roof
antenna pole, turn it clockwise. When reinstalling your roof anten-
na, it is important that it is fully
tightened and adjusted to the
upright position to ensure proper
reception.
When cargo is loaded on the roof rack, do not place the cargo near
the antenna pole to ensure proper
reception.
OHM048154N
AUDIO SYSTEM
CAUTION- Antenna
Before entering a place with alow height clearance or a carwash, remove the antenna poleby rotating it counterclockwise.If not, the antenna may be dam-aged.
Page 241 of 492
4161
Features of your vehicle
SYSTEM CONTROLLERS
AND FUNCTIONS
❈Display and settings may differ
depending on the selected audio.
Audio Head Unit
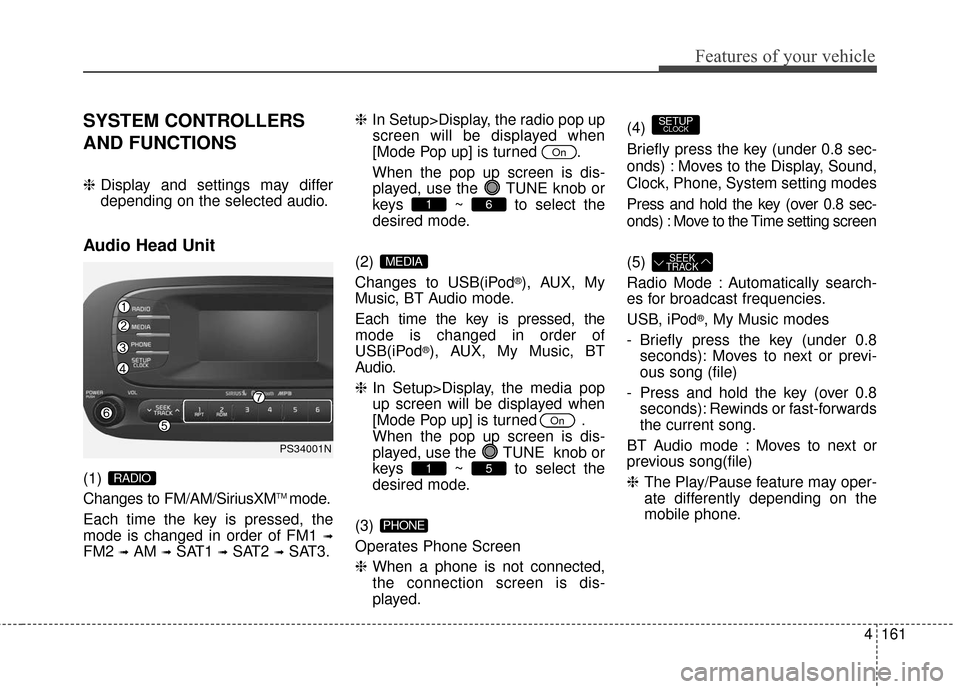
(1)
Changes to FM/AM/SiriusXMTM mode.
Each time the key is pressed, the
mode is changed in order of FM1
➟
FM2 ➟AM ➟SAT1 ➟SAT2 ➟SAT3. ❈
In Setup>Display, the radio pop up
screen will be displayed when
[Mode Pop up] is turned .
When the pop up screen is dis- played, use the TUNE knob or
keys ~ to select the
desired mode.
(2)
Changes to USB(iPod
®), AUX, My
Music, BT Audio mode.
Each time the key is pressed, the
mode is changed in order of
USB(iPod
®), AUX, My Music, BT
Audio.
❈ In Setup>Display, the media pop
up screen will be displayed when
[Mode Pop up] is turned .
When the pop up screen is dis-
played, use the TUNE knob or
keys ~ to select the
desired mode.
(3)
Operates Phone Screen
❈ When a phone is not connected,
the connection screen is dis-
played. (4)
Briefly press the key (under 0.8 sec-
onds) : Moves to the Display, Sound,
Clock, Phone, System setting modes
Press and hold the key (over 0.8 sec-
onds) : Move to the Time setting screen
(5)
Radio Mode : Automatically search-
es for broadcast frequencies.
USB, iPod
®, My Music modes
- Briefly press the key (under 0.8 seconds): Moves to next or previ-
ous song (file)
- Press and hold the key (over 0.8 seconds): Rewinds or fast-forwards
the current song.
BT Audio mode : Moves to next or
previous song(file)
❈ The Play/Pause feature may oper-
ate differently depending on the
mobile phone.
SEEK
TRACK
SETUPCLOCK
PHONE
51
On
MEDIA
61
On
RADIO
PS34001N
Page 246 of 492
Features of your vehicle
166
4
CLOCK SETTINGS
Press the key Select [Clock]
through TUNE knob or key
Select menu through TUNE knob
Sound Settings
This menu is used to set the time.
Select [Clock Settings] Set through
TUNE knob Press TUNE knob
❈Adjust the number currently in
focus to set the [hour] and press
the tune knob to set the [minute]
and [AM/PM].
Calendar Settings
This menu is used to set the date
(MM/DD/YYYY).
Select [Calendar Settings] Set through TUNE knob Press TUNE knob
❈Adjust the number currently in
focus to make the settings and
press the tune knob to move to the
next setting. (Set in order of
Year/Month/Day)
Time Format
This function is used to set the
12/24 hour time format of the
audio system. Select [Time
Format] Set 12Hr / 24Hr through
TUNEknob
Clock Display when Power is OFF
Select [Clock Disp.(Pwr Off) Set
/through TUNEknob
: Displays time/date on screen : Turn off.
Off
On
OffOn
3
SETUPCLOCK
Page 357 of 492
What to do in an emergency
10
6
Always move the vehicle complete-
ly off the road and onto the shoul-
der before trying to change a tire.
The jack should be used on a firm
level ground. If you cannot find a
firm, level place off the road, call a
towing service company for assis-
tance.
Be sure to use the correct front and rear jacking positions on the vehi-
cle; never use the bumpers or any
other part of the vehicle for jack
support.
Do not allow anyone to remain in the vehicle while it is on the jack.
Make sure any children present are in a secure place away from
the road and from the vehicle to be
raised with the jack.Removing and storing the
spare tire (if equipped)
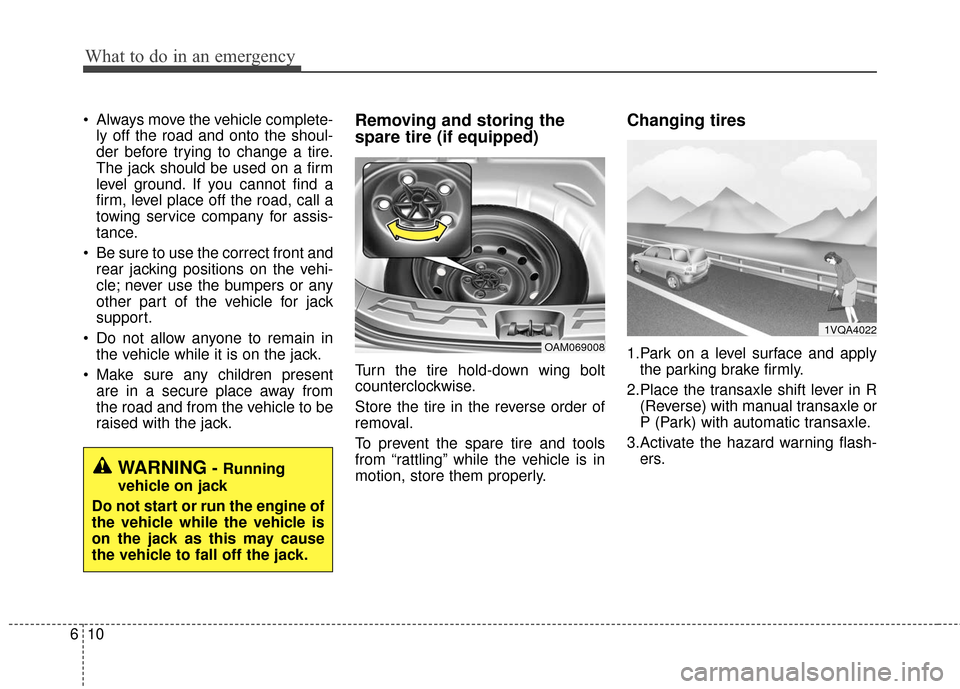
Turn the tire hold-down wing bolt
counterclockwise.
Store the tire in the reverse order of
removal.
To prevent the spare tire and tools
from “rattling” while the vehicle is in
motion, store them properly.
Changing tires
1.Park on a level surface and applythe parking brake firmly.
2.Place the transaxle shift lever in R (Reverse) with manual transaxle or
P (Park) with automatic transaxle.
3.Activate the hazard warning flash- ers.OAM069008
1VQA4022
WARNING- Running
vehicle on jack
Do not start or run the engine of
the vehicle while the vehicle is
on the jack as this may cause
the vehicle to fall off the jack.
Page 358 of 492
611
What to do in an emergency
4.Remove the wheel lug nut wrench,jack, jack handle, and spare tire
from the vehicle.
5.Block both the front and rear of the wheel that is diagonally opposite
from the jack position. To prevent vehicle movement while
changing a tire, always set the
parking brake fully, and always
block the wheel diagonally oppo-
site the wheel being changed.
We recommend that the wheels of the vehicle be blocked, and that no
person remain in a vehicle that is
being jacked.
6.Loosen the wheel lug nuts counter-clockwise one turn each, but do
not remove any nut until the tire
has been raised off the ground.
1VQA4023OPS063004
Page 359 of 492
What to do in an emergency
12
6
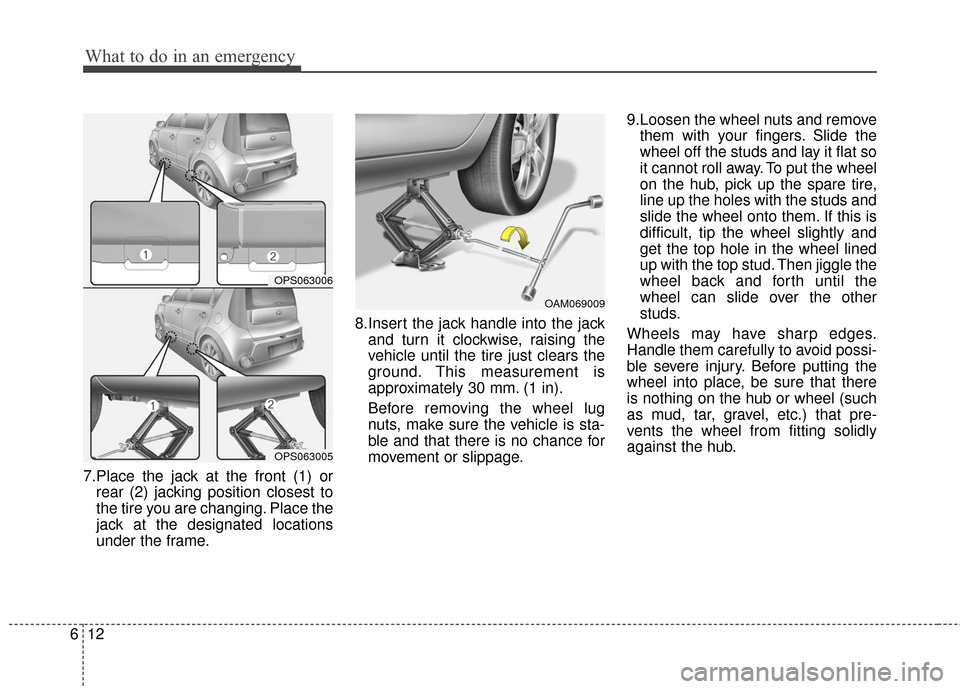
7.Place the jack at the front (1) or
rear (2) jacking position closest to
the tire you are changing. Place the
jack at the designated locations
under the frame. 8.Insert the jack handle into the jack
and turn it clockwise, raising the
vehicle until the tire just clears the
ground. This measurement is
approximately 30 mm. (1 in).
Before removing the wheel lug
nuts, make sure the vehicle is sta-
ble and that there is no chance for
movement or slippage. 9.Loosen the wheel nuts and remove
them with your fingers. Slide the
wheel off the studs and lay it flat so
it cannot roll away. To put the wheel
on the hub, pick up the spare tire,
line up the holes with the studs and
slide the wheel onto them. If this is
difficult, tip the wheel slightly and
get the top hole in the wheel lined
up with the top stud. Then jiggle the
wheel back and forth until the
wheel can slide over the other
studs.
Wheels may have sharp edges.
Handle them carefully to avoid possi-
ble severe injury. Before putting the
wheel into place, be sure that there
is nothing on the hub or wheel (such
as mud, tar, gravel, etc.) that pre-
vents the wheel from fitting solidly
against the hub.
OAM069009
OPS063006
OPS063005