Page 426 of 492
Maintenance
50
7
Disc brake pads should be inspected
for wear whenever tires are rotated.
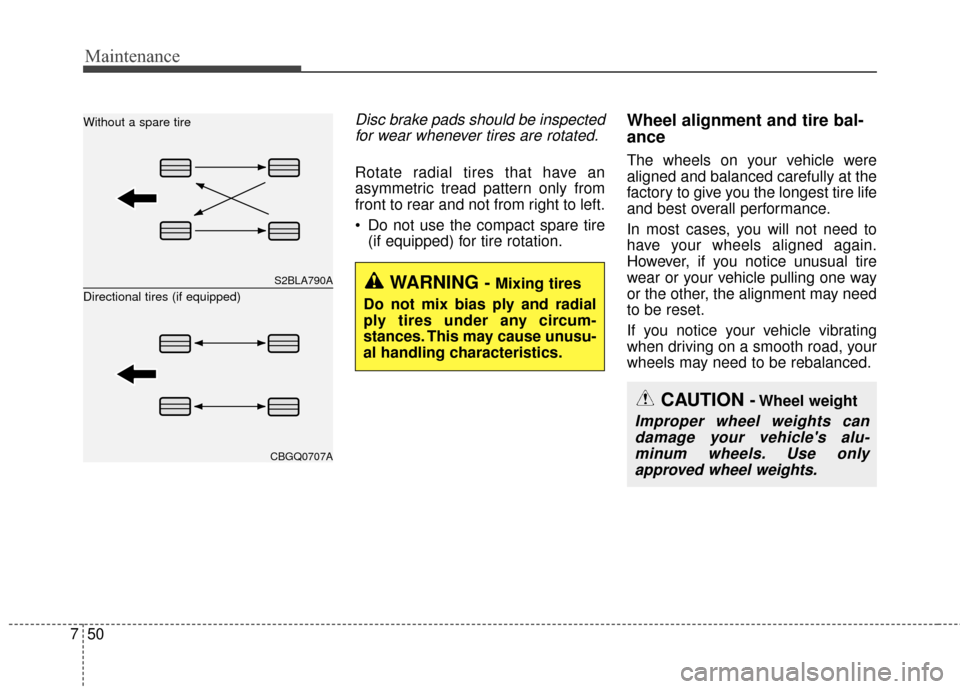
Rotate radial tires that have an
asymmetric tread pattern only from
front to rear and not from right to left.
Do not use the compact spare tire (if equipped) for tire rotation.
Wheel alignment and tire bal-
ance
The wheels on your vehicle were
aligned and balanced carefully at the
factory to give you the longest tire life
and best overall performance.
In most cases, you will not need to
have your wheels aligned again.
However, if you notice unusual tire
wear or your vehicle pulling one way
or the other, the alignment may need
to be reset.
If you notice your vehicle vibrating
when driving on a smooth road, your
wheels may need to be rebalanced.
S2BLA790A
CBGQ0707A
Without a spare tire
Directional tires (if equipped)
CAUTION -Wheel weight
Improper wheel weights candamage your vehicle's alu-minum wheels. Use onlyapproved wheel weights.
WARNING - Mixing tires
Do not mix bias ply and radial
ply tires under any circum-
stances. This may cause unusu-
al handling characteristics.
Page 430 of 492
Maintenance
54
7
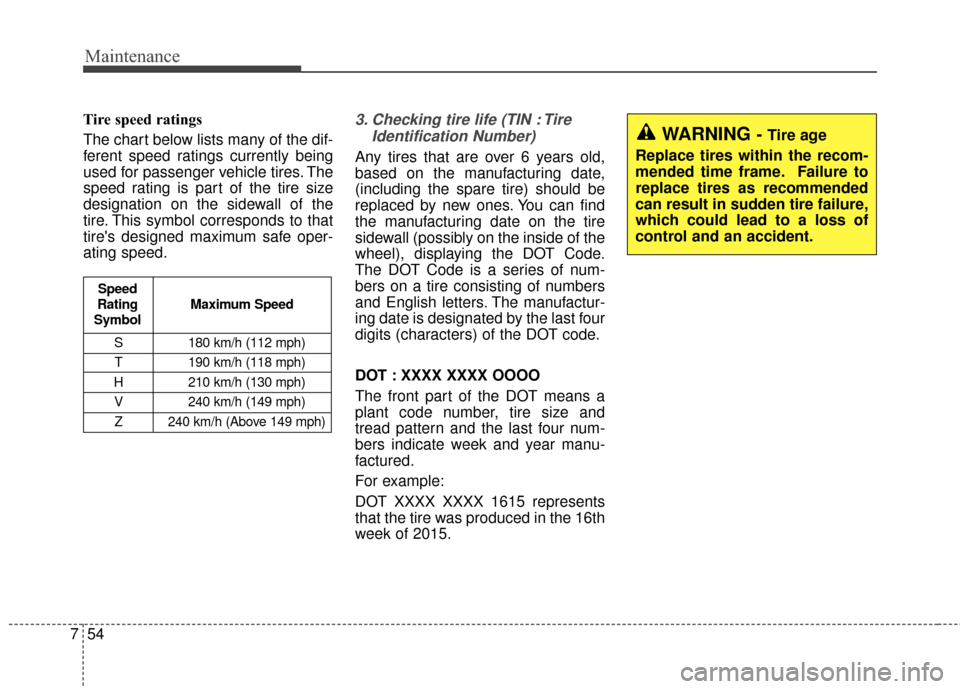
Tire speed ratings
The chart below lists many of the dif-
ferent speed ratings currently being
used for passenger vehicle tires. The
speed rating is part of the tire size
designation on the sidewall of the
tire. This symbol corresponds to that
tire's designed maximum safe oper-
ating speed.3. Checking tire life (TIN : Tire
Identification Number)
Any tires that are over 6 years old,
based on the manufacturing date,
(including the spare tire) should be
replaced by new ones. You can find
the manufacturing date on the tire
sidewall (possibly on the inside of the
wheel), displaying the DOT Code.
The DOT Code is a series of num-
bers on a tire consisting of numbers
and English letters. The manufactur-
ing date is designated by the last four
digits (characters) of the DOT code.
DOT : XXXX XXXX OOOO
The front part of the DOT means a
plant code number, tire size and
tread pattern and the last four num-
bers indicate week and year manu-
factured.
For example:
DOT XXXX XXXX 1615 represents
that the tire was produced in the 16th
week of 2015.
S 180 km/h (112 mph)
T 190 km/h (118 mph)
H 210 km/h (130 mph) V 240 km/h (149 mph)Z 240 km/h (Above 149 mph)
Maximum Speed
Speed
Rating
Symbol
WARNING - Tire age
Replace tires within the recom-
mended time frame. Failure to
replace tires as recommended
can result in sudden tire failure,
which could lead to a loss of
control and an accident.
Page 438 of 492
Maintenance
62
7
FUSES
A vehicle’s electrical system is pro-
tected from electrical overload dam-
age by fuses.
This vehicle has 2 (or 3) fuse panels,
one located in the driver’s side panel
bolster, the other in the engine com-
partment near the battery.
If any of your vehicle’s lights, acces-
sories, or controls do not work, check
the appropriate circuit fuse. If a fuse
has blown, the element inside the
fuse will melt.
If the electrical system does not
work, first check the driver’s side
fuse panel.
Always replace a blown fuse with
one of the same rating.
If the replacement fuse blows, this
indicates an electrical problem. Avoid
using the system involved and imme-
diately consult an authorized Kia
dealer.
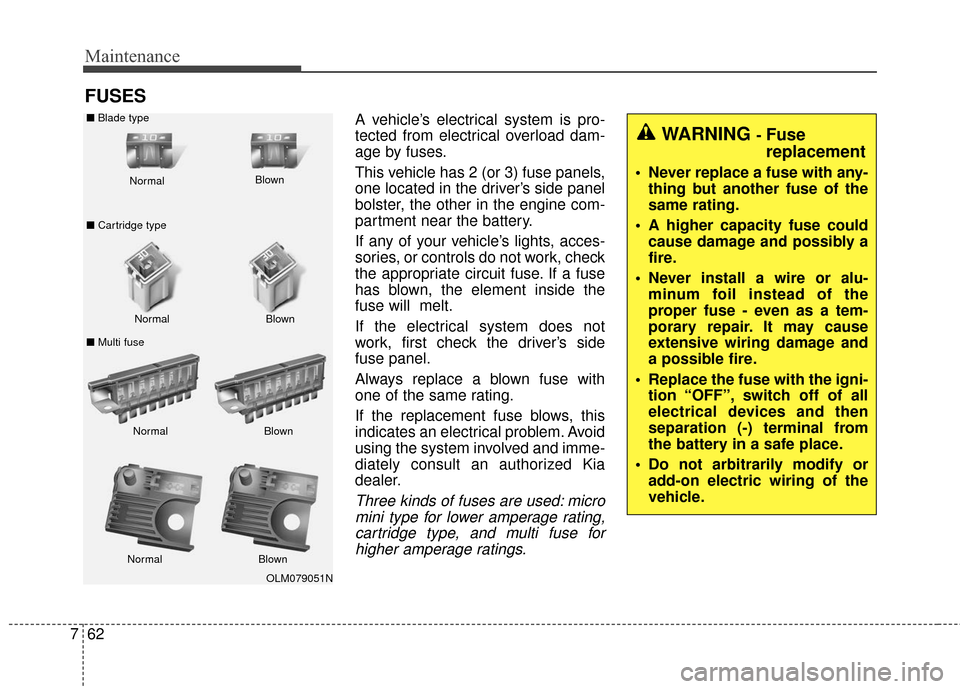
Three kinds of fuses are used: micro
mini type for lower amperage rating,cartridge type, and multi fuse forhigher amperage ratings.
WARNING - Fuse
replacement
Never replace a fuse with any- thing but another fuse of the
same rating.
A higher capacity fuse could cause damage and possibly a
fire.
Never install a wire or alu- minum foil instead of the
proper fuse - even as a tem-
porary repair. It may cause
extensive wiring damage and
a possible fire.
Replace the fuse with the igni- tion “OFF”, switch off of all
electrical devices and then
separation (-) terminal from
the battery in a safe place.
Do not arbitrarily modify or add-on electric wiring of the
vehicle.
OLM079051N
Normal
Normal
■
Blade type
■ Cartridge type
■ Multi fuse Blown
Blown
Normal Blown
Normal Blown
Page 439 of 492
763
Maintenance
✽
✽NOTICE
The actual fuse/relay panel label
may differ from equipped items.
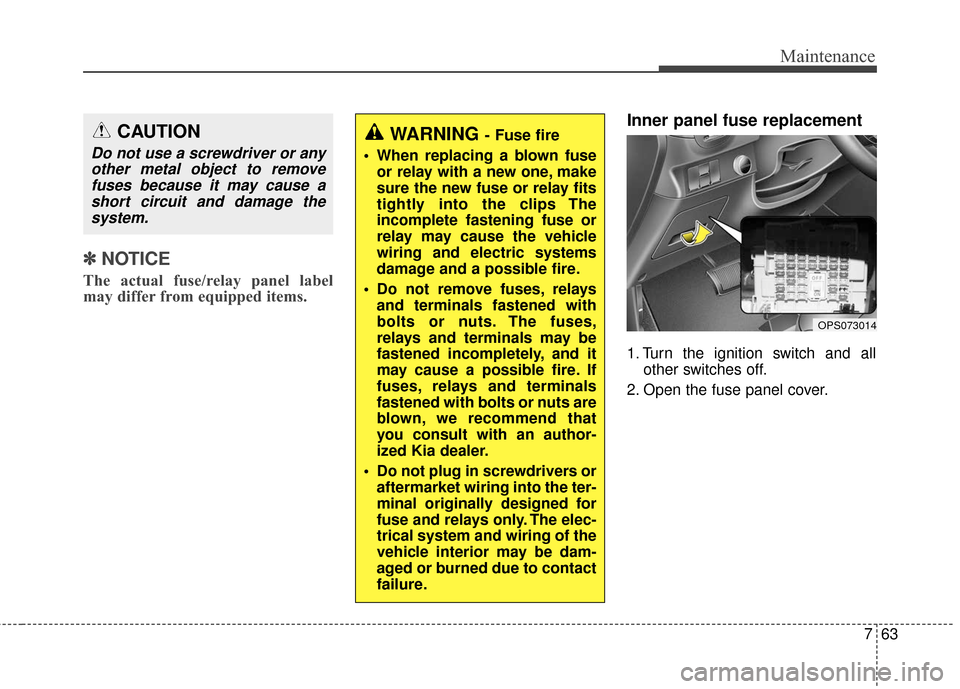
Inner panel fuse replacement
1. Turn the ignition switch and all
other switches off.
2. Open the fuse panel cover.
OPS073014
CAUTION
Do not use a screwdriver or any other metal object to removefuses because it may cause ashort circuit and damage thesystem.
WARNING - Fuse fire
When replacing a blown fuse or relay with a new one, make
sure the new fuse or relay fits
tightly into the clips The
incomplete fastening fuse or
relay may cause the vehicle
wiring and electric systems
damage and a possible fire.
Do not remove fuses, relays and terminals fastened with
bolts or nuts. The fuses,
relays and terminals may be
fastened incompletely, and it
may cause a possible fire. If
fuses, relays and terminals
fastened with bolts or nuts are
blown, we recommend that
you consult with an author-
ized Kia dealer.
Do not plug in screwdrivers or aftermarket wiring into the ter-
minal originally designed for
fuse and relays only. The elec-
trical system and wiring of the
vehicle interior may be dam-
aged or burned due to contact
failure.
Page 445 of 492
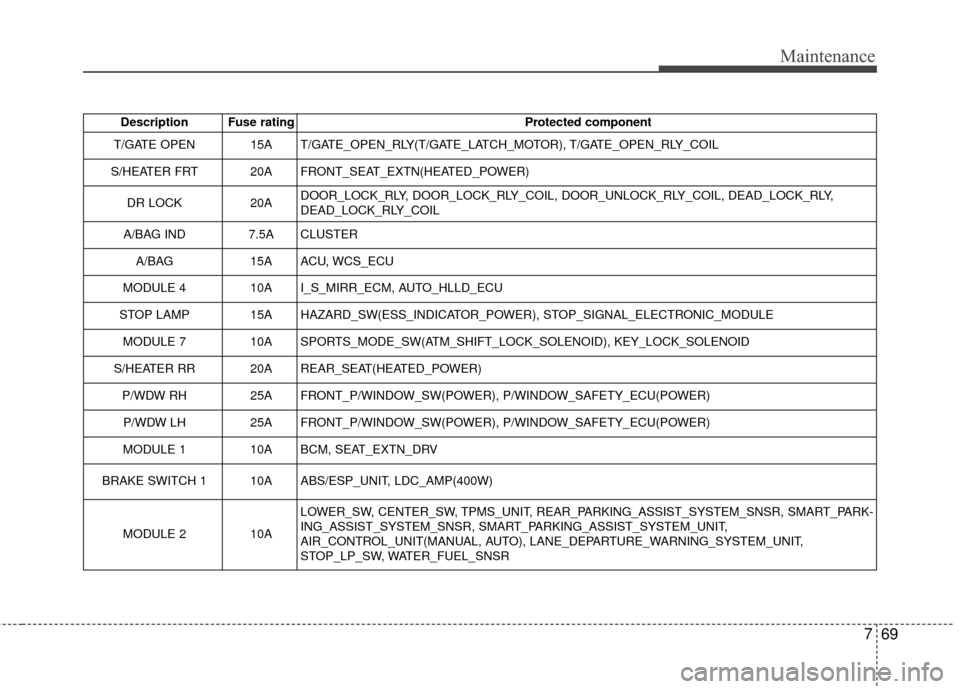
769
Maintenance
Description Fuse ratingProtected component
T/GATE OPEN 15A T/GATE_OPEN_RLY(T/GATE_LATCH_MOTOR), T/GATE_OPEN_RLY_COIL
S/HEATER FRT 20A FRONT_SEAT_EXTN(HEATED_POWER)
DR LOCK 20ADOOR_LOCK_RLY, DOOR_LOCK_RLY_COIL, DOOR_UNLOCK_RLY_COIL, DEAD_LOCK_RLY,
DEAD_LOCK_RLY_COIL
A/BAG IND 7.5A CLUSTER
A/BAG 15A ACU, WCS_ECU
MODULE 4 10A I_S_MIRR_ECM, AUTO_HLLD_ECU
STOP LAMP 15A HAZARD_SW(ESS_INDICATOR_POWER), STOP_SIGNAL_ELECTRONIC_MODULE MODULE 7 10A SPORTS_MODE_SW(ATM_SHIFT_LOCK_SOLENOID), KEY_LOCK_SOLENOID
S/HEATER RR 20A REAR_SEAT(HEATED_POWER) P/WDW RH 25A FRONT_P/WINDOW_SW(POWER), P/WINDOW_SAFETY_ECU(POWER)
P/WDW LH 25A FRONT_P/WINDOW_SW(POWER), P/WINDOW_SAFETY_ECU(POWER)
MODULE 1 10A BCM, SEAT_EXTN_DRV
BRAKE SWITCH 110AABS/ESP_UNIT, LDC_AMP(400W)
MODULE 210A
LOWER_SW, CENTER_SW, TPMS_UNIT, REAR_PARKING_ASSIST_SYSTEM_SNSR, SMART_PARK-
ING_ASSIST_SYSTEM_SNSR, SMART_PARKING_ASSIST_SYSTEM_UNIT,
AIR_CONTROL_UNIT(MANUAL, AUTO), LANE_DEPARTURE_WARNING_SYSTEM_UNIT,
STOP_LP_SW, WATER_FUEL_SNSR
Page 447 of 492
771
Maintenance
Description Fuse ratingProtected component
I.O.D 1 7.5AGLOVE_BOX_LAMP, DOOR_WARNING_SW, OVER_HEAD_CONSOLE_LAMP, PERSONAL_LAMP,
SUNVISOR_LAMP, LUGGAGE_LAMP, PORTABLE_LAMP(DOOR)
PDM 2 7.5A SMK_UNIT(BATT_CPU), SMATRA_IMMOBILIZATION(BATT)
PDM 1 20A SMK_UNIT(POWER)
BRAKE SWITCH 2 10A STOP_LAMP_SW(NORMAL_OPEN), SMK_UNIT
Page 451 of 492

775
Maintenance
LIGHT BULBS
Use only the bulbs of the specifiedwattage.
If you don’t have necessary tools, the correct bulbs and the expertise,
consult an authorized Kia dealer. In
many cases, it is difficult to replace
vehicle light bulbs because other
parts of the vehicle must be
removed before you can get to the
bulb. This is especially true if you
have to remove the headlight
assembly to get to the bulb(s).
Removing/installing the headlight
assembly can result in damage to
the vehicle.
Do not install additional bulb or LED. If you install that, the lamp
may not be operated properly and
fuse box or electric wiring system
may have problem.Headlight, position light, turn
signal light, side marker light
and front fog light bulb
replacementWARNING - Lights
Prior to working on the light,
firmly apply the parking brake,
ensure that the ignition switch
is turned to the LOCK position
and turn off the lights to avoid
sudden movement of the vehi-
cle and burning your fingers or
receiving an electric shock.
CAUTION
- Light replacement
Be sure to replace the burned- out bulb with one of the samewattage rating. Otherwise, itmay cause damage to the fuseor electric wiring system.
OPS073020
■ Type A
OPS073021
■Type B
Page 452 of 492
Maintenance
76
7
(1) Headlight (High)
(2) Headlight (Low)
(3) Front side marker light
(4) Front turn signal
(5) Front position light
(6) Front fog light (if equipped)
If the headlight aiming adjustment is
necessary after the headlight
assembly is reinstalled, consult an
authorized Kia dealer. Always handle them carefully, and
avoid scratches and abrasions. If
the bulbs are lit, avoid contact with
liquids. Never touch the glass with
bare hands. Residual oil may
cause the bulb to overheat and
burst when lit. A bulb should be
operated only when installed in a
headlight.
If a bulb becomes damaged or cracked, replace it immediately
and carefully dispose of it.
Wear eye protection when chang- ing a bulb. Allow the bulb to cool
down before handling it.
OHD076046
WARNING - Halogen
bulbs
Handle halogen bulbs with care.
Halogen bulbs contain pres- surized gas that will produce
flying pieces of glass if bro-
ken.