Page 316 of 407

753
Maintenance
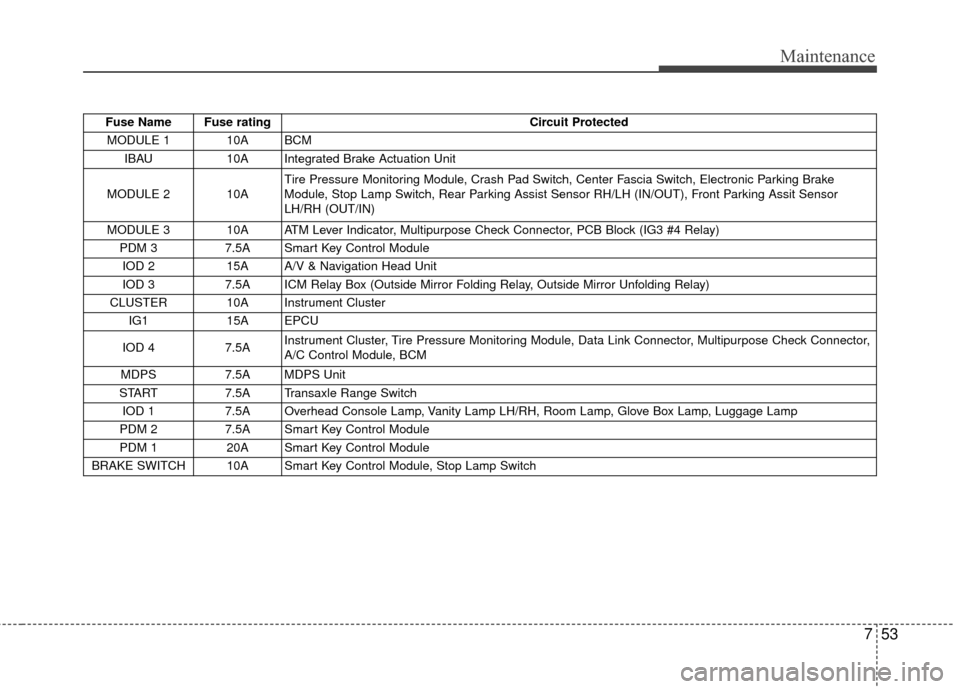
Fuse Name Fuse ratingCircuit Protected
MODULE 1 10A BCM IBAU 10A Integrated Brake Actuation Unit
MODULE 2 10A Tire Pressure Monitoring Module, Crash Pad Switch, Center Fascia Switch, Electronic Parking Brake
Module, Stop Lamp Switch, Rear Parking Assist Sensor RH/LH (IN/OUT), Front Parking Assit Sensor
LH/RH (OUT/IN)
MODULE 3 10A ATM Lever Indicator, Multipurpose Check Connector, PCB Block (IG3 #4 Relay) PDM 3 7.5A Smart Key Control Module
IOD 2 15A A/V & Navigation Head Unit
IOD 3 7.5A ICM Relay Box (Outside Mirror Folding Relay, Outside Mirror Unfolding Relay)
CLUSTER 10A Instrument Cluster IG1 15A EPCU
IOD 4 7.5A Instrument Cluster, Tire Pressure Monitoring Module, Data Link Connector, Multipurpose Check Connector,
A/C Control Module, BCM
MDPS 7.5A MDPS Unit
START 7.5A Transaxle Range Switch
IOD 1 7.5A Overhead Console Lamp, Vanity Lamp LH/RH, Room Lamp, Glove Box Lamp, Luggage Lamp
PDM 2 7.5A Smart Key Control Module
PDM 1 20A Smart Key Control Module
BRAKE SWITCH 10A Smart Key Control Module, Stop Lamp Switch
Page 319 of 407
Maintenance
56
7
Fuse Name Fuse rating Circuit Protected
IG1 40A Button Start (ACC) Relay, Button Start (IG1) Relay
BLOWER 40A Blower Relay IG3 1 30A IG3 #1/#2/#3/#4/#5 Relay
EPB 1 30A Electronic Parking Brake Module
EPB 2 30A Electronic Parking Brake Module
IG3 2 10A Blower Relay, A/C Control Module, A/C Compressor, E/R Junction Block (Cooling Fan 1/2 Relay), Heater
Assembly (PTC Heater)
CHARGER 1 10A OBC Unit, BMS Control Module EWP 10A Electronic Water Pump
IG3 3 15A EPCU, Transaxle Range Switch, A/V & Navigation Head Unit, Instrument Cluster
HORN 15A Horn Relay
B/UP LAMP 10A Transaxle Range Switch, EPCU
BATTERY C/FAN 25A Battery C/FAN Relay
No. Relay Name Type
E41 Power Outlet Relay PLUG MICRO
E42 C/FAN 1 Relay PLUG MICRO
E43 RR HTD Relay PLUG MICRO
E44 C/FAN 2 Relay PLUG MINI
Page 367 of 407
22
5. Open the charging door and pressthe normal charging inlet cover
release tab (1) to open the normal
charging inlet cover. 6. Remove any dust on the charging
connector and charging inlet.
7. Hold the charging connector han- dle and connect it to the vehicle
normal charging inlet. Push the
connector until you hear a "click-
ing" sound. 8. Check if the charge indicator lamp
of the high voltage battery in the
instrument cluster is turned ON.
Charging is not done when the
charging indicator lamp is OFF.
When the charging connector is
not connected properly, reconnect
the charging cable to charge.
CHARGING ELECTRIC VEHICLE
(NORMAL CHARGE)
OPSE0Q4013OPSE0Q4012OPSE0Q4014
Page 368 of 407

23
You can start charging when thePower button is in the OFF posi-
tion and the shift lever is in P
(Park). After charging has started,
you can use electrical compo-
nents such as the radio by press-
ing the Power button to the ACC or
ON position.
If you move the shift lever from P (Park) to R (Rear), N (Neutral), D
(Drive), charging stops immedi-
ately. If you want to start charging
again, place the shift lever to P
(Park) and press the Power button
to the OFF position. Unplug and
reconnect the charging cable to
start charging again. 9. After charging has started, the
estimated charging time is dis-
played on the instrument cluster
for about 1 minute.
If you open the driver seat door
while charging, the estimated
charging time is also displayed on
the instrument cluster for about 1
minute.
When reserved charging is set,
the estimated charging time is
displayed as “--" . Depending on the condition and
durability of the high voltage battery,
charger specifications, and ambient
temperature, the time required for
charging the battery may vary.
CHARGING ELECTRIC VEHICLE
(NORMAL CHARGE)
OPSE044044L
Page 373 of 407

28
❈Refer to the manual for each type
of quick charger for how to charge
and remove the charger.
❈ The shape of the charging con-
nector may vary depending on the
manufacturer.
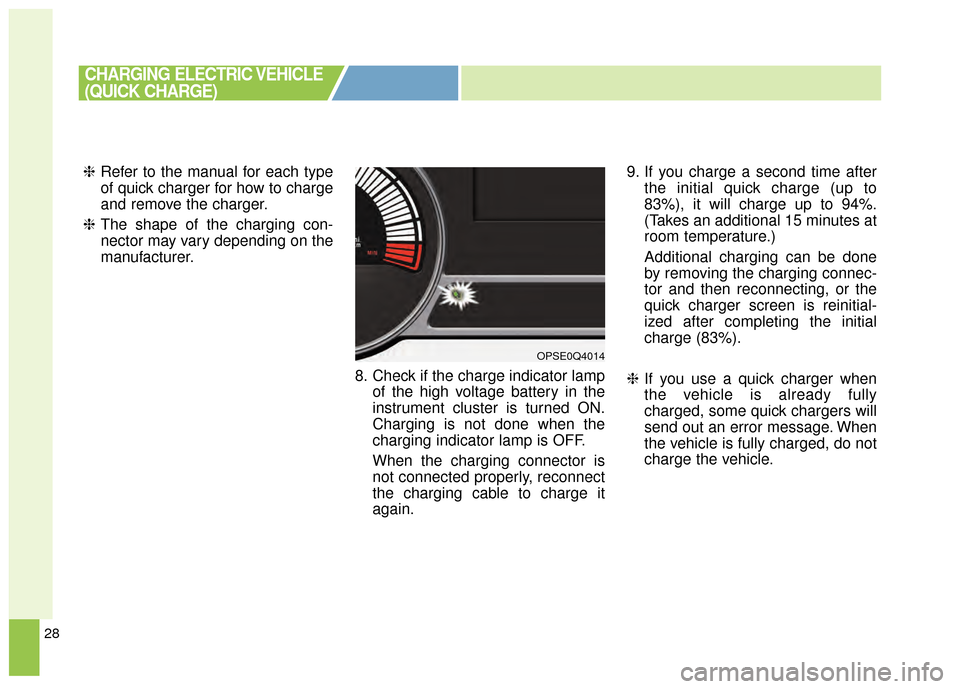
8. Check if the charge indicator lampof the high voltage battery in the
instrument cluster is turned ON.
Charging is not done when the
charging indicator lamp is OFF.
When the charging connector is
not connected properly, reconnect
the charging cable to charge it
again. 9. If you charge a second time after
the initial quick charge (up to
83%), it will charge up to 94%.
(Takes an additional 15 minutes at
room temperature.)
Additional charging can be done
by removing the charging connec-
tor and then reconnecting, or the
quick charger screen is reinitial-
ized after completing the initial
charge (83%).
❈ If you use a quick charger when
the vehicle is already fully
charged, some quick chargers will
send out an error message. When
the vehicle is fully charged, do not
charge the vehicle.
CHARGING ELECTRIC VEHICLE
(QUICK CHARGE)
OPSE0Q4014
Page 378 of 407
33
8. Open the protective cover of thecharging connector and remove
any dust on the charging connec-
tor and charging inlet.
9. Hold the charging connector han- dle and connect it to the vehicle
normal charging inlet. Push the
connector until you hear a "click-
ing" sound. 10.Charging starts automatically.
Check if the power lamp and
charging lamp (orange) are ON. 11.Check if the charge indicator
lamp of the high voltage battery in
the instrument cluster is turned
ON. Charging is not done when
the charging indicator lamp is
OFF.
When the charging connector is
not connected properly, recon-
nect the charging cable to charge
it again.
CHARGING ELECTRIC VEHICLE
(TRICKLE CHARGE)
OPSE0Q4013OPSE0Q4044OPSE0Q4014
Page 379 of 407

34
You can start charging when thePower button is in the OFF posi-
tion and the shift lever is in P
(Park).
After charging has started, you
can use electrical components
such as the radio by pressing the
Power button to ACC or ON posi-
tion.
If you move the shift lever from P (Park) to R (Reverse), N (Neutral),
D (Drive), charging stops immedi-
ately. If you want to start charging
again, place the shift lever to P
(Park) and press the Power button
to the OFF position. Unplug and
reconnect the charging cable to
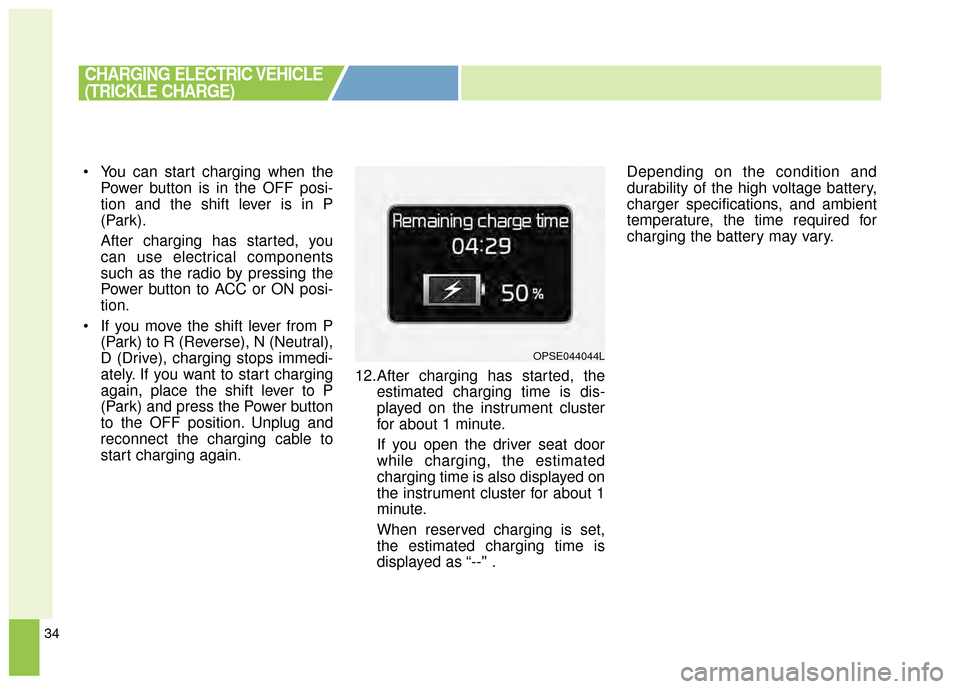
start charging again. 12.After charging has started, the
estimated charging time is dis-
played on the instrument cluster
for about 1 minute.
If you open the driver seat door
while charging, the estimated
charging time is also displayed on
the instrument cluster for about 1
minute.
When reserved charging is set,
the estimated charging time is
displayed as “--" . Depending on the condition and
durability of the high voltage battery,
charger specifications, and ambient
temperature, the time required for
charging the battery may vary.
CHARGING ELECTRIC VEHICLE
(TRICKLE CHARGE)
OPSE044044L
Page 385 of 407

40
❈For vehicles with Shift Lock, you
have to press the POWER button
to the ON position, press and
hold the brake pedal, then press
the unlock button on the shift
lever while it is placed in P (Park)
in order to move the shift lever to
R (Reverse).
While the charging cable is con- nected, you cannot use the shift
lever for safety reasons.
11.Release the parking brake and slowly release the brake pedal.
Check if the vehicle slowly moves
forward, then press the accelera-
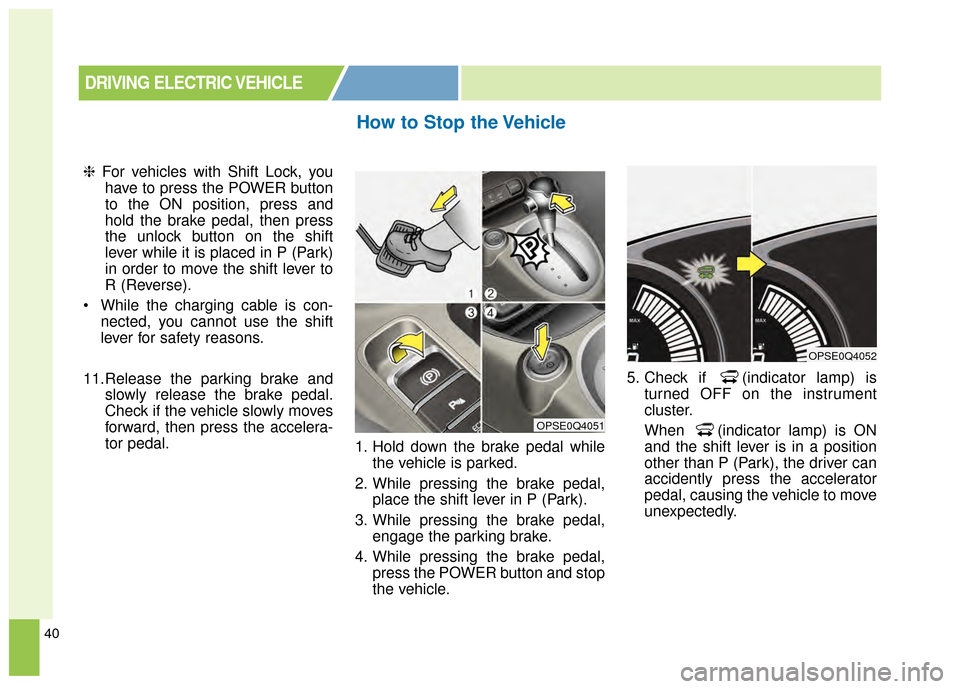
tor pedal. 1. Hold down the brake pedal while
the vehicle is parked.
2. While pressing the brake pedal, place the shift lever in P (Park).
3. While pressing the brake pedal, engage the parking brake.
4. While pressing the brake pedal, press the POWER button and stop
the vehicle. 5. Check if (indicator lamp) is
turned OFF on the instrument
cluster.
When (indicator lamp) is ON
and the shift lever is in a position
other than P (Park), the driver can
accidently press the accelerator
pedal, causing the vehicle to move
unexpectedly.
How to Stop the Vehicle
DRIVING ELECTRIC VEHICLE
OPSE0Q4051
OPSE0Q4052