2015 KIA Soul EV heater
[x] Cancel search: heaterPage 171 of 407
4101
Features of your vehicle
Checking the amount of air
conditioner refrigerant and
compressor lubricant
When the amount of refrigerant is
low, the performance of the air con-
ditioning is reduced. Overfilling also
has a negative impact on the air con-
ditioning system.
(Heater performance as well as air
conditioner performance can be
deteriorated on the vehicle that is
equipped with a heat pump.)
Therefore, if abnormal operation is
found, have the system inspected by
an authorized Kia dealer.
WARNING
The air conditioning system for
the Electric Vehicle (EV) should
be serviced by an authorized
Kia dealer. The Electric Vehicle
(EV) air conditioning system is
connected to the high voltage
system and requires special flu-
ids, tools and service proce-
dures. Improperly servicing the
Electric Vehicle (EV) air condi-
tioning system could result in
electrical shock, serious injury,
or even death.
WARNING
The oil and refrigerant in your
vehicle's air conditioning sys-
tem is under very high pres-
sure. If proper service proce-
dures are not followed an explo-
sion may result. To reduce the
risk of serious injury or death,
the air conditioning system in
your vehicle should only be
serviced by trained and certi-
fied technicians.
CAUTION
It is important that the correcttype and amount of oil andrefrigerant is used, otherwisedamage to the vehicle and injurymay occur. To prevent damage,the air conditioning system inyour vehicle should only beserviced by trained and certifiedtechnicians.
Page 172 of 407
Features of your vehicle
102
4
For maximum defrosting, set the
temperature control to the extreme
right/hot position and the fan speed
control to the highest speed.
If warm air to the floor is desired while defrosting or defogging, set the
mode to the floor-defrost position.
Before driving, clear all snow and ice from the windshield, rear win-
dow, outside rear view mirrors, and
all side windows.
Clear all snow and ice from the hood and air inlet in the cowl grille
to improve heater and defroster
efficiency and to reduce the proba-
bility of fogging up inside of the
windshield.Automatic climate control
system
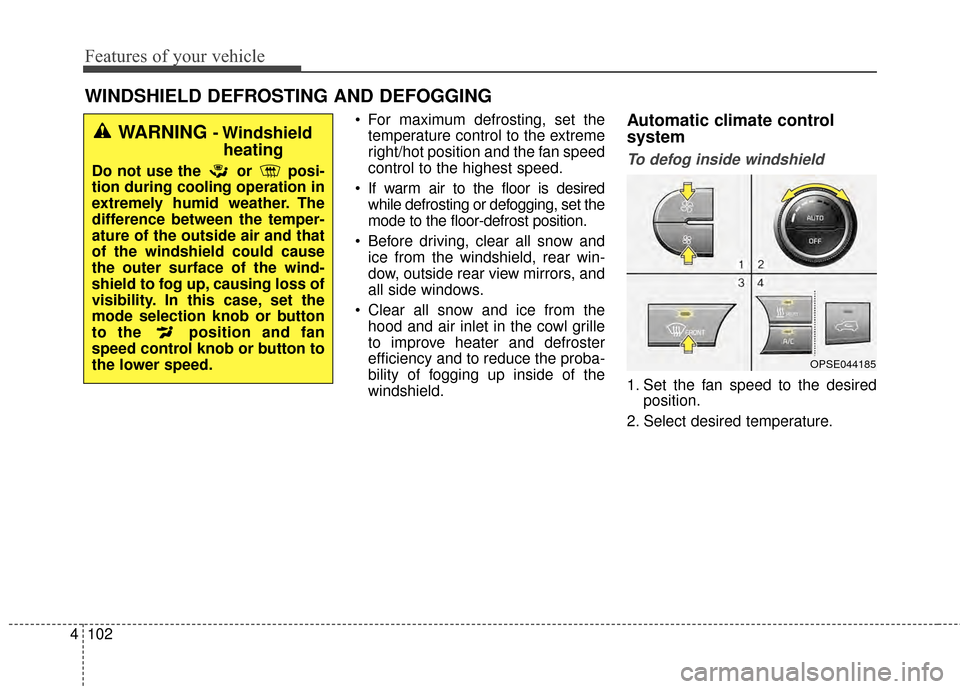
To defog inside windshield
1. Set the fan speed to the desired position.
2. Select desired temperature.
WINDSHIELD DEFROSTING AND DEFOGGING
WARNING - Windshield heating
Do not use the or posi-
tion during cooling operation in
extremely humid weather. The
difference between the temper-
ature of the outside air and that
of the windshield could cause
the outer surface of the wind-
shield to fog up, causing loss of
visibility. In this case, set the
mode selection knob or button
to the position and fan
speed control knob or button to
the lower speed.
OPSE044185
Page 173 of 407
4103
Features of your vehicle
3. Press the defrost button ( ).
4. The air-conditioning and heaterwill be turned on according to the
detected ambient temperature,
outside (fresh) air position and
higher fan speed will be selected
automatically.
If the air-conditioning and heater,
outside (fresh) air position and high-
er fan speed are not selected auto-
matically, adjust the corresponding
button or knob manually.
If the position is selected, with a
low fan speed, a higher fan speed
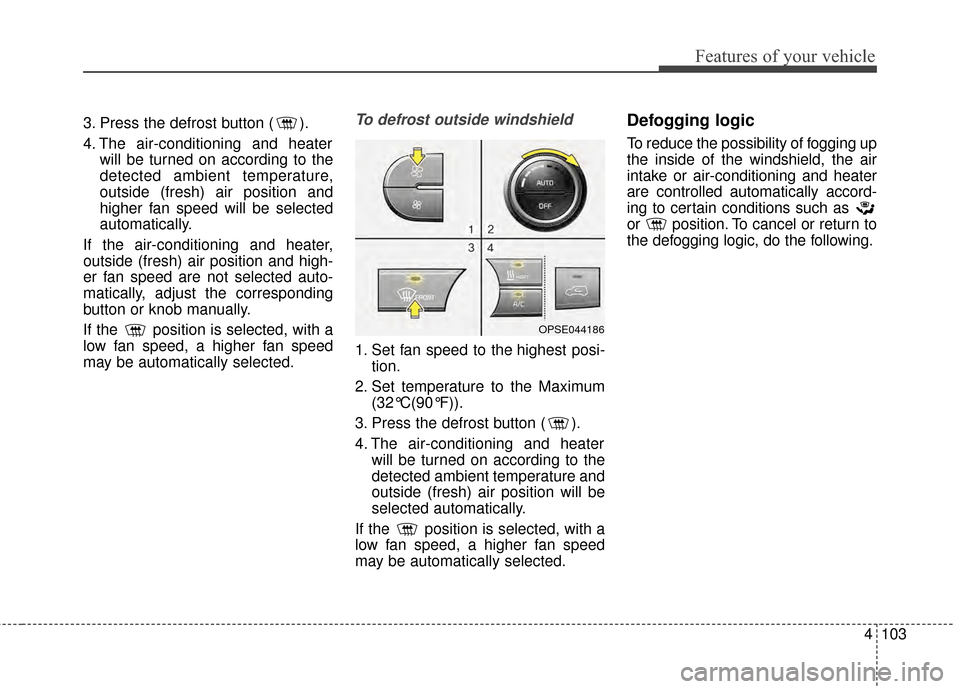
may be automatically selected.To defrost outside windshield
1. Set fan speed to the highest posi- tion.
2. Set temperature to the Maximum (32°C(90°F)).
3. Press the defrost button ( ).
4. The air-conditioning and heater will be turned on according to the
detected ambient temperature and
outside (fresh) air position will be
selected automatically.
If the position is selected, with a
low fan speed, a higher fan speed
may be automatically selected.
Defogging logic
To reduce the possibility of fogging up
the inside of the windshield, the air
intake or air-conditioning and heater
are controlled automatically accord-
ing to certain conditions such as
or position. To cancel or return to
the defogging logic, do the following.
OPSE044186
Page 180 of 407
Features of your vehicle
110
4
✽
✽
NOTICE
With the seat warmer switch in the
ON position, the heating system in the
seat turns off or on automatically
depending on the seat temperature.CAUTION- Seat damage
When cleaning the seats, do
not use an organic solventsuch as paint thinner, ben-zene, alcohol and gasoline.Doing so may damage the sur-face of the heater or seats.
To prevent overheating the seat warmer, do not place any-thing on the seats that insu-lates against heat, such asblankets, cushions or seatcovers while the seat warmeris in operation.
Do not place heavy or sharp objects on seats equippedwith seat warmers. Damage tothe seat warming componentscould occur.
Be careful not to spill liquid such as water or beverages onthe seat. If you spill some liq-uid, wipe the seat with a drytowel. Before using the seatwarmer, dry the seat com-pletely.
WARNING- Seat heater
burns
The seat warmer may cause
burns, even at low tempera-
tures, if used over a long period
of time. Never allow passengers
who may not be able to take
care of themselves to be
exposed to the risk of seat
heater burns. These include:
1. Infants, children, elderly or disabled persons, or hospital
outpatients
2. Persons with sensitive skin or those that burn easily
3. Fatigued individuals
4. Intoxicated individuals
5. Individuals taking medication that can cause drowsiness or
sleepiness (sleeping pills,
cold tablets, etc.)
Page 182 of 407
Features of your vehicle
112
4
When pressing the switch for more
than 1.5 seconds with the seat
warmer operating, the seat warmer
will turn OFF.
The seat warmer defaults to the OFF position whenever the
POWER button is turned on.
✽ ✽ NOTICE
With the seat warmer switch in the
ON position, the heating system in
the seat turns off or on automatically
depending on the seat temperature.
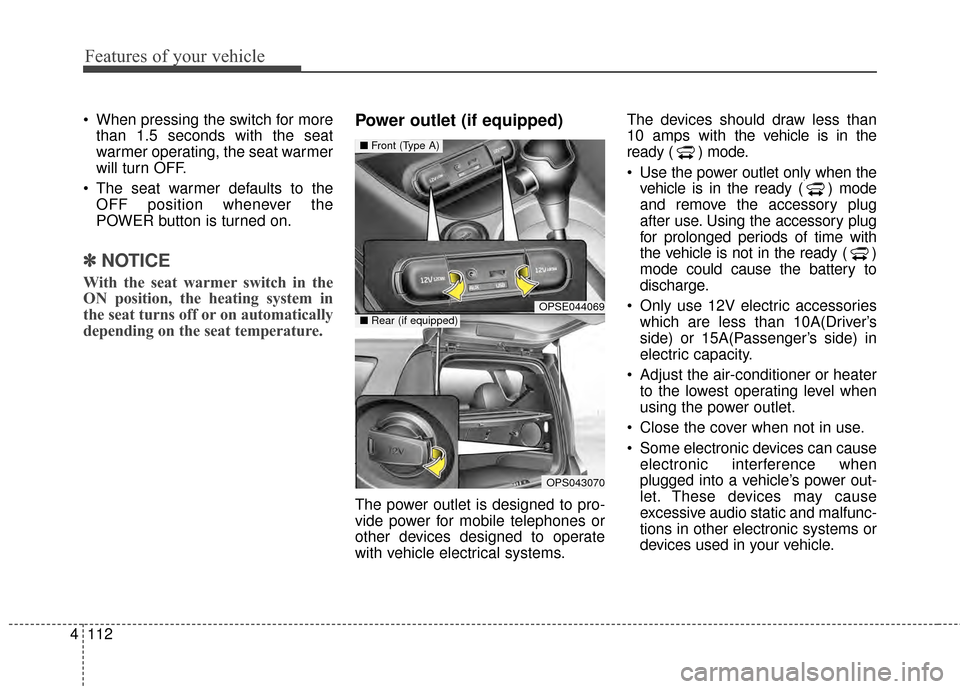
Power outlet (if equipped)
The power outlet is designed to pro-
vide power for mobile telephones or
other devices designed to operate
with vehicle electrical systems. The devices should draw less than
10 amps with the vehicle is in the
ready ( ) mode.
Use the power outlet only when the
vehicle is in the ready ( ) mode
and remove the accessory plug
after use. Using the accessory plug
for prolonged periods of time with
the vehicle is not in the ready ( )
mode could cause the battery to
discharge.
Only use 12V electric accessories which are less than 10A(Driver’s
side) or 15A(Passenger’s side) in
electric capacity.
Adjust the air-conditioner or heater to the lowest operating level when
using the power outlet.
Close the cover when not in use.
Some electronic devices can cause electronic interference when
plugged into a vehicle’s power out-
let. These devices may cause
excessive audio static and malfunc-
tions in other electronic systems or
devices used in your vehicle.
OPSE044069
OPS043070
■ Front (Type A)
■Rear (if equipped)
Page 269 of 407
Maintenance
67
At least monthly:
Check the coolant level in thecoolant reservoir.
Check the operation of all exterior lights, including the stoplights, turn
signals and hazard warning flash-
ers.
Check the inflation pressures of all tires including the spare.
At least twice a year
(i.e., every Spring and Fall):
Check the radiator, heater and air conditioning hoses for leaks or
damage.
Check the windshield washer spray and wiper operation. Clean
the wiper blades with clean cloth
dampened with washer fluid.
Check the headlight alignment.
Check the muffler, exhaust pipes, shields and clamps.
Check the lap/shoulder belts for wear and function.
Check for worn tires and loose wheel lug nuts.
At least once a year:
Clean the body and door drainholes.
Lubricate the door hinges and checks, and hood hinges.
Lubricate the door and hood locks and latches.
Lubricate the door rubber weather- strips.
Check the air conditioning system.
Inspect and lubricate the reduction gear linkage and controls.
Clean the battery and terminals.
Check the brake fluid level.
Page 284 of 407
721
Maintenance
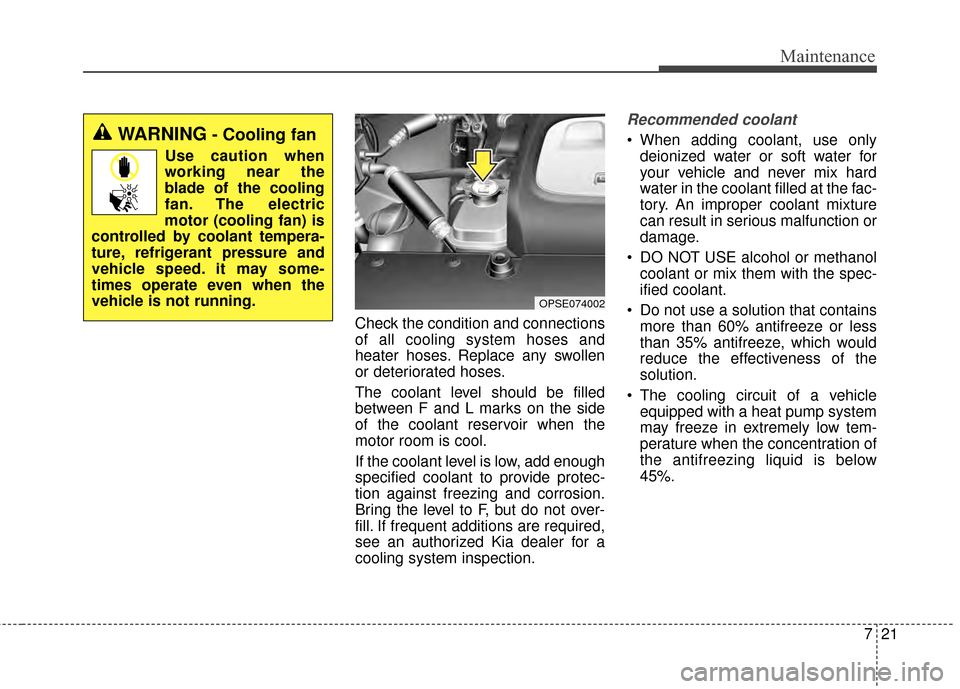
Check the condition and connections
of all cooling system hoses and
heater hoses. Replace any swollen
or deteriorated hoses.
The coolant level should be filled
between F and L marks on the side
of the coolant reservoir when the
motor room is cool.
If the coolant level is low, add enough
specified coolant to provide protec-
tion against freezing and corrosion.
Bring the level to F, but do not over-
fill. If frequent additions are required,
see an authorized Kia dealer for a
cooling system inspection.
Recommended coolant
When adding coolant, use onlydeionized water or soft water for
your vehicle and never mix hard
water in the coolant filled at the fac-
tory. An improper coolant mixture
can result in serious malfunction or
damage.
DO NOT USE alcohol or methanol coolant or mix them with the spec-
ified coolant.
Do not use a solution that contains more than 60% antifreeze or less
than 35% antifreeze, which would
reduce the effectiveness of the
solution.
The cooling circuit of a vehicle equipped with a heat pump system
may freeze in extremely low tem-
perature when the concentration of
the antifreezing liquid is below
45%.
OPSE074002
WARNING- Cooling fan
Use caution when
working near the
blade of the cooling
fan. The electric
motor (cooling fan) is
controlled by coolant tempera-
ture, refrigerant pressure and
vehicle speed. it may some-
times operate even when the
vehicle is not running.
Page 315 of 407
Maintenance
52
7
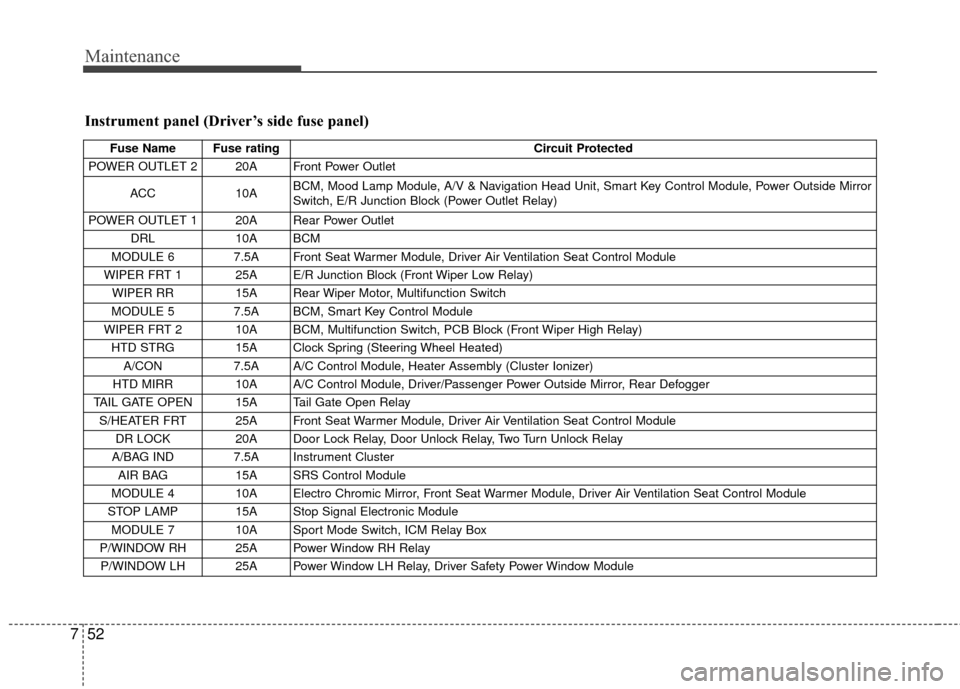
Instrument panel (Driver’s side fuse panel)
Fuse Name Fuse rating Circuit Protected
POWER OUTLET 2 20A Front Power Outlet
ACC 10A BCM, Mood Lamp Module, A/V & Navigation Head Unit, Smart Key Control Module, Power Outside Mirror
Switch, E/R Junction Block (Power Outlet Relay)
POWER OUTLET 1 20A Rear Power Outlet DRL 10A BCM
MODULE 6 7.5A Front Seat Warmer Module, Driver Air Ventilation Seat Control Module
WIPER FRT 1 25A E/R Junction Block (Front Wiper Low Relay) WIPER RR 15A Rear Wiper Motor, Multifunction Switch
MODULE 5 7.5A BCM, Smart Key Control Module
WIPER FRT 2 10A BCM, Multifunction Switch, PCB Block (Front Wiper High Relay) HTD STRG 15A Clock Spring (Steering Wheel Heated) A/CON 7.5A A/C Control Module, Heater Assembly (Cluster Ionizer)
HTD MIRR 10A A/C Control Module, Driver/Passenger Power Outside Mirror, Rear Defogger
TAIL GATE OPEN 15A Tail Gate Open Relay S/HEATER FRT 25A Front Seat Warmer Module, Driver Air Ventilation Seat Control Module DR LOCK 20A Door Lock Relay, Door Unlock Relay, Two Turn Unlock Relay
A/BAG IND 7.5A Instrument Cluster AIR BAG 15A SRS Control Module
MODULE 4 10A Electro Chromic Mirror, Front Seat Warmer Module, Driver Air Ventilation Seat Control Module
STOP LAMP 15A Stop Signal Electronic Module MODULE 7 10A Sport Mode Switch, ICM Relay Box
P/WINDOW RH 25A Power Window RH Relay P/WINDOW LH 25A Power Window LH Relay, Driver Safety Power Window Module