2015 KIA Rio ignition
[x] Cancel search: ignitionPage 305 of 398

What to do in an emergency
24
6
Using the Tire Mobility Kit
1. Detach the speed restriction label
(0) from the sealant bottle (1), and
place it in a highly visible place
inside the vehicle such as on the
steering wheel to remind the driv-
er not to drive too fast.
2. Screw connection hose (9) onto the connector of the sealant bottle.
3. Ensure that screw cap (8) is closed.
4. Unscrew the valve cap from the valve of the defective wheel and
screw filling hose (2) of the sealant
bottle onto the valve.
5. Insert the sealant bottle into the housing (4) of the compressor so
that the bottle is upright. 6. Ensure that the compressor is
switched off, position 0.
7. Plug the compressor power cord into the vehicle power outlet.
8. With the engine start/stop button position on or ignition switch posi-
tion on, switch on the compressor
and let it run for approximately 5~7
minutes to fill the sealant up to
proper pressure. (refer to the Tire
and Wheels, chapter 8). The infla-
tion pressure of the tire after filling
is unimportant and will be
checked/corrected later.
Be careful not to overinflate the
tire and stay away from the tire
when filling it. 9. Switch off the compressor.
10. Detach the hoses from the
sealant bottle connector and
from the tire valve.
Return the Tire Mobility Kit to its stor-
age location in the vehicle.
OUB061010
WARNING - Carbon monoxide
Do not leave your vehicle run-
ning in a poorly ventilated area
for extended periods of time.
Carbon monoxide poisoning
and suffocation can occur.
WARNING - Tire pressure
Do not attempt to drive your
vehicle if the tire pressure is
below 200kpa (29 PSI). This
could result in an accident due
to sudden tire failure.
Page 306 of 398

625
What to do in an emergency
Distributing the sealant
11. Immediately drive approximately7~10km (4~6miles or about
10min) to evenly distribute the
sealant in the tire.
Do not exceed a speed of 80 km/h
(50 mph). If possible, do not fall
below a speed of 20 km/h (12 mph).
While driving, if you experience any
unusual vibration, ride disturbance or
noise, reduce your speed and drive
with caution until you can safely pull
off of the side of the road. If this
occures, call for roadside service or
towing.
When you use the Tire Mobility Kit,
the tire pressure sensors and wheel
may be damaged by sealant, remove
the sealant stained with tire pressure
sensors and wheel and inspect in
authorized dealer. Checking the tire inflation pres-
sure
1.After driving approximately
7~10km (4 ~6miles or about
10min), stop at a safe location.
2.Connect connection hose (9) of the compressor directly to the tire
valve.
3.Plug the compressor power cord into the vehicle power outlet.
4.Adjust the tire inflation pressure to the recomended tire inflation.
With the ignition switched on, pro-
ceed as follows.
- To increase the inflation pres-sure : Switch on the compressor,
position I. To check the current
inflation pressure setting, briefly
switch off the compressor.✽ ✽ NOTICE
The pressure gauge may show high-
er than actual reading when the
compressor is running. To get an
accurate tire pressure, the compres-
sor needs to be turned off.
- To reduce the inflation pres-
sure: Loosen the screw cap (8)
on the compressor hose.
Page 309 of 398

What to do in an emergency
28
6
When towing your vehicle in an emer-
gency without wheel dollies :
1. Set the ignition switch in the ACC posi-
tion.
2. Place the transaxle shift lever in N (Neutral).
3. Release the parking brake.
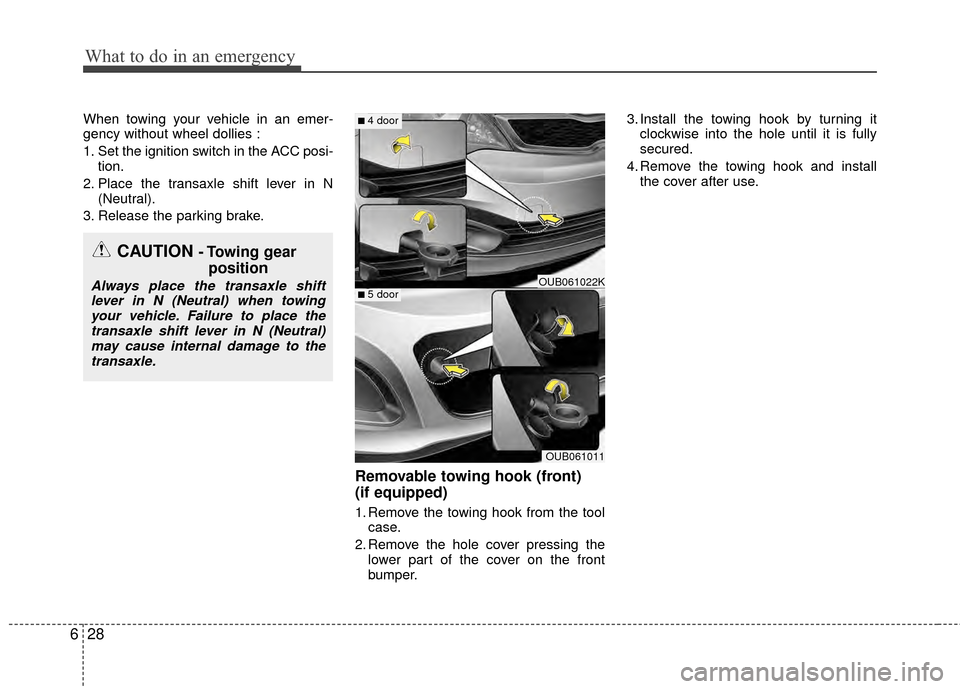
Removable towing hook (front)
(if equipped)
1. Remove the towing hook from the tool case.
2. Remove the hole cover pressing the lower part of the cover on the front
bumper. 3. Install the towing hook by turning it
clockwise into the hole until it is fully
secured.
4. Remove the towing hook and install the cover after use.
CAUTION - Towing gear position
Always place the transaxle shift
lever in N (Neutral) when towingyour vehicle. Failure to place thetransaxle shift lever in N (Neutral)may cause internal damage to the transaxle.
OUB061011
■ 4 door
■ 5 doorOUB061022K
Page 311 of 398

What to do in an emergency
30
6
Use a towing strap less than 5 m
(16 feet) long. Attach a white or red
cloth (about 30 cm (12 inches) wide) in
the middle of the strap for easy visibili-
ty.
Drive carefully so that the towing strap is not loosened during towing.
Emergency towing precautions
Turn the ignition switch to ACC so thesteering wheel isn’t locked.
Place the transaxle shift lever in N (Neutral).
Release the parking brake.
Press the brake pedal with more force than normal since you will have
reduced brake performance. More steering effort will be required
because the power steering system
will be disabled.
If you are driving down a long hill, the brakes may overheat and brake per-
formance will be reduced. Stop often
and let the brakes cool off.
If the car is being towed with all four
wheels on the ground, it can be towed
only from the front. Be sure that the
transmission is in neutral. Be sure the
steering is unlocked by placing the igni-
tion switch in the ACC position. A driver
must be in the towed vehicle to operate
the steering and brakes.
CAUTION - Automatic transaxle
To avoid serious damage to the
automatic transmission, limit thevehicle speed to 15 km/h (10 mph)and drive less than 1.5 km (1 mile) when towing.
Before towing, check for an auto- matic transmission fluid leakunder your vehicle. If the auto-matic transmission fluid is leak-ing, a flatbed equipment or tow- ing dolly must be used.
OED066029
Page 346 of 398

735
Maintenance
Always read the following
instructions carefully when han-
dling a battery.
If any electrolyte gets into your eyes, flush your eyes with clean
water for at least 15 minutes and
get immediate medical attention.
If electrolyte gets on your skin,
thoroughly wash the contacted
area. If you feel pain or burning
sensation, get medical attention
immediately. An inappropriately disposed bat-tery can be harmful to the envi-
ronment and human health.
Dispose the battery according to
your local law(s) or regulation.
The battery contains lead. Do
not dispose of it after use.
Please return the battery to an
authorized Kia dealer to be recy-
cled. When you don’t use the vehicle for a long
time in the low temperature area, sepa-
rate the battery and keep it indoors.
WARNING - Risk of
explosion
Keep Lit cigarettes and all
other flames or sparks
away from the battery.
The battery contains hydro-
gen -- a highly combustible
gas, which will explode if it
comes in contact with a
flame or spark.
WARNING - Sulfuric acidin batteries
Keep batteries out of the
reach of children because
batteries contain highly
corrosive SULFURIC ACID
and electrolytes. Do not
allow battery acid to con-
tact your skin, eyes, cloth-
ing or paint finish.
Wear eye protection when charging or working near a
battery. Always provide
ventilation when working in
an enclosed space.
WARNING - Recharging
battery
Never attempt to recharge the bat-
tery when the battery cables are
connected.
WARNING - Risk of elec-
trocution
Never touch the electrical ignition
system while the vehicle is run-
ning. This system works with high
voltage which can "zap" you.
Page 361 of 398

Maintenance
50
7
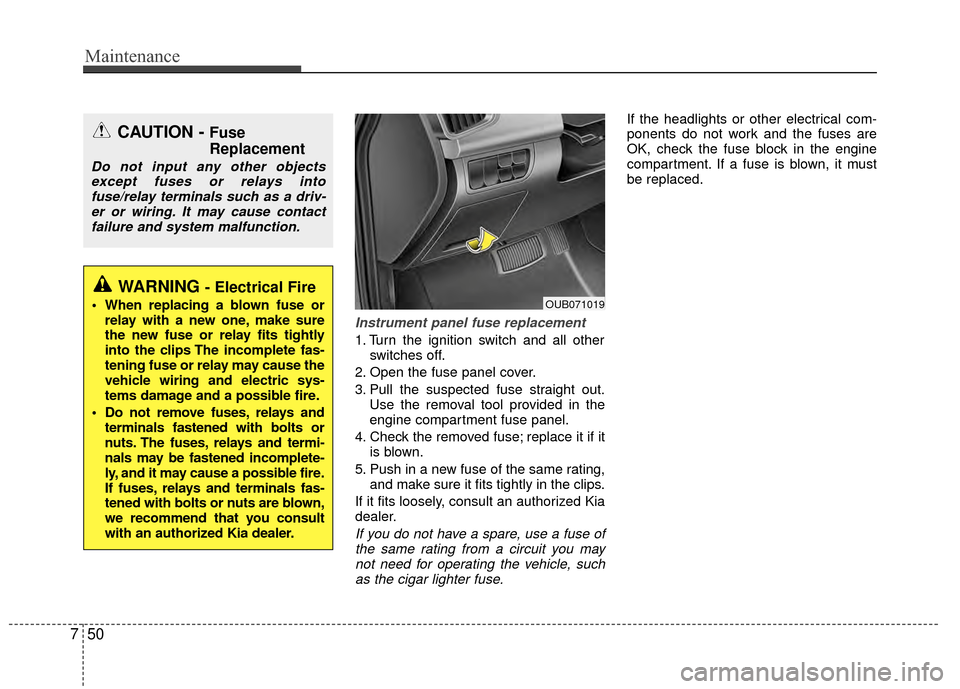
Instrument panel fuse replacement
1. Turn the ignition switch and all other
switches off.
2. Open the fuse panel cover.
3. Pull the suspected fuse straight out. Use the removal tool provided in the
engine compartment fuse panel.
4. Check the removed fuse; replace it if it is blown.
5. Push in a new fuse of the same rating, and make sure it fits tightly in the clips.
If it fits loosely, consult an authorized Kia
dealer.
If you do not have a spare, use a fuse of the same rating from a circuit you maynot need for operating the vehicle, suchas the cigar lighter fuse.
If the headlights or other electrical com-
ponents do not work and the fuses are
OK, check the fuse block in the engine
compartment. If a fuse is blown, it must
be replaced.
OUB071019
CAUTION - Fuse
Replacement
Do not input any other objectsexcept fuses or relays intofuse/relay terminals such as a driv-er or wiring. It may cause contactfailure and system malfunction.
WARNING - Electrical Fire
When replacing a blown fuse or relay with a new one, make sure
the new fuse or relay fits tightly
into the clips The incomplete fas-
tening fuse or relay may cause the
vehicle wiring and electric sys-
tems damage and a possible fire.
Do not remove fuses, relays and terminals fastened with bolts or
nuts. The fuses, relays and termi-
nals may be fastened incomplete-
ly, and it may cause a possible fire.
If fuses, relays and terminals fas-
tened with bolts or nuts are blown,
we recommend that you consult
with an authorized Kia dealer.
Page 362 of 398

751
Maintenance
Memory fuse
Your vehicle is equipped with the memo-
ry fuse to prevent battery discharge if
your vehicle is parked without being
operated for prolonged periods. Use the
following procedures before parking the
vehicle for prolonged periods.
1. Turn off the engine.
2. Turn off the headlights and tail lights.
3. Open the driver’s side panel cover andpull up the memory fuse. If the memory fuse is pulled up from the
fuse panel, the warning chime, audio,
clock and interior lamps, etc., will not
operate. Some items must be reset after
replacement. Refer to “Battery” in this
section.
Even though the memory fuse is pulled
up, the battery can still be discharged by
operation of the headlights or other elec-
trical devices.
Engine compartment panel fuse
replacement
1. Turn the ignition switch and all other switches off.
2. Remove the fuse box cover by press- ing the tap and pulling up the cover.
3. Check the removed fuse; replace it if it is blown. To remove or insert the fuse,
use the fuse puller in the engine com-
partment fuse panel.
4. Push in a new fuse of the same rating, and make sure it fits tightly in the clips.
If it fits loosely, consult an authorized
Kia dealer.
OUB071021OUB071022
■Type B
Page 367 of 398

Maintenance
56
7
Fuse Name Fuse rating Circuit Protected
IG1 2 10AVehicle Speed Sensor, Stop Lamp Switch, Inverter
A/C Control Module
HAZARD 15A Hazard Switch, BCM
PDM 1 25A Smart Key Control Module
SUNROOF 15A Sunroof Motor
PDM 2 10AImmobilizer Module, Start/Stop Button Switch,
Smart Key Control Module
ECU 15ASmart Key Control Module, Immobilizer Module,
ECM/PCM, Transaxle Range Switch
IGN COIL 15A Ignition Coil #1/#2/#3/#4, Condenser
IG2 10ABCM, Smart Key Control Module, Driver CCS Seat Warmer Module
Cluster Ionizer, Rain Sensor, A/C Control Module, Sunroof Motor
PCB Fuse & Relay Box (Blower Relay, Head Lamp (HI) Relay,
Fuel Pump #1 Relay)
WIPER FRT 25AMultifunction Switch, Front Wiper Motor
PCB Fuse & Relay Box (Rain Sensor Relay, Front Wiper Relay)
DOOR LOCK 20ADoor Lock/Unlock Relay, Tail Gate Unlock Relay,
Two Turn Unlock Relay
SAFETY POWER
WINDOW 25A Driver Safety Power Window Module
S/HEATER 15ASeat Warmer Switch, Driver CCS Seat Warmer Module,
Passenger Seat Warmer Module
FOLD'G MIRR 10A Power Outside Mirror Switch
ROOM LP 10ABCM, Door Warning Switch, Tire Pressure Monitoring Module
Instrument Cluster, Digital Clock, A/C Control Module
Luggage Lamp