2015 KIA Rio engine
[x] Cancel search: enginePage 241 of 398

Driving your vehicle
16
5
For smooth operation, depress the brake
pedal when shifting from N (Neutral) to aforward or reverse gear.
When stopped on an upgrade, do not
hold the vehicle with engine power. Use
the service brake or the parking brake.
Transaxle ranges
The indicator light in the instrument clus-
ter displays the shift lever position when
the ignition switch is in the ON position.
P (Park)
Always come to a complete stop before
shifting into P (Park). This position locks
the transaxle and prevents the front
wheels from rotating.
Shifting into P (Park) while the vehicle is
in motion will cause the drive wheels to
lock which will cause you to lose control
of the vehicle.
WARNING- Automatic transaxle
Before leaving the driver’s seat,
always make sure the shift lever is
in the P (Park) position; then set the
parking brake fully and shut the
engine off. Do not use the P posi-
tion in place of the parking brake.
Always make sure the shift lever is
latched in the P position and set the
parking brake fully. Unexpected
and sudden vehicle movement can
occur if these precautions are not
followed.
CAUTION - Transaxle
To avoid damage to your transaxle,
do not accelerate the engine in R(Reverse) or any forward gear posi-tion with the brakes on. Thetransaxle may be damaged if you shift into P (Park) while the vehicleis in motion.
Page 243 of 398

Driving your vehicle
18
5
Up (+) : Push the lever forward once to
shift up one gear.
Down (-) : Pull the lever backwards once to shift down one gear.
In sports mode, the driver must exe- cute upshifts in accordance with road
conditions, taking care to keep the
engine speed below the red zone.
In sports mode, only the 6 forward gears can be selected. To reverse or
park the vehicle, move the shift lever to
the R (Reverse) or P (Park) position as
required.
In sports mode, downshifts are made automatically when the vehicle slows
down. When the vehicle stops, 1st gear
is automatically selected.
In sports mode, when the engine rpm approaches the red zone shift points
are varied to upshift automatically.
To maintain the required levels of vehi- cle performance and safety, the system
may not execute certain gearshifts
when the shift lever is operated. When driving on a slippery road, push
the shift lever forward into the +(up)
position. This causes the transaxle to
shift into the 2nd gear which is better
for smooth driving on a slippery road.
Push the shift lever to the -(down) side
to shift back to the 1st gear.
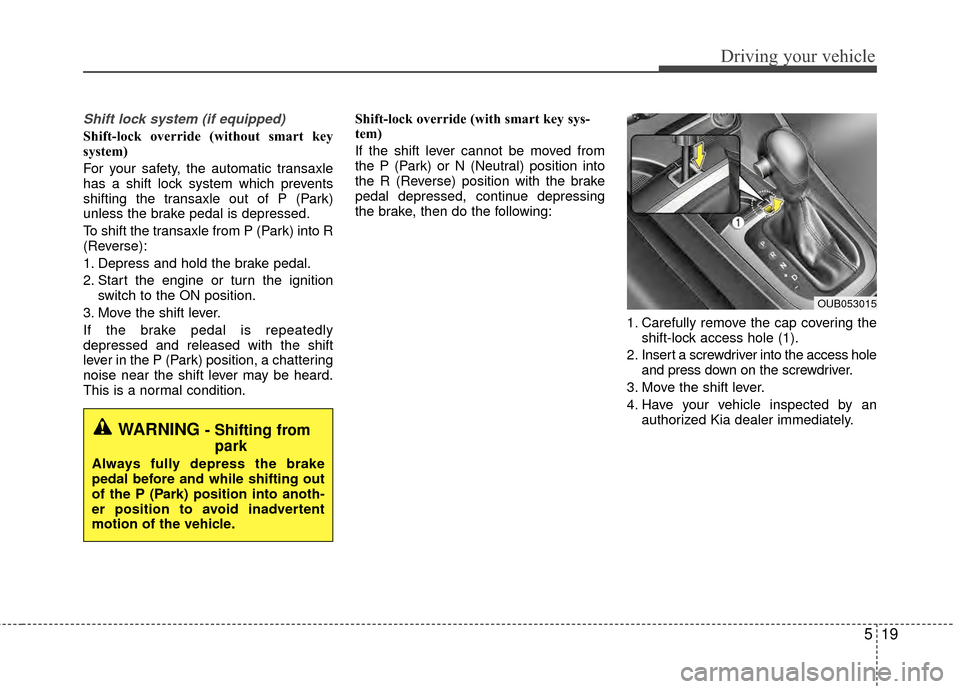
Paddle shifter (if equipped)
The paddle shifter is available when the
shift lever is in the sport mode.
With the shift lever in the sports mode
Pull the [+] or [-] paddle shifter once to
shift up or down one gear.
✽ ✽ NOTICE
If you pull the [+] and [-] paddle shifters
at the same time, you can’t shift the
gear.
OUB052059
Page 244 of 398

519
Driving your vehicle
Shift lock system (if equipped)
Shift-lock override (without smart key
system)
For your safety, the automatic transaxle
has a shift lock system which prevents
shifting the transaxle out of P (Park)
unless the brake pedal is depressed.
To shift the transaxle from P (Park) into R
(Reverse):
1. Depress and hold the brake pedal.
2. Start the engine or turn the ignitionswitch to the ON position.
3. Move the shift lever.
If the brake pedal is repeatedly
depressed and released with the shift
lever in the P (Park) position, a chattering
noise near the shift lever may be heard.
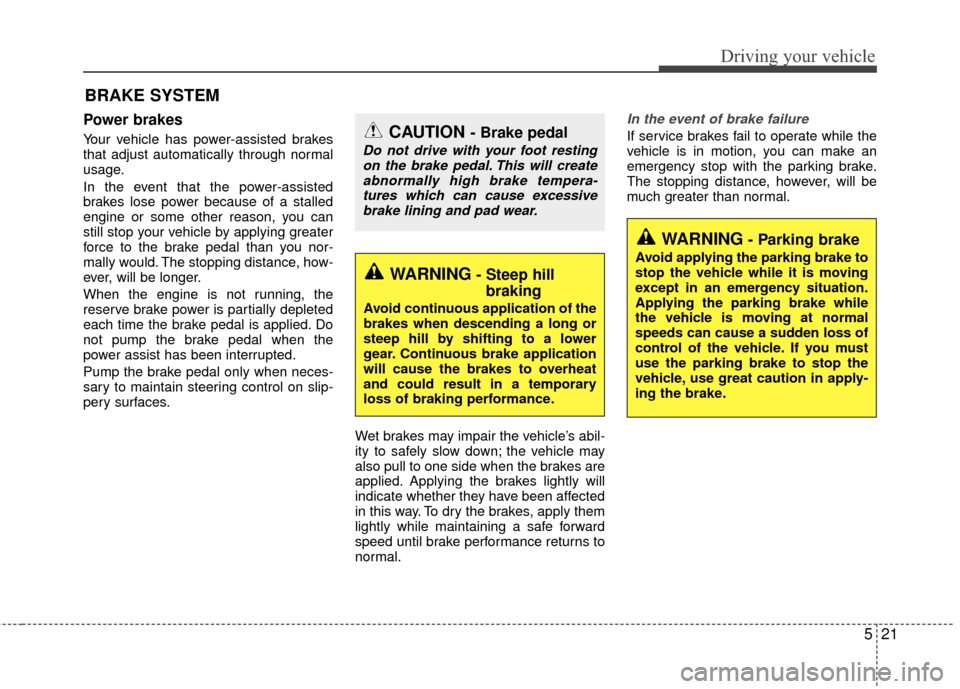
This is a normal condition. Shift-lock override (with smart key sys-
tem)
If the shift lever cannot be moved from
the P (Park) or N (Neutral) position into
the R (Reverse) position with the brake
pedal depressed, continue depressing
the brake, then do the following:
1. Carefully remove the cap covering theshift-lock access hole (1).
2. Insert a screwdriver into the access hole and press down on the screwdriver.
3. Move the shift lever.
4. Have your vehicle inspected by an authorized Kia dealer immediately.
OUB053015
WARNING - Shifting frompark
Always fully depress the brake
pedal before and while shifting out
of the P (Park) position into anoth-
er position to avoid inadvertent
motion of the vehicle.
Page 246 of 398

521
Driving your vehicle
Power brakes
Your vehicle has power-assisted brakes
that adjust automatically through normal
usage.
In the event that the power-assisted
brakes lose power because of a stalled
engine or some other reason, you can
still stop your vehicle by applying greater
force to the brake pedal than you nor-
mally would. The stopping distance, how-
ever, will be longer.
When the engine is not running, the
reserve brake power is partially depleted
each time the brake pedal is applied. Do
not pump the brake pedal when the
power assist has been interrupted.
Pump the brake pedal only when neces-
sary to maintain steering control on slip-
pery surfaces.Wet brakes may impair the vehicle’s abil-
ity to safely slow down; the vehicle may
also pull to one side when the brakes are
applied. Applying the brakes lightly will
indicate whether they have been affected
in this way. To dry the brakes, apply them
lightly while maintaining a safe forward
speed until brake performance returns to
normal.
In the event of brake failure
If service brakes fail to operate while the
vehicle is in motion, you can make an
emergency stop with the parking brake.
The stopping distance, however, will be
much greater than normal.
BRAKE SYSTEM
WARNING- Parking brake
Avoid applying the parking brake to
stop the vehicle while it is moving
except in an emergency situation.
Applying the parking brake while
the vehicle is moving at normal
speeds can cause a sudden loss of
control of the vehicle. If you must
use the parking brake to stop the
vehicle, use great caution in apply-
ing the brake.
WARNING- Steep hillbraking
Avoid continuous application of the
brakes when descending a long or
steep hill by shifting to a lower
gear. Continuous brake application
will cause the brakes to overheat
and could result in a temporary
loss of braking performance.
CAUTION - Brake pedal
Do not drive with your foot resting
on the brake pedal. This will createabnormally high brake tempera-tures which can cause excessivebrake lining and pad wear.
Page 248 of 398

523
Driving your vehicle
Releasing the parking brake
To release the parking brake, first apply
the foot brake and pull up the parking
brake lever slightly. Secondly, press the
release button (1) and lower the parking
brake lever (2) while holding the button.Check the brake warning light by turning
the ignition switch ON (do not start the
engine). This light will illuminate when the
parking brake is applied with the ignition
switch in the START or ON position.
Before driving, be sure the parking brake
is fully released and the brake warning
light is off.
If the brake warning light remains on
after the parking brake is released while
the engine is running, there may be a
malfunction in the brake system.
Immediate attention is necessary.
If at all possible, stop driving the vehicle
immediately. If that is not possible, use
extreme caution while operating the vehi-
cle and only continue to drive the vehicle
until you can reach a safe location or
repair shop.
WARNING - Parking brake
use
All vehicles should always have the
parking brake fully engaged when
parked to avoid inadvertent move-
ment of the vehicle which can
injure occupants or pedestrians.
W-75OUB051017
Page 249 of 398

Driving your vehicle
24
5
Anti-Lock Brake System (ABS)
(if equipped)
ABS (or ESC) will not prevent accidents
due to improper or dangerous driving
maneuvers. Even though vehicle control
is improved during emergency braking,
always maintain a safe distance between
you and objects ahead. Vehicle speeds
should always be reduced during
extreme road conditions.
The vehicle should be driven at reduced
speeds in the following circumstances:
When driving on rough, gravel or
snow-covered roads
When driving on roads where the road surface is pitted or has different sur-
face heights.
Driving in these conditions increases the
stopping distance for your vehicle. The ABS continuously senses the speed
of the wheels. If the wheels are going to
lock, the ABS system repeatedly modu-
lates the hydraulic brake pressure to the
wheels.
When you apply your brakes under con-
ditions which may lock the wheels, you
may hear a “tik-tik’’ sound from the
brakes, or feel a corresponding sensation
in the brake pedal. This is normal and it
means your ABS is active.
In order to obtain the maximum benefit
from your ABS in an emergency situa-
tion, do not attempt to modulate your
brake pressure and do not try to pump
your brakes. Press your brake pedal as
hard as possible or as hard as the situa-
tion allows the ABS to control the force
being delivered to the brakes.
✽ ✽
NOTICE
A click sound may be heard in the
engine compartment when the vehicle
begins to move after the engine is start-
ed. These conditions are normal and
indicate that the Anti-Lock Brake Sys-
tem is functioning properly.
Even with the anti-lock brake system,
your vehicle still requires sufficient
stopping distance. Always maintain a
safe distance from the vehicle in front
of you.
Always slow down when cornering. The Anti-Lock Brake System cannot
prevent accidents resulting from
excessive speeds.
On loose or uneven road surfaces, operation of the Anti-Lock Brake
System may result in a longer stopping
distance than for vehicles equipped
with a conventional brake system.
Page 250 of 398

525
Driving your vehicle
The ABS warning light will stay on for
approximately 3 seconds after the ignition
switch is ON. During that time, the ABS
will go through self-diagnosis and the light
will go off if everything is normal. If the
light stays on, you may have a problem
with your ABS but your regular brakes will
work normally. Contact an authorized Kia
dealer as soon as possible. When you drive on a road with poor
traction, such as an icy road, and oper-
ated your brakes continuously, the
ABS will be active continuously and the
ABS warning light may illuminate. Pull
your vehicle over to a safe place and
stop the engine.
Restart the engine. If the ABS warning light is off, then your ABS is normal.
Otherwise, you may have a problem
with the ABS. Contact an authorized
Kia dealer as soon as possible.✽ ✽ NOTICE
When you jump start your vehicle
because of a drained battery, the engine
may not run as smoothly and the ABS
warning light may turn on at the same
time. This happens because of the low
battery voltage. It does not mean your
ABS has malfunctioned.
• Do not pump your brakes!
• Have the battery recharged before
driving the vehicle.
Electronic stability control (ESC)
The Electronic Stability control (ESC)
system is designed to stabilize the vehicle
during cornering maneuvers. ESC checks
where you are steering and where the
vehicle is actually going. ESC applies the
brakes on individual wheels and
intervenes with the engine management
system to stabilize the vehicle.
No system, no matter how advanced, can
compensate for all driver error and/or
driving conditions. Always drive responsibly.
W-78OUB051018
Page 251 of 398

Driving your vehicle
26
5
Electronic stability control (ESC) will not
prevent accidents. Excessive speed in
turns, abrupt maneuvers and hydroplan-
ing on wet surfaces can still result in seri-
ous accidents. Only a safe and attentive
driver can prevent accidents by avoiding
maneuvers that cause the vehicle to lose
traction. Even with ESC installed, always
follow all the normal precautions for driv-
ing - including driving at safe speeds for
the conditions.
The Electronic Stability Control (ESC)
system is an electronic system designed
to help the driver maintain vehicle control
under adverse conditions. It is not a
substitute for safe driving practices.
Factors including speed, road conditions
and driver steering input can all affect
whether ESC will be effective in
preventing a loss of control. It is still your
responsibility to drive and corner at
reasonable speeds and to leave a
sufficient margin of safety.
When you apply your brakes under con-
ditions which may lock the wheels, you
may hear a “tik-tik’’ sound from the
brakes, or feel a corresponding sensation
in the brake pedal. This is normal and it
means your ESC is active.ESC operation
ESC ON condition
ON, ESC and ESC OFF indi-
cator lights illuminate for
approximately 3 seconds,
then ESC is turned on.
for at least half a second after
turning the ignition ON to turn
ESC off. (ESC OFF indicator
will illuminate). To turn the
ESC on, press the ESC OFF
button (ESC OFF indicator
light will go off).
you may hear a slight ticking
sound. This is the ESC per-
forming an automatic system
self-check and does not indi-
cate a problem. When operating
When the ESC is in operation,
ESC indicator light blinks.
Control is operating properly,
you can feel a slight pulsation
in the vehicle. This is only the
effect of brake control and
indicates nothing unusual.
or slippery road, pressing the
accelerator pedal may not
cause the engine rpm (revo-
lutions per minute) to
increase.
-