2015 KIA PICANTO lights
[x] Cancel search: lightsPage 510 of 846

411
Features of your vehicle
(Continued)
If the transmitter (or smart key) is inclose proximity to your cell phone or
smart phone, the signal from the
transmitter (or smart key) could be
blocked by normal operation of your
cell phone or smart phone. This is
especially important when the phone
is active such as making call, receiving
calls, text messaging, and/or send-
ing/receiving emails. Avoid placing
the transmitter (or smart key) and
your cell phone or smart phone in the
same pants or jacket pocket and
maintain adequate distance between
the two devices.
Vehicles equipped with a theft alarm sys-
tem will have a label attached to the vehi-
cle with the following words:
1. WARNING
2. SECURITY SYSTEM This system is designed to provide pro-
tection from unauthorised entry into the
car. This system is operated in three
stages: the first is the "Armed" stage, the
second is the "Theft-alarm" stage, and
the third is the "Disarmed" stage. If trig-
gered, the system provides an audible
alarm with blinking of the hazard warning
lights.
Armed
stage
Theft-alarm stageDisarmedstage
CAUTION
Keep the smart key away from
water or any liquid. If the keylessentry system is inoperative due to
exposure to water or liquids, it willnot be covered by your manufactur- er’s vehicle warranty.
OJC040170
THEFT-ALARM SYSTEM (IF EQUIPPED)
Page 511 of 846

Features of your vehicle
12
4
Armed stage
Using the smart key
Park the vehicle and stop the engine.
Arm the system as described below.
1. Turn off the engine.
2. Make sure that all doors (and tailgate)
and the engine bonnet are closed and latched.
3. Lock the doors by pressing the button of the front outside door handle with
the smart key in your possession.
After completion of the steps above,
the hazard warning lights operateonce to indicate that the system is
armed.
If any door remains open, the doors
won't lock and the chime will sound
for 3 seconds. Close the door and try
again to lock the doors. If tailgate or engine bonnet remains
open, the hazard warning lights won't
operate and theft-alarm will not arm.
After this, if the tailgate and engine
bonnet are closed, the hazard warn-
ing lights will blink once.
button on the smart key.
After completion of the steps above,
the hazard warning lights will operateonce to indicate that the system is
armed. If any door (and tailgate) or enginebonnet remains open, the hazard
warning lights won't operate and
theft-alarm will not arm. After this, ifall doors (and tailgate) and engine
bonnet are closed, the hazard warn-
ing lights blink once.
Using the transmitter
Park the vehicle and stop the engine.
Arm the system as described below.
1. Turn off the engine and remove the
ignition key from the ignition switch.
2. Make sure that all doors (and tailgate), the engine bonnet are closed and latched.
3. Lock the doors by pressing the lock button on the transmitter.
After completion of the steps above,
the hazard warning lights will blinkonce to indicate that the system is
armed.
If any door (and tailgate) or engine bonnet remains open, the hazard
warning lights won't operate and theft-
alarm will not arm. After this, if all doors(and tailgate) and engine bonnet are
closed, the hazard warning lights blink
once. Do not arm the system until all pas-
sengers have left the vehicle. If thesystem is armed whilst a passen-
ger(s) remains in the vehicle, the
alarm may be activated when the
remaining passenger(s) leave the
vehicle. If any door, tailgate orengine bonnet is opened within 30seconds after entering the armed
stage, the system is disarmed to
prevent unnecessary alarm.
Theft-alarm stage
The alarm will be activated if any of the
following occurs whilst the system is
armed.
A door is opened without using the transmitter (or smart key).
The tailgate is opened without using the transmitter (or smart key).
The engine bonnet is opened.
The horn will sound and the hazard
warning lights will blink continuously for
approximately 30 seconds. To turn off the
system, unlock the doors with the trans-
mitter (or smart key).
Page 512 of 846

413
Features of your vehicle
Disarmed stage
The system will be disarmed when:
Transmitter
- The door unlock button is pressed.
- The engine is started.
- The ignition switch is in the “ON” posi-tion for 30 seconds or more.
Smart key
- The door unlock button is pressed.
- The button of the front outside door ispressed whilst carrying the smart key.
- The engine is started.
After the doors are unlocked, the hazard
warning lights will blink twice to indicate
that the system is disarmed.
After pressing the unlock button, if anydoor (or tailgate) is not opened within 30
seconds, the system will be rearmed.
✽✽ NOTICE - Non-immobiliser system
Avoid trying to start the engine whilst the alarm is activated. The vehicle
starting motor is disabled during the
theft-alarm stage.
If the system is not disarmed with the
transmitter, insert the key into the
ignition switch, turn the ignition
switch to the ON position and wait for
30 seconds. Then the system will be
disarmed.
If you lose your keys, consult your
authorised Kia dealer.
✽
✽ NOTICE - Immobiliser system
If the system is not disarmed with the transmitter, insert the key into the
ignition switch and start the engine.
Then the system will be disarmed.
If you lose your keys, consult your
authorised Kia dealer.
CAUTION
Do not change, alter or adjust the
theft-alarm system because it could
cause the theft-alarm system to mal- function and should only be serv-iced by an authorised Kia dealer.
Malfunctions caused by improperalterations, adjustments or modifi- cations to the theft-alarm systemare not covered by your vehicle manufacturer warranty.
Page 533 of 846

Features of your vehicle
34
4
Electric power steering (if equipped)
Power steering uses the motor to assist
you in steering the vehicle. If the engine
is off or if the power steering system
becomes inoperative, the vehicle may
still be steered, but it will require
increased steering effort.
The motor driven power steering is con-
trolled by the power steering control unit
which senses the steering wheel torque,
steering wheel position and vehicle
speed to command the motor.
The steering wheel becomes heavier as
the vehicle’s speed increases and
becomes lighter as the vehicle’s speed
decreases for better control of the steer-ing wheel.
Should you notice any change in the
effort required to steer during normal
vehicle operation, have the power steer-
ing checked by an authorised Kia dealer.
✽✽
NOTICE
The following symptoms may occur dur-
ing normal vehicle operation:
The EPS warning light does not illumi- nate. (Continued)(Continued)
The steering effort is high immediately
after turning the ignition switch on.
This happens as the system performs
the EPS system diagnostics. When the
diagnostics is completed, the steering
wheel will return to its normal condi-
tion.
A click noise may be heard from the
EPS relay after the ignition switch is
turned to the ON or LOCK position.
Motor noise may be heard when the vehicle is at a stop or at a low driving
speed.
If the Electric Power Steering System
does not operate normally, the warn-
ing light will illuminate on the instru-
ment cluster. The steering wheel may
become difficult to control or operate
abnormally. Take your vehicle to an
authorised Kia dealer and have the
vehicle checked as soon as possible.
The steering effort increases if the steering wheel is rotated continuously
when the vehicle is not in motion.
However, after a few minutes, it will
return to its normal conditions.
When you operate the steering wheel
in low temperature, abnormal noise
could occur. If temperature rises, the
noise will disappear. This is a normal
condition.
Tilt steering (if equipped)
Tilt steering allows you to adjust the
steering wheel before you drive. You can
also raise it to give your legs more room
when you exit and enter the vehicle.
The steering wheel should be positioned
so that it is comfortable for you to drive,
whilst permitting you to see the instru-
ment panel warning lights and gauges.
STEERING WHEEL
WARNING
Never adjust the angle of the steering wheel whilst driving. You
may lose steering control and
cause severe personal injury,death or accidents.
After adjusting, push the steering wheel both up and down to be
certain it is locked in position.
Page 536 of 846

437
Features of your vehicle
Inside rearview mirror
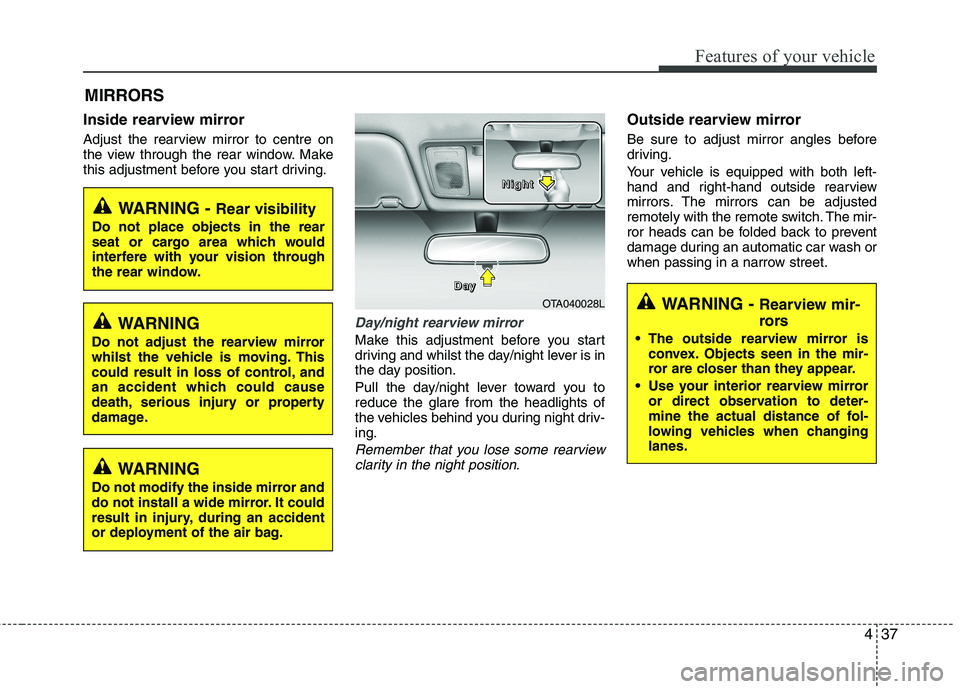
Adjust the rearview mirror to centre on
the view through the rear window. Make
this adjustment before you start driving.
Day/night rearview mirror
Make this adjustment before you start
driving and whilst the day/night lever is in
the day position.
Pull the day/night lever toward you to reduce the glare from the headlights of
the vehicles behind you during night driv-ing.
Remember that you lose some rearviewclarity in the night position.
Outside rearview mirror
Be sure to adjust mirror angles before
driving.
Your vehicle is equipped with both left-
hand and right-hand outside rearview
mirrors. The mirrors can be adjusted
remotely with the remote switch. The mir-
ror heads can be folded back to prevent
damage during an automatic car wash or
when passing in a narrow street.
MIRRORS
WARNING -
Rear visibility
Do not place objects in the rear
seat or cargo area which would
interfere with your vision through
the rear window.
OTA040028L
D
DDDaaaayyyy
NNNNiiiigggghhhhtttt
WARNING
Do not adjust the rearview mirror
whilst the vehicle is moving. This
could result in loss of control, and
an accident which could cause
death, serious injury or property
damage.
WARNING
Do not modify the inside mirror and
do not install a wide mirror. It could
result in injury, during an accident
or deployment of the air bag.
WARNING - Rearview mir-
rors
The outside rearview mirror is convex. Objects seen in the mir-
ror are closer than they appear.
Use your interior rearview mirror or direct observation to deter-
mine the actual distance of fol-
lowing vehicles when changinglanes.
Page 540 of 846

441
Features of your vehicle
INSTRUMENT CLUSTER
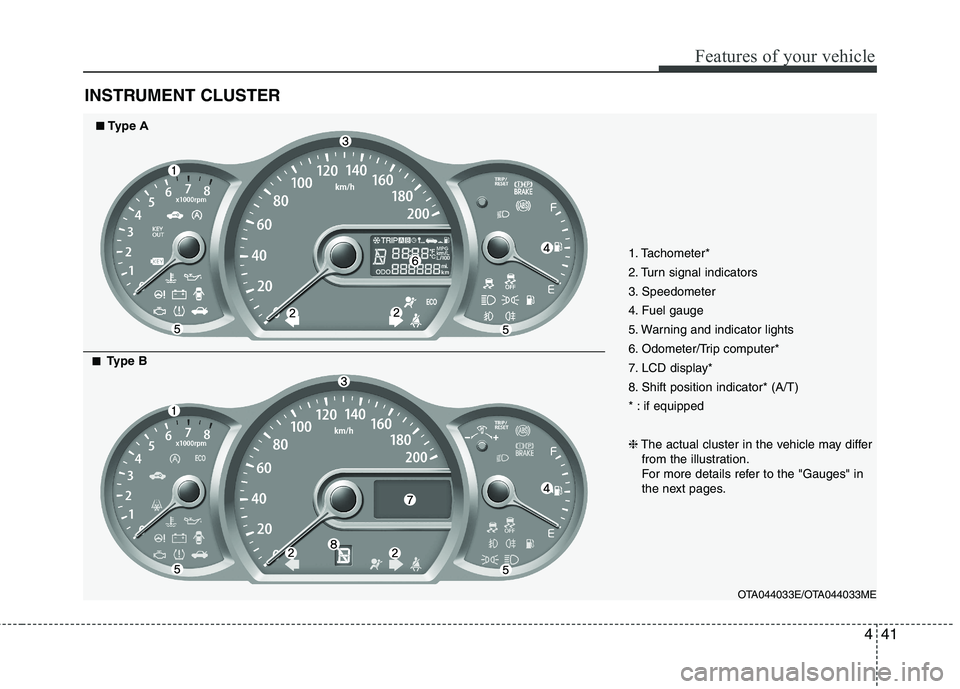
1. Tachometer*
2. Turn signal indicators
3. Speedometer
4. Fuel gauge
5. Warning and indicator lights
6. Odometer/Trip computer*
7. LCD display*
8. Shift position indicator* (A/T)
* : if equipped ❈The actual cluster in the vehicle may differ
from the illustration.
For more details refer to the "Gauges" in
the next pages.
OTA044033E/OTA044033ME
■■Type A
■■
Type B
Page 553 of 846

Features of your vehicle
54
4
ECO
Check stop lamp fuse When the stop lamp fuse is disconnect-
ed, the warning illuminates for 10 sec-
onds on the LCD display.
Replace the fuse with a new one. If that
is not possible you can start the engine
by pressing the engine start/stop button
for 10 seconds in ACC. Warnings and indicators
All warning lights are checked by turning
the ignition switch ON (do not start the
engine). Any light that does not illuminate
should be checked by an authorised Kia
dealer.
After starting the engine, check to make
sure that all warning lights are off. If anyare still on, this indicates a situation that
needs attention. When releasing the
parking brake, the brake system warning
light should go off. The fuel warning light
will stay on if the fuel level is low.ECO indicator
(if equipped) (Automatic transaxle)
The ECO indicator is a system that
informs you to drive economically.
It is displayed if you drive fuel efficiently
to help you improve fuel efficiency.
The ECO indicator (green) will turn on when you are driving fuel efficiently in
the ECO ON mode.
If you don't want the indicator dis-
played, you can turn the ECO ON
mode to OFF mode by pressing the
TRIP/RESET button.
As per ECO ON/OFF Mode operation,
refer to the previous page.
The fuel-efficiency can be changed by the driver's driving habit and road con-dition.
It doesn't work at the condition which doesn't meet economical driving such
as P (Park), N (Neutral), R (Reverse).
Whilst the instant fuel consumption mode is displayed on the LCD screen,
the ECO indicator turns off.
OTA042226L
WARNING
Don't keep watching the indicator
whilst driving. It will distract youwhilst driving and cause an accident
that results in severe personal injury.
Page 554 of 846

455
Features of your vehicle
Air bag warning light(if equipped)
This warning light will illuminate for
approximately 6 seconds each time you
turn the ignition switch to the ON posi-tion. This light also comes on when the
Supplemental Restraint System (SRS) is
not working properly. If the SRS air bag
warning light does not come on, or
continuously remains on after operating
for about 6 seconds when you turned the
ignition switch to the ON position or start-
ed the engine, or if it comes on whilst
driving, have the SRS inspected by an
authorised Kia dealer.
Anti-lock brake system
(ABS) warning light (if equipped)
This warning light illuminates if the igni-
tion switch is turned ON and goes off in
approximately 3 seconds if the system is
operating normally.
If the ABS warning light remains on,
comes on whilst driving, or does not
come on when the ignition switch is
turned to the ON position, this indicates
that there may be a malfunction with the
ABS.
If this occurs, have your vehicle checked
by an authorised Kia dealer as soon as
possible. The normal braking system will
still be operational, but without the assis-
tance of the anti-lock brake system. Electronic brake
force distribution
(EBD) system
warning light
If both warning lights illuminate at the
same time whilst driving, your vehicle
may have a malfunction with the ABSand EBD system.
In this case, your ABS and regular brake
system may not work normally. Have the
vehicle checked by an authorised Kia
dealer as soon as possible.
WARNING
If the both ABS and brake warning
lights are on and stay on, your vehi-
cle’s brake system will not work
normally during sudden braking. In
this case, avoid high speed driving
and abrupt braking. Have your vehi-
cle checked by an authorised Kia
dealer as soon as possible.